
The Witcher 2: Assassins of Kings Guide (Steam) Walkthrough Flotsam
Bandit’s Hideout Key
If you resolved this quest by helping the troll, you’re probably wondering exactly what you do with the key you looted from Dmitri’s body. Well, you can use it to get into the bandit’s hideout, a location you’d never stumble over by accident in the game. No quests ever take you there, so you might as well go pay a visit now and loot the place.
The bandit hideout is the little house you see in the far southwest corner of the blacked-in swampy area on the Chapter 1 area map. The trek there by itself isn’t too dangerous. First head to the troll’s broken bridge and climb down into the riverbank. Next, head upstream a little ways. You should find a ruined bridge that slopes gently down into the water. Climb up it to cross over the river and get into the swamps on the other side.
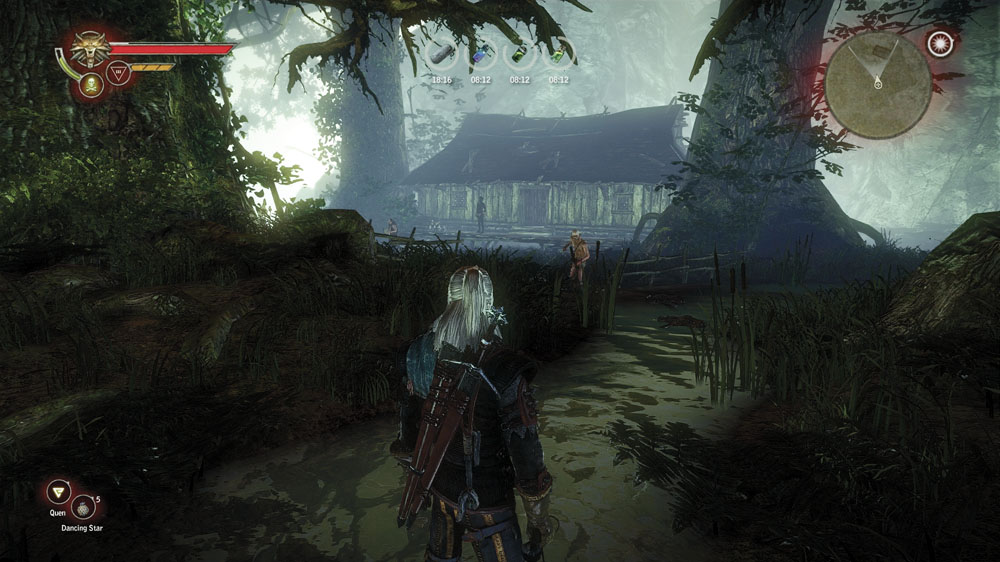
If you head into the swamps at night, expect to run into a lot of drowners. You may even run into groups of drowners led by their much more powerful cousins, the drowned dead. Drowners are very susceptible to stunning effects, so keep some samums or Zerrikanian suns at the ready. Also carry some necrophage oil. Drowned dead have a lot more vitality than the average drowner and hit very hard, so the damage bonus comes in handy if you stumble over some. You may want to pause just before crossing the river to drink some potions to boost your defense and make you more resistant to poisoning.
As you draw near the bandit hideout, you stumble on a dead body dangling from a tree limb. Be sure to check for loot underneath it, as you can find some superb well-balanced daggers that come in handy later on in the chapter. Once you’re within sight of the hideout, you should see bandits patrolling the area. Bombs of all sorts are quite useful here, and you have ample opportunity to lay down traps. You can use Axii to turn the bandits against each other, too. Sometimes during the battle drowners crash the party. If so, the bandits may actually focus on fighting the drowners instead of you.
Once you’ve picked off all the bandits, loot the bodies and then head to the actual hideout, a wooden shack. Use the bandit’s hideout key to enter. Inside is a chest stuffed with goodies, most notably a sun rune and the superb cutlass. The superb cutlass is probably better than what you’re carrying now, so go ahead and equip it. You can loot some orens from another chest and pick up some random loot, too. Once you’re done, head back to Flotsam.
The Kayran

There are more side quests to be done before we finish up with this chapter, but now it makes sense to go revisit the main plot for a bit. As you recall, Triss teleported off to go investigate the kayran’s lair. Go catch up with her now. Have your steel sword at the ready, since the road to the kayran’s lair is infested with bandits. Be sure to loot the chest of orens the second group of bandits is guarding.
Triss is waiting for you at the end of the footpath. Follow her down into the kayran’s lair proper. Get your silver sword ready, as you’re going to be ambushed by drowners. Five drowners may seem like a trivial battle with an assistant, but you can be killed here fairly easily. Oiling your blade with necrophage oil and keeping Quen up should see you through the fight. Zerrikanian suns are also useful here.
After the drowners are taken care of, head toward the enormous pile of green snot by the quest marker. Once you’re close enough, you get a prompt to interact in order to collect mucus. This leads to a cutscene that opens up the side quest The Kayran: Ostmurk and gives you the mongoose formula. It’s worth doing the Ostmurk side quest now, since the potion formula you get for completing it is very useful for things besides fighting the kayran. First, there’s a side quest to trigger in this area, though.
Mystic River

Head toward the wrecked ship at the far side of the pit that is the kayran’s lair. Scan it with your medallion. You should find a skeleton you can examine and two chests. From the skeleton, you can loot the key of the Petra Sile’s captain. Next to it is a chest holding a modest sum of orens. Head farther up the boat to find a locked chest that you need the captain’s key to open. Loot it for some modest crafting loot and a couple of interesting documents. Be sure to read both the captain’s log and captain’s report.
You can forward the documents, but you would need to find a drop box for the Royal Mail in Flotsam. Remember that locked chest on Louis Merse’s desk? Go there. Stand next to the box and interact to insert the captain’s report. Then talk to Merse and use Axii to convince him to let you open the box. Take Merse’s report from the box and look it over. This is all you can do with the quest in this chapter, but you’ll be able to continue it in the next chapter.
The Kayran: Ostmurk


Now to deal with more pressing matters. Head back to Lobinden and talk to Cedric. Ask him where you can find some ostmurk. He directs you to explore some caves to the south, beneath the elven ruins. Make any necessary preparations, then travel across the forest. Depending on luck and time of day, you can encounter nekkers, drowners, or Scoia’tael in the area around the cave. An encounter that’s rare but very lucrative is Scoia’tael fighting a whole horde of nekkers, which lets you pick up all sorts of loot after you finish off the winning side.
Once you enter the cave, you are probably going to find yourself fighting a steady stream of nekkers and nekker warriors. There shouldn’t be too many for you to deal with at once, but you may be halfway through the cave before you’ve picked them all off. Head right at the first fork so you can loot some robust well-balanced daggers off of a corpse. Prepare yourself for a fight before you climb up to the slightly elevated part of the cave.
A greater rotfiend waits beyond. While this enemy becomes trivial for you to fight later in the game, right now it may be overwhelming. Since there’s only one, you can toss Quen up to mitigate damage and oil your silver sword with necrophage oil. Use strong attacks against it. After you reduce the rotfiend’s vitality to 0, you see it tremble in place and scream. Quickly roll away from it before it explodes into a poisonous mess.

Just beyond the rotfiend, you find the ostmurk growing on a wall. Once you collect it, you can head out of the cave. On the way out, check the other fork in the upper area to find a mail enhancement on a corpse. For the last part of the quest you can do right now, head back to Flotsam and brew at least one Mongoose potion once you’re there. You actually don’t need ostmurk to make the potion; you can substitute any fulgur alchemy component for it. Mongoose comes in handy in the next side quest and, really, when fighting any enemy that uses poison. For the quest coming up, you’ll want two Mongoose potions.
The Endrega Contract

Now that you’ve got Mongoose, you’re finally ready to take on The Endrega Contract . To initiate the quest, go pick it up from the notice board outside the Flotsam inn. As with The Nekker Contract , go buy the relevant book about them from Einar Gausel and read it to learn about an endrega’s weaknesses. Of course, you might have killed enough endregas already to have full knowledge of them. If so, then you can advance the quest by just reading the info on your character attributes screen. Next, gear up for the hunt. Fighting actual endregas should be simple for you by now, but to complete the quest you must kill two dangerous endrega queens. They are huge and have tons of vitality, so you can’t just attack them relentlessly the way you do regular endregas. You need to be a bit sneakier.
First, make sure you’re carrying a good complement of traps. Virtually any trap aside from fury traps works well here. If you’ve been picking snares up in the forest, they are both highly useful and completely free. Have a couple of applications of insectoid oil on hand. For potions, go with options that increase Geralt’s defense. Mongoose, Swallow, and Brock can be a good combination, but plenty of others can work. You can also try using a Petri’s Philtre to strengthen signs, if you play a more mage-oriented build. Finally, have an emergency supply of damaging bombs like grapeshot and throwing daggers on hand. Be sure to make enough stuff for two battles, because you have to kill two endrega queens to finish the quest.

Endrega queens only appear when endrega nurseries are threatened. There are two nurseries and you’ve probably passed by them before—they’ve got weird cocoon pods sitting around the trunk of an enormous tree. The locations of the two endrega nurseries are marked on the guide map, just in case you don’t remember where they’re located offhand. Expect to be attacked by endregas of all sorts as you draw nearer to the nurseries. Pick off every endrega in the area before summoning the queen. To summon the queen, open each of the three cocoon pods in the nursery and destroy them with sword blows. Be sure to loot them for endrega embryo drops. After you destroy the third cocoon pod, the endrega queen emerges.
When you’ve got a good supply of traps, use Quen as your default sign for extra defense. Don’t engage the endrega queen, just make her chase you over the traps you’ve laid. You may be able to kill her without using your sword at all. She moves very quickly, so it can help to lay your traps in the nursery area before she appears. Once you have a feel for which direction she tends to approach you from, you can actually set your traps up so she has to walk over all of them before she can reach you.
If you run out of traps and she’s still not dead, then switch your active sign to Yrden and coat your silver blade with brown oil. Start luring her over your Yrdens, then quickly roll up to her and hit her with a few strong strikes while she’s stunned. After two or three blows, roll away before she can counterattack. A few volleys like this should finish her off if she’s already limping from trap damage.

A final tactic you can try is kiting the endrega queen to the edge of her territory, standing just outside her reach, and pelting her with bombs or knives until she dies. It takes a ton of thrown weapons to pull this off, though, and if you misjudge the edge of her territory you may get Geralt killed.
Save after you defeat the first endrega queen. Be sure to loot her body, as she produces some very rare alchemy items and produces extremely useful mutagens. Return to town and craft more traps if you’ve run out of them. If you’re using snares, you can just pick them up again to reuse later. Head out to the second endrega nursery. Repeat the tactics you used the first time. Now that you’ve had a little practice, you should find the second endrega queen a bit easier to defeat than the first one. Check the map and take advantage of any circles that happen to be near a nursery before you invade it.
Once both queens are dead, head back to Flotsam and see Louis Merse. Turn in The Endrega Contract by selecting the dialogue option about endregas. The quest should be worth 200 orens and 75 XP. When you turn in The Endrega Contract , you should get the diagram of the superb witcher’s silver sword in addition to the promised orens if you also turned in The Nekker Contract . This sword is easy to make and is the best silver sword you can obtain in Chapter 1. It is recommended that you go ahead and make it, although it won’t actually make a huge difference in any of the upcoming battles. It serves you very well early on in Chapter 2, though.
The Kayran: A Matter Of Price

Head down to the harbor and look for a merchant who’s marked with a quest marker. You enter dialogue. The entirety of this quest comes down to negotiating to try and get a better price for your services. If you ask the merchant for an advance, he gives you 200 orens up front, no questions asked. This won’t increase the reward after you kill the kayran, though.
If you ask the merchant to double the fee, he balks at your request. This opens up a set of four dialogue options you can use. The one you really want to try here is the Axii special option “You’ll double the reward,” which rewards you with the Haggling attribute after you’ve slain the kayran in addition to a doubled reward. You can also successfully get the merchant to double the reward by using the intimidation option, “Nuh-uh,” but you can’t get Haggling this way.

If you say “I’ll tell Síle you’re looking to cheat her,” the merchant increases the reward but will not double it. At this point, you get another dialogue option that says “Gimme an advance” or “Fine.” Regardless of what you say, it works like asking for an advance immediately. You get 200 orens up front.
If you say “Get back to me when you get tired of Flotsam,” either in the second dialogue or up front, it works like accusing the merchant of cheating Síle. The merchant agrees to increase the reward but won’t double it, then you get a dialogue option that lets you demand the 200 oren advance.
The Kayran
Now it’s time to go advance the plot a little by actually killing the kayran. This battle is more of an action-oriented challenge than one where your gear or skill makes a huge difference (though spending talents on Feet Work can make a difference). The only real preparations you’ll want to make are crafting the kayran trap with the part you got from Indecent Proposal and brewing a Mongoose potion to drink just before you start the battle. To craft the kayran trap, you need to purchase the diagram from Cedric at Lobinden.

When you’re ready to set out and do the deed, go talk to Síle in her room above the inn. She teleports you automatically to the ruined bridge above the kayran’s lair. After the dialogue, begin down the sloping path. Stop when you can see the bottom, meditate, and drink the Mongoose. When you approach the final drop-off, the game auto-saves and you’re automatically taken down into the basin.
Right now, you’re probably around level 10. No matter how you’ve invested your talents or what sort of armor you’re wearing, you can probably only take about three hits from the kayran before dying. Focus on learning the kayran’s movement patterns so you can evade it while luring it into doing the things you want it to do.
This also means there are a few things you absolutely don’t want to do. If you move too far around to the kayran’s left or right, as if trying to go behind it, the kayran counterattacks with a powerful horizontal sweep of its tentacle that knocks you away. This can set up a ghastly combo where you take a ton of damage from the horizontal sweep, then take extra damage from follow-up blows while you’re trying to get up. Likewise, if you move too far back from the kayran, you get tangled up in swamp weeds and have to press your interaction button rapidly to get free. You also get poisoned while doing this if you haven’t drunk Mongoose.
Here’s the ideal way to handle the battle: When the fight starts, you’re located at roughly six o’clock from the kayran. There are two tentacles in front of you, tentacles at five and four o’clock to your right, and tentacles at seven and eight o’clock to your left. We’re going to start working on eliminating the tentacles at seven and eight o’clock, but you can start with the four and five o’clock tentacles if that’s easier for you. Just follow the general strategy outlined here.

First, eliminate the seven o’clock tentacle. When the battle begins, one of the kayran’s six o’clock tentacles rises up. If you stand there stupidly, it will smash down on you, taking off over a third of your vitality. The best way to evade it is to dodge-roll as soon as you see the kayran telegraph its move. Try dodge-rolling once or twice to the right. The tentacle misses you.
When you move directly in front of the kayran, getting between the six o’clock tentacles, it begins to rear up and spit poison. The poison can’t hurt you because of the Mongoose potion you drank. Take this opportunity to run toward the glowing yellow indicator in front of the seven o’clock tentacle. That’s where you place the kayran trap. Just draw close to it and tap your interaction button to place it. What should happen next is that after the kayran finishes its poison spray, the seven o’clock tentacle rises up to try and smash you. Dodge-roll once or twice to the right.
If you placed the trap successfully, the kayran’s tentacle gets severed by it when it smashes down. Doing this successfully unlocks the Artful Dodger achievement. This takes about one-third off of the kayran’s vitality bar immediately. Quickly position Geralt so he’s standing in front of the severed tentacle stump. After you sever one of the kayran’s tentacles, it begins smashing everything around it in a frenzy of pain. If you’re standing in front of a severed tentacle, well, the kayran has nothing to smash you with.

After the kayran’s pain frenzy ends, move just a little bit to the left and place an Yrden. Ideally, what happens next is that the kayran raises its eight o’clock tentacle to prepare to smash you. Once again, dodge-roll to the right once or twice. When the kayran’s tentacle hits an Yrden, the tentacle gets stuck to it. When this happens, make your way over to the trapped tentacle as quickly as possible. Begin striking at the bulging, cancerous growth in the tentacle’s center with light attacks. After you hit it enough times, Geralt severs the tentacle. Have him remain where he’s standing as the kayran enters another frenzy of pain. He should be safe from the flailing tentacles.
After the kayran’s second frenzy ends, you enter a very tricky part of the battle. Basically, you need to switch sides so you can sever one of the tentacles opposite you (in this case, we want the five o’clock tentacle). The easiest way to do this is to dodge-roll to get quickly past the six o’clock tentacles. Once on the other side, try to orient yourself quickly. It is very easy to get smashed by a tentacle while you try to figure out where the kayran is in its attack animation cycle. Ideally, you get into position in the area the five o’clock tentacle guards and put down an Yrden without getting smashed. When the five o’clock tentacle goes up, dodge-roll to the left once or twice. Go sever this tentacle the same way you did the last one. The kayran enters another frenzy of pain you can avoid in the usual way.
Now you enter a series of QTEs that are what a tabletop gamer might call save-or-die situations. The kayran is going to sweep its remaining non-center tentacle, in this case the four o’clock tentacle, horizontally over the basin where you’re fighting. Quickly press the strong attack button when prompted to make Geralt avoid damage by grabbing onto it. If you are not successful, Geralt is probably going to die instantly.

Once you’re on the tentacle, you get another prompt, this time with the interaction button. You need to press it rapidly to fill up a meter, while the kayran waves you around. This shouldn’t be difficult. The next button prompt has a tendency to be a killer, though. After you finish filling up the meter with the interaction button, be ready to hit the dodge button as soon as the prompt appears. If you hit it in time, then Geralt leaps off the tentacle before the kayran smashes down half the ruined bridge on itself. If you miss this prompt, Geralt gets smashed into the ruined bridge and dies instantly.
The rubble falls on the kayran such that it can no longer move, while also creating a giant stone ramp that leads up to its head. The kayran is going to defend the ramp with a pair of smashing tentacles, so you can’t walk up it. You can, however, dodge-roll up it safely. Just make sure you don’t get stuck on any of the terrain, and never stop dodge-rolling until you reach the top of the ramp. Generally the left side of the ramp is the easiest to roll up. When you reach the top of the ramp, Geralt crams a bomb into the kayran in a cutscene. The battle is over.
You get a whopping 1,750 XP for defeating the kayran and unlock the achievement Oh My God! You Killed The Kayran! You Bastards!. You should level up at least once after that. The Kayran: Ostmurk automatically concludes after this battle if you drank Mongoose before the fight. Your reward for drinking the Mongoose first is the Strong Stomach attribute. Be sure to approach and loot the kayran’s body for drops before you leave the area, too.
The Kayran: A Matter Of Price

This quest technically doesn’t conclude until you return to the merchant you negotiated with earlier. If you had the reward doubled, you get 1,000 orens. If you accepted the default reward, you get 500 orens. If you took one of the options that increased the reward but didn’t double it, the number should be around 750 orens. So if you take the increase and an advance, you can get up to around 950 orens in total for killing the kayran, which only falls a little short of what you get for doubling the reward. That said, doubling the reward is overall the most lucrative way to go here, and it’s very easy to do. Haggling reduces shop prices by 20 percent, making your store of orens go farther for the rest of the game.
In addition to the money, the diagram for kayran carapace armor should appear in your inventory after this. If you looted the kayran’s body, you can now go make the best armor available in Chapter 1. Now is generally a good time to begin optimizing Geralt’s equipment, since you should be able to afford the diagram of the jagged blade and should also have the 15 endrega teeth required to craft it. If you don’t, you can buy them from Anezka or go grind endregas in the forest. You should also equip the kayran trophy, which gives you a far better bonus than any other trophy you can acquire at this point in the game. You can’t improve your boots, gloves, or trousers much at this point, so don’t worry about that for now. You should already have an optimal silver sword.
The Assassins Of Kings
As soon as you walk away from the merchant, Triss appears. She says that Iorveth’s right-hand elf is being held on the prison barge and that he may know something about the kingslayer. After you’ve finished upgrading your gear, meet up with her in the harbor. Talk to the guards to gain entrance to the barge. The elf you want to speak with is in the hold. Before you can speak with him, you need to use Axii on him while Triss casts a healing spell. Press the interaction button to initiate this mini-game. Just press it repeatedly to fill up the meter.

Once he’s awake, you can have a conversation with him. Regardless of the conversation options you pick, you’re going to discover that Letho has turned against Iorveth’s Scoia’tael unit, but Iorveth doesn’t know it yet. You also find out that roses of remembrance grow nearby.
Returning Memories
After the conversation with Ciaran ends, Geralt recovers a bit more of his lost memory. Triss says that with a rose of remembrance, she could restore his memory completely. At this point, you can decide whether you take Triss on the next quest with you or not. If Triss goes with you, she can have a love scene with Geralt during the quest. If Geralt goes alone, this obviously is not going to happen, but he can still complete the quest normally. It’s worth noting that there’s an attribute you can obtain specifically by taking Triss with you on the next quest but then not making love to her.
The Rose Of Remembrance
If you take Triss with you on the quest, you can simply follow her. If you insist on doing the quest without her, then you need to go to Lobinden before you set out for the elven ruins where the roses of remembrance grow. Cedric’s an elf, so go ask him about the roses of remembrance.

When you do, you are prompted at one point in the conversation to give him vodka. If you do this, Geralt drinks with him and the screen goes all wobbly to indicate that hammering down vodka before a trek through a monster-infested forest is not actually a good idea. If you don’t give Cedric vodka, he asks for orens to go buy some instead. You can give him up to 82 orens and should probably give him the maximum amount to make sure he tells you directions to the roses of remembrance. All told, it’s cheaper and funnier to give him vodka instead.
Head south toward the waterfall, then look for the marker next to the path that leads up to the gardens. The roses of remembrance grow at the very top of the path, blooming violet on a bush in front of a giant statue. Pick one, then take it back to Triss at the Flotsam inn. After this you have a story conversation. You can say whatever you want in this one—it won’t affect the outcome of the quest. You also won’t get any XP for doing things this way.
Really, you’re supposed to take Triss with you to the elven ruins. If you do things that way, then you get to the elven ruins by simply following her. After you pick a rose, you can choose to give it to Triss or not, which has no mechanical affect on the outcome of the quest. While you’re in the garden, some bandits who intend to hack up part of the statues and haul them back to town appear. As usual, when you fight the bandits, Triss setting you on fire is a greater hazard than your actual enemies. Keep Quen up and it should be easy.


After you defeat the bandits, a cutscene drops you into the baths beneath the elven ruins. Begin by looking around for loot. A chest in a corner contains some random loot and a book about the Wild Hunt. Next, talk to Triss. If you say “Nothing. Let’s get out of here,” a dialogue ensues. For most of the dialogue you can say whatever you want, but agreeing with Triss in the very last dialogue tree, by saying “I guess so,” results in you getting no XP for the quest. So when you get to the end of the dialogue with Triss, be sure to say whatever appears as the top option, usually “I can’t” or “You know I can’t.” After the dialogue ends you get 250 XP. To get out of the elven baths, cast Aard on a false wall to the left of the pool. You don’t do this the usual way; instead you get to cast it via an interaction prompt when you draw near it. After the wall is blasted, you get the rather potent Resistance to Magic attribute.
After you climb out of the tunnel, you run across a pair of Scoia’tael elves and a dwarf. If you say “Let us leave in peace,” you get another dialogue option after the elf asks you to identify the corpses. There are four options, including three special ones. If you try a special option and fail it, you find yourself in a battle with the three Scoia’tael, who…really don’t stand a chance. Use Quen and break out your new jagged blade. When you loot the bodies, you can pick an armor enhancement off the dwarf.
If you try a special option and succeed, the leader of the Scoia’tael decides to let you go in peace. If you say “Show me what you’ve got,” you go directly to a battle. Sometimes you can’t loot the dwarf’s body at all if you go directly to the main fight. After you win, you can just walk back to Flotsam.

Let’s go back to the conversation in the elven bath. If you say “You could use a bath,” then you trigger an elaborate love scene involving Triss and Geralt. The love scene makes the rest of the quest play out very differently. The Scoia’tael unit never encounters Geralt and Triss, since they’re *cough* busy down in the bath level. Geralt doesn’t get the Resistance to Magic attribute. When Triss and Geralt have their conversation later, you still need to make sure that your last decision is either “I can’t” or “You know I can’t,” to get XP for finishing the quest.
After the conversation, in this chain of events, Roche arrives to break down the wall to the left of the bath. Once you’re outside, you can return directly to Flotsam.
The most lucrative way to resolve this quest, by far, is to refuse Triss, make sure you get the quest XP at the end of their conversation, and kill the Scoia’tael waiting for you outside. Resistance to Magic is a very powerful attribute and really comes in handy later in the game. The chain of events you follow to obtain it, though, tends to leave Triss feeling pretty depressed. If you like Triss and want to see her in a good mood instead, trigger the love scene and just make sure to get the quest XP.
The Assassins Of Kings

Now go see Iorveth. This next sequence is crucial, so be sure you play through it carefully. First, be ready to fight an arachasae. If you got the care package earlier in the game, you should already have a book about arachasae you can read to get knowledge of them. Make sure you have insectoid oil on hand. When you’re ready to set out, speak with Zoltan at the Flotsam inn. He begins leading you to an area where you can meet Iorveth.
As you follow Zoltan through the forest, you have an opportunity to pass through a circle of vigor, circle of endurance, and a circle of life. Do this and you shouldn’t need to prepare any potions for the arachasae battle—just use some insectoid oil and make sure you keep Quen up at all times. If you invested in Feet Work for the kayran battle, that trait comes in handy here, too.
Just dodge-roll to get to the arachasae’s back or sides and lay into it with strong blows. The arachasae tends not to block but will try to angle its front at you so it can counterattack. When Quen goes down, roll away from the arachasae, refresh it, and wade back into the battle. Zoltan helps distract it during the fight so you should have no trouble getting blows in. After the arachasae dies, if you’re lucky you can loot it quickly before the cutscenes start.

After the arachasae dies, the Scoia’tael emerge and you enter a dialogue scene. Throughout this dialogue scene, you can say whatever you want—provided you don’t say something that pisses Iorveth off. If you do, then his men decide to fill you full of arrows. Geralt and Zoltan die in a cutscene. Time to reload!
So here’s a guide to what not to say to Iorveth, since as long as he’s not pissed off what you say will inevitably progress the plot. At the first dialogue option, do not say “You’re a murderer.” If you choose “Let Zoltan go,” then do not say “Loredo was right about you” at the next branch of the conversation.
Once you say “Letho wants you dead” at any dialogue branch, you trigger a cutscene that leads to Iorveth’s men lowering their bows. After that you can say what you like. When you get to the final branch in the conversation, though, be sure to say “I need to do something first.” Do not say “Let’s go,” as that takes you directly into a fight with no time for you to make preparations.

If you say “I need to do something first,” Iorveth goes to wait for you at the elven ruins. Now, be sure to scan the meeting place very carefully for loot. If you failed to loot the arachasae’s body before the cutscene, be sure to do it now. Among the loot should be a pair of arachasae eyes you should hold onto for use in a later quest. Also, search the clearing carefully for the sword of Kaer Morhen. Its location is marked on the map to make it a bit easier to find. It is the second-best silver sword available in Chapter 1 and essential if you missed getting the diagram of the superb witcher’s silver sword earlier. Note that you can’t obtain it before you do this quest as part of The Assassins of Kings . If you try to head to this area earlier in the game, rocks block all of the available paths.
After you’re done looting the clearing, head back to Flotsam. There’s one last side quest you want to clear before moving the storyline forward. You should also focus on buying anything from the vendors at this point that you might want. After the battle, you have to make a decision that branches the main plot a little and causes certain vendors in Flotsam to shut down. So it’s best to have everything you might want to obtain in your inventory before you go off to face Letho.
Melitele's Heart
Remember that amulet you got from Newboy in the Prologue? Go see Anezka at Lobinden about it. Say “Tell me what you know about this amulet” to initiate the quest. She says there’s real magic in it and offers to buy it from you. If you say “I wouldn’t mind selling it,” a cutscene ensues where Geralt and Anezka haggle on price. Generally she settles on a final offer of 200 orens for it. If you say “I want to get rid of it,” Geralt accepts the sale and trades away Newboy’s talisman for 200 orens. This resolves the quest and nets you 50 XP. “What’s your final offer?” in the final dialogue branch makes Anezka restate her price, while “I’ve changed my mind” stops the sale sequence.

If you say “It must be precious to you,” you trigger a cutscene that leads to another dialogue branch. At the branch, if you say “I need to ask you something else,” you terminate this entire sequence. What you want to do instead is use the persuasion special option above it: “A customer like me doesn’t come along often…”
If your persuasion is successful (and it probably will be), Anezka reveals that the talisman is actually Melitele’s Heart, a potent protective amulet that was cursed. The curse distorts its effect, so it actually brings misfortune upon those who carry it. Anezka wants it because she thinks she could undo the curse, provided she had the right alchemical ingredients. She needs a troll tongue, a pair of arachasae eyes, essence of death, and an endrega embryo. Although Anezka refers to an endrega fetus in her dialogue, it’s the endrega embryo alchemy item that she requires.
If you’ve side-quested diligently up to this point, you should have all of these items. You get the troll tongue resolving Troll Trouble , the arachasae eyes from The Assassins of Kings sequence earlier, essence of death from the wraiths you battle during In the Claws of Madness , and endrega embryos while you’re raiding the endrega nurseries during The Endrega Contract . If you did something foolish like wasting your troll tongue to brew a potion, you can go buy replacements from Cedric. You can’t buy a replacement for the endrega embryo, though. If you somehow wasted all of them, go farm endregas for a while.

When you’re ready to lift the curse on the talisman, visit Anezka and say “I’m interested in that ritual” after you ask about the talisman. Next, ask her if she can conduct the ritual. Anezka tells you to go to the statue of Veyopatis at midnight. Say “I’ve made up my mind” to initiate this part of the quest. If you are speaking to Anezka after sundown, you can follow her to the statue. When she asks you if you’re ready, don’t say “I am” unless you’re genuinely ready for a pretty fearsome battle.

When Anezka begins performing the ritual, she summons a series of wraiths around her. The wraiths spawn infinitely, but you only have to fight three at a time. You need to hold off the wraiths while she performs the ritual. If she stops performing the ritual, then it’s possible for you to be stuck fighting infinitely respawning wraiths until dawn. To prepare for this fight, you definitely want some specter oil on hand. Both Quen and Axii are useful here, Axii to turn the wraiths against each other and Quen for defense. A very prudent approach can be to use Quen and lay fury traps around the area, which can affect a whole group of wraiths at once.
Make sure you have the chapter’s optimal equipment and all of your talents invested. If you have any mutagens worth slotting, go ahead and spend them. You may want to socket +2 enhancements into your armor and socket your silver sword with runes. The best rune overall for socketing is the fire rune, which exploits wraiths’ weakness to incineration while increasing overall damage. You probably only have one fire rune, though, and they’re difficult to acquire at this point in the game. If you decide you want to save your fire rune for later in the game or for use in a steel sword, a sun rune or moon rune can also be very useful.
If you focus on using Axii on the wraiths, you may want to create some dancing stars to help with crowd control when your vigor is low. For potions, you’ll probably want a combination along the lines of Petri’s Philtre, Swallow, and Tawny Owl. It’s actually worth spending some fulgur to make a Tawny Owl for this, if you’ve got the alchemy components to spare. This battle is a candidate for the toughest in the chapter, and how you prepare makes a big difference in how it turns out. Also take advantage of the circle of endurance and circle of power near where the fight is to take place.
How many wraiths you kill is immaterial to success or failure here. You just need to keep the fight from getting anywhere near Anezka, which is why it’s useful to have optimized equipment going into the battle. The tougher your stats are, the more trivial the wraiths are as opponents.

Killing wraiths is helpful, since that means they have to spend time respawning far from the ritual rather than stabbing you or Anezka. Run around, keep Quen up, and do what you can to manage the crowd of wraiths. Bombs, fury traps, Axii—whatever happens to work best for your build. This is the first major fight in the game where how you handle it will depend more on how you’ve built Geralt than the basic characteristics of the enemies. Expect a lot more fights like this in Chapter 2.
When Anezka says “I’ve done it!” the battle is over. Ask her if the ritual was successful. If it wasn’t, you can try again. If it was, then she gives you the restored Melitele’s Heart to reward you for helping her lift the curse. Now Melitele’s Heart gives Geralt perpetual +1 vitality regeneration, without even needing to be equipped. You also get 125 XP for resolving the quest this way. Go loot the wraith remains and prepare yourself for another tough battle.
The Assassins Of Kings
It’s time to go have a talk with Letho. There’s a dialogue before you fight him. For most of it you can say whatever you want. One way or another, Iorveth is going to order the Scoia’tael into action and you’re going to end up battling Letho.

Just before you battle Letho, you have a timed decision to either give Iorveth his sword or help Roche. What you decide here forks the plot for a little bit in Chapter 1, affecting the way the beginning of Where Is Triss Merigold? plays out. It is not the chapter’s most important decision, but it can have consequences in Chapter 2.
If you give Iorveth his sword, you’ve sided with him and should read the Where Is Triss Merigold?(Iorveth) description after the Letho battle. If you help Roche, you’ve sided with him and should read the Where Is Triss Merigold?(Roche) description.
It’s worth noting up front that siding with Roche here offers slightly more XP. That is otherwise the only substantial difference between the two branches. The main differences are all pure matters of how the story unfolds. It’s also worth noting that on both branches, regardless of your choice, you lose access to Berthold, Einar, Fioravanti, and Cedric’s shops.
Finally, after you finish Where Is Triss Merigold? , the game auto-tracks quests based on the decision you make here. If you sided with Iorveth, then At a Crossroads: Scoia’tael is auto-tracked. If you side with Roche, then At a Crossroads: Vernon Roche is auto-tracked. You can still choose to track the other At a Crossroads quest if you wish, so you can make a final decision to side with Iorveth or Roche that’s totally the opposite of what you pick here.

Anyway, back to Letho. His vulnerability is Yrden and traps, somewhat similar to the endrega queens, so your snares can come in handy here. The problem with fighting Letho is that he’s also a witcher, so he has all of your abilities. He uses Quen on himself, uses Aard to knock you over, and throws bombs if you get too far away from him. You can use thrown daggers to interrupt his casting and throwing animations if you’ve got quick reflexes, which can make taking a bunch of well-balanced throwing daggers into this fight worthwhile.
Again, the better your equipment here is, and the more you’ve built up Geralt with talents, the easier Letho is going to be to defeat. Make sure you’ve socketed runes into your steel sword before the battle. The jagged blade has two rune slots, so the optimal runes to slot would be your fire rune and earth rune. That said, these runes are rare and difficult to obtain, so you may want to save them for later in the game. If so, then any combination of Ysgith, sun, and moon runes can help give you an edge here.
Complicating matters is that your potion meters are ticking down during the dialogue before the Letho fight. Even if you prepare your potions and drink them at the last possible moment before triggering the fight, chances are you only have about three minutes left on them before the battle begins (unless you’ve taken the alchemy skill Specialization: Potions). If you’ve somehow made a build that is super-reliant on potions, you will have problems. Geralt builds that are heavy on alchemy should be sticking to bombs and traps here.
It’s still worth drinking some potions—just make good use of those three minutes. Also try to use easier-to-brew potions like Rook here, rather than ones that use rare ingredients, like Tawny Owl. It’s not worth sacrificing rare ingredients for only three minutes or so of actual use. Also, don’t oil your steel sword with hanged man’s venom until after the fight with Letho begins. You can do that from the inventory screen, fortunately.

When Letho puts up Quen, keep a little distance away from him. Don’t waste attacks on battering it down, just let it run out. Plant traps or Yrdens instead. Don’t get too far away, or he punishes you with a bomb, Aard, or Igni. Wait for his Quen to run out before you get serious about attacking him, or rush him after the damage from a snare knocks it down. If you’re using daggers, try to interrupt him when he begins the animation for casting it, Aard, or Igni.
Don’t rush in and attack him with your sword blindly. Instead, wait to catch him in a situation where he can’t block. That means hitting him during casting or throwing animations, getting behind him, or going after him when he’s staggered. You can stagger Letho by blocking his sword blows, like other humanoid opponents, or luring him onto an Yrden. Once you land a few blows on Letho, it’s easy to stay on top of him and keep him trying to attack you rather than putting up Quen. Letho isn’t all that fast compared to you, so heavy blows work well here.
You only have to take Letho down to about 50 percent vitality to count as having won the battle, so don’t be alarmed if it looks like the damage you do is puny. If you exploit Geralt’s strengths and Letho’s weaknesses, chances are you’ll prevail. After the battle, you immediately see the results of the choice you made earlier.
Where Is Triss Merigold? (Iorveth)

Iorveth appears in the cutscene after Letho leaves, asking what happened to him. Letho is headed to Flotsam to get Triss, and Iorveth implores you to kill him before he gets there. Geralt asks Iorveth to set out with him, but Iorveth reminds Geralt that he can’t do anything given the garrison stationed there. You’re on your own for finding Triss.
Before you leave the elven baths, make sure you loot the area. Pick up your snares if you used them and make sure to retrieve the sword you lost in the final cutscene with Letho. You can also find a little bag of loot Letho leaves behind. It contains grapeshot, dancing stars, and a robust long sword. There’s also a chest containing random loot nearby. Outside, loot the bodies of the fallen.
If you’re overburdened with loot, stop in Lobinden to trade with Anezka or Sendler. When you get into Flotsam, madness has erupted. The battle between the Scoia’tael and the Blue Stripes has become Loredo’s long-desired catalyst for inciting the humans into open violence against the Flotsam nonhumans. Angry mobs are assaulting nonhumans.

Your first goal here is to get to the inn, but you can stop to interrupt the various beatings and other acts of mob violence you see around them. You can usually try to quell them with special decisions in a dialogue, or by just getting your sword out and killing the mob. Once you’re in the inn, you have to save Dandelion from a similar situation.
You can use Axii or intimidation to convince the innkeeper not to kill Dandelion, or you can kill him and his allies. You don’t get any noteworthy loot for killing the townsfolk, so it’s quicker to bypass the fights if you can. By this point in the game you should be particularly good at using either Axii or intimidation in conversations. Just stick with whatever you’re best at when you’re trying to quell fights.
Talk to Dandelion about what’s going on. Ask him “Have you seen Triss?” when you want to advance the plot. Head to Síle’s room to find out what happened next. The room is a wreck, so examine it for clues. Eventually, you should find the peephole that leads into the brothel. Go next door to see if the madam knows anything.

Once you’re there, talk to Margot. One of her elven girls, Derae, was murdered by the mob. Margot lets you know what happened to Triss in the room and you get a cutscene of Triss’s conversation with Philippa. During the cutscene you can make conversation choices, but none of them affect the plot. They just give you a little more information about what’s going on. After the scene with Triss and Philippa, Margot mentions that she saw Cedric stagger out toward the forest. Margot also gives you a letter for Iorveth naming Derae’s killers. You can take it by asking her if she’s spying for Iorveth. The other two conversation options lead to her keeping the letter. The letter doesn’t affect the plot in any way but is interesting reading.
Head out into the forest to find Cedric. If you want, you can drink a Cat potion and follow a blood trail from Lobinden to where Cedric lies in the forest. If you’d rather not use Cat, just head toward the elven ruins and you can easily find him nearby just by scanning with your medallion. When you find him, a cutscene begins where Cedric tells you what happened with Triss and Letho. Following that, there’s a brief dialogue with Dandelion and Zoltan. After that dialogue, you get 900 XP and the quest resolves for now.
At this point, the mutually exclusive quests At a Crossroads: Scoia’tael and At a Crossroads: Vernon Roche open up. If you do the Scoia’tael version of the quest, you side with Iorveth in Chapter 2 and get a set of quests and locations specific to that. If you do the Vernon Roche version of the quest, you get a largely different set of quests and locations. If you want to side with Iorveth, turn to for the walkthrough for At a Crossroads: Scoia’tael . If you want to side with Roche, turn to for the walkthrough for At a Crossroads: Vernon Roche . Whether you do Iorveth or Roche’s quest is the most important decision you make this chapter.

Before you decide either way, linger near Cedric long enough to loot his body. (C’mon, he’d want you to have his stuff.) You can pick up elven armor and reinforced boots. Neither is particularly useful, but the elven armor is otherwise fairly difficult to obtain.
Where Is Triss Merigold? (Roche)

Roche appears in the cutscene after Letho leaves, asking what happened to him. Letho is headed to Flotsam to get Triss, and Roche agrees to help you try to get to her first. In the conversation, Roche reveals that the Blue Stripes were able to take Iorveth prisoner.
Before you leave the elven baths, make sure you loot the area. Pick up your snares if you used them and make sure to retrieve the sword you lost in the final cutscene with Letho. You can also find a little bag of loot Letho leaves behind. It contains grapeshot, dancing stars, and a robust long sword. There’s also a chestcontaining random loot. Outside, loot the bodies of the fallen. You should be able to pick up the Special Forces sword from a fallen Blue Stripes soldier.
This time, Roche and Geralt return to a hero’s welcome in Flotsam, since they captured the hated Iorveth. At one point Loredo offers you a drink. If you take it, you can get the screen wobble effect that indicates drunkenness in The Witcher 2. There’s no penalty for turning it down, but you don’t have a lot of chances to get Geralt drunk in this game. After the encounter with Loredo, head into the inn and meet Dandelion. You have another chance to have a drink or turn it down.
Next, go to investigate Síle’s room. The room is a wreck, so examine it for clues. Eventually, you should find the peephole that leads into the brothel. Go next door to see if the prostitute waiting there knows what happened. At this point you should receive 100 XP for successfully investigating the room.
Have a talk with the woman who’s waiting there, Derae. She confirms that Triss and Cedric were next door in Síle’s room earlier. This triggers a cutscene of Triss’s conversation with Dethmold. During the cutscene you can make conversation choices, but none of them affect the plot. They just give you a little more information about what’s going on. Note that when you get to either persuade or intimidate Dethmold with a special conversation option, Triss uses Geralt’s levels in those skills. So for that conversation option, pick whatever Geralt is currently best at if you want to get extra information.

After the scene with Triss and Dethmold, Derae mentions that Margot went missing and also that she saw Cedric stagger out toward the forest. While you’ll need to find Cedric to complete this quest, go finish the sub-quest with Margot first. Note that it is skippable and therefore technically a side quest.
Margot's Disappearance

Basically, just go downstairs into Margot’s usual room in the brothel wing of the inn. You discover Dandelion there, staring at Margot’s body hanging from a rafter. On the ground beneath her is Margot’s farewell letter, which you can pick up and read to understand why she killed herself. Margot was spying for Iorveth and figured that her goose was cooked once Iorveth was captured. You can also loot Margot’s room to find her notes. They usually appear in the end table next to her bed. You get no XP for resolving this quest, just extra information about the plot.
Where Is Triss Merigold? (Roche)
Head out into the forest to find Cedric. You can easily find him nearby just by scanning with your medallion, which reveals Cedric’s bloodstains. The minute you set foot into the forest, you’ll be attacked by an angry unit of about five Scoia’tael. They shouldn’t be hard to beat at Geralt’s current level, but if you’ve already drunk Cat the fight becomes very annoying due to the damage penalty and Geralt’s altered vision. Remember that Axii and similar effects are very useful when dealing with large groups of enemies.

To find Cedric without using Cat, just head toward the elven ruins. You can easily find him nearby just by scanning with your medallion. When you find him, a cutscene begins where Cedric tells you what happened with Triss and Letho. Following that, there’s a brief dialogue with Dandelion and Zoltan. After that dialogue, you get 900 XP and the quest resolves for now.
At this point, the mutually exclusive quests At a Crossroads: Scoia’tael and At a Crossroads: Vernon Roche open up. If you do the Scoia’tael version of the quest, you side with Iorveth in Chapter 2 and get a set of quests and locations specific to that. If you do the Vernon Roche version of the quest, you get a largely different set of quests and locations. If you want to side with Iorveth, read on for the walkthrough for At a Crossroads: Scoia’tael . If you want to side with Roche, turn to for the walkthrough for At a Crossroads: Vernon Roche .
Before you decide either way, linger near Cedric long enough to loot his body. (C’mon, he’d want you to have his stuff.) You can pick up elven armor and reinforced boots. Neither is particularly useful, but the elven armor is otherwise fairly difficult to obtain.
At A Crossroads: Scoia'Tael

This quest can be very different depending on if you sided with Iorveth or Roche just before the fight with Letho. If you sided with Roche, you meet with Zoltan in the elven ruins and a small detachment of Scoia’tael NPCs. They’re harsh to Geralt, but after you say “I want to help the Scoia’tael,” don’t worry about saying something to put yourself on bad terms with the Scoia’tael again. Ultimately, they decide that if you help them free Iorveth from the prison barge you’ve proved that you’re on their side. You get 50 XP for resolving the quest.
If you sided with Iorveth before your fight with Letho, then it’s him you meet in the elven ruins. You get different options during the dialogue, mainly ones that let you acquire a little bit more information. Once you give Iorveth the “Count me in” dialogue option, the quest resolves. You get 50 XP. On this branch, your next quest is , which ends Chapter 1.
The Floating Prison
The first half of this mission is only slightly different, depending on whether Iorveth is with you or if you’re rescuing Iorveth. If you’re rescuing Iorveth, then a dwarf leads your party as you begin climbing the cliffs around the city so you can get to the harbor in secret. If Iorveth is with you, then he leads the party instead.

As you make your way around Flotsam, you encounter small groups of guards. You should be able to overpower them easily with the help of the Scoia’tael NPCs with you; just keep Quen up for defense. The guards all drop short swords and sometimes a few orens. You should fight about three groups of them as you make your way up the cliffs, and you have a chance to activate a circle of vigor.
Once you reach the top of the cliffs, you see that the other group of Scoia’tael has flooded the harbor and is battling the guards en masse. Rush down with your group and start cutting up the guards near you. When they cluster together, you can make good use of bombs like dancing star, but be careful not to set your own allies on fire. When you run into the burly guards in Loredo’s livery, you need to take a more methodical approach to fighting. A block-and-counter approach works, with the Riposte skill being quite powerful if you’ve invested in it and gotten the hang of its timing.
Once you get onto the boat, you need to slay all of the guards aboard. If Iorveth is with you, you seize control of it automatically after the guards are wasted. If you’re rescuing him, then you need to rescue him before you have control of the ship. Iorveth stands at the aft of the ship. Approach him to get an interaction prompt that releases him.

Once the ship is in motion, Loredo threatens to burn down a building with some elven women trapped inside if the boat doesn’t stop. Instead of the boat stopping, Geralt hops out to mete out some justice, which sends Loredo running. At this point, you can do one of the two things: rescue the elven hostages or kill Loredo.
If you choose to rescue the elven hostages, you need to fight your way around to the entrance to the building where they’re being held. There are two guards you have to take out, and you may end up fighting a handful of peasants, too. If you have optimal equipment, these fights should be trivial.
Quickly get inside the building. Put up Quen to protect Geralt from the fire and start climbing the ladders. Once you’re inside you’re on a timer to finish this part of the quest, and if you take too long, the building collapses in a fiery mess, killing Geralt and everyone else inside. When you get to the top, move near the three hostages. Stand near them and begin hammering your interaction button to fill up the meter that lets you release each of them. Once you’ve released all three, you automatically get a cutscene where you leap out of the tower to safety. Be sure to get well away from the top of the ladder before you start trying to release the hostage nearest it.

If you choose to hunt down Loredo, chase him down the docks and into Flotsam’s town square. You have to fight all the way, both peasants and ordinary town guards. These fights should be trivial for you with your current equipment. Take the door that leads from the harbor into the town square. Loredo waits for you there with five of his personal guards and a town guard armed with a sword and heavy shield. You have to contend with Loredo’s personal guards before he comes down from the gallows to fight you himself.
Loredo’s personal guards are the main challenge here, because they all have the sort of AI that tends to block a lot. If you have dancing stars, then tossing one or two into a group of them can rapidly whittle down their vitality. You can also use typical crowd control techniques like Axii and fury traps. Once you’ve thinned the guards’ numbers down a little, you can finish them off with some old-fashioned sword-fighting. You can take the town guard out with a block-and-counter approach, since he doesn’t enter the fray until Loredo’s personal guards are gone. Loredo himself should be trivial to defeat. Once Loredo is dead, you can loot his body for a ton of items, including a studded leather reinforcement and the Royal Mail key.

Now you need to head back to the harbor to get back on the prison barge. Head to the very end of the dock, then stand toward the right side of it. You should get an interaction prompt to use the rowboat beneath you. This triggers a cutscene that places Geralt automatically back on the prison barge.
At the very end of this quest, if you ask about Roche right before Iorveth says it’s time to set sail, you can see a special cutscene depicting Iorveth’s encounter with him. Then you briefly take control of Iorveth and get to fight Roche in a brief battle, which leads into another cutscene. Note that you can get this cutscene whether Iorveth was imprisoned or not.

So which way is best for resolving the quest? Well, the best loot you get from slaying Loredo is a studded leather reinforcement, which you can buy freely in Chapter 2. If you rescue the elven hostages, then among them is Mottle, who becomes a shopkeeper in Chapter 2. She can also have a romantic encounter with Geralt if she survives and gives him a useful item. If you opt to kill Loredo, she’s not available in Chapter 2 at all. So overall, it’s best to try rescuing the elven hostages. That said, it’s also worth killing Loredo just once to hear Iorveth’s amazing rant in the cutscene that follows. At the chapter’s end, you should get the To Aedirn! achievement. After this, navigate to the Vergen (Iorveth) walkthrough for Chapter 2 with Iorveth as Geralt’s ally.
At A Crossroads: Vernon Roche
This is very straightforward. Meet with Roche at the Blue Stripes headquarters in Flotsam. He reveals that Loredo is in bed with spies from the rival nation of Kaedwen. Roche plans to execute Loredo as a traitor and insists that Geralt help him assault Loredo’s compound before they sail for Aedirn. Say “All right, let’s do it your way” and you’ve sided with Roche. Note that you get no XP for resolving this quest.

If you side with Iorveth just before the battle with Loredo and then do this quest, the only real difference is some extra dialogue that happens before Roche divulges his intentions for Loredo. Roche chews out Geralt for giving Iorveth a sword and will answer a few questions about how the riot in Flotsam got started. You don’t get any XP for resolving this version of the quest.
Death To The Traitor!
It’s time for Loredo to pay for his crimes. Note that who you sided with earlier before you fought Letho doesn’t really affect the way this quest plays out. Roche orders everyone to meet in an alley after dark to do this quest, so you may want to take advantage of the break to lighten Geralt’s load by selling stuff off or putting it into storage. Loredo’s house is absolutely stuffed with loot you’ll want to carry out.
What the game tells you to do is basically a stealth mission. In the alley where you meet Roche’s man, there’s a ladder. You need to go to this location at night to use the ladder. If you arrive during the day, you’re told to come back later. Climb it to get onto a plank you can use to drop down into Loredo’s compound. A merchant is walking nearby, looking for a girl named Helen. Wait until his back is toward you. You can choose to sneak by him or to knock him out. He’s very easy to knock out, so you might as well. Now you need to find Helen. Sneak toward the center of the map. Wait until the guard patrolling the center of the courtyard has his back turned. Run and hide behind the woodpile.

Move around it, then head for the guard off to your right. Stun him when his back is turned. This lets you climb the ladder that lets you drop down into the courtyard where you snagged the part for the kayran trap earlier. You can have a talk with Helen here. She fills you in on what’s happened with Ves and tells you that to get farther into the compound, you need to get a key from Loredo’s mother.
If you’re not a fan of stealth, there’s another way to get into Loredo’s mansion. Remember the trap door at the end of the nekker cave you investigated during the Malena side quest? Try going back in there. Fight your way through the nekkers, which should be much easier now that you’ve begun to invest some talents in Geralt’s specialized abilities. While the trap door was locked earlier, this time you can pass through it easily. You may encounter a guard on his way down the ladder. Passing through the trap door puts you in the little walled courtyard where Helen waits, so you can talk to her to proceed with the quest normally from here. You’re awarded an additional 400 XP for entering the compound through the nekker cave, so this is really the best way to do the beginning of this quest.
Climb up the low wooden platform and then into Loredo’s compound through an open window. This puts you in the kitchen. Scan the area, not so much for loot but for objects that make noise if you bump into them. There’s a guard in the hallway that leads out of the kitchen you probably want to knock out. Wait until he’s standing at the bottom of the stairs with your back toward you, then sneak up on him and crack him on the back of the head. Open the door with the quest marker behind it—the other one leads outside, where you really don’t want to be right now.

Loredo’s mother waits in this room, distilling fisstech. Be ready for a QTE when the cutscene begins. Loredo’s mother tries to attack you with a knife, so you must press the interaction button to successfully counter her attack. This is one of the game’s more forgiving QTEs, fortunately. Loot the room once Loredo’s mother is dead, so the drunkenness effect from the fisstech she threw at you can wear off. Be sure to loot her body to get Marietta’s key, which you need for sneaking your way up the main tower.
Now that you have Marietta’s key, you don’t really need to worry about sneaking around anymore. The next floor takes you to Loredo’s office. You can try knocking all the guards out stealthily, but chances are you’re going to be seen here. Go ahead and kill them so you can loot this room. Unlock the glittering box near the door to get Bernard Loredo’s letter, which contains information confirming everything Roche alleged about Loredo. Obtaining this document also advances Mystic River but isn’t required to finish that side quest.
The next level is a room full of sleeping guards. You can try to sneak through it to get the tower key in the chest in the next room, or you can just wake the guards up and fight them all. Winning this battle shouldn’t be difficult, even given the tight quarters, provided you’re starting to specialize your Geralt build for combat. Even if you aren’t, some bombs can do terrible things to enemies in a tightly packed area like this. Head on up to the next level of the tower.

Here is where Loredo is lying in wait for you, with a trap. Hit the interaction button when the prompt appears in the middle of the screen to deflect Loredo’s spear charge. After that, you begin a proper fight with him. Loredo’s huge spear actually makes him very easy to defeat, because his blows are so slow. It’s easy to use the Riposte skill on him, or just use Quen to make staggering him easy. If you use light attacks on him, it’s also very easy to back him into a corner and catch him in perpetual hit-stun until he dies. Free Ves after Loredo dies (use the strong attack button prompt), then loot Loredo’s body to pick up some nice armor enhancements and the Royal Mail key. Be sure to loot the room before you head next door to find Moril.
Lead Moril down a couple of flights of steps. Her water breaks, which means she has to go back to the tower to deliver her baby. In the meantime, Geralt needs to kill the guards on the ground floor of the compound, then head out into the courtyard to help Roche’s men mop up the rest of Loredo’s forces. These fights should be fairly trivial. When Geralt asks Roche what kept him, you get a cutscene where Roche briefly encounters Iorveth, followed by a battle where you get to control Roche as he duels Iorveth. From here, cutscenes take you into the beginning of Chapter 2 and you should unlock the To Aedirn! achievement. Navigate to The Kaedweni Camp (Roche) walkthrough for Roche’s version of Chapter 2.