Ninja Gaiden 3 Guide Walkthrough Ninja Trials
Master Mission Analysis
MASTER 01
| DIFFICULTY: |
|

Mission Details
|
Wave |
Enemy |
Initial Force |
Reinforcements |
|---|---|---|---|
|
1 |
Spider Ninja |
2 |
4 |
|
1
|
Spider Talon Ninja |
2 |
4 |
|
1
|
Epigonos |
1 |
0 |
|
2 |
Spider Aya Ninja |
2 |
2 |
|
2
|
Ourboros |
0 |
2 |
|
2
|
Epigonos Final Form |
1 |
0 |
Tactical Analysis
Wave 1: At the onset of this wave, stay away from the center of the area and locate the Epigonos. He blends in with the other Ninja and the area, so it’s important to pinpoint his location and keep an eye on him.
Do not engage him yet; instead take out the Spider Ninja and Talon Ninja first. When you have Ninpo or an Ultimate Technique available, try to use it on the Epigonos, but if you can’t target him, just take out the other Ninja instead.
When only the Epigonos remains, wait for him to start a combo and slide to avoid the third and fifth attacks. When the combo ends, hit him with an Izuna Drop combo.
As long as you avoid the third and fifth attacks in his combos, he’ll have a hard time inflicting damage. It will take quite a few Izuna Drops to finish him off, but this is not a difficult battle.
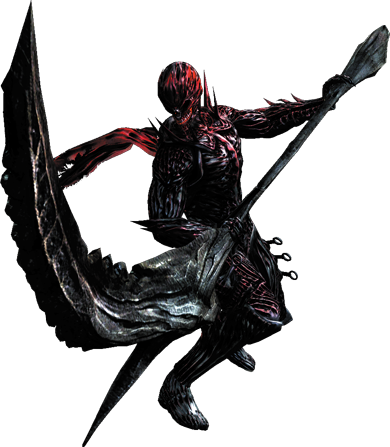
Wave 2: There are only two waves in this mission, but both feature an Epigonos. The second wave has the Epigonos in his Final Form. Take out the four Aya Ninja first so you don’t have to worry about their magic attacks.
The reinforcements for the Aya Ninja and the Ourboros spawn based on how much health the Epigonos has. When the Epigonos hits 50 percent health, no more Aya reinforcements will spawn.
Instead, the Ourboros will appear one at a time.
If you feel confident that you can avoid the Aya’s attacks while engaging the Epigonos, focus solely on the Hayabusa clone. When the Epigonos reaches 50 percent health, and the Ourboros appears, take down the two Aya Ninja.
No matter how you decide to face this fight, when the Ourboros appears, shift your focus to them instead of the Epigonos.
They attack one at a time, which makes it relatively easy to finish off the two Ourboros and continue attacking the Epigonos.
Fight the Epigonos Final Form just like you did in the story mode. Wait for it to switch to the Dragon Sword, then slide to avoid its combos and attack with an Izuna Drop.
Watch out for long-range attacks when it’s using the scythe, and a quick slide when it’s using the Dragon’s Claw.
MASTER 02
| DIFFICULTY: |
|

Mission Details
|
Wave |
Enemy |
Initial Force |
Reinforcements |
|---|---|---|---|
|
1 |
Light Shell Bug |
3 |
21 |
|
1
|
Ourboros |
3 |
9 |
|
1
|
Megaselion |
3 |
6 |
|
2 |
Shadow Fiend |
3 |
6 |
|
2
|
Van Gelf Fiend |
2 |
4 |
|
2
|
High Van Gelf Fiend |
1 |
3 |
|
3 |
Ourboros |
1 |
3 |
|
3
|
Megaselion |
0 |
4 |
|
3
|
Goddess Prototype |
1 |
1 |
Tactical Analysis
Wave 1: Under normal circumstances, the first wave of this mission would not be overly difficult. However, with the small area you must fight in, and the large number of enemies, this becomes a much more difficult battle.
The Megaselions are very aggressive, but avoid them as much as you can to focus on the Light Shell Bugs.
Alone, the Bugs are easy to extinguish, but with all the other enemies around, they can quickly become a difficult foe if they’re not dealt with quickly.
If you have trouble avoiding the Megaselions or Ourboros, continuously slide around the area, aiming for the Bugs. Two slides is enough to take out the Bugs.
When the Light Shell Bugs are down, shift your attention to the Ourboros. They go down faster than the Megaselions and you can use their deaths to build up to an Ultimate Technique.
Any time you have an Ultimate Technique available during this mission, get close to the Megaselions and try to target them with it.
You will have to stay on the move throughout most of this fight, so if you have difficulty executing an Ultimate Technique near a Megaselion, just use it as soon as possible to clear out any of the enemies.
With only the Megaselions left, this becomes a much easier battle.
The close quarters combat is still your greatest foe, but without the Light Shell Bugs and Ourboros to contend with, the Megaselions go down without too much of a hassle.
Try to focus on attacking the same Megaselion until it goes down, but if you have trouble doing this, just attack the closest enemy.
Wave 2: Once again, the size of the battle area makes this fight far more difficult than it would normally be. Take down the Shadows first, but if the High Vangelf or the Vangelfs get in your way, attack whichever enemy is closest.
The Shadow Fiends are more agile and harder to keep track of compared to the larger Vangelf and High Vangelf, so whenever possible, use a quick Izuna Drop to finish off as many Shadows as possible.
With the Shadows down, it’s a toss-up as to which enemy you should target next. Both the Vangelf and High Vangelf are formidable opponents and fight almost exactly the same.
The best strategy is to focus on one at a time, but if another enemy gets close, slide away as quickly as possible. It will take longer to defeat all the enemies, but you do not want to get attacked by two or more enemies at once.
Wave 3: This wave begins with one Goddess Prototype and one Ourboros. When the Ourboros is defeated, one Megaselion appears.
From this point forward, the Ourboros and Megaselions attack one at a time, alternating between the two (one Ourboros, then one Megaselion).
Ignore the Prototype and focus on the Ourboros and Megaselions first. When all eight of them are down, then shift your attention to the first of two Prototypes.
The fight against the Prototype is very similar to the story mode battle, but this variant is stronger and takes longer to defeat.
Follow the same strategy as before, sliding to avoid her combos when she has normal arms, waiting for the Acid Spray when she has tentacle arms, and avoiding her attacks with Demon arms.
MASTER 03
| DIFFICULTY: |
|
Mission Details
|
Wave |
Enemy |
Initial Force |
Reinforcements |
|---|---|---|---|
|
1 |
High Van Gelf Fiend |
2 |
2 |
|
2 |
Genshin |
2 |
0 |
|
3 |
Epigonos |
1 |
1 |
|
3
|
Epigonos Final Form |
0 |
1 |
Tactical Analysis
Wave 1: Fighting two High Van Gelf Fiends at a time isn’t all that tough. The main strategy is to know where the other High Vangelf is at all times.
The High Vangelfs go down pretty easily, and although you may take an Unblockable Grab here and there, if you attack with a constant barrage of Quick Attack or Strong Attack combos, the four High Vangelfs will go down before you do.
When the wave is over, your Health Gauge is replenished for the battle against two Genshins.
However, if you lose track of the second High Vangelf, it can attack from your blind side with its Fireball Projectile or its Unblockable Lunging Grab. Both have very good range and both inflict significant damage.
If you can avoid these, getting hit with an Unblockable Grab or two will not end the mission for you. Just keep both High Vangelfs in visual range at all times. This is a large stage, so it’s easy for one to escape your view and get lost.
Wave 2: The two Genshins are arguably the hardest part of this mission. Fighting one Genshin is hard enough, but fighting two can be difficult.
The stage is fairly large, so position yourself as far away from the two enemies as possible. When one of them closes in, wait for it to attack, evade his combo, then counter with an Izuna Drop combo.
If the other Genshin gets close, slide away and regroup.
Genshin hits very hard, so it’s extremely important to engage only one of them at a time. It’s also very helpful if you can keep track of which Genshin you’re attacking so that you can continually attack the same Genshin.
When one Genshin is down, it’s much easier to take out the last remaining Genshin.
Wave 3: This wave begins with a single Epigonos. When the first Epigonos is down, a second one appears, and after the normal Epigonos is defeated, the Epigonos Final Form spawns.
Deal with the first two Epigonos by waiting for them to attack, sliding to avoid the third and fifth attacks in their combos, then countering with an Izuna Drop.
When facing off against the Epigonos Final Form, stay away from him until he switches to the Dragon Sword, then use the same strategy from fighting the normal Epigonos.
MASTER 04
| DIFFICULTY: |
|
Mission Details
|
Wave |
Enemy |
Initial Force |
Reinforcements |
|---|---|---|---|
|
1 |
Terrorist (White) |
2 |
4 |
|
1
|
Rocket Launcher |
2 |
4 |
|
1
|
Ghost Soldier |
0 |
4 |
|
1
|
Assassin (White) |
3 |
6 |
|
1
|
Heavy Soldier (White) |
3 |
6 |
|
2 |
Alchemist |
3 |
3 |
|
2
|
Regent of the Mask |
1 |
1 |
Tactical Analysis
Wave 1: Under normal circumstances, the best strategy for this wave would be to take down the Rocket Launchers first, followed by the Terrorists (White).
While you should still take down the Rocket Launchers first, leave the Terrorists (White) for last. The reason for this is because the Ghost Soldiers do not appear until the Terrorists (White) are all dead.
Take down the Rocket Launchers, then take your pick between the Heavy Soldiers (White) and Assassins. This wave is relatively easy compared to most of the other waves in the Master Ninja missions.
When only a few enemies and the Terrorists remain, take them out, but save your last Ultimate Technique until the Ghost Soldiers spawn.
While it’s easy enough to use arrows to pinpoint the location of the Ghost Soldiers, it’s even easier to unleash an Ultimate Technique and take out three of them right off the bat.
Wave 2: The second wave of this mission starts off with one Regent of the Mask accompanied by three Alchemists.
Usually this would not be a big problem, but the Regent of the Mask is two and a half times stronger than when you fought him during the story mode.
The strategy to defeat him hasn’t changed, and after facing him so many times in the story mode you should have it down to a science by now, but it will take much longer to bring him down.
Start off by staying away from the first Regent of the Mask and focusing on the Alchemists instead. They fight three at a time, which isn’t too difficult.
However, you should still isolate one to fight by sliding from one end of the area to the other. This is made slightly more difficult by the fact that you need to avoid the Regent of the Mask as well.
It will take a little longer to take down the six Alchemists, but it’s important to fight cautiously and avoid taking unnecessary damage.
When only the Regent of the Mask remains, follow the standard strategy to defeat him, but be more careful than normal. There’s a second Regent of the Mask that spawns when the first one dies.
As this is a Master Ninja mission, your retries are limited and you don’t want to have to start over at the beginning of the mission again. Only attack after evading a combo, and do not use full combos.
Use one or two attacks, then slide away in case the Regent of the Mask attempts an Unblockable Grab.
MASTER 05
| DIFFICULTY: |
|

Mission Details
|
Wave |
Enemy |
Initial Force |
Reinforcements |
|---|---|---|---|
|
1 |
Epigonos Final Form |
3 |
3 |
Tactical Analysis
Wave 1: There’s only one wave in this mission, but it consists of six Epigonos in his Final Form, fighting three at a time. Unfortunately, there’s no easy way to approach this fight.
All the Epigonos are relatively aggressive, and even if you wait until one is using the Dragon Sword, it’s still best to let him attack, then counterattack with an Izuna Drop.
However, that’s difficult to do when you need to stay away from any Epigonos using the scythe.
And if any of the Epigonos are using the Dragon’s Claw, they can attack very quickly, making it difficult to evade while trying to engage another Epigonos.
Luckily, the battle area is relatively large, which gives you plenty of room to move around. Stay on one side of the area and wait until one of the Epigonos changes to the Dragon Sword.
If he’s away from the other two, rush over to him and wait for a combo. Evade the third and fifth attacks, then counter with an Izuna Drop.
You may have to take some risks because the Epigonos are rarely far apart, so pay close attention to the other two Epigonos and quickly move away if they approach.