
Kingdom Hearts HD 1.5 Remix Guide KHFM: Essentials Gummi Garage
Gummi Garage
Your gummi ship brings you to the worlds; without it, you wouldn’t be able to save anything more than Traverse Town. During your adventure, you will collect or buy gummi blocks that can be used to improve your ship’s offensive and defensive capabilities.
Gummi Space
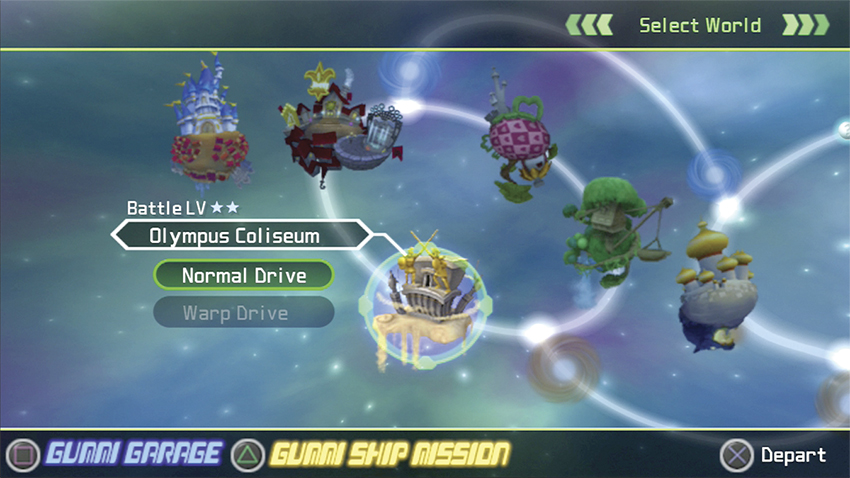
You can hop onboard your gummi ship at most save points. When you do, the Navigational Map pops up and you can choose to travel to one of the currently accessible worlds. A world with a keyhole symbol means it’s been locked, while those undiscovered will only show the world’s battle level. If “Normal Drive” is displayed, you will have to travel through dangerous space territory to reach the world; planets marked with “Warp Drive” can be directly jumped to without battling through gummi space.
Controlling Your Ship
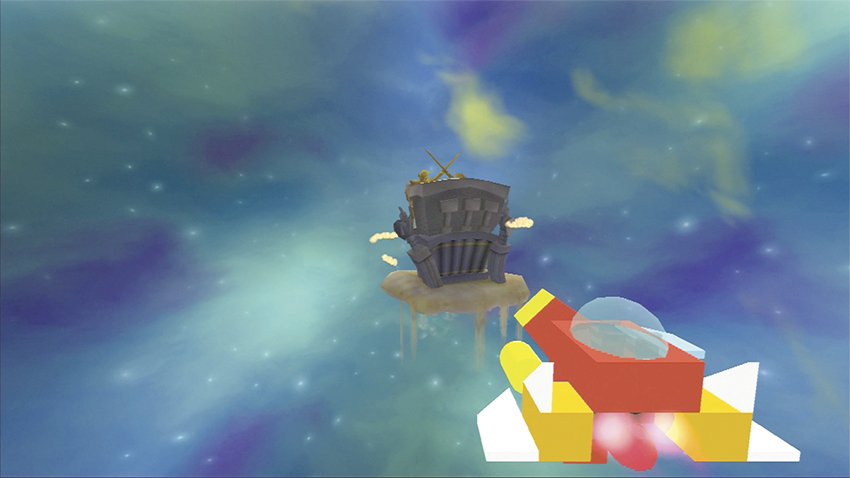
You can steer your gummi ship up and down, left and right, as you dodge obstacles and blast enemy spacecraft. You begin with basic capabilities and can upgrade your ship in the Gummi Garage with more advanced gummi blocks.
Flight Controls
| Action | Control | Details |
|---|---|---|
| Maneuver | left analog stick | Attach gummi blocks on the wings to improve flight responsiveness |
| Cannon |

|
Attach extra cannons to fire more shots simultaneously |
| Laser |

|
Laser consumes the blue power meter |
| Accelerate |

|
Haste-G or Haste2-G booster gummi blocks increase speed momentarily |
| Decelerate |

|
Deceleration, helpful to pick up items and avoid space debris |
| Arm | right analog stick | With Osmose-G equipped, tilt the right analog stick to attract items within a wide radius around the ship (consumes power meter) |
| Target Lock |

|
Hold to stabilize aim while moving ship around |
Flight Gauges
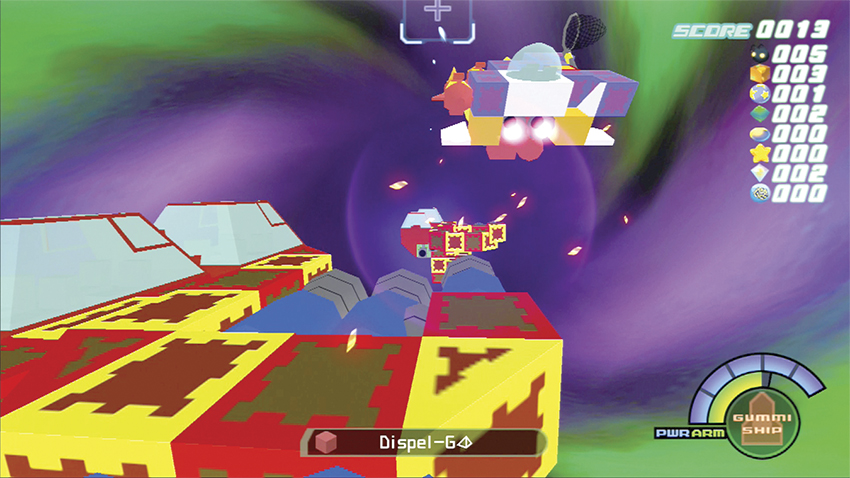
You have four readouts to monitor during gummi flight: armor, power, shield, and charge. For your starting ship, you won’t have to pay much attention to anything but your armor rating as you try to avoid obstacles, but as you redesign your ship, all these features will come into play.
Armor: Think of this as a gummi ship’s hit points. Lose all your armor and your gummi ship returns to your previous destination and you lose any gummi blocks that you accumulated on the trip. You can, however, replenish armor during flight by picking up items left behind by destroyed meteors. Adding gummi blocks with higher armor ratings will increase your ship’s armor.
Power: This is the fuel you need to operate certain gummi specialties, such as special weapons and Osmose-G blocks to attract floating items to your ship.
Shield: You must attach a Shield-G or Shield2-G to your ship to see this display. Shields act like extra armor; any hits to the ship first get absorbed by the shields before affecting armor.
Charge: You must attach a Haste-G or Haste2-G to your ship to see this display. Charge provides you with a turbo boost to quickly accelerate your ship for a short period of time. To use it again, you must wait for it to fully recharge.
Flight Routes
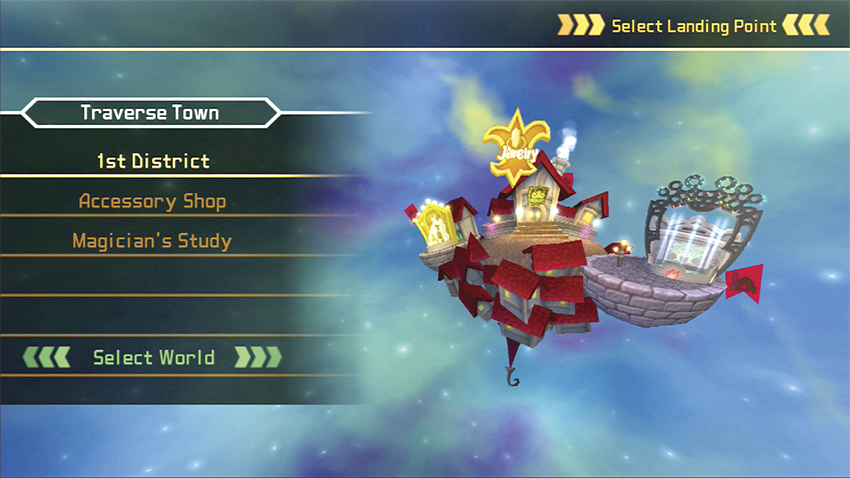
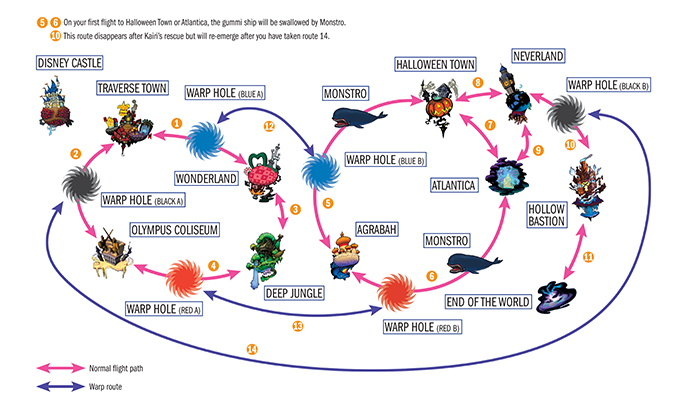
The gummi ship allows you to fly around the Navigational Map and reach distant worlds. As you progress in the game, certain warp holes will open up and give you further access to locations. Review the following for all the flight routes, normal versus warp paths, and any complications you may run into during your travels:
Space Combat
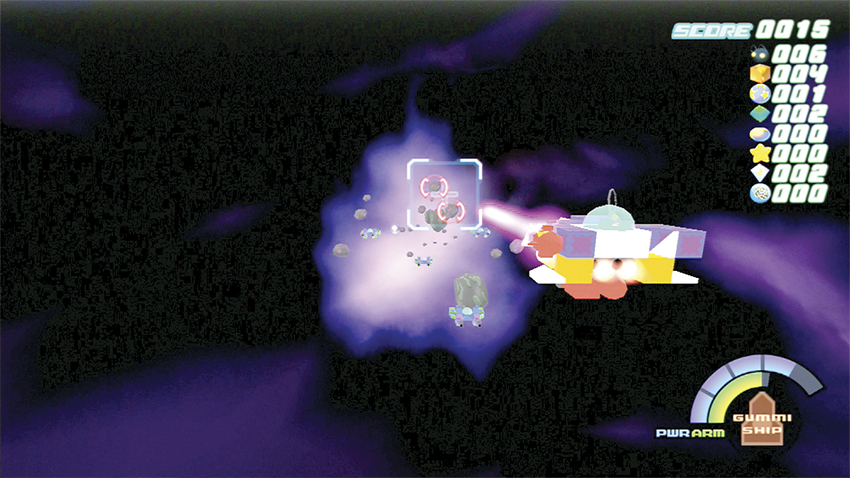
Out in space, you will fly through countless destructible and indestructible obstacles on your flights between worlds. Some obstacles are just in the way; either dodge them or blow them to smithereens. Many obstacles, though, give you special items if you destroy them. Learn your obstacles to take full advantage of their benefits.
Besides obstacles, you have enemies bent on your destruction. As with obstacles, you can evade or destroy them, but many will fight back. Upgrade your weapon early on to make sure you have the firepower to deal with big obstacles and more powerful enemies’ ships. Destroyed enemies leave behind gummi blocks, or 10 percent of the time they will leave behind a blueprint of their ship.
Space Obstacles
| Obstacle | HP | Damage | Item |
|---|---|---|---|
| Slab (blue) | 50 | 25 | Barrier |
| Small meteorite (green) | 50 | 25 | - |
| Medium-size meteorite (light blue) | 50 | 25 | Energy or Shield |
| Slab (yellow) | 200 | 25 | - |
| Small meteorite (purple) | 200 | 25 | - |
| Small meteorite (red) | 300 | 25 | - |
| Medium-size meteorite (blue) | 400 | 25 | - |
| Large meteorite (purple) | 400 | 50 | Special |
| Pole | 500 | 25 | - |
| Large meteorite (green) | 800 | 50 | Special |
| Slab (orange) | 1000 | 25 | - |
| Medium-size meteorite (green) | 1000 | 25 | - |
| Large meteorite (brown) | 2000 | 50 | Special |
| Barrier | * | 100 | - |
| Fossilized lava | * | 50 | - |
| Rock with holes | * | 50 | - |
| Ring | * | 25 | - |
| Cube | * | 25 | - |
If you start destroying things instead of evading them, you will start accumulating items. You can gain six different types of items by flying through the item as it floats in space. The following table explains each item, where it comes from, and what it’s good for:
Gummi Travel Items
| Item | From | Details |
|---|---|---|
| Gummi Block | Enemy Ship | Remodel your gummi ship |
| Blueprint | Enemy Ship | Build a new gummi ship |
| Shield | Obstacle | Replenishes armor by one-half segment |
| Barrier | Obstacle | Replenishes shield by one segment |
| Energy | Obstacle | Replenishes power by one segment |
| Special | Obstacle | Replenishes all gauges to full |
During your travels, you will be able to perform Gummi Ship Missions. Each world has three missions, and you earn points based on the mission requirements, such as destroying enemy ships or collecting items. For example, the “Survival of the Fittest” mission requires you to use two or fewer gummi blocks and arrive at your destination without taking any damage or using the brakes. To beat some of the tougher missions or to skyrocket your high score, build gummi ships that are tailored specifically for a certain mission.
Enemy Ships
| Enemy Ships | ||||
|---|---|---|---|---|
| Route | Opponent | HP | Damage | Items * |
| 1 | Atomos 2 | 250 | 100 | Protect-G (1), Dispel-G (7), Dispel-G (3), Dispel-G (6) |
| 1, 2 | Ahriman 1 (fast) | 50 | 25 | Dispel-G (5), Protect-G (2), Protect-G (3), Protect-G (8) |
| 1, 2 | Ahriman 2 | 50 | 25 | Protect-G (1), Protect-G (5), Dispel-G (7), Protect-G (2) |
| 1, 2 | Alexander 2 | 3000 | 100 | Protect-G (1), Float-G 4, Float-G 6, Float-G 6 |
| 1, 2, 14 | Ahriman 1 (normal) | 50 | 25 | Protect-G (1), Aero-G 6, Aero-G 4, Aero-G 4 |
| 1, 2, 3, 4 | Goblin | 50 | 25 | Shell-G (1), Shell-G (3), Shell-G (2), Dispel-G (1) |
| 1, 11 | Sylph 2 | 50 | 25 | Protect-G (2), Protect-G (4), Protect-G (2), Dispel-G (1) |
| 2, 4 | Ramuh 1 | 150 | 100 | Dispel-G (2), Protect-G (8), Shell-G (3), Shell-G (8) |
| 2, 4 | Ramuh 2 | 150 | 100 | Shell-G (3), Protect-G (7), Shell-G (2), Shell-G (6) |
| 2, 4 | Shiva 1 (fast) | 50 | 25 | Protect-G (2), Aerora-G 6, Aerora-G 4, Aerora-G 4 |
| 2, 4, 14 | Shiva 1 (normal) | 50 | 25 | Protect-G (1), Dispel-G (4), Shell-G (3), Dispel-G (1) |
| 3 | Golem 2 | 3000 | 100 | Shell-G (2), Protect-G (7), Aero-G SQ, Shell-G (7) |
| 3, 4 | Cindy 1 (fast) | 50 | 25 | Shell-G (3), Shell-G (5), Aero-G SQ, Dispel-G (1) |
| 3, 4 | Odin 2 | 500 | 100 | Protect-G (3), Aeroga-G 6, Aeroga-G 4, Aeroga-G 4 |
| 3, 4, 10, 11 | Cindy 2 | 50 | 25 | Shell-G (2), Shell-G (1), Shell-G (2), Shell-G (6) |
| 3, 4, 14 | Cindy 1 (normal) | 50 | 25 | Aero-G 6, Aero-G 4, Aero-G 4, Shell-G (2) |
| 3, 5, 6 | Sylph 1 | 50 | 25 | Protect-G (3), Protect-G (5), Dispel-G (3), Aero-G SQ |
| 5 | Typhoon 1 | 6000 | 100 | Protect-G (3), Shell-G (4), Dispel-G (8), Protect-G (8) |
| 5 | Typhoon 2 | 3000 | 100 | Protect-G (2), Aerora-G 6, Aerora-G 4, Aerora-G 4 |
| 5, 6 | Adamant 1 | 50 | 50 | Shell-G (3), Float-G 6, Float-G 4, Float-G 4 |
| 5, 6 | Carbuncle 1 (normal) | 50 | 25 | Protect-G (3), Shell-G (7), Aero-G SQ, Dispel-G (3) |
| 5, 6 | Carbuncle 1 (fast) | 50 | 25 | Shell-G (1), Float-G 6, Float-G 4, Float-G 4 |
| 5, 6, 7, 8, 9 | Mindy (normal) | 50 | 25 | Dispel-G (1), Tornado-G 4, Tornado-G 6, Tornado-G 6 |
| 5, 7, 8 | Atomos 1 | 1000 | 100 | Shell-G (1), Shell-G (8), Shell-G (1), Shell-G (3) |
| 5, 7, 8 | Bomb 1 (normal) | 50 | 25 | Shell-G (3), Shell-G (3), Shell-G (8), Dispel-G (1) |
| 5, 7, 8 | Bomb 1 (fast) | 50 | 25 | Dispel-G (1), Aeroga-G 6, Aeroga-G 4, Aeroga-G 4 |
| 5, 7, 8 | Golem 1 | 3000 | 100 | Protect-G (3), Shell-G (7), Shell-G (8), Dispel-G (8) |
| 5, 7, 8 | Sandy | 50 | 25 | Shell-G (2), Shell-G (5), Shell-G (1), Shell-G (2) |
| 5, 7, 8, 9 | Bomb 2 (fast) | 50 | 25 | Dispel-G (2), Dispel-G (1), Dispel-G (2), Dispel-G (3) |
| 6 | Carbuncle 2 | 50 | 25 | Shell-G (2), Protect-G (4), Shell-G (1), Shell-G (1) |
| 6 | Diablos 2 | 2000 | 100 | Protect-G (3), Protect-G (5), Dispel-G (2), Protect-G (7) |
| 6, 7, 9, 10, 11, 12 | Deathguise 1 | 300 | 100 | Shell-G (3), Aero-G SQ, Dispel-G (3), Dispel-G (6) |
| 6, 10 | Lamia 3 (fast) | 50 | 25 | Protect-G (2), Tornado-G 4, Tornado-G 6, Tornado-G 6 |
| 6, 10, 11 | Lamia 3 (normal) | 50 | 25 | Protect-G (2), Aero-G 6, Aero-G 4, Aero-G 4 |
| 7, 9 | Lamia 1 | 50 | 25 | Protect-G (1), Protect-G (6), Protect-G (1), Dispel-G (2) |
| 7, 9 | Lamia 2 | 50 | 25 | Protect-G (2), Protect-G (8), Dispel-G (4), Protect-G (4) |
| 8, 9 | Catoblepas 1 | 50 | 50 | Protect-G (1), Protect-G (6), Protect-G (3), Dispel-G (1) |
| 8, 9 | Catoblepas 2 | 50 | 50 | Protect-G (3), Aerora-G 4, Aerora-G 6, Aerora-G 6 |
| 8, 9 | Diablos 1 | 2000 | 100 | Protect-G (2), Aeroga-G 4, Aeroga-G 6, Aeroga-G 6 |
| 8, 9 | Stingray 1 (normal) | 50 | 25 | Protect-G (2), Float-G 6, Float-G 4, Float-G 4 |
| 8, 9, 10, 11, 12 | Stingray 2 | 50 | 25 | Aero-G SQ, Shell-G (4), Dispel-G (5), Shell-G (5) |
| 8, 9, 12 | Bomb 2 (fast) | 50 | 25 | Dispel-G (3), Aero-G 4, Aero-G 6, Aero-G 6 |
| 9 | Mindy (fast) | 50 | 25 | Shell-G (1), Protect-G (4), Shell-G (3), Shell-G (2) |
| 9 | Stingray 1 (fast) | 50 | 25 | Protect-G (3), Shell-G (4), Protect-G (2), Shell-G (4) |
| 10 | Adamant 2 | 50 | 50 | Dispel-G (2), Shell-G (6), Dispel-G (1), Dispel-G (2) |
| 10 | Serpent | 100 | 50 | Protect-G (1), Aero-G 4, Aero-G 6, Aero-G 6 |
| 10 | Shiva 2 (fast) | 50 | 25 | Shell-G (1), Float-G 4, Float-G 6, Float-G 6 |
| 10, 11 | Deathguise 2 (normal) | 500 | 100 | Dispel-G (2), Aerora-G 4, Aerora-G 6, Aerora-G 6 |
| 10, 11, 12 | Deathguise 2 (fast) | 500 | 100 | Dispel-G (3), Shell-G (4), Dispel-G (5), Shell-G (4) |
| 10, 11, 14 | Shiva 2 (normal) | 50 | 25 | Protect-G (3), Dispel-G (8), Dispel-G (3), Dispel-G (2) |
| 10, 12 | Leviathan 1 | 1000 | 100 | Shell-G (2), Protect-G (7), Shell-G (1), Dispel-G (1) |
| 11 | Alexander 1 | 15000 | 100 | Protect-G (2), Tornado-G 6, Tornado-G 4, Tornado-G 4 |
| 11 | Omega 1 | 3000 | 100 | Protect-G (1), Dispel-G (5), Dispel-G (3), Dispel-G (2) |
| 11 | Omega 2 (normal) | 3000 | 100 | Protect-G (3), Shell-G (7), Protect-G (2), Dispel-G (3) |
| 11 | Omega 2 (fast) | 3000 | 100 | Protect-G (1), Float-G 4, Float-G 6, Float-G 6 |
| 11 | Omega 3 | 6000 | 100 | Protect-G (2), Protect-G (4), Protect-G (1), Dispel-G (1) |
| 12 | Leviathan 2 | 250 | 100 | Shell-G (1), Dispel-G (4), Aero-G 6, Dispel-G (2) |
| 13 | Imp | 50 | 25 | Dispel-G (1), Protect-G (7), Dispel-G (3), Dispel-G (2) |
| 13 | Remora | 50 | 25 | Shell-G (3), Protect-G (5), Aero-G 6, Aero-G 6 |
| 13 | Siren 1 | 50 | 25 | Protect-G (1), Aeroga-G 6, Aeroga-G 4, Aeroga-G 4 |
| 14 | Ifrit 1 | 50 | 50 | Shell-G (2), Aeroga-G 4, Aeroga-G 6, Aeroga-G 6 |
| 14 | Ifrit 2 | 50 | 50 | Shell-G (2), Dispel-G (8), Shell-G (1), Dispel-G (3) |
| 14 | Odin 1 | 500 | 100 | Protect-G (2), Dispel-G (3), Protect-G (1), Dispel-G (7) |
| 14 | Siren 2 | 50 | 25 | Protect-G (3), Dispel-G (5), Protect-G (1), Dispel-G (1) |
*Only one of the items from the list will appear, with the following probability: 1st item -- 40%; 2nd item -- 30%; 3rd item -- 20%; and 4th item -- 10%.
In the Garage
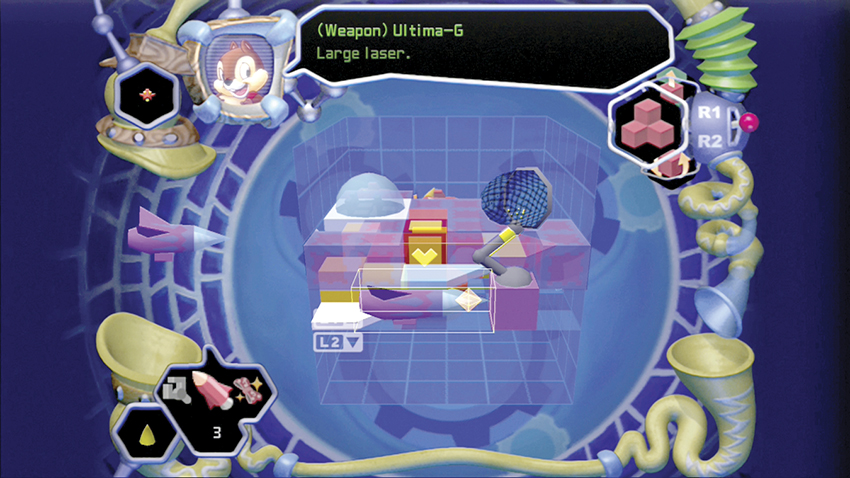
So you want to create a new gummi ship? Enter the Gummi Garage from the Navigational Map and watch Chip and Dale’s tutorial the first time you visit the garage. Experiment with the garage controls and repeat the tutorial if you need any more help. Explore the three-dimensional garage space and don’t be afraid to try different combinations. Most of all, have fun!
Garage Controls
| Mode | Input | Description |
|---|---|---|
| Select | directional buttons Up / Down | Scroll through gummi blocks |
| Select | directional buttons Left / Right | Scroll through gummi block classes |
| Select | left analog stick | Rotate gummi block |
| Select | right analog stick | Rotate view of grid |
| Select |
|
Paint (requires spray) |
| Select |
|
Color palette (in paint mode, requires palette) |
| Select |
|
Exit to gummi menu |
| Select |
or
|
Build Mode |
| Build | directional buttons | Move cursor / gummi according to view |
| Build | left analog stick | Rotate selected gummi block |
| Build | right analog stick | Rotate view of grid |
| Build |

|
Move cursor up on the grid |
| Build |

|
Move cursor down on the grid |
| Build |
|
Start from scratch (when entire ship is selected) |
| Build |
|
Select entire ship |
| Build |
|
Detach selected gummi |
| Build |
|
Attach gummi |
| Build |
Hold
|
Reposition selected gummi |
| Build |
|
Return to Select Mode |
| Build |

|
Enter Inspect Mode |
| Build |

|
Build Mode gummi guide |
| Inspect | right analog stick | Rotate gummi ship |
| Inspect |
|
Zoom in |
| Inspect |
|
Zoom out |
| Inspect |
|
Display features |
| Inspect |
|
Display report |
| Inspect |
or
|
Return to Build Mode |
| Inspect |
|
Test equipment |
| Inspect |
|
Inspect / Select Mode gummi guide |
| Inspect |

|
Exit to Gummi Garage |
Select the Garage option when you’re ready to build. You’ll see a list of all your blueprints: blue are for ships that you’ve saved; green must be built to the specifications of the model. If you don’t have enough gummi blocks to complete a ship, you can start building it and save it for further remodeling later. As you acquire new gummi blocks they will appear in the garage ready for your favorite vessel or brand-new ship.
Gummi Ship Blueprints
| Blueprint | Condition |
|---|---|
| Kingdom | Basic ship |
| Geppetto | Defeat Parasite Cage (second time) and speak to Geppetto |
| Cid | Defeat 500 Heartless, then speak with Geppetto |
| Cactuar | Defeat 1000 Heartless, then speak with Geppetto |
| Yuffie | Defeat 1500 Heartless, then speak with Geppetto |
| Aerith | Defeat 3000 Heartless, then speak with Geppetto |
| Leon | Defeat 4000 Heartless, then speak with Geppetto |
| Hyperion | Defeat 5000 Heartless, then speak with Geppetto |
| Chocobo | Visit Geppetto’s House in Traverse Town 30 times, then speak with Pinocchio |
| All Others | 10% chance after ship’s destruction |
Certain blueprints will require you to upgrade your computer system or construction area. If a blueprint’s model is too complex for your current setup, talk to Cid about purchasing a COM.LV2 or COM.LV3 upgrades. If a blueprint’s model is too large for your current setup, talk to Cid about purchasing the SYS.UP1 and SYS.UP2 upgrades.
Next, select a gummi block. Left and right alters the type of block, from cockpit to weapon; up and down selects the specific gummi block you want to equip. You can rotate the block and/or the ship to find the best fit, then confirm your choice. A green dot above the confirmation symbol means the block can be installed, while red means the selected block is either not available or is incompatible with an existing ship part.
Check that your gummi ship has all the parts you want in your garage before you save it. For example, you want your Engine blocks facing to the rear and you don’t want to forget to include weapons before leaving on missions.
Gummi Blocks
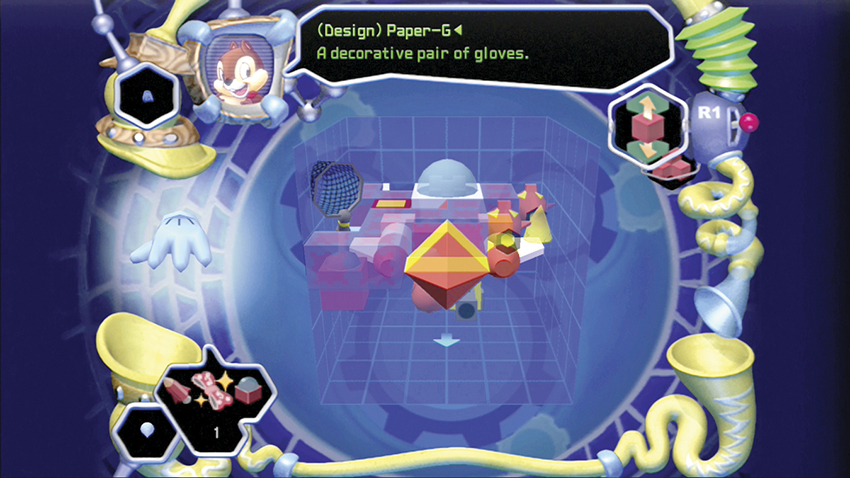
There are a ton of options for your gummi ships. The best way to discover what you like is to play around with the gummi blocks that you find or purchase. Create various ships with different configurations to see which will be the keeper.
To help you get started, here’s the rundown on the main types of gummi blocks. See the “Gummi Parts” table for details on all the blocks.
Armor: As discussed before, armor is your ship’s HP rating. Gummi blocks like Shell-G and Protect-G increase your armor.
Cockpits: You can’t fly without one! It’s your seat, after all. Cure-G and Curaga-G cockpits increase the benefits from armor as you collect recovery items, while Life-G and Full-Life-G cockpits automatically refill a portion of the armor gauge once during flight if your armor reaches zero.
Engines: These determine how fast your ship cruises. Fire-G, Flare-G, and Holy-G are examples of engine gummi blocks. Holy-G is the speediest and will rocket you through space, but you might want a slower engine if you plan on collecting items.
Weapons: You can have up to 10 weapons on certain gummi ships! The Thunder class of gummi provides your firepower, and Ultima-G is the finest weapon available. It will blast through some enemies and hit the enemies behind them as well, or it might loop around to strike the same enemy ship twice. Stack smaller weapons to form a barrage that obliterates enemies in one or two shots.
Wings: Your maneuverability is based on your wing gummi, which include the Aero class, Float-G, and Tornado-G.
Special Gummis: Add new capabilities to your ship with gummis like Scan-G to spy enemy armor points and Osmose-G to suck items toward your craft.
Gummi Parts
Cockpits
| Name | Size | Max | Price | Armor |
|---|---|---|---|---|
| Cure-G | 2x2x2 | 1 | - | 200 |
| Curaga-G | 2x2x2 | 1 | 500 | 200 |
| Life-G | 2x2x2 | 1 | 750 | 200 |
| Full-Life-G | 2x2x2 | 1 | - | 200 |
Engines
| Name | Size | Max | Price | Armor | TopSpd | LowSpd | Horsepower |
|---|---|---|---|---|---|---|---|
| Fire-G | 1x1x1 | 6 | 120 | 10 | 80 | 60 | 10 |
| Fira-G | 1x1x2 | 6 | 250 | 20 | 90 | 70 | 20 |
| Firaga-G | 2x2x2 | 4 | 500 | 30 | 100 | 80 | 50 |
| Flare-G | 1x1x3 | 4 | 1000 | 40 | 110 | 90 | 30 |
| Holy-G | 2x2x2 | 2 | 1500 | 50 | 120 | 100 | 80 |
Wings
| Name | Size | Max | Price | Sell | Armor | Handling |
|---|---|---|---|---|---|---|
| Aero-G | 1x1x1 | 99 | 20 | 1 | 5 | 98 |
| Aero-G | 1x1x1 | 99 | 20 | 1 | 5 | 98 |
| Aero-G | 1x1x1 | 99 | 20 | 1 | 5 | 98 |
| Aerora-G | 1x1x2 | 30 | 40 | 2 | 15 | 105 |
| Aerora-G | 1x1x2 | 30 | 40 | 2 | 15 | 105 |
| Aeroga-G | 1x1x3 | 20 | - | 4 | 12 | 110 |
| Aeroga-G | 1x1x3 | 20 | - | 4 | 12 | 110 |
| Float-G | 1x1x3 | 10 | - | 3 | 8 | 110 |
| Float-G | 1x1x3 | 10 | - | 3 | 8 | 110 |
| Tornado-G | 2x1x2 | 10 | - | 5 | 10 | 120 |
| Tornado-G | 2x1x2 | 10 | - | 5 | 10 | 120 |
Armor
| Name | Size | Max | Price | Sell | Armor |
|---|---|---|---|---|---|
| Protect-G | 1x1x1 | 99 | 20 | 2 | 5 |
| Protect-G | 1x1x1 | 99 | 20 | 2 | 3 |
| Protect-G | 1x1x1 | 99 | 20 | 2 | 3 |
| Protect-G | 1x1x1 | 30 | 20 | 2 | 4 |
| Protect-G | 1x1x1 | 30 | 20 | 2 | 4 |
| Protect-G | 1x1x1 | 10 | 20 | 2 | 3 |
| Protect-G | 1x1x1 | 10 | 20 | 2 | 3 |
| Protect-G | 1x1x1 | 10 | 20 | 2 | 3 |
| Shell-G | 1x1x1 | 99 | - | 3 | 10 |
| Shell-G | 1x1x1 | 99 | - | 3 | 5 |
| Shell-G | 1x1x1 | 99 | - | 3 | 5 |
| Shell-G | 1x1x1 | 20 | - | 3 | 7 |
| Shell-G | 1x1x1 | 20 | - | 3 | 7 |
| Shell-G | 1x1x1 | 8 | - | 3 | 5 |
| Shell-G | 1x1x1 | 8 | - | 3 | 5 |
| Shell-G | 1x1x1 | 8 | - | 3 | 5 |
| Dispel-G | 1x1x1 | 99 | - | 4 | 15 |
| Dispel-G | 1x1x1 | 99 | - | 4 | 7 |
| Dispel-G | 1x1x1 | 99 | - | 4 | 7 |
| Dispel-G | 1x1x1 | 10 | - | 4 | 12 |
| Dispel-G | 1x1x1 | 10 | - | 4 | 12 |
| Dispel-G | 1x1x1 | 6 | - | 4 | 7 |
| Dispel-G | 1x1x1 | 6 | - | 4 | 7 |
| Dispel-G | 1x1x1 | 6 | - | 4 | 7 |
Special Gummis
| Name | Size | Max | Price | Armor | Energy Use |
|---|---|---|---|---|---|
| Drain-G | 4x1x1 | 4 | 500 | 15 | 1 |
| Drain-G | 4x1x1 | 4 | 500 | 15 | 1 |
| Esuna-G | 1x1x1 | 6 | 400 | 10 | 0 |
| Esuna-G | 1x1x1 | 10 | 250 | 10 | 0 |
| Haste-G | 1x1x2 | 2 | 1000 | 30 | 0 |
| Haste2-G | 1x1x2 | 2 | 1500 | 30 | 0 |
| Osmose-G | 4x1x1 | 2 | 1000 | 15 | 1 |
| Osmose-G | 4x1x1 | 2 | 1000 | 15 | 1 |
| Warp-G | 1x1x1 | 1 | - | 0 | 0 |
| Transform-G | 1x1x1 | 1 | - | 10 | 1 |
| Scan-G | 1x2x1 | 2 | 250 | 15 | 0 |
| Scan-G | 1x2x1 | 2 | 500 | 15 | 0 |
| Shield-G | 1x1x2 | 1 | 500 | 10 | 0 |
| Shield2-G | 1x1x2 | 1 | 1500 | 10 | 0 |
Weapons
| Name | Size | Max | Price | Armor | Power | Power Use |
|---|---|---|---|---|---|---|
| Thunder-G | 1x1x2 | 10 | 500 | 25 | 50 | 0 |
| Thundara-G | 1x1x2 | 8 | 1000 | 30 | 75 | 0 |
| Thundaga-G | 1x1x3 | 6 | 1500 | 35 | 100 | 0 |
Lasers
| Name | Size | Total | Price | Armor | Power | Power Use |
|---|---|---|---|---|---|---|
| Comet-G | 1x1x2 | 8 | 500 | 30 | 1000 | 0.1 |
| Meteor-G | 1x1x2 | 6 | 1500 | 35 | 300 | 0.1 |
| Ultima-G | 1x1x3 | 4 | 2500 | 40 | 100 | 0.1 |
Ship Blueprints
| Blueprint | Def | Spd | Atk | Where Found |
|---|---|---|---|---|
| Kingdom | *** | * | * | Default model |
| Hyperion | *** | *** | *** | Defeat more than 5000 Heartless, learn all summons, talk to Geppetto |
| Geppetto | *** | * | * | At Geppetto's House, talk to Geppetto |
| Cid | *** | * | 0 | Defeat 500 Heartless, talk to Geppetto |
| Leon | *** | ** | ** | Defeat 4000 Heartless, talk to Geppetto |
| Yuffie | *** | * | 0 | Defeat 1500 Heartless, talk to Geppetto |
| Aerith | *** | * | ** | Defeat 3000 Heartless, talk to Geppetto |
| Cactuar | *** | * | 0 | Defeat 1000 Heartless, talk to Geppetto |
| Chocobo | *** | * | 0 | Enter Geppetto's House 30 times or more, then speak to Pinocchio |
| Cindy | ** | * | * | Defeat Cindy ships |
| Shiva | *** | * | * | Defeat Shiva ships |
| Lamia | ** | * | 0 | Defeat Lamia ships |
| Sandy | *** | * | 0 | Defeat Sandy ships |
| Sylph | *** | * | * | Defeat Sylph ships |
| Carbuncle | ** | * | 0 | Defeat Carbuncle ships |
| Mindy | *** | ** | ** | Defeat Mindy ships |
| Goblin | *** | * | * | Defeat Goblin ships |
| Bomb | ** | * | 0 | Defeat Bomb ships |
| Remora | ** | * | * | Defeat Remora ships |
| Ahriman | *** | ** | 0 | Defeat Ahriman ships |
| Imp | ** | * | 0 | Defeat Imp ships |
| Siren | ** | * | 0 | Defeat Siren ships |
| Stingray | * | * | 0 | Defeat Stingray ships |
| Catoblepas | ** | * | 0 | Defeat Catoblepas ships |
| Adamant | *** | * | * | Defeat Adamant ships |
| Serpent | *** | ** | * | Defeat Serpent ships |
| Ifrit | *** | * | * | Defeat Ifrit ships |
| Odin | *** | * | ** | Defeat Odin ships |
| Atomos | *** | * | * | Defeat Atomos ships |
| Golem | *** | * | * | Defeat Golem ships |
| Diablos | *** | *** | *** | Defeat Diablos ships |
| Deathguise | *** | ** | * | Defeat Deathguise ships |
| Typhoon | *** | ** | * | Defeat Typhoon ships |
| Alexander | *** | * | * | Defeat Alexander ships |
| Leviathan | *** | *** | *** | Defeat Leviathan ships |
| Ramuh | *** | *** | * | Defeat Ramuh ships |
| Omega | *** | * | 0 | Defeat Omega ships |