
Dragon Age II Guide Walkthrough Act Two Quests
Secondary Quests

Night Terrors
Start Location:
Requirements:
- Accept the letter from the Writing Desk.
- Speak to Arianni in Lowtown’s elven alienage, then select your party for the journey.
- You can complete three “puzzles” to gain a total of four attribute points for Hawke before you continue with the quest. See the diagrams below for a step-by-step guide.
- Puzzle #1: In the room that you arrive in, interact with the floating book to gain a single attribute point. In true Space Invaders tradition, focus on where the book will be – not where it actually is – to catch it.
- Puzzle #2 (Diagram 1): In the corridor to the east you will find the first of two “barrel puzzles”, where you must rearrange the containers into a specific order within a limited number of moves. If you fail, you lose the attribute point(s) on offer, and must fight a group of enemies. In this first instance you must rearrange the barrels so that the large ones are at the bottom, small ones at the top – and all within 18 moves.
- Puzzle #3 (Diagram 2): There is another puzzle in a room to the east. The objective here is hinted at by the drums on either side of the room. You must rearrange the containers to have a block of four red barrels in the center. You have 18 moves to achieve this, with two attribute points given if you succeed – and a fight if you fail.
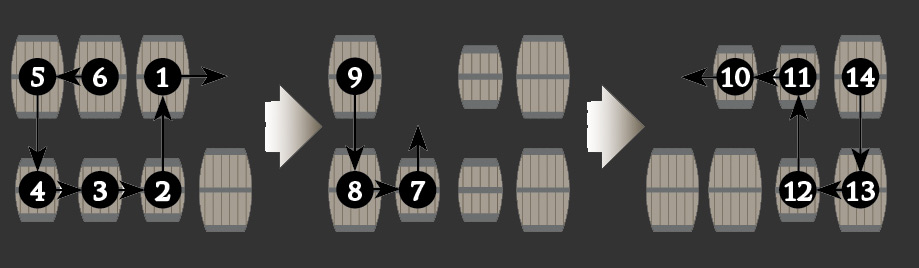
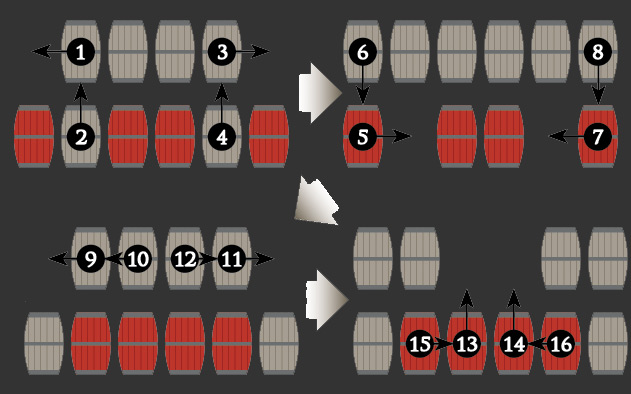
- Having claimed the available rewards, proceed into the central room. You will be greeted by the Sloth Demon (Torpor), who has a proposal: if Hawke can help him to possess Feynriel, he will offer a large reward.
- If Anders is in your party, he will object to any prospective deal with this demon. If you choose the “Back off, Anders!” option (in order to take the demon’s offer), you must fight him; his death expels him from the Fade, reducing your party by one (and with future repercussions – see Consequences).
- If you choose to negotiate, the demon can fulfill one of three potential desires: power (four Attribute Points), knowledge (one Talent Point) or magic (the unique Torpor’s Barrier Rune, which offers notable magic resistance when applied to armor). However, these rewards will only be delivered should Torpor actually take control of the elf. Your choice of payment is irreversible; the decision to sacrifice Feynriel is not. If you intend to go through with this betrayal, note that the Rune is a fine addition to companion armor.
- If you refuse the Sloth Demon’s advance, you must fight him and his cohorts immediately.
- Your actions within this shadowy realm influence Feynriel’s mental state; too much disharmony will destabilize his mind. The goal is to ensure that he suffers as little anguish as possible. Note that Feynriel’s mental state must be healthy to complete any deal with Torpor: again, see Consequences.
- Save your progress, then head into the east room first, via the door marked Feynriel’s Desires. In the scene that follows, there are three resolutions:
- If you attempt to persuade Feynriel to go with his father (in reality, the Desire Demon, Caress), his instability will increase dramatically.
- If you try to convince Feynriel that the scene isn’t real, his instability will increase marginally.
- To avoid an instability increase entirely, convince Feynriel to reject his father.
- In the aftermath of this dialogue, the furious Caress will remonstrate with Hawke.
- If Isabela is in your party, she will succumb to the Desire Demon’s promise and turn on Hawke. Killing her will expel her from the Fade.
- If Isabela is not in your party but Aveline is, she will turn on Hawke instead.
- You must defeat Pride (and Isabela or Aveline, if either are present) to continue. Take the initiative quickly, especially if you have been reduced to a single companion: strike with your most effective attacks and aim to at least incapacitate your opponents from the moment combat begins. Once the battle ends, travel through the main room to reach the Feynriel’s Pride door. Save, then enter.
- As with the earlier scene, the lines you choose in this second charade will affect Feynriel’s state of mind.
- If you play along with the Pride Demon’s attempt to make Feynriel accept his destiny as a Dreamer, and as prospective savior of the elves, his instability will greatly increase.
- Attempting to reveal the true nature of the situation will lead to a small instability hike.
- Encourage Feynriel to reject his “destiny” and raise concerns over what being a Dreamer could represent for no instability increase at all.
- The demon will not take kindly to Hawke’s interference, and will seek a very personal form of retribution before conventional combat ensues. This plays out in the same way as the equivalent situation with the Pride Demon (Wryme).
- If Merrill is in the party, she will accept the demon’s offer.
- If Fenris is in the party but Merrill is not, he will succumb to Wryme’s promises instead.
- If Varric is in the party but Merrill and Fenris are not, the storyteller will turn on Hawke.
- As with the battle with Caress, strike hard and fast to bring down Wryme before he can inflict any damage of note.
- On your return to the central room, the scene that greets you is dependant on your choices throughout the quest. If you made a deal with Torpor, there are three possibilities:
- If Feynriel’s mind has been twisted and wrought by Hawke’s malevolent or clumsy interference, Torpor will be incapable of possessing the elf. It will attack Hawke, furious at his inability to complete his part of the deal.
- If Feynriel’s mental state is good, select the “You’re safe” option to allow Torpor to take control of the Dreamer and deliver your desired boon.
- You can renege on the deal to save Feynriel, but that means fighting the demon and forgoing the reward it promised you earlier.
- If Feynriel is not possessed by Torpor, he will leave the Fade immediately. If his instability is high, he will beg Hawke to kill him. Agreeing will make him Tranquil.
Consequences:
- If Feynriel emerges unscathed by his journey through the Fade, a small reactive quest may be unlocked at the start of Act 3.
- If Torpor possesses Feynriel, you get a very different concluding cutscene and will have access to a reactive event in Act 3.
- A third narrative wrap-up is available if Feynriel is made Tranquil. This leads to no follow-up events of note and is the least profitable outcome.
Companion Guidance:
- Striking a deal with Torpor will cause a large rivalry increase with Anders. Picking the “Quiet, Anders!” option during the conversation with Keeper Marethari at the end of the quest will also annoy him severely. Accepting the blame, by contrast, meets with surprised (albeit slight) approval.
- Any companion beguiled by a demon (or, in Anders’ case, enraged by proxy) in the Fade will wish to speak to Hawke at their home or hangout when the quest ends. The possible results of these short companion quests are detailed below.
Night Terrors Reactivity
- Depending on your selection of companions during the Night Terrors quest and your choices during your time in the Fade, certain companions may wish to talk to you once you return to Kirkwall.
- With Anders, there is a big friendship increase if you select “It was a ruse” having saved Feynriel at the end; you will meet with unavoidably massive disapproval if you did not. The latter eventuality will also end any ongoing romance.
- For Isabela, forgive her and flirt (or pick the diplomacy option) for +10 friendship. Lambast her as a backstabber for the same in rivalry points.
- With all other companions, friendship and rivalry increases are very minor – and the result of each conversational choice is fairly obvious. Interestingly, Sebastian is incorruptible in the Fade, which is very useful on the Nightmare difficulty.
Herbalist’s Tasks
Start Location:
Requirements:
- You must have completed the equivalent quest during Act 1.
- Speak to Solivitus and offer your assistance once again.
- The Harlot’s Blush Flower is located in the northwest of the Wounded Coast. It’s just in front of the cave that you enter for the Search and Rescue side quest.
- Dalish Tattoo Ink can be acquired from a chest inside the Dalish Camp at the base of Sundermount. You can talk about this ingredient with Master Ilen, but his response is not favorable: you have to steal it.
- The Varterral Heart is obtained from the creature fought at the end of Merrill’s companion quest, Mirror Image.
-
Return the ingredients to Solivitus in the Gallows to pick up your payment.
Fool’s Gold
Start Location:
-
Hightown
Requirements:
- Only available if Nathaniel died or wasn’t recruited in Dragon Age: Origins – Awakening, or if you chose the Hero of Ferelden character background during the Prologue.
- Speak to Yevhen and agree to help.
- After accepting the quest, set out for the Deep Roads via the World Map. Ideally, try to equip your mages with weapons that inflict spirit or nature damage: the darkspawn await…
- When you reach Emrys you are given a choice between saving Merin or going to Iwan’s aid in order to obtain an apparently powerful weapon. There is only time to complete one objective: rescue one brother, and the other will die. (Note that the area south of Emrys features two waves of assorted spider enemies: a potentially tricky battle, but certainly worth the XP and loot.)
- If you choose Merin, he can be found a short walk to the north. There are two Darkspawn Emissaries here, powerful mages who can tear through a well-prepared party with disturbing ease. Deal with these immediately. After the battle ends, speak to Merin, then travel south to find Iwan’s body and retrieve the Golem Control Rod.
- If you choose Iwan, head straight to his position to the northeast. On arrival, you’ll find him fighting a much smaller collection of darkspawn. In the conversation that follows you can either pay him for the Golem Control Rod, attempt to threaten him or have Varric step in to negotiate if present. The latter solution is the neatest of the three. You can optionally return to fight the collection of enemies that attacked Merin (see above) for additional XP before you continue.
- At this point, both paths converge. Interact with the Golem when you reach it to acquire a new ally, then fight your way past its less governable peers: cold and electricity attacks work best. There’s a nasty battle with darkspawn just beyond this point that features an Emissary and an Ogre. You may find it prudent to pull back up the steps behind your position when they appear. The contents of the Treasure Cache depend on which brother you save. For noble Merin, you get a sizable sum of sovereigns; if you saved the conniving, heartless Iwan, there’s substantially less currency but two unique weapons and a selection of loot.
- Whichever brother you save, collect the Lyrium-Laced Bilge Hoop from the treasure room at the end of the map to begin the side quest of the same name. Return to Hightown and speak with Yevhen.
Consequences:
- Those who save Iwan have the option of revealing his betrayal to his father.
- If you accept Fool’s Gold, you cannot undertake the Finding Nathaniel quest in Act 3. It is only possible to play one of these two quests in a given playthrough.
Raiders on the Cliffs
Start Location:
Requirements:
- This quest is triggered by walking along the path that leads to the southernmost section of the Wounded Coast area.
- Approach Lieutenant Harley to hear an appraisal of the situation. Both Aveline and Isabela have interesting reactions to this quest, so it might be worth bringing them along. You have three choices:
- You can offer to fight alongside the guardsmen. Players who favor diplomatic or aggressive speech responses can use a unique dialogue option to inspire these allies before the battle begins. This is definitely the easier option.
- Walk away. You can return to complete the quest later, but Aveline will express mild disapproval if present.
- Mount an attack on the gang without any support from the guardsmen. This is tough, but by no means insurmountable. Once again, Aveline will be a little irked by this: why can’t her guards contribute to the fight?
- The area is littered with traps, with some being the complex variety (requiring 30 Cunning to disarm). Having your rogue lead the way can keep your party safe and act as a good source of XP. If you carefully micromanage this battle and head straight to the center of the roughly pretzel-shaped area (where most enemies are concentrated), you can actually disarm most of these afterwards.
- The most deadly opponent in this battle is Fell Orden, a blood mage. As is traditional in these instances, concentrate your party’s fire on him to remove his baneful presence as soon as you can. Orden drops the Swatch of the Jackyard (which begins the related side quest), and the Flex-Chain – Guardsman Pattern armor upgrade for Aveline.
- Visit the Viscount’s Keep and speak with Jelden to be reimbursed for your labors.
Consequences:
- If you complete this quest, the leader of Evets Marauders may attempt to exact revenge during a visit to the Wounded Coast in Act 3.
Inside Job
Start Location:
Requirements:
- You must have completed The Bone Pit in Act 1.
- Complete Prime Suspect.
- Read the letter at the Writing Desk.
- Speak to Hubert in Hightown. Accepting the quest will automatically transport you to a location where Hubert has a man accused of theft tied to a chair. Pick diplomatic options (and promise to look after the miner’s family) to learn the location of his stolen goods. After you decide the prisoner’s fate, there is another automatic area transition.
- On arrival at the Outside Kirkwall map there is a short ambush by mercenaries. Scour the small area for collectibles, then travel to Darktown. Head to Lilley’s waypoint marker. In the dialogue that follows, you can either persuade the Coterie representatives of your innocence, or fight them (via aggressive options) for additional XP.
- A small group of thugs await just inside Brekker’s Hideaway, but these can be dismissed with ease. The second group features a Coterie Alchemist. Disable him immediately; if you don’t, he will likely teleport to the upper level and rain destruction upon your party. The battle against Brekker at the waypoint starts slowly, but soon picks up momentum as three Coterie Rogues enter the fray. If you’re quick, you can kill your principle target before they arrive.
-
Leave the area via the nearby exit and return to Hubert.
Companion Guidance:
- Accepting the letter from the Writing Desk also causes Hubert’s Fine Goods to reopen in Hightown.
- Unlocks a linear sequence of quests based around the Bone Pit Mines. This begins with Cave Crawling. If you took pity on Sabin and treated him with nothing but kindness, you will find Sabin’s Stash in a crate when you next visit the Bone Pit.
Cave Crawling
Start Location:
Requirements:
- Complete Inside Job.
- Visit the Bone Pit and approach Jansen.
- After speaking with Jansen, collect the Petrified Human Finger from a sack south of the mine entrance to begin the Wentworth’s Sixth Finger side quest.
- Enter the Bone Pit Mines. The Queen Spider is just inside the entrance and is supported by a few waves of her smaller kin. Anything that causes electricity damage will shorten this battle considerably. Scavenge the area for loot, then leave and return to Jansen.
Consequences:
- Unlocks Cavern of Dead.
Cavern of Dead
Start Location:
Requirements:
- Complete Cave Crawling.
- Speak to Jansen
- If you have only just completed Cave Crawling, note that you must leave the Bone Pit for another area and return to activate this quest.
- Access the Bone Pit Mines through a new entrance further east. As you face undead opponents throughout this short quest, weapons or attacks that cause spirit or electricity damage will be something of a boon.
- You can reach the central area where the Arcane Horror awaits by taking the north or east corridors. Both have traps placed across the first doorway that you reach, with a small but solid group of undead foes poised to take advantage of those caught unawares.
- The Arcane Horror is supported by a Revenant and other undead troops, with the Skeleton Archers being a particular headache for weaker mages. Retreating to the small chamber to the west will enable you to draw your opponents out gradually, and turn the access corridor into an avenue of easy slaughter.
- Pillage to your heart’s desire, then report back to Jansen.
Consequences:
- Unlocks Pick Up Pickaxes.
Pick Up Pickaxes
Start Location:
Requirements:
- Complete Cavern of Dead.
- Speak to Jansen.
- If you have only just completed Cavern of Dead, you must leave the Bone Pit and return to activate this quest.
- After agreeing to help, travel to Lowtown and visit the Smith standing next to the Armor Stand. The pickaxes cost a hefty 15 sovereigns, but this expense is the only way to complete the quest.
Consequences:
- Hubert has short reactions to Cave Crawling, Cavern of Dead and Pick Up Pickaxes. The latter will confirm the sinking feeling that you may be experiencing after paying such an exorbitant sum for a relatively minor 1,000 XP…