
Dragon Age II Guide Essentials Strategy & Analysis
Useful Features
Onscreen Display
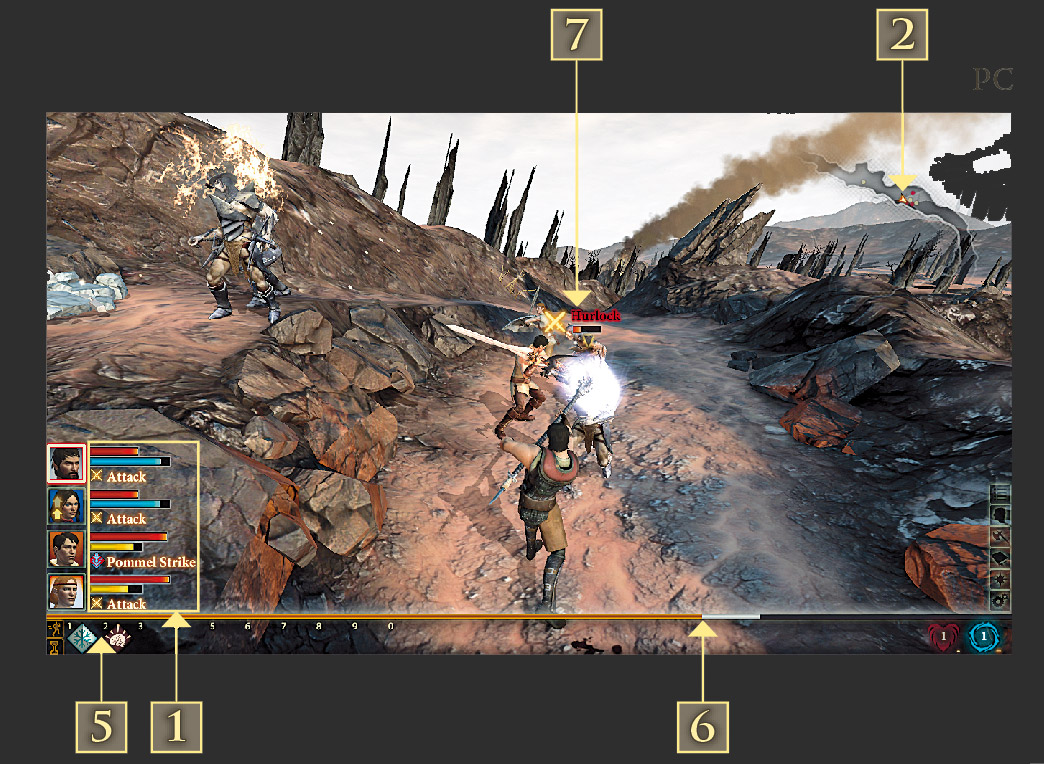
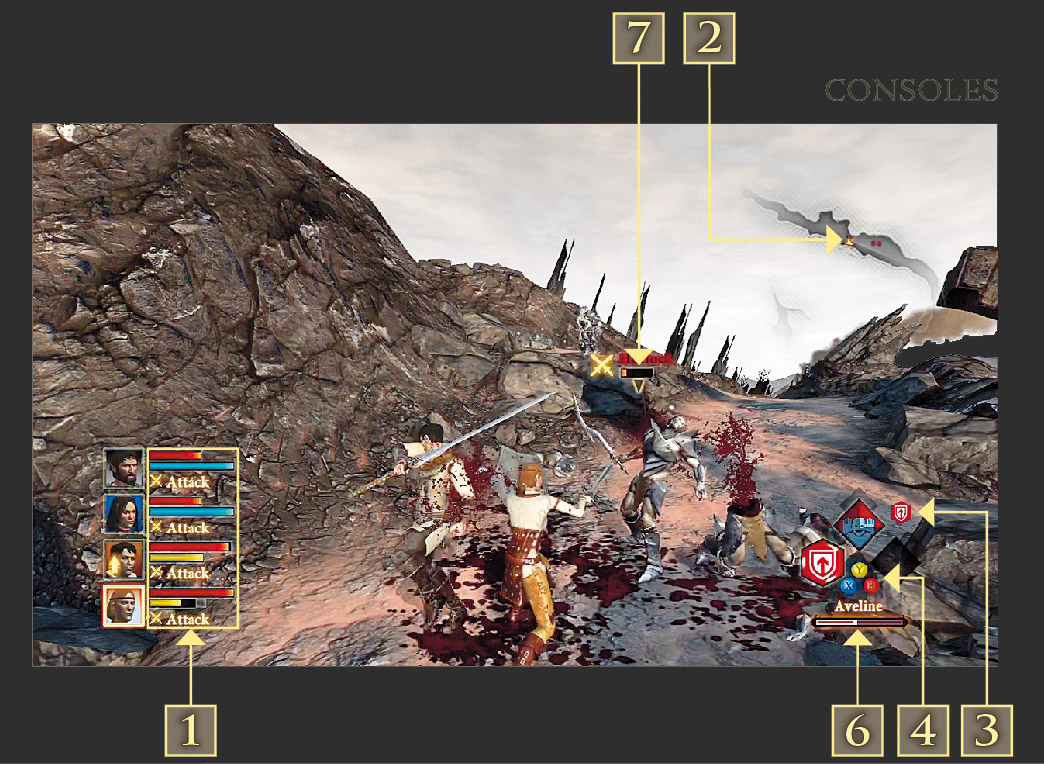
1. Party Gauges: These provide information on the status of Hawke and his active companions.
- The box highlight indicates the character currently under your direct control.
- The red bar is the health gauge. When this is exhausted during combat, a character is rendered unconscious and can play no further part until combat ends (or, later in the game, is revived).
- The bar beneath indicates a character’s current stamina (yellow) or mana reserves (blue – mages only). This is required to use the majority of abilities acquired during the course of the story.
- During combat, simple descriptions of each party member’s actions or reactions will appear beneath the above gauges. You can use these prompts to keep track of companions outside your field of view.
- If a party member is ready to level up, an animated arrow will appear within their portrait window.
2. Minimap: This shows an outline view of your current surroundings, including significant points of interactivity. See “Maps” overleaf for further information.
3. Sustained Abilities & Status Effects: These icons indicate which status effects or sustained abilities are affecting the currently selected party member. A red hue denotes a harmful status effect inflicted by an opponent; a clockwise fill indicates the time remaining until this effect elapses.
4. Battle Menu Shortcuts (Xbox 360 & PS3 only): By default, this display shows the first set of three abilities that can be performed with the Battle Menu Shortcut buttons. Hold the Shortcut button to both view and activate abilities in the second set.
5. Quickbar (PC only): Those playing the PC version can assign up to ten keyboard shortcuts for abilities, and have a further nine mapped to the quickbar for easy access with a mouse. From the Abilities menu, simply drag the talents or spells of your choice to the slots at the bottom of the screen. The quickbar also features shortcuts that correspond to Radial Menu options in the console releases.
6. XP Gauge: This bar gives an approximate indication of how far the selected character has to progress until they level up. Sums of XP awarded after battles or from specific feats will appear briefly to the left of this meter.
7. Current Target: This icon indicates your current target; the enemy in question will also be surrounded by a fairly subtle highlight and have its name displayed. When you use an activated ability that covers a specific area (rather than an individual opponent), all adversaries within its effect range will be emphasized in this manner. During combat, the allegiance of all participants is denoted by a circle at their feet: red for enemies, yellow for companions and blue for other allies.
Radial Menu (Xbox 360 & PS3 Only)
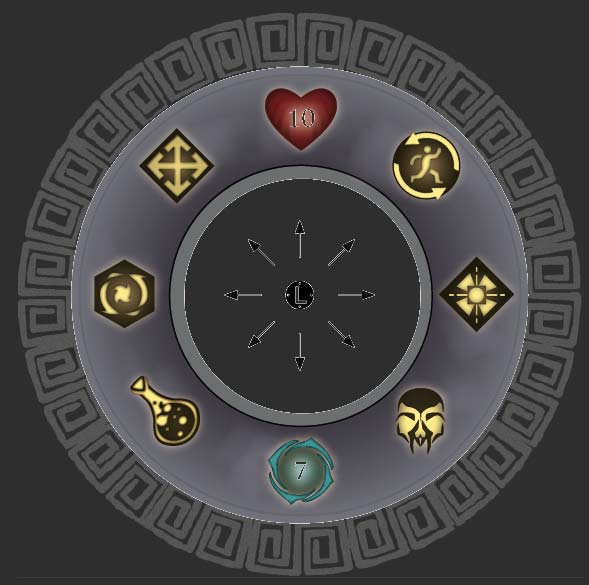
Activating the Radial Menu offers access to a wide range of useful features and functions. It also pauses the action, which provides time to survey the field of combat and formulate strategies. Though you will rarely need to use it for this purpose during the opening few hours of play, you will find that it becomes a common occurrence during many of Dragon Age II’s more demanding battles – especially on higher difficulty levels. On PC, most icons from the Radial Menu appear on the quickbar at the bottom of the screen.
The text that follows is a quick introduction to each Radial Menu option. We’ll cover these in greater detail in the Walkthrough chapter.

|
Quick Heal: Instantly applies the most appropriate Health Potion to the character under your direct control. This can be adjusted in the Options menu. |

|
Hold Position: Instructs selected party member(s) to remain in their current location. Very useful if you wish to carefully entice enemies to a specific position, or need to prevent overzealous companions from rushing into ruinous situations during difficult battles. |

|
Activated Spells/Talents: You will reach a point during Act 1 where you acquire more abilities than Battle Menu Shortcuts, which is where this sub-menu becomes much more relevant. It’s also useful when you wish to set up commands for party members while the action is paused – for example, to unleash a simultaneous four-pronged assault on a particularly dangerous opponent. Battle Menu Shortcuts can be assigned or customized via this option. |

|
Poisons and Bombs: This enables you to coat weapons with poisons (contributing additional status effects and/or damage), or hurl explosives at your opponents. (Not available until Act 1.) |

|
Quick Mana/Quick Stamina: In the same manner as Quick Heal, this instantly applies a Lyrium Potion or Stamina Draught (as applicable) to the character under your control. |

|
Potions: This sub-menu provides access to all potions in your inventory. |

|
Sustained Spells/Talents: Another sub-menu, used to activate or deactivate “sustained” abilities. We’ll return to this later: it’s of no great consequence during the Prologue. |

|
Move to Point: This option is used to manually direct selected party member(s) to a specific position. Usually employed in conjunction with Hold Position for precision battle management. |
Maps
The minimap and Map screen are invaluable tools as you navigate Dragon Age II’s many locales.
-
Press the Map button (
 /
/
 ) to visit the dedicated Map screen.
- Places of interest, points of interactivity and active waypoints are marked by icons. If you are unsure of what a particular symbol on the minimap represents, visit the main Map screen to study the legend. The same icons are used for both the full and truncated map.
- The minimap features animated icons that direct you to waypoints in active quests. It’s sometimes possible to have a few of these active at once. When you visit certain “hub” areas (particularly the major districts of Kirkwall), it’s usually sensible to visit the Map screen to identify which one you seek.
Button Definitions
As Xbox 360, PS3 and PC players own different control devices, we generally use the standardized terms presented in the table below to refer to each button or key in many areas of the guide. These should be easy to recognize, but you can return here to refresh your memory at any point.
We also tend to offer slightly more assistance to Xbox 360 and PS3 players in the early sections of the guide as the console versions of Dragon Age II will be played by an audience with wildly varying levels of gaming ability and RPG experience.
| Xbox 360 | PS3 | Button definition | Summary |

|
|
Movement stick | Move the character that is under your direct control. By default, your character will target the closest enemy in the direction faced unless instructed otherwise. |

|
|
Camera stick | Used to adjust the game camera. |

|
|
Target Select buttons | Used to cycle through points of interactivity while free roaming (companions, containers, et al), or to pick specific targets during combat. |

|

|
Interact button | Used to confirm decisions and ability usage, initiate conversations, collect loot, open doors and containers, and a host of other interactions. During combat, this triggers your character’s low-powered “default” attack. |

|

|
Battle Menu Shortcut buttons (Xbox 360 & PS3 only) | Performs the ability assigned to the relevant Battle Menu Shortcut slot. Also employed to cancel actions or move back one step in the user interface. |

|

|
Battle Menu Shortcut buttons (Xbox 360 & PS3 only) | Performs the ability assigned to the relevant Battle Menu Shortcut slot. |

|

|
Battle Menu Shortcut buttons (Xbox 360 & PS3 only) | Performs the ability assigned to the relevant Battle Menu Shortcut slot. Also employed to skip through lines of dialogue, or entire cutscenes. |

|

|
Party Select buttons | Cycle through available party members. Press both Party Select buttons simultaneously to select all party members at once. |

|

|
Radial Menu button (Xbox 360 & PS3 only) | Brings up the Radial Menu. You must hold this by default; there is an option to change it to an on/off toggle at the Options H Gameplay options screen. |

|

|
Shortcut button (Xbox 360 & PS3 only) | Hold to bring the second set of Battle Menu Shortcuts to the fore. |
|
|
|
Target Lock button | Use this to ensure that all attacks will be directed at the specified target. Automatically disengaged once an enemy has been disabled. |
|
|

|
Center Camera button | Immediately rotates the camera to face in the same direction as the character under your control. |

|

|
Pause Menu button | Opens the pause menu. |
|
|
|
Map button | Used to open/close the map screen. |
Choosing a class
The class you choose at the beginning of Dragon Age II has a significant effect on your play experience. Your gender, however, is a primarily aesthetic concern: with the exception of minor dialogue changes and different opportunities for romantic attachments with companions, there are no specific advantages or drawbacks to either sex.
Mage
Perhaps the most enjoyable class to play, mages can exert greater influence (indeed, control) over combat encounters than their more melee-focused peers thanks to the sheer number of potential options at their disposal.
The least robust of the three classes, mages specialize in spells that can be cast at range (particularly magical attacks). Their ability to strike or support from afar is a necessity: they will fall swiftly under a concerted assault, and must always rely on their cohorts to shield them from danger. As a player, you will find that their typical position on the periphery of each battle affords you an excellent tactical overview of proceedings.
If you decide that Hawke will be a mage, it makes sense to shape him or her as a so-called “nuke”, focused on debilitating magical assaults and devastating Area of Effect (AoE) attacks. That’s not to say that you can’t slightly customize this archetype to include less explicitly aggressive abilities. An extra Heal spell, for example, will never go amiss.
Rogue
The overhauled rogue class offers an enormous amount of scope for interesting character builds, and is vastly different from the rogues in Dragon Age: Origins. The core decision with a rogue is whether to favor ranged combat (through archery) or focus on causing havoc as a melee fighter (dual-wielding two daggers). Thereafter, the possibilities are astonishingly broad. The rogue’s class-specific talents can enable them to flit around any given battlefield with ease, inflicting targeted harm and disappearing before any reprisals can take place. This gives the game a much more action-oriented, hack ‘n’ slash feel that some players may prefer.
Rogues also have two unique abilities: they alone can pick locks and detect or disable traps. Having a rogue in your party will increase your ability to accumulate loot of all kinds (from otherwise inaccessible locked chests) and, to a lesser extent, XP (awarded for both lockpicking and disarming traps). That said, this doesn’t mean that it’s a class that you should feel obliged to adopt: you will recruit two companions who can fulfill this role early in Act 1.
Warrior
The warrior specializes in melee combat only, wielding either a sword and shield or a massive two-handed blade or cudgel. Within this class, there are two fairly distinct archetypes:
- The “tank”: a near-essential fixture in any party, this warrior is focused on attracting enemy attention and withstanding terrible punishment at the very heart of any given battle. They are not built to inflict heavy damage, but to survive it. Effectively, they act as a lightning rod for hostiles in range, therefore enabling their cohorts (especially weaker mages) to make decisive attacks without fear of devastating reprisal.
- The “damage dealer”: a less robust warrior build focused on abilities that cause greater harm. These can play a decisive role in battles against strong individual enemies, but tend to be less efficient against large groups of stock assailants.
Conclusion
Hawke will usually fight alongside three allies. It’s therefore vital to remember that your character is a mechanism in a larger machine, and must possess attributes and aptitudes that complement those of his or her companions. The most practical party build for a balanced first playthrough consists of a warrior who adopts the tank role, a rogue (either ranged or close-quarters), and two mages: one concentrating on raw damage, while the other works in a support/healer capacity. We recommend using the mage class for your first playthrough: concentrating on raw damage from afar is an ideal way to build a greater appreciation of how Dragon Age II works. Our second choice would be the rogue: these dynamic and daring characters are a lot of fun to play, though they are a little more demanding to control.
This may seem to belittle the warrior, but that’s not our intention: it’s just that this class is arguably a more “technical” choice than the other two in how its abilities must be used for maximum efficiency. The warrior is probably best left for a future playthrough when you have a better understanding of the game and its multifarious mechanics.
Players who wish to consider every available option before committing to a decision can find a complete appraisal of character archetypes and reliable party builds in the Strategy & Analysis chapter.
Companions
Through the early stages of the adventure, Hawke can encounter individuals who become “companions” during the events of Dragon Age II. Each potential cohort has their own unique personality and a wide assortment of aptitudes and specialties.
- Certain companions are enlisted automatically. Others must be sought out, or acquired by completing a particular quest. We’ll let you know whenever this is possible.
- While you can select weapons and accessories for companions, each has a preset one-piece armor suit that cannot be unequipped. This can be improved by finding or purchasing special upgrades.
- Your relationship with each companion is graded on a scale that ranges between “rivalry” and “friendship”. This shifts constantly as they react to your decisions and dialogue choices while they are in the active party. There is no right or wrong way to approach this feature, though there are certainly ways to manage it to achieve your desired goals. The Quests chapter features tips on which actions will lead to significant levels of approval or disapproval.
-
Whenever a new companion is introduced, we offer a quick appraisal of key traits or attitudes that define them. You can use this advice to tailor your dealings with your party members and, perhaps more importantly, your attitude towards other people you meet while they are present. Note that, with exceptions that we will make abundantly clear in due time, a state of high rivalry is not necessarily a bad thing: it’s just a different type of relationship.

Loot
Dragon Age II employs a distinctive shimmering effect to highlight certain points of interactivity. In most instances, these are used to highlight sources of loot – such as containers, corpses, furniture or piles of rocks.
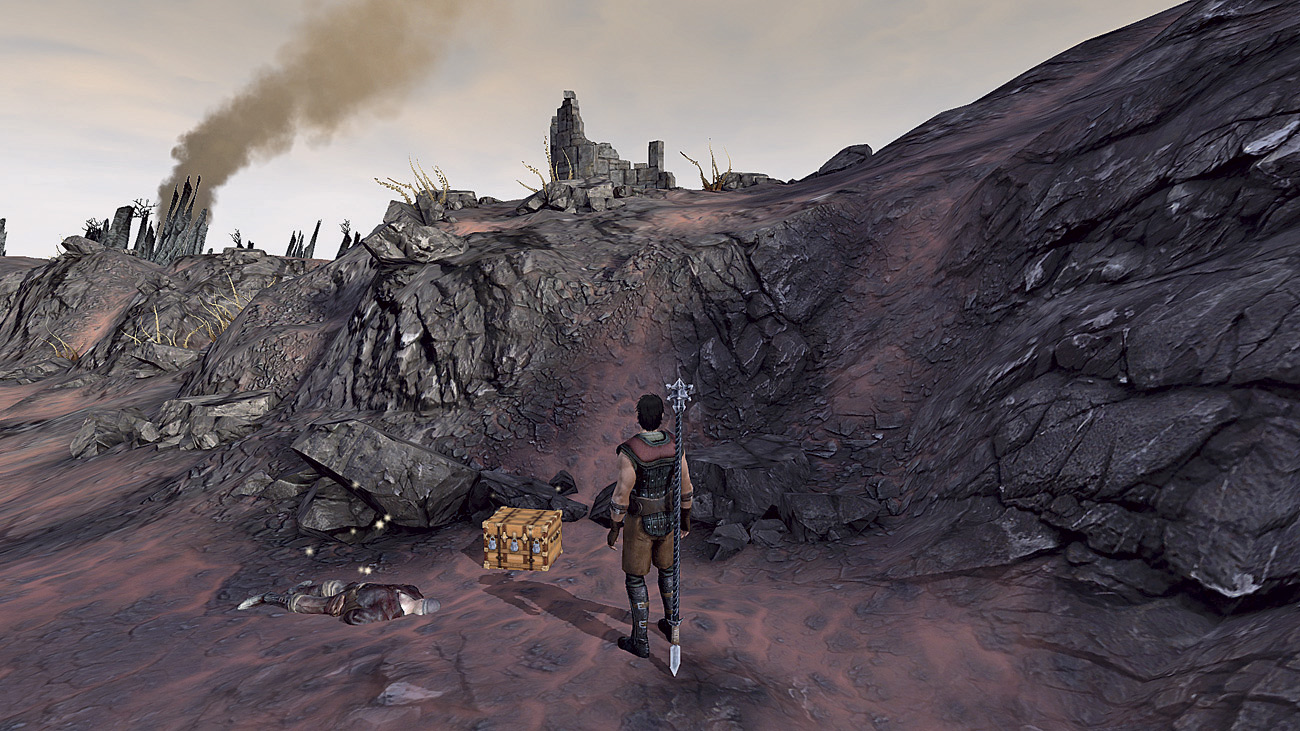
Loot can take a variety of forms, though there are broadly three categories: equipment (weapons, armor and accessories), raw currency and junk. The latter exists purely to be sold, often for a modest return, so it can be regarded as essentially coin in a less convenient form. Most pieces of equipment are randomly generated in accordance with Hawke’s current level, though you will also encounter many prebuilt items of interest (or resale value).
It’s impossible to overstate the value of diligent pillaging every last room, path and battlefield. Incremental character growth through attribute increases and talent acquisition is important, granted, but the most reliable way to stay ahead of the difficulty curve is through equipping the finest weapons, armor and accessories that you can find, or your appropriated Sovereigns can buy.
Though collecting everything you can lay your hands on is undoubtedly the path to success, your ability to do so is not unrestricted. All items (with the exception of plot-critical objects, which do not appear on the Inventory screen) have an inherent “weight”: one unit per slot of inventory space. In short, this means that both a piece of armor and a stack of seven potions will contribute exactly one point towards your party’s collective burden.
Your inventory space is initially capped at 50, but you can increase this carrying capacity by purchasing Backpack expansions (each offering additional slots) from select vendors in and around Kirkwall. As a rule, though, it’s always a good idea to stop by a vendor to offload surplus items between quests. There’s nothing more frustrating than hitting a mother lode of loot while sufficiently far from civilization to preclude a quick selling trip, and realizing that you must leave treasures or destroy existing items due to poor inventory management.
All area maps appear in our dedicated Maps section. These reveal the location of all notable loot containers (including locked chests) that you can find throughout the game. Your equipment options in the Prologue are rather limited to making use of what you find, but Act 1 introduces countless possibilities. From that point forward, the Inventory chapter will reveal which weapons, armor, accessories and upgrades offer the best perks for your current level – and, in many instances, how much you will need to earn to obtain them.
Terms and Abbreviations
Whenever you encounter an unfamiliar term or abbreviation, our Glossary should provide the explanation you seek. Though we have made every effort to make the guide approachable to players of all backgrounds, readers less versed in RPG terminology and abbreviations can visit this to reveal the meaning of quizzical expressions such as “Threat” (the system that governs which party member enemies will target) and “AoE” (Area of Effect: used to describe abilities that cover a designated area rather than a specific target).