
Dragon Age II Guide Walkthrough Act Three
The Last Straw
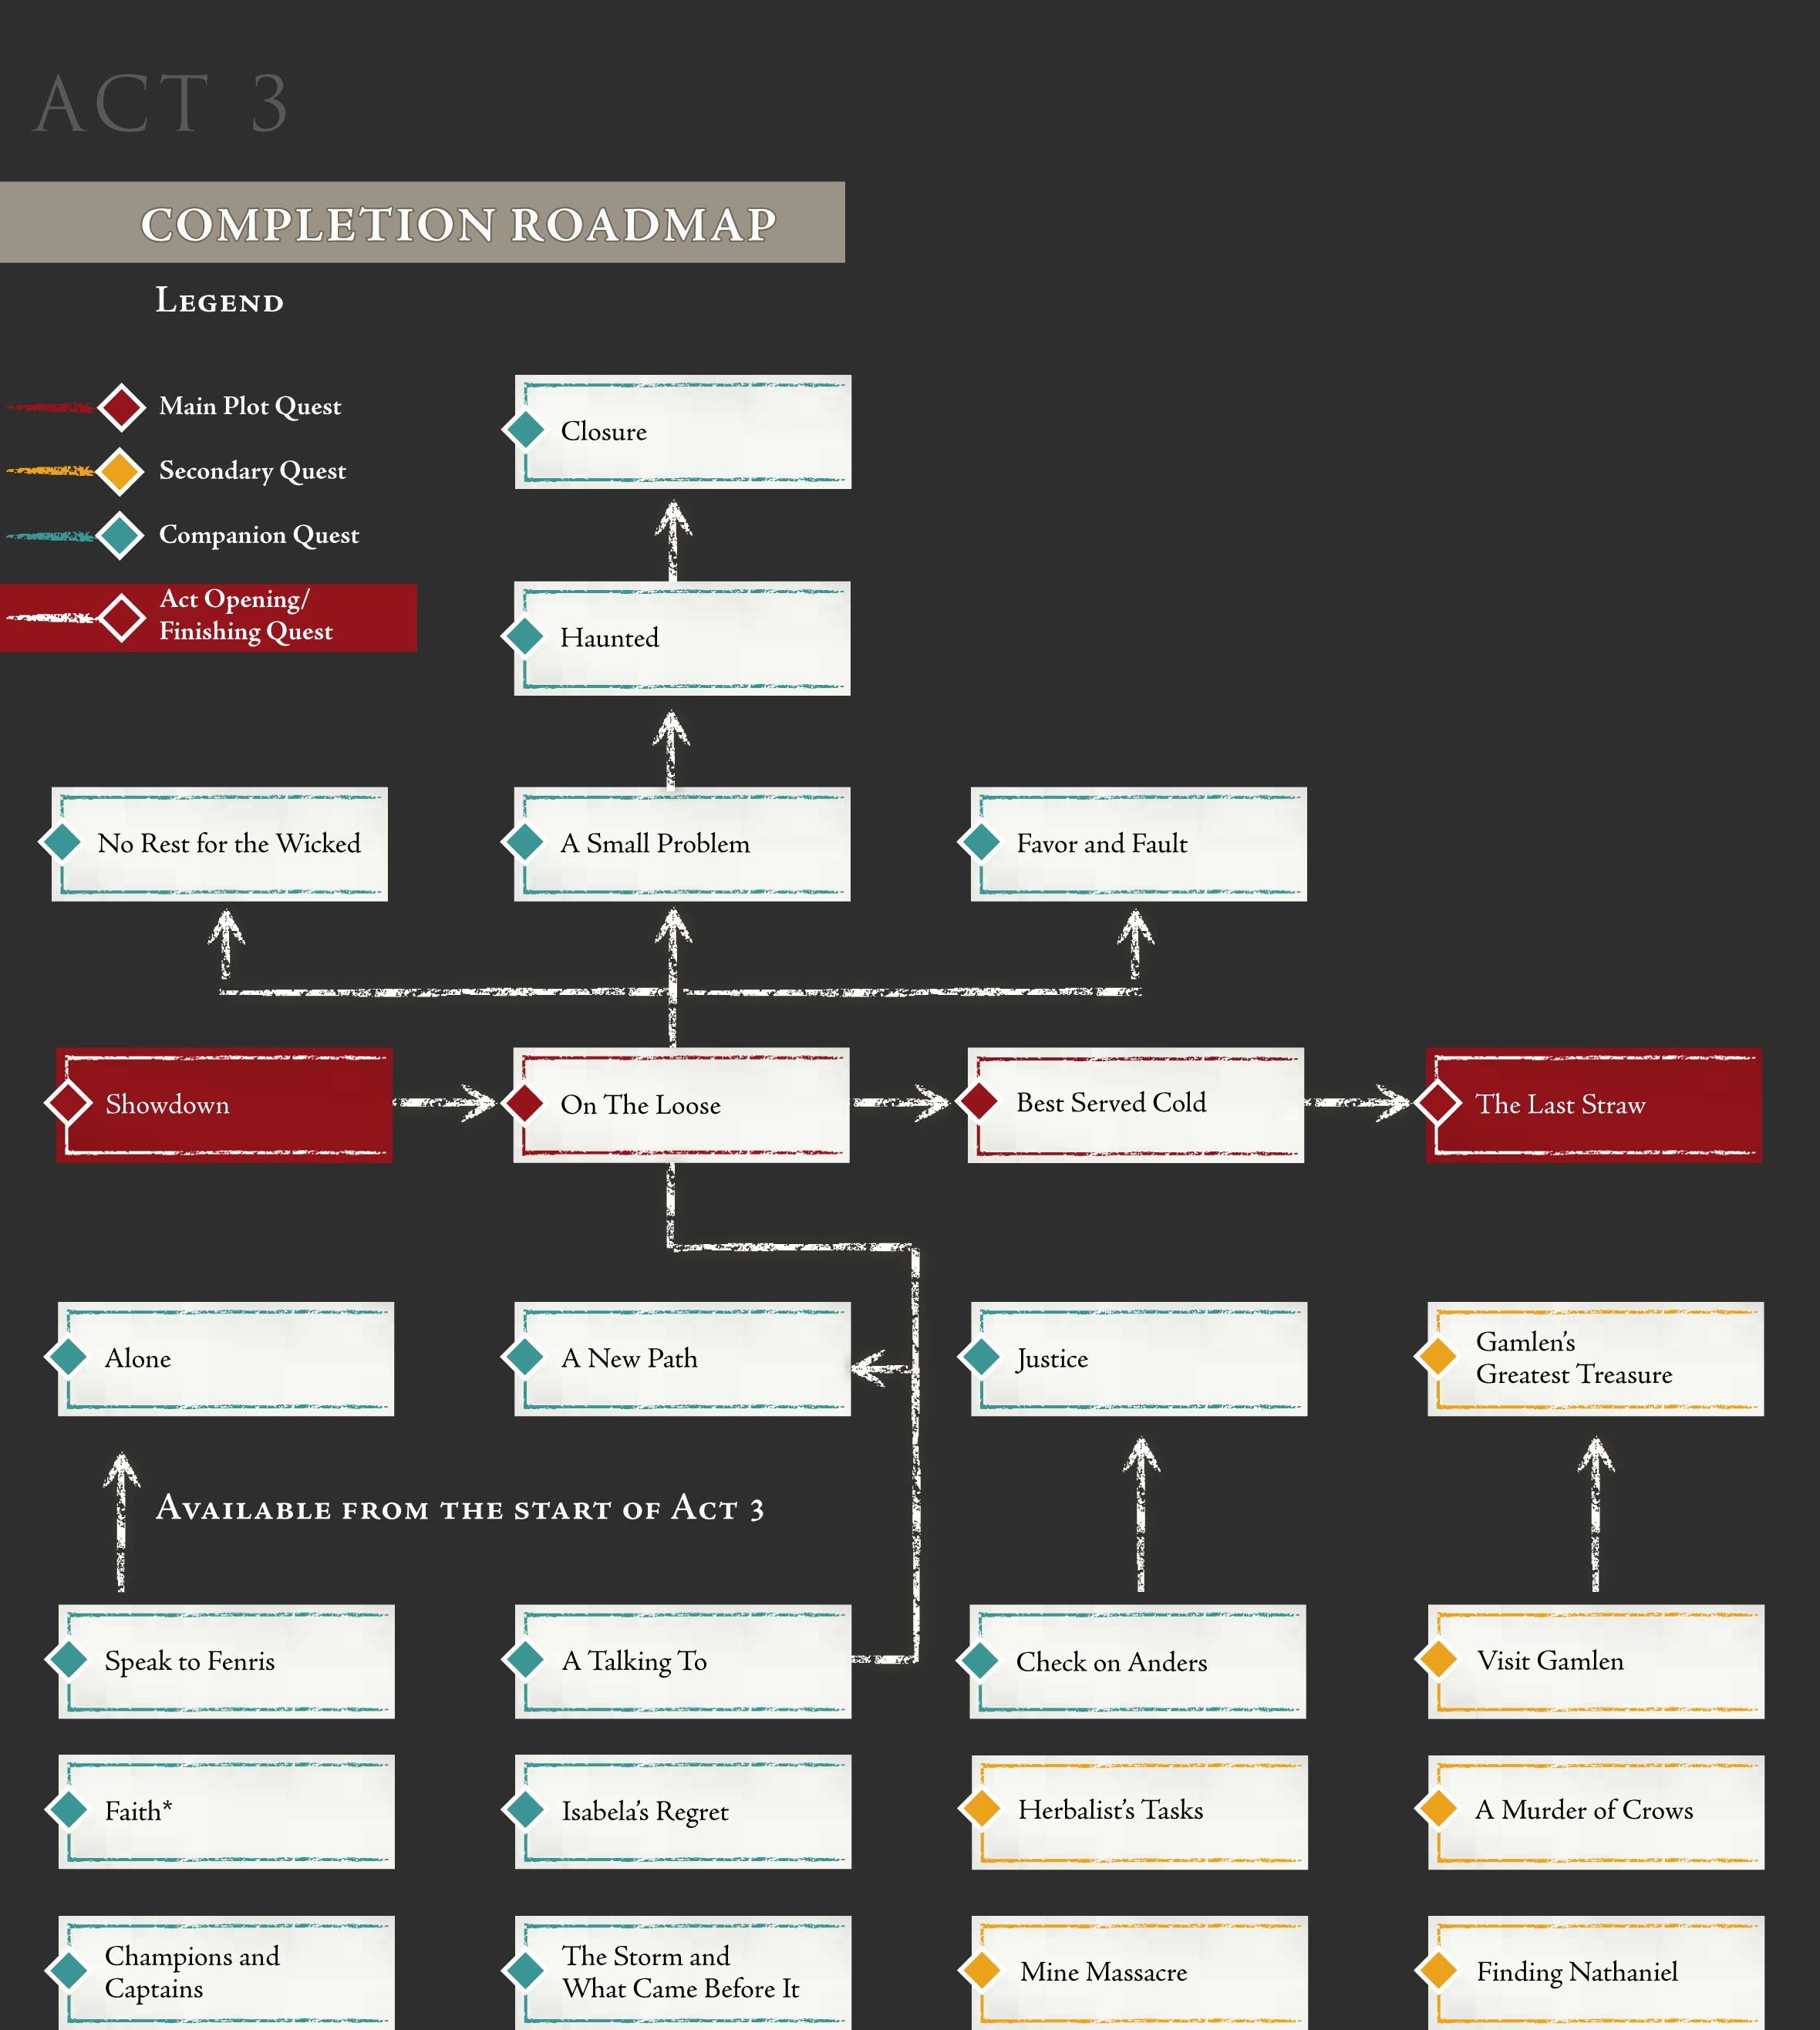
This diagram will help you plan your route through Act 3 by revealing the unlock progression for all main plot, secondary and companion quests. You will find fact sheets for these in the pages that follow, plus guidance for smaller side quests and their unlock conditions.
1. On The Loose
After speaking with Elsa, you must track down each of the three mages in turn.
To locate Emile, speak to Comtesse de Launcet in her Hightown mansion. Feel free to rifle through the building after the dialogue ends. There is an ambush by Blood Mages and Apostate Mages when you leave so be ready to attack with full fury before they can unleash any spells. At The Hanged Man, convince Emile to return to the Circle – though you may permit him a small kindness if you wish.
After interviewing Nyssa, your meeting with Huon is less whimsical than the first apostate. This Blood Mage will summon Shades as support, but these are of no consequence: just hammer the twisted elf with everything your party can direct his way.
Once the conversation with Walter reveals the location of Evelina, fight your way through Shades and Rage Demons to reach the east side of the Sewer Passage. The mage takes on the form of an Abomination at first but can transform into other demonic forms as the battle progresses. Lay down suppressing AoE attacks, then concentrate your fire on Evelina. When the battle ends, open the chest next to the exit, then return to Meredith.
2. Best Served Cold
The battle in Hightown pits you against templars and Circle Mages. As always, it pays to deal with the latter first. There are additional mages among the waves of reinforcements, so keep a watchful eye for these. After collecting the Conspirator’s Notes, head for the Secret Meeting Place. The battle that takes place here is an expanded version of the earlier conflict, with the addition of an Enchanter (your priority target) and Templar Hunters. In this fight, concentrate on the weaker foes first to reduce the numbers against you. Leave those with larger health gauges until last. The area is also packed with traps: after the Enchanter falls at the start, consider a brief rush with your most cunning rogue to disarm those in your vicinity. Speak to Keran when the battle ends, then tell him to leave. Be sure to explore the area for loot before you do the same.
At the Wounded Coast, follow the path south from the entrance. When you reach the path that leads to the ruins waypoint, there is a brief battle with templars, mages and corpses before you encounter Samson. No matter what you say to Samson or Thrask, conflict is inevitable.
Grace is by far the most dangerous opponent in this battle. Attack her exclusively until her health is diminished, at which point she transforms into a Pride Abomination. No matter which strategy you opt for (and we would suggest a mages > lesser enemies > Pride Abomination > Lieutenant > Hunter priority order), it’s vital that you position your weaker ranged fighters far from the main melee. If you really struggle in this fight, try moving your party far to the north at the outbreak of hostilities. With a little micromanagement, this will enable you to engage each wave in your own time.
3. The Last Straw
Take the time to wrap up any other quests or general activities that you wish to complete as The Last Straw marks the point of no return for the Dragon Age II storyline. Our walkthrough here follows one specific path, but rest assured that we cover all possible permutations in the Quests chapter. Before you begin, ensure that you have a full stock of potions and all other items (such as Mythal’s Favor and Fel Grenades) that might be of benefit in the demanding battles that lie ahead.
In the face-off between Orsino and Meredith, side with the mages, then confirm your decision with “I’ve already made my choice”. Depending on the state of your relationship with Fenris and Aveline, one of the two may refuse to follow you from this point forward. Hawke is technically alone but supported by numerous allies in the brief battle that follows. The choice of what to do with Anders is a momentous decision… but if he is your primary party healer, it definitely makes sense to spare his life and ask him to join you for the conflict that lies ahead. This will, however, lead to Sebastian’s immediate departure if you count him among your ranks.
After picking your party, proceed through the streets of Lowtown until you encounter a mage cornered by templars. You can stand back and watch the initial part of this battle unfold from a safe distance, perhaps contributing long-range AoE attacks to the fracas, but your complete involvement is assured with the arrival of additional Fade creatures. Unless they actively engage your party members, you will benefit by leaving the templars (especially the Lieutenant) alone: these will distract the more numerous Shades and Rage Demons, which will work in your favor. A mage with Mind Blast could make use of that talent to potentially redirect templar aggression whenever possible.
The next fight is against a Desire Demon and an army of Abominations, with the following confrontation plunging you into a pitched brawl between templars and mages allied to your cause. Making a stand at the top of the steps will subject you to assault from both sides, so you may wish to move down the slope and draw templars to your position.
On arrival at the Docks, a Blood Mage summons a daunting collection of Shades before attacking with typical venom. Smite this particular foe with everything you have, then use AoE attacks to weaken the numerous swarming hostiles as the Pride Demon enters the fray. Turn to page 231 to learn more about this beast’s strengths and weaknesses. The most important tips we can offer are to move away whenever it stands poised to charge or if you notice the blue AoE radius that appears prior to its Crushing Prison-style attack.
At the Gallows Courtyard, there is an opportunity to persuade lost party members to return to the fold. Inside the Gallows Prison, you can take a moment to speak with your companions before asking Orsino to advance. Save your progress before you do so (we would recommend that you use a new slot), then make your final party selection. When the templars attack, run forward to engage them on the bridge area. Creating a bottleneck here will concentrate the battle in a confined space, which is beneficial with so many allies fighting alongside you. See the page to your right for information on the battle with Orsino.
There are three simultaneous Rage Demons and even more Shades just inside the Templar Hall. Beyond the door, however, is the welcome sight of Sandal and his improvised store. Buy as many potions as you need, offload junk, then move on. Head south to fight a massive group of templars. Another multi-wave attack awaits you in the central area; in the last part of this fight, Aveline or Fenris may confront Hawke. When the dust settles, leave via the area exit to reach the final showdown with Meredith.