
Prima Games eGuides
primagames.com Browse Redeem a code Help
LEGO Star Wars: The Force Awakens eGuide
Sign in My Guides

Sign in or create an account

We'll email you a link. No password needed, and if you don't have an account yet, the link makes one.

By creating an account or signing in, you agree to our Terms of Service and Privacy Policy.

Have a password?

Had an account on the old eGuides site, or a code from a printed guide? Help and troubleshooting

Sign in with a password

By signing in, you agree to our Terms of Service and Privacy Policy.

Check your email

A sign-in link is on its way. It works once and expires in 15 minutes. Open it and you're in, with an account if you didn't already have one.

Contents

  • Changelog
    • Updates
  • Game Basics
    • Overview
    • How the Game Flows
    • Fighting for the Fate of the Galaxy
    • Rewards
    • Getting 100% Completion
  • Console Characters
    • Unlocking Characters
    • Character Abilities
    • Character Class
    • Character List
  • Console Walkthrough
    • Prologue: Battle of Endor
      • Battle of Endor Objectives
      • Endor Shield Generator
      • Death Star Interior
      • Death Star Escape
    • Free play: The Battle of Endor
      • Endor Shield Generator
      • Death Star Interior
      • Death Star Escape
    • HUB: D’Qar
      • D’Qar Objectives
      • Resistance Base
    • Chapter I: Assault on Jakku
      • Assault On Jakku Objectives
      • Village Retreat
      • First Order Assault
      • Water Tower Washout
    • Free Play: Assault on Jakku
      • Village Retreat
      • First Order Assault
    • HUB: Jakku (First Visit)
      • Jakku (First Visit) Objectives
      • First Order Staging Area
    • Chapter II: Escape from the Finalizer
      • Escape from the Finalizer Objectives
      • Finalizer Hangar
      • Star Destroyer Exterior
      • Jakku Graveyard Part 1
    • Free play: Escape from the Finalizer
      • Finalizer Hangar
      • Star Destroyer Exterior
      • Jakku Graveyard Part 2
    • HUB: Jakku (Second Visit)
      • Jakku (Second Visit) Objectives
      • Jakku Sands
    • Chapter III: Niima Outpost
      • Niima Outpost Objectives
      • Niima Outpost
      • Niima Bombardment
      • Jakku Graveyard Flight
    • Free play: Niima Outpost
      • Niima Outpost
      • Niima Bombardment
      • Jakku Graveyard Flight
    • HUB: Millennium Falcon (First Visit)
      • Millennium Falcon (First Visit) Objectives
      • Millennium Falcon Interior
    • Chapter IV: The Eravana
      • The Eravana Objectives
      • Freighter Battle
      • Freighter Chase
      • Freighter Shutdown
    • Free play: The Ervana
      • Freighter Battle
      • Freighter Chase
      • Freighter Shutdown
    • HUB: Millennium Falcon (Second Visit)
      • Millennium Falcon (Second Visit) Objectives
      • Forward Maintenance Bay
    • Chapter V: Maz’s Castle
      • Maz’s Castle Objectives
      • Castle Approach
      • Castle Hall
      • Castle Basement
    • Free Play: Maz’s Castle
      • Castle Approach
      • Castle Basement
    • HUB: Takodana (First Visit)
      • Takodana (First Visit) Objectives
      • Outside Maz’s Castle
    • Chapter VI: Battle of Takodana
      • Battle of Takodana Objectives
      • Castle Corridors
      • Takodana Skies
    • Free Play: Battle of Takodana
      • Castle Corridors
      • Takodana Skies
    • Hub: Takodana (Second Visit)
      • Takodana (Second Visit) Objectives
      • Ruins of Takodana
    • Chapter VII: The Resistance
      • The Resistance Objectives
      • Resistance Base
      • Resistance Hangar
    • Free Play: The Resistance
      • Resistance Base
      • Resistance Hangar
    • Hub: Millennium Falcon (Third Visit)
      • Millennium Falcon (Third Visit) Objectives
      • Millennium Falcon Interior
    • Chapter VIII: Starkiller Sabotage
      • Starkiller Sabotage Objectives
      • Starkiller Crash Site
      • Starkiller Wall
      • Starkiller Shield Room
    • Free Play: Starkiller Sabotage
      • Starkiller Crash Site
      • Starkiller Wall
      • Starkiller Shield Room
    • Hub: D’Qar (Second Visit)
      • D’Qar (Second Visit) Objectives
      • Resistance Base
    • Chapter IX: Destroy Starkiller Base
      • Destroy Starkiller Base Objectives
      • Assault on Starkiller
      • Rey’s Escape
      • Oscillator Interior
    • Free Play: Destroy Starkiller Base
      • Assault on Starkiller
      • Rey’s Escape
      • Oscillator Interior
    • Hub: Starkiller Base
      • Starkiller Base Objectives
      • Outside Starkiller Base
    • Chapter X: The Finale
      • The Finale Objectives
      • Oscillator Bombing Run
      • Starkiller Showdown
    • Free Play: The Finale
      • Oscillator Bombing Run
      • Starkiller Showdown
    • Hub: D’qar (Third Visit)
      • D’qar (Third Visit) Objectives
      • Resistance Base
    • Epilogue: Luke’s Island
      • Luke’s Island Objectives
      • Luke’s Island
    • Free Play: Luke’s Island
      • Luke’s Island
  • Console New Star Wars Adventures
    • Poe to the Rescue
      • Poe to the Rescue Objectives
      • Trash Compactor
      • Hangar Battle
      • Asteroid Escape
    • Free Play: Poe to the Rescue
      • Trash Compactor
      • Hangar Battle
      • Asteroid Escape
    • Lor San Tekka’s Return
      • Lor San Tekka’s Return Objectives
      • Kelvin Ravine
    • Free Play: Lor San Tekka’s Return
      • Kelvin Ravine
    • Rathtar Hunting
      • Rathtar Hunting Objectives
      • Rathtar Caverns
      • Loading Area
    • Free Play: Rathtar Hunting
      • Rathtar Caverns
      • Loading Area
    • The Crimson Corsair
      • The Crimson Corsair Objectives
      • Landing Site
    • Free Play: Crimson Corsair
      • Landing Site
    • Trouble over Taul
      • Trouble over Taul Objectives
      • Corvette Interior
    • Free Play: trouble over taul
      • Corvette Interior
    • Ottegan Assault
      • Ottegan Assault Objectives
      • Ottegan Pursuit
      • Ottegan Surface
    • Free Play: Ottegan Assault
      • Ottegan Pursuit
      • Ottegan Surface
  • Console Hubs
    • Hub: D’Qar (Hub)
      • Points of Interest
      • Carbonite
      • Gold Bricks
      • Quests
    • Hub: Jakku (Hub)
      • Points of Interest
      • Carbonite
      • Gold Bricks
      • Quests
    • Hub: Takodana (Hub)
      • Points of Interest
      • Carbonite
      • Gold Bricks
      • Quests
    • Hub: Millennium Falcon (Hub)
      • Points of Interest
      • Carbonite
      • Gold Bricks
      • Quests
    • Hub: Starkiller Base (Hub)
      • Points of Interest
      • Carbonite
      • Gold Bricks
      • Quests
  • Console Collectibles Checklists
    • Story Mode Collectibles
      • Minikits
      • Red Bricks
      • Vehicles
    • Hub Collectibles
  • Console Achievements & Trophies
    • Achievements & Trophies
  • Handheld Characters
    • Characters
  • Handheld Walkthrough
    • Chapter 1: Assault on Jakku
      • Village Retreat
      • First Order Assault
      • Jakku Graveyard
    • Chapter 2: Escape from the Finalizer
      • Finalizer Hangar 1
      • Finalizer Hangar 2
      • Star Destroyer Exterior
    • Chapter 3: Niima Outpost
      • Niima Outpost
      • Niima Bombardment
      • Jakku Graveyard Flight
    • Chapter 4: The Eravana
      • Freighter Battle
      • Freighter Chase
      • Freighter Shutdown
    • Chapter 5: Maz’s Castle
      • Castle Approach
      • Castle Hall
      • Castle Basement
    • Chapter 6: Attack on Takodana
      • Castle Corridors
      • Castle Escape
      • Takodana Skies
    • Chapter 7: Starkiller Sabotage
      • Starkiller Crash Site
      • Shield Room Approach
      • Phasma
    • Chapter 8: Destroy the Starkiller
      • Assault of Starkiller
      • Rey’s Escape
      • Oscillator Interior
    • Chapter 9: The Finale
      • Oscillator Bombing Run
      • Starkiller Forest
      • Starkiller Showdown
    • Epilogue: Luke’s Island
      • Epilogue: Luke’s Island
  • Handheld New Star Wars Adventures
    • Prologue: The Battle of Endor
      • Endor Shield Generator
      • Death Star Interior
      • Death Star Escape
    • Poe to the Rescue
      • Trash Compactor
      • Asteroid Escape
    • Rathtar Hunting
      • Rathtar Caverns
      • Loading Area
    • Ottegan Assault
      • Ottegan Pursuit
      • Ottegan Surface
  • Handheld Hubs
    • Resistance Base Hub
      • Resistance Base Hub Overview
      • Resistance Base Hub Characters
    • Jakku Hub
      • Jakku Hub Collectibles
      • Jakku Hub Characters in Carbonite
    • Takodana Hub
      • Takodana Hub Collectibles
      • Takodana Hub Characters in Carbonite
    • Starkiller Hub
      • Starkiller Hub Collectibles
      • Starkiller Hub Characters in Carbonite
    • Starkiller Arena
  • Handheld Collectibles Checklists
    • Red Bricks
    • Gold Bricks
    • Minikits
    • Characters in Carbonite
    • Vehicles
    • Trophies
  • Credits
    • Legal

LEGO Star Wars: The Force Awakens Guide › Console Walkthrough › Chapter IV: The Eravana

Freighter Shutdown

BB-8, Chewbacca, Crab Droid, Finn, Han Solo, Rey
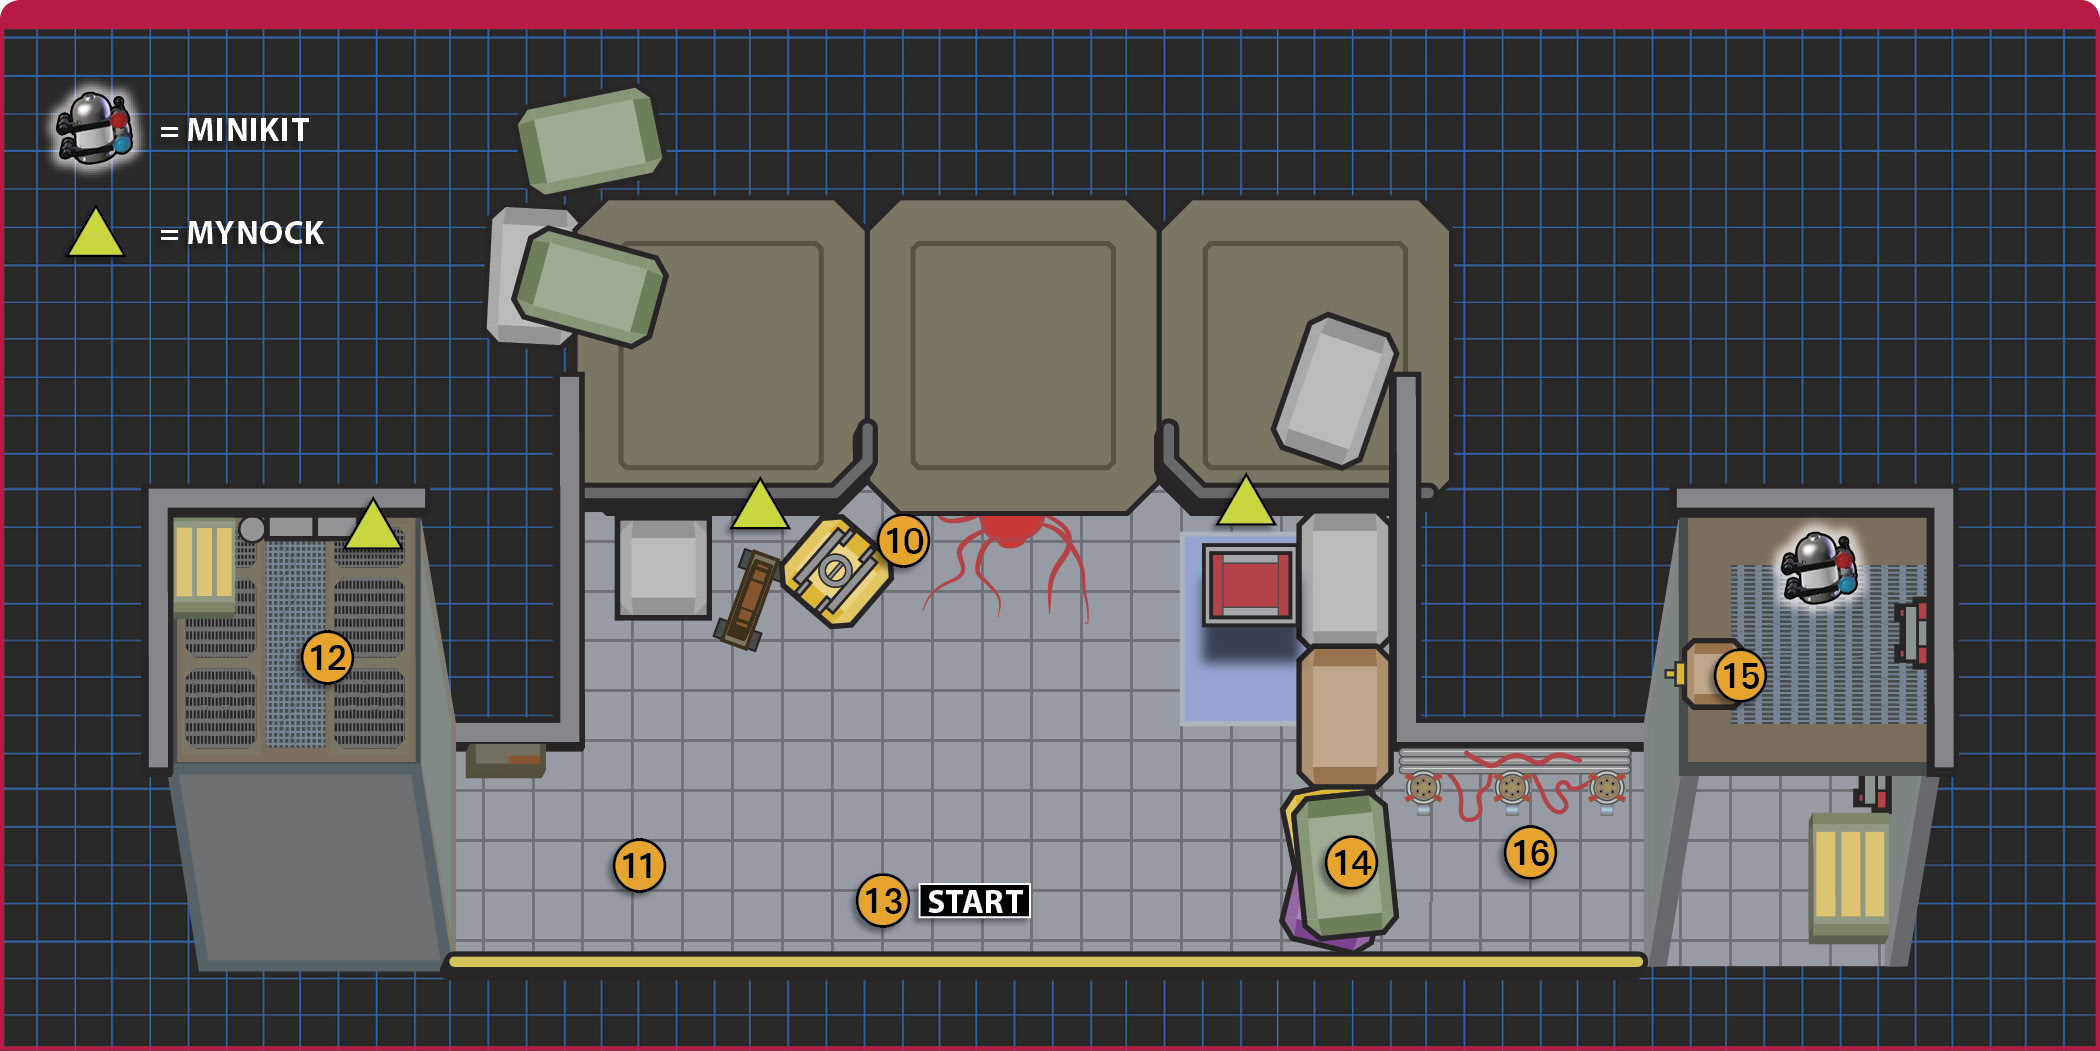
First Delivery Control Panel

The rathtar isn’t going anywhere, so build your multiplier by taking down the gang members in the hangar. Pick up all the studs you uncovered during the exchange of fire with the Kanjiklub members before your multiplier shrinks too much.

Minikit: Three Mynocks

Shoot the two mynocks clinging to fencing around the rathtar. The third mynock is above the climb wall.

When the rathtar grabs a yellow container, 10 hit the target on it. It explodes and showers a pile of Multi-Build bricks in the corner of the room 11.The order you build things doesn’t matter, but both Rey and BB-8 must get up to the alcove.

The machine built against the shorter, protruding wall reveals a climb wall that Rey can climb to the top 12. The launch pad built in the corner near a large door sends BB-8 up to the same spot. Tag to Rey and use the spinner switch to roll out an astromech access. Switch to BB-8 and restart the conveyor belt.

A patrol of Guavians appears near the rathtar to investigate the disturbance. After you dispatch the gang members, the rathtar snags another explosive container.

Hit the target and use the bricks it leaves behind to make most of something 13. Unfortunately, there aren’t enough bricks to complete it!

Tricky Traffic Lights

After two containers explode in its grasp, the rathtar vents its frustration and knocks loose a panel on a cargo container. Move Han Solo or Rey to the proper spot in the corner and scan the top container 14.

Destroy the silver LEGO bricks with a thermal detonator from Chewbacca. Move Finn through the gas and use the grapple handle to pull down the container from its high perch 15.

Note the color of the lights in the middle of the large cargo container to the right and the wire housings on the wall behind the three spots where you can use the Multi-Build bricks 16.

Build the left-hand (red) unit first. Build the right-hand (green) unit next, and the center unit (yellow) last. If you build one out of order, you must start over with the red unit.

Minikit: Upper Deck

After completing the colored light puzzle, send BB-8 through the access hatch in the cargo container. He pops out on top of the container, next to a Minikit.

Second Delivery Control Panel

Use the bricks from inside the container to repair the crab droid. Send the crab droid to attack the rathtar. Build a lift control from the leftover bricks after the crab droid is crushed by the rathtar.

Assemble a rotary control that operates a lift. Send Chewbacca up to the top of the containers, where he can pull the strength handles to start the delivery system again.

The gangs can’t resist the sound of a conveyor belt and make another appearance here. When they’re gone, blast the yellow container the rathtar holds in its tentacle.

The bricks complete the construction started earlier. The finished item is a turret. Blast the rathtar and gang members to clear the path to the Millennium Falcon.

Keep reading with a free account

The first 3 sections of LEGO Star Wars: The Force Awakens are open to everyone. An account opens the rest of it, and every other guide in the archive. It's free, and there's nothing to buy.

Bought guides on the old Prima Games site? Your account and every guide you own moved here, so there's nothing to buy again. Sign in.

Create a free account Or browse our free guides

PreviousFreighter Chase NextFreighter Battle