
LEGO Star Wars: The Force Awakens Guide Console New Star Wars Adventures The Crimson Corsair
Landing Site
Pru Sweevant, Quiggold, Sidon Ithano
Drop the Shield
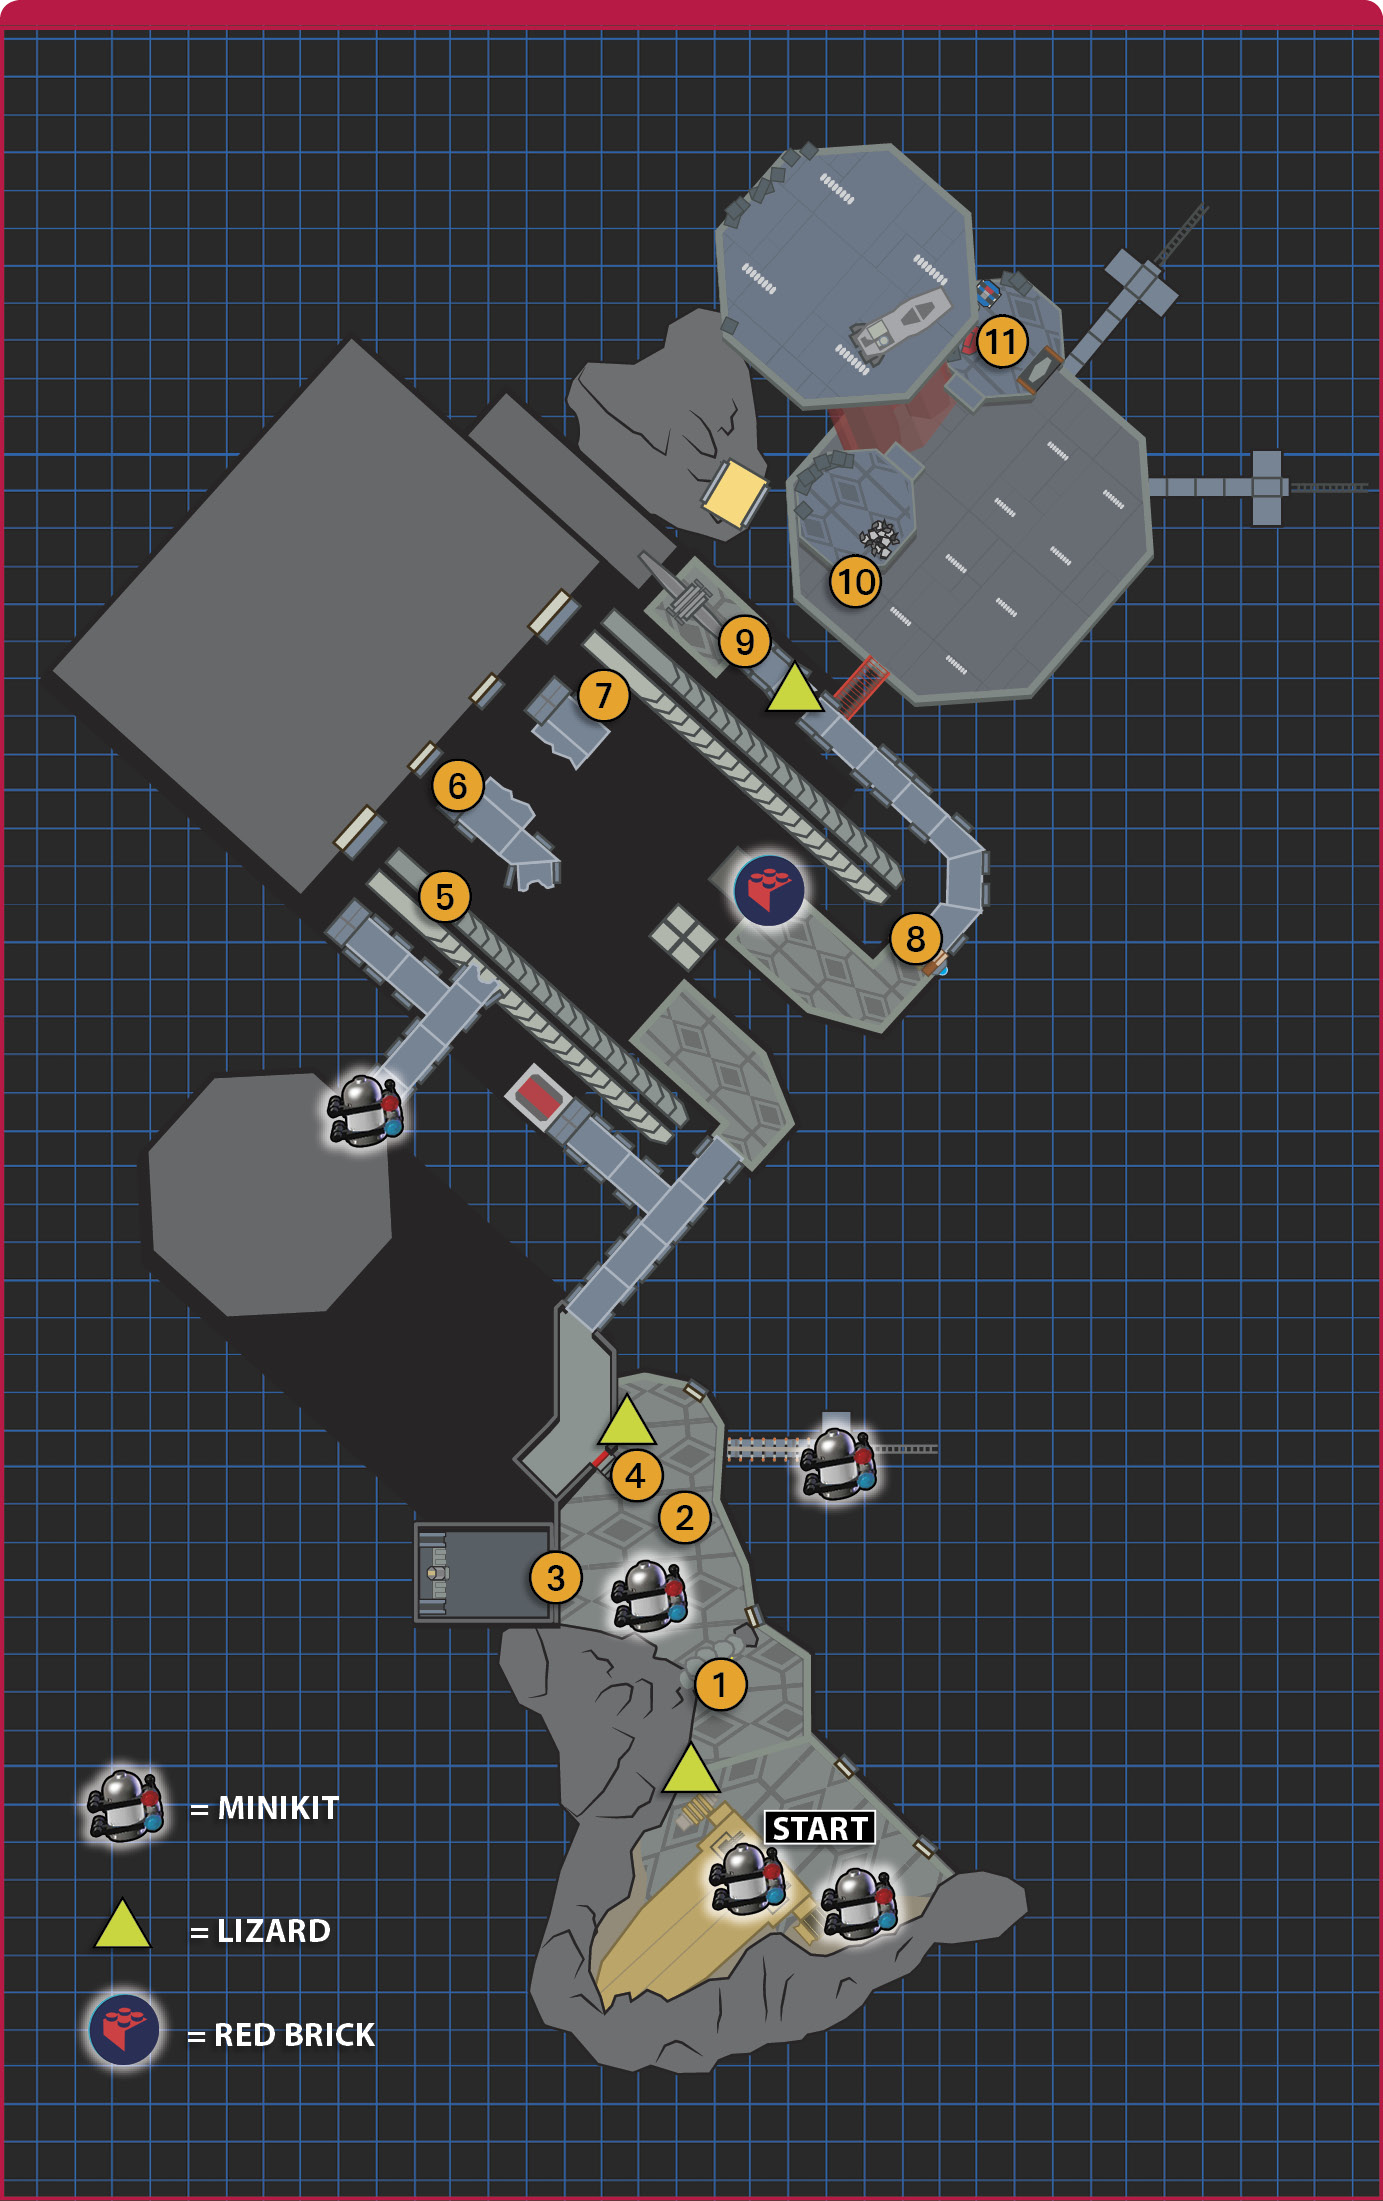
There’s a wall of gold LEGO bricks 1 that keeps enemies away initially, leaving you free to explore the area and collect studs. When you’re done, tag to Quiggold and blast through the gold LEGO bricks and eliminate the stormtroopers on the other side of them.

With the stormtroopers out of the way, tag to Sidon Ithano and target the grapple handle. The yellow machine 2 becomes a pile of Multi-Build bricks when pulled apart.
Assemble strength handles against the door 3 with the Multi-Build bricks. Switch to Quiggold and pull on the strength handles to destroy the door to the shield generator building.


Eliminate the stormtroopers inside the building. Build another set of strength handles against the shield generator. Pull on the strength handles to expose the generator, which is built from silver LEGO bricks.
Tag to Pru Sweevant and destroy the generator with a thermal detonator. Break down the Multi-Build bricks, then cap the energy geyser on the right with them. Electricity lingers on the steps, making them impassable, until that happens.


Get to the Landing Pad


Ascend the staircase 4. Battle stormtroopers through the windowed walkway. Don’t worry about the giant fan until you return in Free Play, but the stormtroopers guarding it investigate your crew when they emerge from the windowed walkway.
Destroy the long gear shaft made of silver LEGO bricks 5 with a thermal detonator. A droid emerges from the blast doors and hovers overhead. Switch to Sidon Ithano and target the grapple handle under the droid.
Swing across to another broken section of the upper walkway with an assist from a grapple handle-equipped droid. Go to the white arrows 6 that send Sidon Ithano over the gap. Drop down to the concrete walkway.

Rebuild the door controls by directing the Multi-Build bricks 7 to the spot in the corner on the left. The blast doors open and trios of droids emerge from it. When the droids stop in place, Pru Sweevant and Quiggold can hop across the gap using the droids.
Tag to Quiggold to clear the path ahead 8. The stormtroopers across the gap deactivate the bridge. Clear out the debris blocking access to an access hatch 9.
Send Pru Sweevant through the access hatch, which leads to a ledge above. Toss a thermal detonator at the silver LEGO device to send a makeshift bridge below. The final lizard is on this broken walkway as well.

Steal a Troop Transport
The bridge isn’t stable, so the first person to cross it slips off. Quickly tap the flashing button to get back up. The others can hurry across without a worry, except for stormtrooper fire.
Stormtroopers shuttled in on floating platforms form a greeting party 10, and you must defeat a dozen of them. After the twelfth stormtrooper falls, a microfighter is assembled on a landing pad and sent after your crew.
It’s constructed from gold LEGO bricks, making it Quiggold’s target. When the mini TIE fighter is rebuilt with silver LEGO bricks, it’s Pru Sweevant’s turn to shoot it down.


A final platform swoops in, but it’s caught in plasma and crashes. Switch to Sidon Ithano and jump to the landing pad. Move to the right edge of the platform, then target the grapple handle above.
Swing over to the landing pad to the left 11. Rebuild the lift’s engine so that Quiggold and Pru Sweevant have a way to get up on the platform. Scan the back of the landing pad. Target the silver LEGO gears with a thermal detonator to remove the energy shields on the support columns.
Scan the right-hand shaft to reveal a door built from gold LEGO bricks. Remove the bricks, then toss a thermal detonator at the silver LEGO bricks behind it.

Cobble together strength handles from the bricks leftover after the explosion. Rip open the left shaft to expose another column of silver LEGO bricks. The troop transport slides down until its new crew takes over and flies off.
Characters now available for purchase
 Blass Tyran
 Oskus Stooratt
 Stormtrooper Sergeant
 Wi’ba Tuyill