
Tom Clancy's Splinter Cell Blacklist Guide Essentials Interface: Using the HUD
Interface: Using the HUD
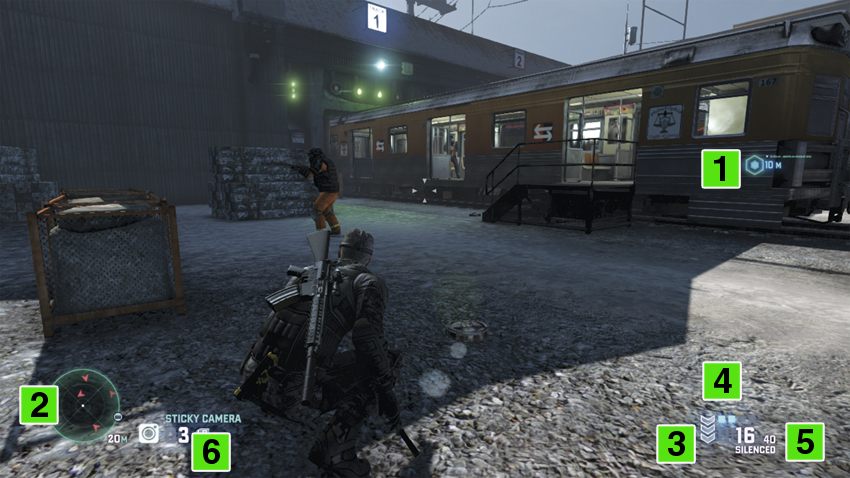
1. Waypoint Marker
This icon represents the current waypoint, along with the distance to the waypoint, measured in meters. Follow waypoints to navigate the area of operations, moving from one objective to the next.
2. Radar
The white dot in the middle represents your location in relation to other hostiles or items. Detected hostiles, drones, and security cameras appear on the Radar as either red diamonds or red arrows. Two half circles on either side of a hostile icon means they are alerted to your presence. High Value Targets appear as a red circle with a diamond or arrow in the middle. Dead Drops, Blacklist Laptops, and Supply Caches are shown as a white icon representing their type. The number underneath the Radar represents how many meters you can see around you.
3. Execute Gauge
When the icons are red, you can Mark hostiles and use your Execute Ability. When the icons are white, you are unable to use your Execute Ability, but you can Mark hostiles ahead of time for when your ability is ready for use.
4. Magazine Ammo
This number represents the number of rounds remaining in your selected weapon’s magazine. Reloading happens automatically when a magazine is empty.
5. Reserve Ammo
This number represents the total number of rounds you’re carrying in spare magazines.
6. Item Count
When a gadget or grenade is selected for use, the name and the number remaining are shown here.