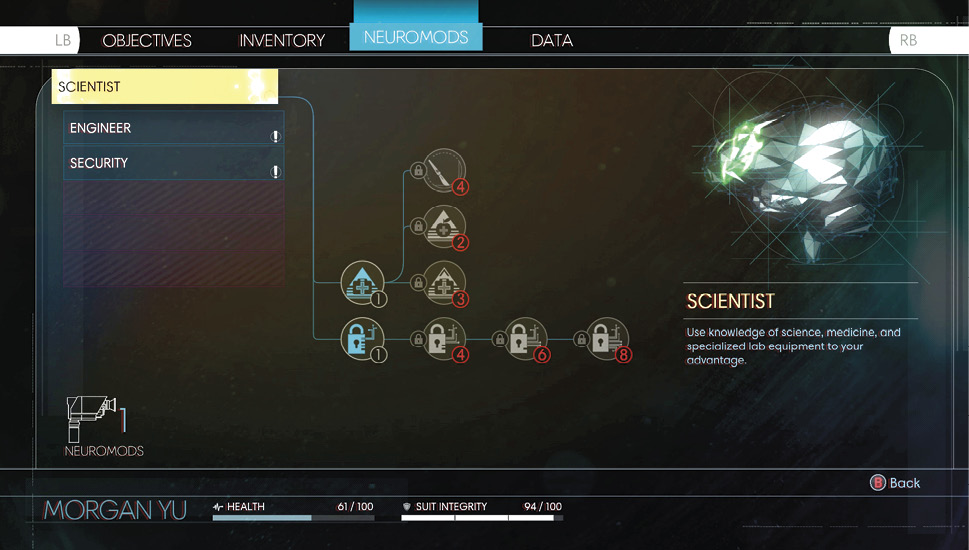
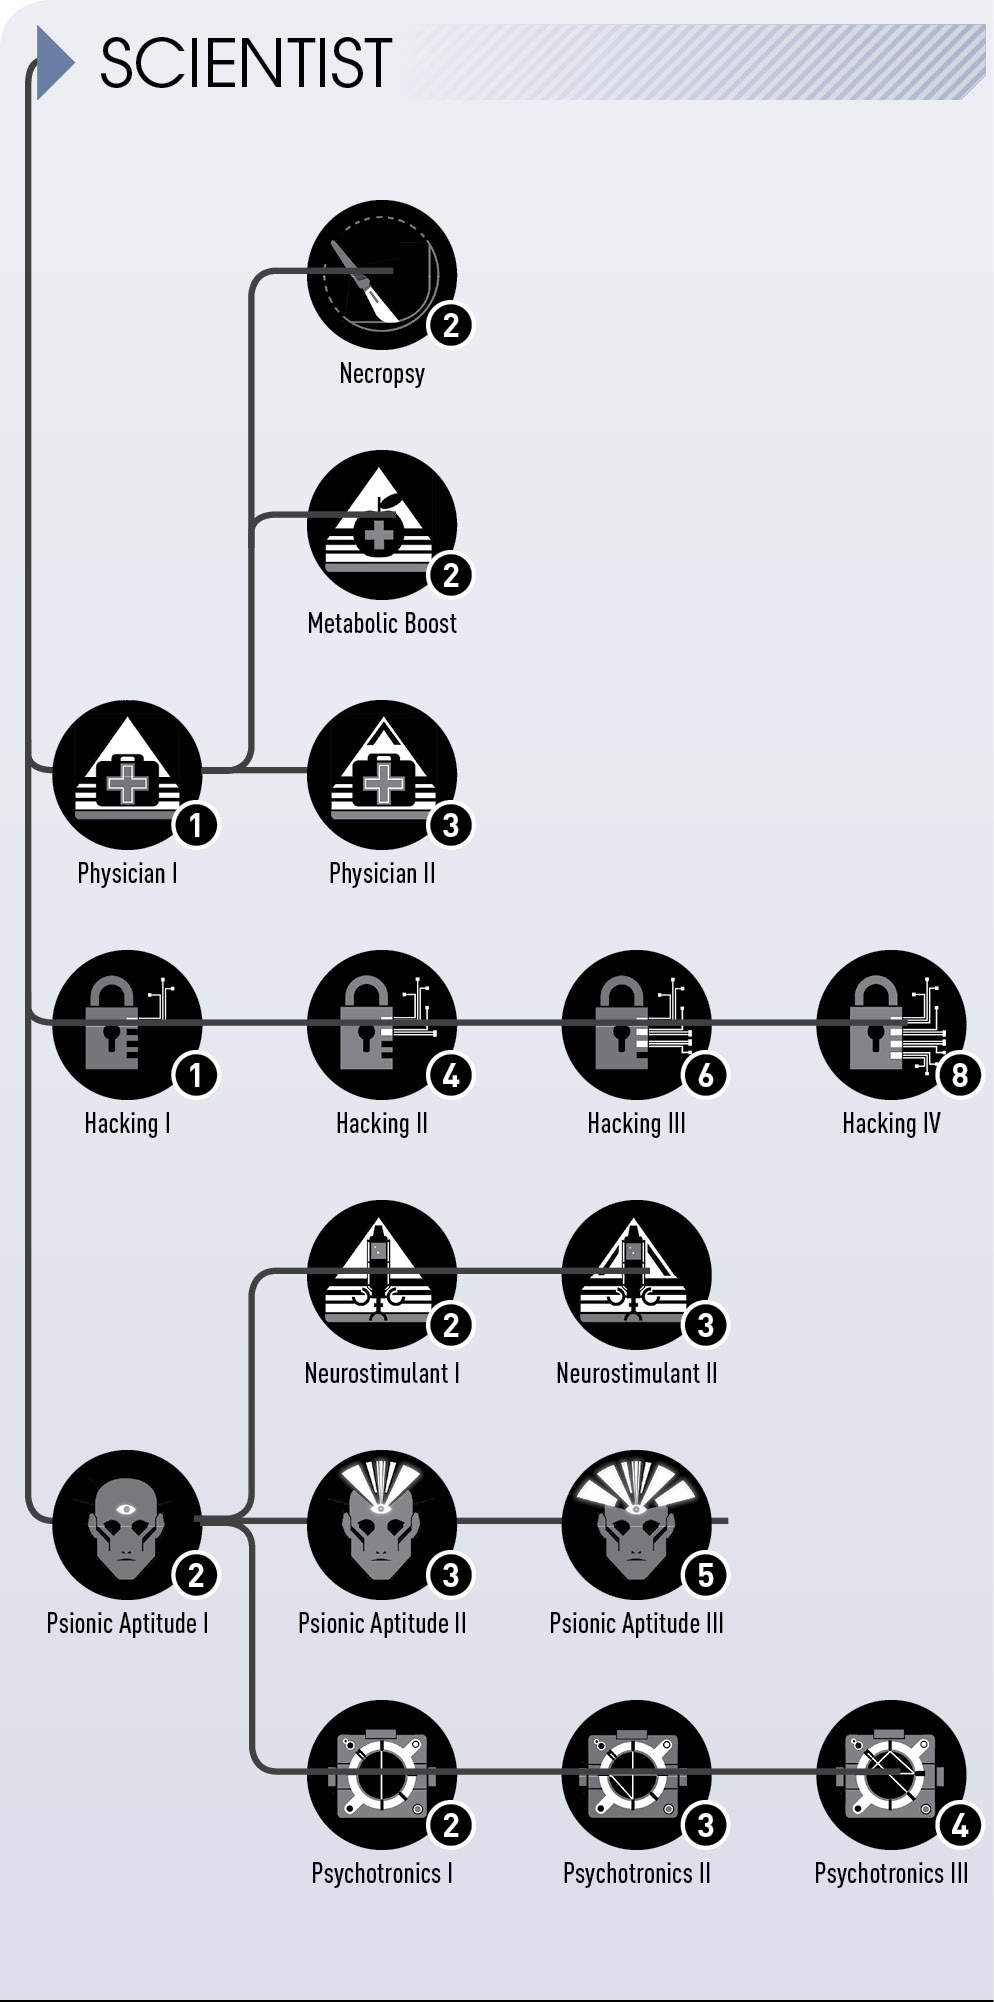
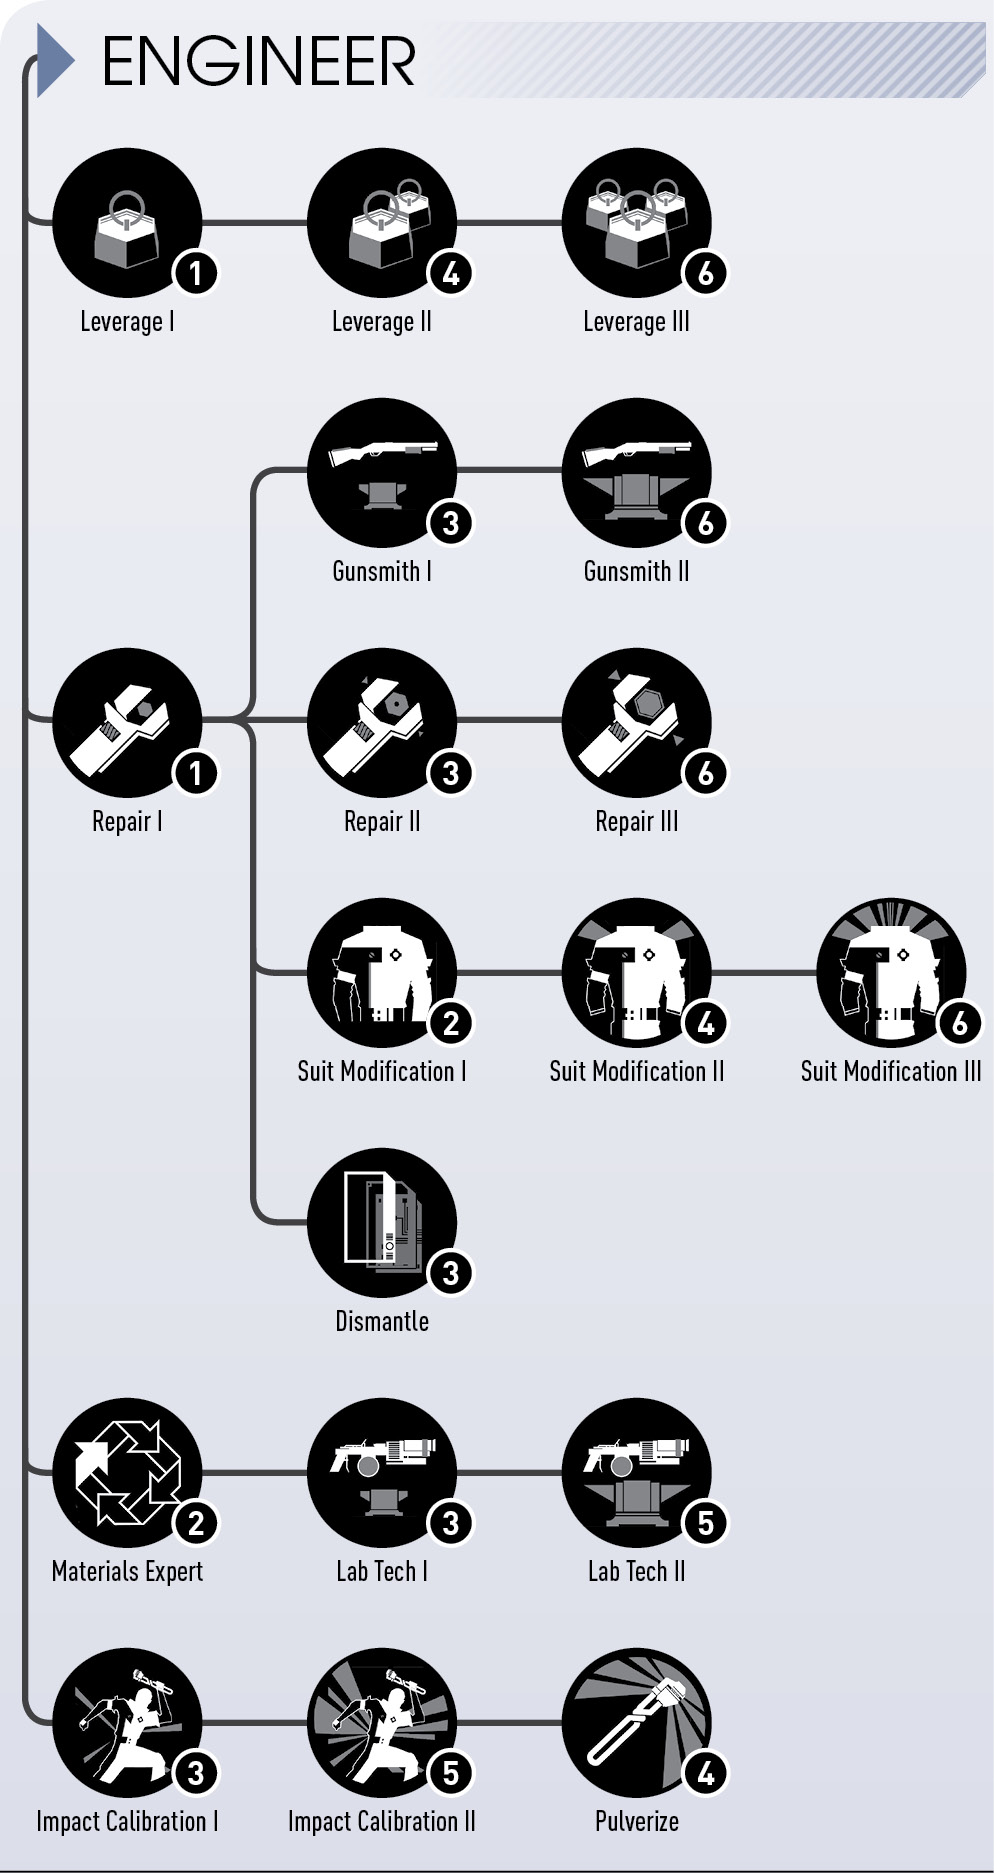
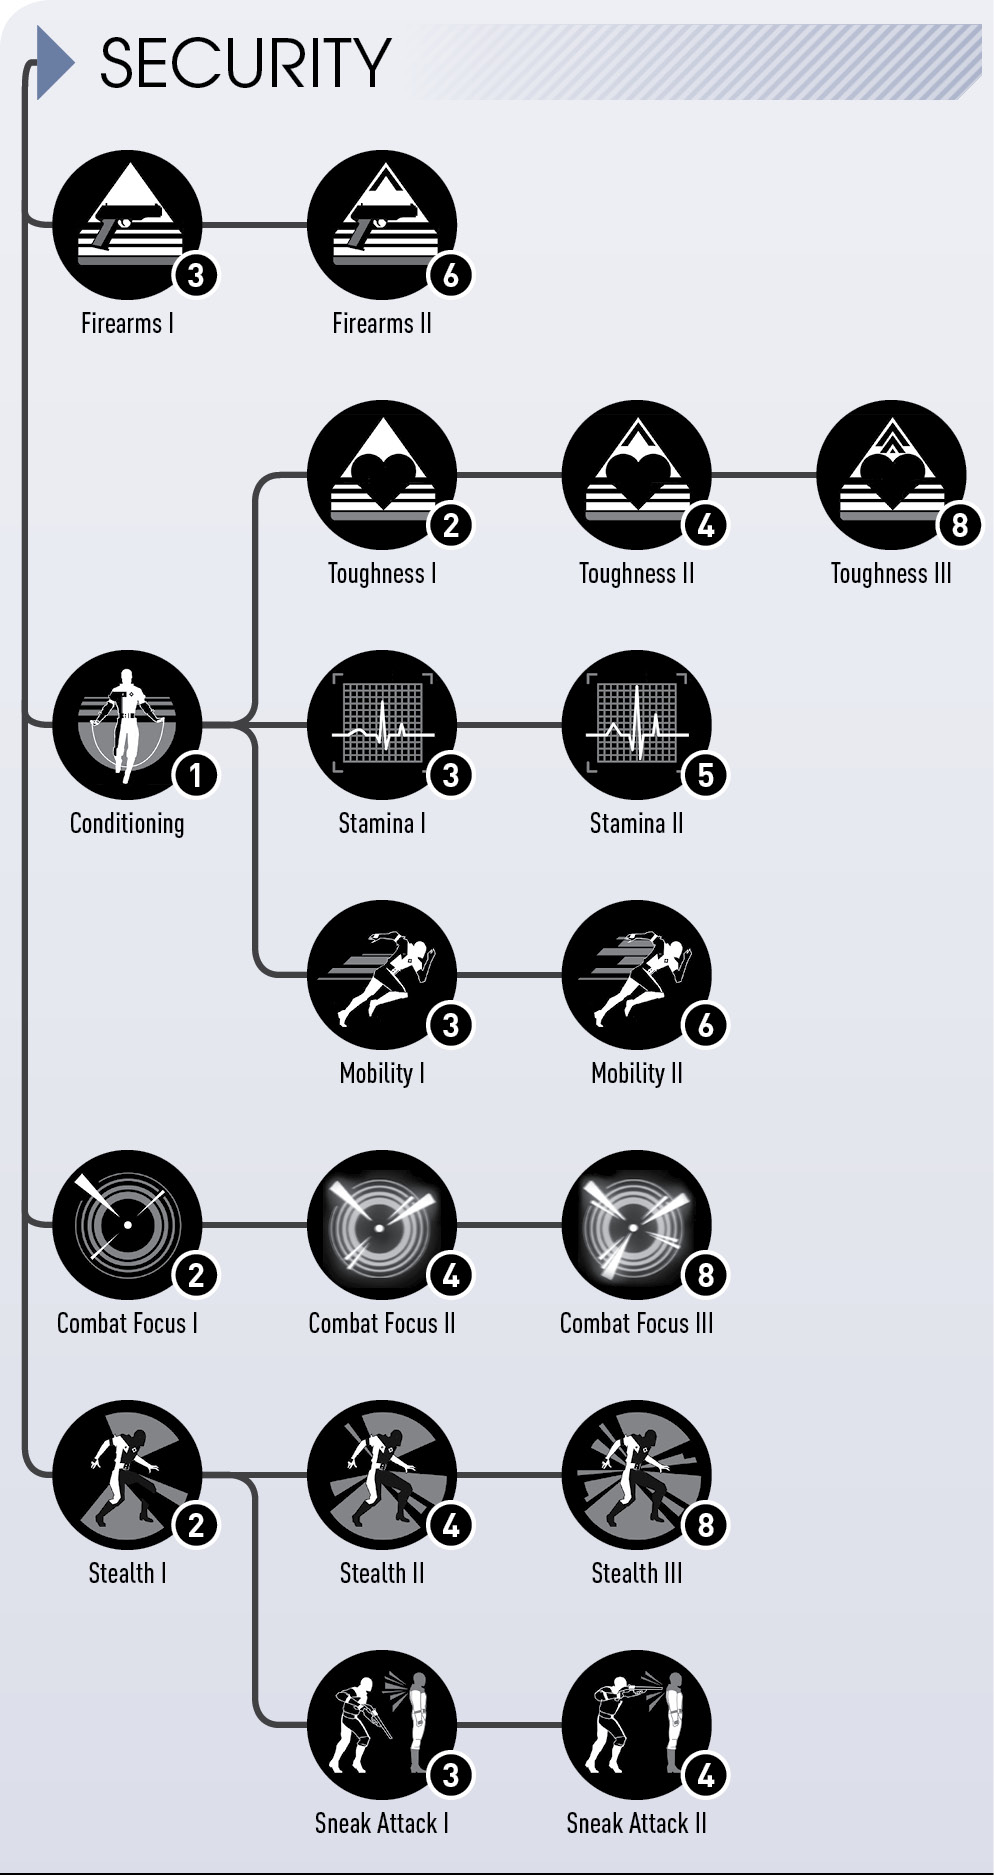
Upon first acquiring a Neuromod, all human abilities are unlocked. Access the Neuromod section of the TranScribe to view all abilities within the Scientist, Engineer, and Security skill trees. However, most abilities have prerequisites that must be met before they can be acquired. Furthermore, each ability requires a certain number of Neuromods prior to installation. But once these conditions are met, abilities can be installed via the TranScribe. With the exception of Combat Focus, all human abilities are passive, requiring no activation or Psi energy. Still, these abilities enhance your character in various ways while allowing you to perform a variety of tasks ranging from repairing broken items to hacking workstations and other devices.
Access your TranScribe to install Neuromods. All human abilities are available at the outset.
Human Abilities: Achievements and Trophies
Image
Name
Description
Gamerscore
Trophy
Engineer (Repair)
You repaired at least 20 objects on and around Talos I.
15
Bronze
Dead Calm (Combat Focus)
You killed an enemy while using Combat Focus.
15
Bronze
Operator (Hacking)
You hacked at least 20 hackable objects on and around Talos I.
15
Bronze
Scientist
Description
Use knowledge of science, medicine, and specialized lab equipment to your advantage.
Physician I, Necropsy, Hacking I & II, Psionic Aptitude I, Psychotronics I
Physician I
Neuromods Required
1
Prerequisite
None
Description
Your knowledge of medical practice increases the effectiveness of Medkits to 150%.
Notes
The low cost of this ability makes it a good choice during the early moments of the game. While the increased boost to Medkits is welcome, Physician I serves as the prerequisite for Necropsy, a must-have ability if you plan to fabricate your own Neuromods.
Physician II
Neuromods Required
3
Prerequisite
Physician I
Description
Your knowledge of medical practice increases the effectiveness of Medkits to 300%.
Notes
Unless playing on Nightmare difficulty, Physician II isn’t essential. You can usually find plenty of health-giving items to keep you alive. Your Neuromods are better spent on other abilities.
Necropsy
Neuromods Required
2
Prerequisite
Physician I
Description
Recover more valuable organs from Typhon remains. Typhon organs can be recycled for exotic material, which is used in the fabrication of Neuromods.
Notes
Don’t overlook this ability—install it early on. Necropsy allows you to extract more tissue from Typhon corpses which can then be recycled into exotic material. Exotic material is somewhat rare. The more you can acquire, the better off you’ll be when it comes to fabricating Neuromods.
Metabolic Boost
Neuromods Required
2
Prerequisite
Physician I
Description
Doubles both the duration of the Well Fed bonus and the health gained by consuming food.
Notes
The usefulness of this ability is largely dependent on how often you rely on food to replenish your health. Consuming food is a great way to top off your health, and this ability increases these benefits. Don’t make this ability a priority, but consider installing it if you have a couple of Neuromods to spare.
Hacking I
Neuromods Required
1
Prerequisite
None
Description
Bypass level 1 security measures on computers and robotic systems.
Notes
Hacking I is the entry-level ability required to crack safes, keypads, and workstations. Very few items have such low security, so think of Hacking I as a mere stepping stone toward the more powerful Hacking abilities.
Hacking II
Neuromods Required
4
Prerequisite
Hacking I
Description
Bypass level 2 security measures on computers and robotic systems.
Notes
Hacking II is much more useful than its predecessor, allowing you access to a wider range of secure devices. If you’re not fond of hunting down notes and emails containing passwords and codes, this is a worthwhile ability. Hacking II also allows you to hack turrets. This is necessary if a turret becomes hostile due to tampering by a Technopath, or if you install two or more Typhonabilities.
Hacking III
Neuromods Required
6
Prerequisite
Hacking II
Description
Bypass level 3 security measures on computers and robotic systems.
Notes
Costing six Neuromods, Hacking III isn’t cheap. But it allows you to hack the majority of keypads, workstations, and safes on Talos I. Consider installing this ability once you’ve accumulated several extra Neuromods or obtained a Neuromod fabrication license.
Hacking IV
Neuromods Required
8
Prerequisite
Hacking III
Description
Bypass level 4 security measures on computers and robotic systems.
Notes
With Hacking IV, there’s no device you can’t crack. However, devices with level 4 security are somewhat rare, making this ability a hard sell until you’ve reached the latter stages of the game or acquire more Neuromods than you know what to do with. Cracking level 4 safes and workstations can yield some valuable items and information. The ability is most useful for hacking hostile Military Operators.
Psionic Aptitude I
Neuromods Required
2
Prerequisite
None
Description
Increase your Psi pool to 120.
Notes
Hold off on this ability until you acquire the Psychoscope—this is when your Psi energy meter first appears. Boosting your Psi pool to 120 is worthwhile if you plan to invest in a few Typhonabilities. This increases the number of Typhonabilities you can deploy before using a Psi Hypo or Science Operator to recover. Psionic Aptitude I is also the gateway prerequisite to Neurostimulant I and Psychotronics I.
Psionic Aptitude II
Neuromods Required
3
Prerequisite
Psionic Aptitude I
Description
Increase your Psi pool to 150.
Notes
If you find yourself using more and more Typhonabilities, Psionic Aptitude II is a good choice—and it’s relatively cheap. With a Psi pool of 150 you can deploy more Typhonabilities, relying less on Psi Hypos.
Psionic Aptitude III
Neuromods Required
5
Prerequisite
Psionic Aptitude II
Description
Increase your Psi pool to 200.
Notes
Psionic Aptitude III is ideal when building a character relying primarily on Typhonabilities, benefiting from a generous Psi pool of 200. However, the ability isn’t cheap. Consider the upgrade if you have an abundance of Neuromods or the capability of fabricating your own.
Neurostimulant I
Neuromods Required
2
Prerequisite
Psionic Aptitude I
Description
Increase the effectiveness of Psi Hypos by 50%.
Notes
Don’t bother investing in this ability until you obtain the Psychoscope, unlocking the Typhon ability trees. Even then, hold back until you determine how heavily you deploy Typhonabilities—Psi Hypos and this ability are worthless if you have no intention of using Typhonabilities.
Neurostimulant II
Neuromods Required
3
Prerequisite
Neurostimulant II
Description
Increase the effectiveness of Psi hypos by 100%.
Notes
Like Neurostimulant I, this upgraded ability is only useful if you’re constantly using Psi Hypos to recover following the deployment of Typhonabilities. Only consider this ability if you’re building a Typhon-heavy character.
Psychotronics I
Neuromods Required
2
Prerequisite
Psionic Aptitude I
Description
Allows installation of two additional chipsets on your Psychoscope.
Notes
Initially, your Psychoscope has two available slots for chipsets. This ability expands the number of chipset slots to four. Installing up to four chipsets allows you to benefit from a wider range of buffs.
Psychotronics II
Neuromods Required
3
Prerequisite
Psychotronics I
Description
Allows installation of two additional chipsets on your Psychoscope.
Notes
Building on Psychotronics I, this ability boosts the number of chipset slots in your Psychoscope to six. This ability only makes sense once you’ve acquired a variety of Scope Chipsets. Even then you can swap out chipsets on the fly, making this ability less of a necessity.
Psychotronics III
Neuromods Required
4
Prerequisite
Psychotronics II
Description
Allows installation of two additional chipsets on your Psychoscope.
Notes
Psychotronics III boosts the number of chipset slots in your Psychoscope to eight. Even in the game’s latter stages, this ability is a bit excessive. However, it might be worth it if you’re annoyed by constantly managing your installed chipsets.
Engineer
Description
Specialize in modifying your gear, repairing, and crushing problems with your wrench.
Leverage I, Repair I & II, Gunsmith I & II, Suit Modification I, Materials Expert, Lab Tech I & II
Leverage I
Neuromods Required
1
Prerequisite
None
Description
Lift heavy objects with ease and throw objects further. Thrown objects will damage enemies.
Notes
Leverage I allows you to lift moderately sized objects, and throw them with surprising force. While throwing objects at enemies isn’t the best offensive option, if you score a hit, it will inflict some damage. This ability is most useful for moving objects out of your way, allowing you to access new areas. Given its cheap cost and versatility, consider installing this ability early on.
Leverage II
Neuromods Required
4
Prerequisite
Leverage I
Description
Lift even heavier objects and throw objects even further. Thrown objects will damage enemies.
Notes
This ability improves upon Leverage I, giving you the strength to lift and throw larger objects. The increased mass of the objects you can lift results in heavier damage when thrown at an enemy. Still, lifting and throwing objects isn’t always the best course of action. The ability is more suitable for dismantling makeshift barricades, giving you access to new rooms and areas.
Leverage III
Neuromods Required
6
Prerequisite
Leverage II
Description
Lift anything that isn’t bolted to the floor and throw objects even further. Your brute strength can be applied to force open an unpowered door.
Notes
Leverage III isn’t cheap, but it grants you the strength to lift and throw any movable object on Talos I—throwing large objects can outright kill weaker Typhon entities. In addition to lifting and throwing massive objects, the ability also allows you to force unpowered doors open, eschewing the need to locate a power kiosk or alternative path.
Gunsmith I
Neuromods Required
3
Prerequisite
Repair I
Description
Allows use of Weapon Upgrade Kits to upgrade security weapons beyond modification level 1.
Notes
Gunsmith I allows you to make significant improvements when using Weapon Upgrade Kits on the Silenced Pistol, Shotgun, Disruptor Stun Gun, or Artemis Golden Pistol. If you find yourself relying on any of these weapons regularly, this is a worthwhile ability to acquire (but you’ll need Repair I first).
Gunsmith II
Neuromods Required
6
Prerequisite
Gunsmith I
Description
Allows use of Weapon Upgrade Kits to fully upgrade security weapons.
Notes
The Silenced Pistol, Shotgun, Disruptor Stun Gun, and Artemis Golden Pistol can’t be fully upgraded until the Gunsmith II ability is installed. Hold off on this ability until you’ve addressed more pressing priorities, like Lab Tech I and Lab Tech II. The upgrades available under Gunsmith I should prove adequate until you reach the game’s midpoint.
Repair I
Neuromods Required
1
Prerequisite
None
Description
Fix broken Grav Shafts, Fabricators, and Recyclers with Spare Parts.
Notes
Repair I is a great first-choice candidate when acquiring your first Neuromod. While the ability limits you to fixing Grav Shafts, Fabricators, and Recyclers, it’s a crucial gateway prerequisite for other abilities including Repair II, Gunsmith I, Suit Modification I, and Dismantle. Costing only one Neuromod, this ability is a no-brainer—install it as soon as possible.
Repair II
Neuromods Required
3
Prerequisite
Repair I
Description
Fix broken Turrets, Operators, and Electrical Junctions with Spare Parts. Increased efficiency with Spare Parts.
Notes
When it comes to fixing things, Repair I is somewhat lacking. But much of its deficiencies are addressed by Repair II, allowing you to fix almost everything on Talos I. This comes in handy for repairing damaged turrets, Operators, and electrical junctions. The ability also reduces the amount of spare parts required to fix each object. Install this ability as early as possible so you can leverage the impressive firepower provided by turrets.
Repair III
Neuromods Required
6
Prerequisite
Repair II
Description
Fortify Turrets with Spare Parts. Increased efficiency with Spare Parts.
Notes
Repair III isn’t as crucial as its predecessors—unless you’re a huge fan of turrets. This gives you the ability to fortify turrets, allowing them to absorb much more damage before they become disabled. Fortified turrets are more effective against aggressive, durable enemies, like Thermal Phantoms. If you have plenty of spare parts and the necessary Neuromods, this is a worthwhile ability once you reach the game’s midpoint. But if you don’t use turrets regularly, forget about it.
Suit Modification I
Neuromods Required
2
Prerequisite
Repair I
Description
Upgrade your TranStar uniform with extra inventory space and allow installation of two additional chipsets.
Notes
As you collect more and more items, the lack of inventory space becomes a problem. Suit Modification I helps relieve this by expanding the number of inventory slots. The ability also unlocks two extra chipset slots, allowing you to install up to four simultaneously. Consider installing this ability early on, particularly as you discover more weapons.
Suit Modification II
Neuromods Required
4
Prerequisite
Suit Modification I
Description
Upgrade your TranStar uniform with extra inventory space and allow installation of two additional chipsets.
Notes
If you have Suit Modification I and you’re still running out of inventory space, upgrading this ability can help alleviate some of that inventory management anxiety. In addition, this ability unlocks two additional chipset slots, bringing the total to six.
Suit Modification III
Neuromods Required
6
Prerequisite
Suit Modification II
Description
Upgrade your TranStar uniform with extra inventory space and allow installation of two additional chipsets.
Notes
Suit Modification III expands your inventory to its maximum size. This makes it easier to carry every weapon as well as supplies and recyclable junk. This ability also unlocks the last two chipset slots, bringing the total to eight. With all the extra space, you’ll spend less time sorting through your inventory and managing chipsets.
Dismantle
Neuromods Required
3
Prerequisite
Repair I
Description
Break down equipment in your inventory into Spare Parts and recover Spare Parts from destroyed Operators.
Notes
Constantly repairing objects takes its toll on your stash of spare parts. Dismantle allows you to take apart objects in your inventory, yielding extra spare parts. The ability also allows you to retrieve spare parts from destroyed Operators. Dismantle isn’t the most crucial ability, but it can prove useful if spare parts become scarce.
Materials Expert
Neuromods Required
2
Prerequisite
None
Description
Increase recycling yield by 20%.
Notes
Install this ability early to recover 20% more material when using Recyclers. While the increased recycling yield is welcome, it’s not the only reason to make Materials Expert an early choice. The ability is also the gateway prerequisite for Lab Tech I, allowing you to install advanced upgrades to the GLOO Cannon and Q-Beam.
Lab Tech I
Neuromods Required
3
Prerequisite
Materials Expert
Description
Allows use of Weapon Upgrade Kits to upgrade non-standard tech weapons beyond modification level 1.
Notes
Upgrading the GLOO Cannon and Q-Beam should be a top priority—Lab Tech I gives you the knowledge to do so. Apply Weapon Upgrade Kits to these weapons to install second-tier upgrades, making each weapon more effective. Prioritize Q-Beam upgrades over the GLOO Cannon, as it’s the most effective weapon against advanced Typhon organisms.
Lab Tech II
Neuromods Required
5
Prerequisite
Lab Tech II
Description
Allows use of Weapon Upgrade Kits to fully upgrade non-standard tech weapons.
Notes
Lab Tech II is required to fully upgrade the GLOO Cannon and Q-Beam. Apply your Weapon Upgrade Kits to the Q-Beam first, focusing on its power and firing time. Once those stats are maxed out, apply upgrades to the GLOO Cannon’s incapacitation rate and range. Upgrading these key weapons makes survival aboard Talos I a bit easier.
Impact Calibration I
Neuromods Required
3
Prerequisite
None
Description
Reduce stamina cost of wrench attacks by 25%.
Notes
If you prefer whacking enemies with the wrench, Impact Calibration I may be a worthwhile ability. This reduces the amount of stamina required to swing the wrench by 25%. While the wrench is a vital weapon during the game’s opening moments, its importance wanes as you acquire new weapons. Given its relative high cost, this ability is a tough sell unless you’re adamant about wielding the wrench.
Impact Calibration II
Neuromods Required
5
Prerequisite
Impact Calibration I
Description
Wrench attacks deal 50% more damage.
Notes
Impact Calibration II makes melee strikes with the wrench even deadlier, increasing damage by 50%. For best results, always sneak up on enemies before attacking to gain an additional 150% sneak attack damage bonus. At this point, the wrench becomes a serious contender when attacking unsuspecting Mimics, killing with one hit.
Pulverize
Neuromods Required
4
Prerequisite
Impact Calibration II
Description
Attacking with the wrench has a 25% chance to do Bonus Damage.
Notes
Pulverize is the pinnacle of wrench combat abilities, giving you a 25% chance of inflicting bonus damage. When stacked with Impact Calibration II and Sneak Attack I or Sneak Attack II, the wrench has the potential to inflict surprisingly heavy damage, easily killing weaker Typhon organisms with a single hit.
Security
Description
Boost your physical abilities, skill with firearms, and security tactics.
Conditioning I, Toughness I & II, Mobility I, Combat Focus I & II, Stealth I, Sneak Attack I
Firearms I
Neuromods Required
3
Prerequisite
None
Description
Increases damage with security weapons to 120% and chance to critically hit to 6%.
Notes
Firearms I applies slight damage bonuses to the Silenced Pistol, Shotgun, Disruptor Stun Gun, and Artemis Golden Pistol, making them even deadlier. Increased damage output results in reduced ammo consumption over time, allowing you to use these weapons more frequently. So consider installing this upgrade early on.
Firearms II
Neuromods Required
6
Prerequisite
Firearms I
Description
Increases damage with security weapons to 150% and chance to critically hit to 10%.
Notes
This upgrade offers improved damage bonuses over Firearms I, but at a rather steep price. The value of Firearms II is dependent on how frequently you use the Silenced Pistol, Shotgun, Disruptor Stun Gun, and Artemis Golden Pistol. The six Neuromods required to acquire this ability could be better used, particularly early on.
Conditioning
Neuromods Required
1
Prerequisite
None
Description
Increase your health to 115 and your stamina to 105. Run, sneak, climb, and sprint 5% faster.
Notes
Costing a single Neuromod, the Conditioning ability should be installed early, with no reservations. In addition to boosting your health, stamina, and movement speed, the ability is a gateway prerequisite to Toughness I, Stamina I, and Mobility I.
Toughness I
Neuromods Required
2
Prerequisite
Conditioning
Description
Increase your health to 150. Natural life span increased by 25 years.
Notes
Toughness I builds on the health-boosting bonus offered by Conditioning, increasing your maximum health to 150. This allows you to take more damage before recovering with a Medkit, food, or Medical Operator. Given the relatively cheap cost, this is good choice when playing on any difficulty.
Toughness II
Neuromods Required
4
Prerequisite
Toughness I
Description
Increase your health to 200. Natural life span increased by 50 years.
Notes
The health boosts continue with Toughness II, increasing your maximum health to 200. Do you really need that much health? It all depends on your skill level and the game’s selected difficulty. Novice players or those playing on Nightmare difficulty can definitely benefit from the extra health.
Toughness III
Neuromods Required
8
Prerequisite
Toughness II
Description
Increase your health to 300. Natural life span increased by 75 years.
Notes
Sporting a maximum health of 300, Toughness III is best reserved for those playing on Nightmare difficulty, where damage inflicted by enemies is extreme. When playing on lesser difficulties, the use of Medkits and other health items should be sufficient to keep you alive. Even on Nightmare, the cost of Toughness III can be a deterrent.
Stamina I
Neuromods Required
3
Prerequisite
Conditioning
Description
Increases your stamina to 125.
Notes
Each time you sprint, jump, or swing your wrench, it depletes your stamina, indicated by a white bar appearing in the center of the HUD. If you find yourself getting winded by these strenuous activities, Stamina I offers a slight boost.
Stamina II
Neuromods Required
5
Prerequisite
Stamina I
Description
Increases your stamina to 150.
Notes
Unless you’re sprinting through Talos I as quickly as possible, investing in Stamina II shouldn’t be a priority. While the ability does offer an increase to your stamina, it also costs five Neuromods to install. You can usually find a better way to allocate your Neuromods.
Mobility I
Neuromods Required
3
Prerequisite
Conditioning
Description
Increase overall movement speed. Run, sneak, climb, and sprint 25% faster.
Notes
Mobility I provides a slight boost to your overall movement speed. The faster movement doesn’t necessarily result in a loss of stealth, so don’t worry about alerting enemies while sneaking at a faster rate. How important is it for you to move faster? It’s up to you to determine if the ability is worth the three Neuromods required to install.
Mobility II
Neuromods Required
6
Prerequisite
Mobility I
Description
Gain the ability to sprint with ludicrous speed and to jump incredibly high.
Notes
While the speed gains offered by Mobility I are relatively modest, Mobility II takes speed to a whole new level. Sprinting with this ability allows you to cover ground extremely fast. You can also jump higher and further. Combine sprinting and jumping to leap great distances and heights. Use this in conjunction with the Artax Propulsion System to cover some impressive distances.
Combat Focus I
Neuromods Required
2
Prerequisite
None
Activation Cost
20 Psi
Description
Enter a state of Combat Focus for 10 seconds in which time slows around you and actions cost 50% stamina.
Notes
Combat Focus I and its successors are the only human abilities which consume Psi energy. When activated, time slows, making it easier to dodge enemy attacks while countering with attacks of your own. Use these ten seconds wisely—seek cover, move to a flanking position, or simply escape if you’re outnumbered. Costing only two Neuromods, Combat Focus I is a worthwhile ability, particularly if you’re new to FPS games.
Combat Focus II
Neuromods Required
4
Prerequisite
Combat Focus I
Activation Cost
20 Psi
Description
Combat Focus duration increases to 15 seconds, time slows less for you than your enemies, your attacks deal 120% damage, and actions cost 25% stamina.
Notes
Combat Focus II improves upon its predecessor, slowing time for 15 seconds and granting you a 120% damage bonus for all attacks inflicted during this period. While your movement is still slow, your enemies move even slower. This gives you a significant tactical advantage, allowing you to outmaneuver fast-moving enemies like Mimics and Etheric Phantoms. Try to attack before you’re spotted to benefit from the 150% sneak attack bonus—this stacks with Combat Focus II’s 120% damage bonus.
Combat Focus III
Neuromods Required
8
Prerequisite
Combat Focus II
Activation Cost
20 Psi
Description
Combat Focus duration increases to 20 seconds, time slows around you but you can move normally, your attacks deal 150% damage, and actions cost no stamina.
Notes
This is the apex of the Combat Focus abilities, lasting 20 seconds and offering a variety of benefits, including a 150% damage bonus. As time slows around you, you continue to move at normal speed and experience no stamina costs. This allows you to race up to enemies and attack at close range with weapons like the wrench and Shotgun before they can even respond. While Combat Focus III isn’t cheap, it’s worth the superhero-like capabilities.
Stealth I
Neuromods Required
2
Prerequisite
None
Description
Enemies take longer to detect you when you are sneaking or crawling.
Notes
If you prefer a cautious and less confrontational approach to exploring Talos I, Stealth I allows you to sneak around without drawing too much attention. The ability only applies while sneaking or crawling, so stay low. Consider combining this with Mobility I to increase your movement speed while sneaking. Otherwise, crawling around can be slow.
Stealth II
Neuromods Required
4
Prerequisite
Stealth I
Description
Walk and run without making noise.
Notes
Stealth II builds on the abilities of Stealth I, allowing you to walk and run without making noise. However, you can still be spotted just as easily. So always drop to a crouch and sneak around when operating in areas occupied by enemies—the covert benefits of Stealth I still apply while sneaking.
Stealth III
Neuromods Required
8
Prerequisite
Stealth II
Description
Sprint without making noise.
Notes
This ability extends the benefits of Stealth II to sprinting. But unless you want to draw unwanted attention, it’s still advisable to sneak when moving within line of sight of enemies—just because they can’t hear you it doesn’t mean they can’t see you. Given the slight improvement over Stealth II, this ability is rather costly, requiring eight Neuromods.
Sneak Attack I
Neuromods Required
3
Prerequisite
Stealth I
Description
Do 200% damage to enemies while they are unaware of you.
Notes
Normally, you benefit from a 150% damage bonus when attacking unsuspecting enemies. This ability increases the damage bonus to 200%. Since Stealth I is a prerequisite, this helps increase the chance of sneaking up on enemies. The damage bonus is applied to any weapon, so attack with heavy-hitters like the Shotgun or Q-Beam to maximize damage output.
Sneak Attack II
Neuromods Required
4
Prerequisite
Sneak Attack I
Description
Do 250% damage to enemies while they are unaware of you.
Notes
Sneak Attack II offers a noticeable improvement over its predecessor, benefiting from a 250% damage bonus when attacking enemies who haven’t detected you. As with Sneak Attack I, continue attacking with high damage output weapons like the Shotgun and Q-Beam. This can make a huge difference when attacking durable enemies like Telepaths, Weavers, and Thermal Phantoms. This damage bonus can be stacked with those offered by Combat Focus II and III.