
Halo 3 ODST Guide Walkthrough Single Player Campaign
Uplift Reserve
Mission 03: Uplift Reserve
Dutch Drop-Pod Location to New Mombasa Perimeter
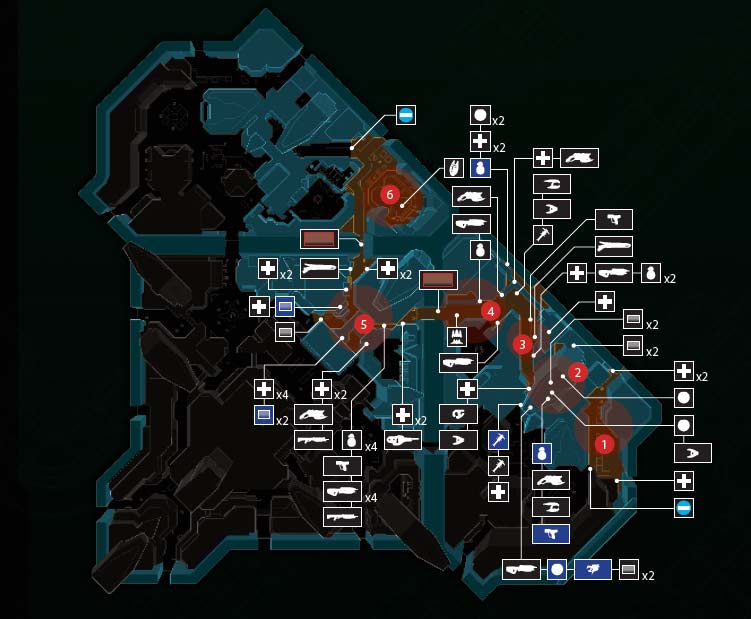
DUTCH • Uplift Nature Reserve • 30m after drop
Landing on the outskirts of the Uplift Reserve (a giant savannah-type nature reserve close to a suborbital space elevator), you (as Dutch) begin with a Spartan Laser and several nearby UNSC Marines with whom to rendezvous. After locating a Warthog, you defeat several Covenant pockets of resistance as you drive across the undulating terrain, attempting to locate a lost platoon of soldiers. Once you find the remains of these forces, you cull additional Covenant until you’re able to head across a bridge; witness the epic destruction of the elevator; and fight to the edge of New Mombasa, where you face your toughest concentration of foes and find a way into the city streets.
DATA STREAM
Uplift Reserve VISR Target Acquisition Mode Ratio: 5 percent*
*COMM Data Terminals are available only during Rookie missions.
Preferred Weapons
- Spartan Laser
- Warthog (vehicle)
- Brute Chopper (vehicle)
- Sniper Rifle
- Rocket Launcher
- Fuel-Rod Cannon*
*Hand this weapon to a Marine in the passenger seat of a Warthog you’re in.
Par Score
- 60,000
Level-Specific Achievements
- Wraith Killer: Kill all Wraiths in Uplift Reserve
- Vidmaster Challenge: Classic—Finish any level solo on Legendary, on LIVE, with no shots fired or grenades thrown.*
*This Vidmaster Challenge can be attempted on any Campaign mission; this is simply the easiest one to achieve it on.
Mission Objectives
- UPLIFT RESERVE Link up with friendly forces
- UPLIFT RESERVE Find Marine Second Platoon
- UPLIFT RESERVE Find Colonel across bridge
- UPLIFT RESERVE Drive up and out of park
Choke Point 1: Overturned Warthog
Objective
- UPLIFT RESERVE Link up with friendly forces


From your smoking escape Pod, check your available weaponry (a Silenced SMG and a devastating Spartan Laser), and trek northeast up a trail, passing the remains of a reserve map (which is far less detailed than your NAV map, which reveals a series of massive, outdoor bowl-shaped clearings linked with winding trails). Rendezvous with a squad of Marines as they locate an overturned Warthog [1A], and fire on a group of Grunts and an armored Brute. Look to the northwest to engage the enemy.
Tactic: A Short, Sharp Shock
As you engage the Covenant squad on the slightly higher ground [1B], you should employ short, controlled Silenced SMG blasts to knock down the Grunts nearest to you and any about to throw Grenades; then tackle the armored Brute using the same weapon. You can use the Spartan Laser, but lining up the shot isn’t the easiest plan, and dealing with suicide Grunts can be a pain. With the Marines backing you up (as long as you’re attacking the Covenant near the UNSC forces), you can destroy them in seconds. Quickly flip the overturned Warthog and enter the driver’s seat. Wait for two Marines to occupy the passenger and Turret locations; you’ll need them both for the incoming mechanized enemies.
Tactic: Laser of Death
Your Spartan Laser is a truly devastating weapon in the right hands. And in this case, the “right hands” means your Marine passenger. Hand the Spartan Laser to him while you drive; he has the luxury of unlimited ammunition while he holds this weapon, allowing him to destroy far more foes than you’re able to.
Choke Point 2: Covenant Drop Zone

There’s a violent confrontation playing out among the undulating scrubland. With the space elevator in the distance, head northeast. You must clear this expansive area of enemy vehicles. You’ll almost immediately encounter a Wraith, a Ghost, a Chopper, and a group of Jackals [2A].
Tactic: Laser Strikes
If you’re after the Wraith kill for personal reasons, you can opt to park the Warthog behind cover (this is especially important, as your Marines become prone if you don’t), and quickly aim your Spartan Laser on the Wraith. The weapon takes a few seconds to warm up, so make sure you have a clear shot but aren’t being fired upon by foes. Once the Laser strikes, dash back to your Warthog.

Tactic: Warthog of Courage
With no room for mistakes, it is imperative you deal with the Wraith as early as possible. The easiest way to complete this is to drive as close to the Wraith as you can without being instantly destroyed by its mortar, and then circle around the grav-tank until your Marine cohorts bombard it with enough firepower to destroy it. The key here is continuous movement; if you slow or stop for even a second, the Wraith launches an attack on you.
A few moments later, a Phantom descends from the sky while a second Wraith enters the northwest corner of the initial scrubland clearing [2B]. The tactic for finishing this tank is the same as detailed previously. By now, your crew should have easily defeated any Jackals in the area (you can help by e-braking over them, splattering them across the grass). However, you can now either hijack the Ghost or Chopper, or drive toward them as the Marines on your Warthog blast them to bits. There are advantages and disadvantages of using a Covenant vehicle over your trusty Warthog: The Chopper and Ghost allow you to drive and shoot at the same time; the Warthog requires a separate Turret gunner. However, the Warthog is well built and able to absorb more damage than a Ghost or Chopper. There’s no “wrong” choice here; choose your preferred method of transportation.
When there’s more than one of you attacking the Covenant, it makes most sense to have one player in a Warthog with Marines, while other members take a second Warthog, Chopper, and Ghost (if you manage to hijack all the available vehicles instead of destroying them).
Wraith Killer Achievement
There are six Wraiths throughout this mission. Instead of fleeing from them, you must eliminate them. Note that when a UNSC teammate or a cooperative player engages a Wraith, you must damage a Wraith in order for the kill to be counted toward this Achievement. If you don’t help with the kill, and the Wraith is destroyed, your Achievement becomes untenable.
Choke Point 3: Endangered Species
Objective
- UPLIFT RESERVE Find Marine Second Platoon
Exit Choke Point 2 by heading along the trail to the northwest, which winds around to a humped tunnel interior. En route, UNSC aircraft are seen in the sky, and your objective updates: you must reach the Marine Second Platoon immediately. There’s a parked Ghost at the entrance to the humped tunnel; this tunnel leads out to Zone 3, where you’ll immediately encounter light resistance.


Tactic: Angles of Attack
Emerge from the short tunnel and let your gunner strafe the Jackals in front (northwest) of you, behind the hastily erected barricades [3A]. Of greater threat is a Grunt and a couple of Brutes on a ridge top slightly right (north) of you; one of the Grunts has a Fuel Rod Cannon, which can damage or destroy your vehicle very easily. Combat this by moving continuously and allowing your gunner a clear line of sight. Then drive west, over the hump by the dead zebra, to the shore. Move around a pond and head to the ridge, which has a Watchtower and a parked Ghost [3B]. Keep driving and firing on the foes; pick off the Brutes in the Watchtower first, then the Ghost drivers, but watch for incoming Grenades.
Tactic: Cannon of Carnage
If you’re driving the Warthog, it is wise to disembark after combat, collect the Fuel Rod Cannon from the Grunt your squadmate recently shot, and hand it off to the Marine in the passenger seat. Do this even if he has the Spartan Laser, as the Fuel Rod Cannon has a much faster rate of fire, and the Marines are more accurate with it, compared to the Laser. The Cannon has unlimited ammo in the hands of the Marine, making your vehicle a real threat to the Covenant squads operating in this theater of war.
By now, you should have vehicles for each member of your squad; tackling foes from four different directions spreads out your enemy’s fire, preventing them from concentrating on you and enabling you to assault the forthcoming choke points with ease.
Choke Point 4: Banshee Bombardment

Close to the ridge where you destroyed Brutes on a Watchtower at the previous choke point, there is a pond. Skirt this area and face east; multiple Banshees are visible in the sky and begin to swoop down, bombarding you with their energy bolts. You have two decisions to make: stand and fight, or flee to Choke Point 5. The former plan is preferable, as it makes the subsequent encounter significantly less dangerous. Try not to flee, especially since you need to destroy only one Banshee: the rest flee once one of them is downed.
Tactic: Plasma-Pistol Packing
Taking down a Banshee effectively depends on the vehicle you’re driving. The weapon systems on a Ghost or a Brute Chopper aren’t designed to take down a swooping Banshee, and you’ll need to face uphill to even stand a chance of hitting one. Don’t waste time with this tactic; instead, grab a Plasma Pistol from a Grunt corpse back at Choke Point 3, and fire a charged shot at the Banshee; this knocks it out of the sky intact. You can’t pilot it, though. If you don’t have a Plasma Pistol, then a well-aimed Spartan Laser shot works, too, as does a rapid-fire weapon that hits instantly.
Tactic: Gunner Earning His Pay
If you’re using the UNSC Warthog, your Marine buddies make short work of the nearest Banshee as soon as they spot the flying fiends. Simply let the Gunner (or passenger) do their job, then carry on to Choke Point 5. This is preferable to stopping the Warthog and aiming the Turret yourself; you’re simply making the Banshee’s attacks a guaranteed success, as you’re now stationary and prone.
Choke Point 5: Zone 3 Perimeter Bluff


Continue across the rocky terrain to a trail leading north. You encroach on a heavily defended bluff with a variety of foes dug in, including three Shade Turrets and vehicles that intercept you as you near the curved slope that leads left (southwest) to the top plateau. Although there’s an overabundance of foes to tackle at once, there are two surefire ways of minimizing your chances of death: ranged warfare and getting up close and personal (see tactics below).
Tactic: Ranged Warfare
Better safe than sorry: The rocky terrain below the bluff, where you approach from, has numerous boulders and trees you can use as cover, either in or out of a vehicle [5A]. Coax a Chopper down and take it out (either by waiting for it or zooming forward to the bluff before quickly retreating). Managing your takedowns one at a time, at your own pace, is safer and reveals the limitations of the Covenant’s defenses (e.g., the Shade Turrets can’t move from their stationary position). You, however, are highly mobile, and the Shade Turrets are located in very visible places, allowing you to use your favored ranged weapon (Sniper Rifle, Fuel Rod Cannon, Rocket Launcher, or Magnum) to tag the Turret user from distance. Then take pot shots at the infantry on the bluff; you can easily defeat the majority of the Covenant before you drive up and onto the bluff.
Tactic: Up Close and Personal
Or, you can use your vehicle and drive up and around the ramped area to the bluff’s top, shooting (or watching your Marines shoot) as you go. Continuous movement is crucial to your safety. Quickly take down the Shade Turrets [5B], driving straight into them, and circle them at close range so they can’t target you. Destroy these first, then splatter, ram, and e-brake (or Boost) your way through the remaining stragglers.
Tactic: The Bypass Boost
Hate extra points but love living? Then use a Brute Chopper to head northeast, toward the sloped ground below the bluff, and then quickly Boost up the otherwise-too-steep cliff wall and onto the end of the bluff. Speed away to Choke Point 6. You’ll bypass this choke point entirely, which quickens your time and keeps you safe.
If you attempted either of the first two tactics, you can inspect the Covenant bodies for equipment, including a Fuel Rod Cannon. Unfortunately, if you do this, you may miss the Brute on a Ghost that speeds away from this confrontation to warn the forces ahead.
Choke Point 6: Shooting the Messenger

If you’re mopping up Covenant stragglers at the bluff as you begin taking control of this area, you may miss a Brute fleeing the scene on a Ghost, with the express intention of warning the forces ahead. If you let this lone Brute escape, Wraiths at Choke Point 7 are alerted to your presence and are ready for you. Tackle the Ghost rider by driving alongside it using the Warthog and letting your Turret gunner do his rapid-fire job. If you’re driving a Chopper or Ghost yourself, you need to both fire and drive to catch up to the Ghost. The trail through the rocky terrain to the platoon outpost branches left and right [6]. Both paths merge again before the large expansive platoon area, so take the considerably shorter left route so you can meet your fleeing foe (who always takes the right path) and demolish him efficiently.
Choke Point 7: Lost Platoon Outpost


Whether you caught the fleeing Ghost or not, enter the Lost Platoon Outpost heading northeast. Enter a large roundabout and observation plateau [7A]. Back up as a Phantom is hovering overhead; it moves on after a few seconds, and you don’t want to be struck by its Plasma Turret fire. The roundabout has an upturned Ghost, Health Pack, and Sniper Rifle near a small metal barrier to the right (east). Your tactics in this area can vary wildly, but the optimal ones are shown below, based on whether the Covenant knows you’re inbound or not.
Tactic: A Sniper Surprise
If you destroyed the Ghost before it reached the roundabout plateau, then it’s a great idea to disembark from your vehicle and take the Sniper Rifle. Now peer northeast toward a rocky hill [7F] on the opposite side of this expansive location. On the hill are two Wraiths, but they are silent and not forewarned. The Covenant are slowly patrolling but are unaware of you; this makes headshots an excellent way to drop some otherwise-hardened targets and makes the subsequent fight a lot easier. The enemy type you aim for is crucial here; tag a Chopper-riding Brute in the head, then take down the Shade Turrets in this area. This galvanizes the Covenant into action!
Tactic: An Incoming Mortar
Did you leave the Ghost to warn the assembled Covenant in this choke point? Then expect the Ghost and a Chopper to be patrolling the general area and the Wraiths on the far hill to be active, launching volleys of plasma mortar that spells instant doom if it engulfs you. You can still grab the Sniper Rifle and try to get a few shots off, but nowhere near as many as you’d like; flee to the outpost building a few seconds later.
Objective
- UPLIFT RESERVE Find Colonel across bridge
Assuming you have the time and accuracy, you should drive your vehicle down the ramp to the left (northwest), to the flat ground to the north. Drive toward the opening in the north wall of the building [7B], and rendezvous with the lost platoon in the process—a ragtag group of Marines who have a variety of equipment to purloin! Your objective updates as you quickly sift through the items: There’s an undamaged Warthog, Health Packs, and ammunition, and on the ground there’s a Marine carrying a Spartan Laser. On the open-air roof mezzanine level of the building are Sniper Rifles, more Health Packs, a second Marine wielding a Spartan Laser, and a couple of Rocket Launchers. You can access these immediately, although it is better to catch the Covenant by surprise as quickly as possible, and return here to grab these items. You now have multiple ways to finish this fight; two of the best are detailed here.
Tactic: Vehicular Bruteslaughter


Ready to cause mass havoc and hopefully not destroy your vehicle in the process? Then run to the driver’s seat of the undamaged Warthog (or, if you don’t trust anyone but yourself, grab a Ghost), and wait for two Marines to join you. Furnish the passenger with a Spartan Laser, a Fuel Rod Cannon, or a Rocket Launcher if he doesn’t have one. When you’re tooled up, drive around either side of the building, heading for combat with several Brute Choppers and Ghosts patrolling the area [7C]. Lay waste to both vehicle types, circling them. Do not leave a Brute Chopper open to line itself up with you, as it has a highly damaging ram and weapon attack!
Your next focus should be on the two Wraiths that are floating down the slope from the hill to the rocky gully at this area’s southern end. On higher difficulties, you must be much more cautious, but generally, you want to temporarily stop your vehicle on the flat roundabout, where it is hidden by the edge of the bluff of this plateau [7A]. Edge southeast, so you or your Marines have a clear view of the first Wraith at the bottom of the slope [7E] (this shows where the Wraith is; your Warthog should be parked on the plateau), and begin firing. When the Wraith launches its mortar, drive closer still, using the edge of the roundabout as cover, and continue to rake the Wraith with fire. Then do the same with the second Wraith to easily and quickly dispatch them. Of course, you could try circling them at [7E], but this is much more dangerous and is not recommended on higher difficulties.
Once you’ve defeated both Wraiths, you can move toward their smoking husks and up the slope to the hill [7F] to begin mopping up the Covenant stragglers. You did take care of the Shade Turret at the rear of the hill, didn’t you? Or if you’re playing it extra safe, you can let the Marines do this job. They should have dealt with the Jackals on the central building, too. Stop and grab any equipment you want, then head toward the tunnel to the bridge [7G].
Tactic: Bringing Out the Big Guns
Move your vehicle to the north side of the outpost structure [7B], pausing to check the room behind the parked Warthog for any equipment you may need; then bound up the stairs to the open second floor of this structure [7D]. If you’ve arrived here early enough, the open area isn’t swarming with Jackals, so you can turn right (west) and take a Sniper Rifle. Then swing around and run toward the overhang section of the building with a Turret on it. Use the wall as cover before peering out at the enemies on the hill [7F] and tagging the foe operating a Shade Turret. Aim for the head to take down the foe in a single shot. Aim wisely: When he fires back, you have a second or two to finish him off before his plasma shots reach you. Use the wall as cover so you aren’t struck. Your fighting attracts Jackals, and they head up to this roof space from the side stairs. Mow them down quickly, and then continue to shoot all Shade Turret operators; these devices should all be empty. Follow this up with any other infantry foes on the hill.


When this occurs, peer down to ground level, stay on the roof, and locate any patrolling Choppers or Ghosts. These must be destroyed, ideally when the vehicles are moving directly toward or away from you, to aid you in lining up the shot. You can tag the driver’s head with your Sniper Rifle or try a less subtle approach—taking a Rocket Launcher, using a Fuel Rod Cannon you found earlier, or swapping weapons with a Marine carrying a Spartan Laser. Remember that some projectile weapons (such as the Rocket Launcher) arc their missiles, so fire at where you think your targeted vehicle will be, not where it is when you fire. When all the vehicles except the two Wraiths are neutralized, move toward the hill. Locate the bus stop and move up the metal steps embedded into the hillside; the Wraiths are usually behind the hill if you haven’t attracted too much attention yet. Edge forward with your Rocket Launcher or Spartan Laser, and when you spot part of a Wraith near the bridge entrance [7G], blast the vehicle. With both destroyed, locate a favorite vehicle (and Marines armed with your favored weapons if you wish), and head to the bridge entrance.
Enter the bridge tunnel entrance, passing a parked Ghost and an overturned but undamaged Warthog; as you try and locate the Colonel, the elevator collapses. During this time, the Colonel drops radio contact after the tether disengages, and he dies. Your objective updates. Cross the bridge, passing another parked Ghost at the eastern end.
Objective
- UPLIFT RESERVE Drive up and out of park
Choke Point 8: Forward Encampment


Wind your way up the dusty trail until you spot a small Covenant forward encampment [8A]. There are Jackals and Grunts milling around a beacon and a small set of defenses, with a Brute in the Watchtower behind them and two Shade Turrets on the continuation of the cliff path. There are two ways to minimize these threats, detailed here.
Tactic: Circle-Strafing
Drive your vehicle around the clump of rocks and trees near the small hill in the encampment; keep moving so the Shade Turrets don’t strike you. On each circular pass of the camp, cut down, ram, or otherwise dispose of more Covenant. Take out only a few enemies each time before retreating behind the rock clump to recharge your Stamina. When the foes at ground level have met their maker, drive up the cliff-side path to the right (south) and defeat the foes inside the Shade Turrets [8B], either by gunfire or by ramming them (the latter is recommended).
Tactic: Shade Turret Strafing
Turn the Covenant’s own weaponry on the ground troops by immediately driving your vehicle along the right cliff-side wall and up around the cliff-side path to the Shade Turrets [8B]. Defeat the operator of one, then the other (or ram into the other one). Next, park your vehicle so the foes below can’t damage it, step into the Shade Turret, and rake the encampment and all the infantry troops with Turret fire: Revenge is a dish best served with rapid-fire Plasma Bolts.
Choke Point 9: Covenant Landing Site
Drive the rest of the way up the cliff-side path, pausing near the small building near the destroyed Warthog if you require a Health Pack or two. Remember to return here if you need more Health during or after this next choke point. Over the rise of the hill ahead (northeast) [9A] is a heavily defended plateau. You’ll immediately notice a Covenant Carrier grav lift [9B], with Grunts, Jackals, and Brutes milling on and around it. Left of the site is a Shade Turret, and there’s a Wraith [9C] on the right. Immediately formulate a safe tactic to defeat them all.
Tactic: Optimal Fallback Position
This tactic provides a manageable, extremely safe, but rather lengthy way to tackle the foes you immediately spot. Fall back to the top of the cliff-side path you just ascended [9A], remaining by the rise and using the protection of the ground; creep forward over the rise, firing at any nearby enemies, starting with the Shade Turret and the Ghost (which usually heads toward you on the cliff-side path). Next, pepper the infantry on the landing platform until all local hostiles are down. As soon as you need to recover Stamina, retreat so the rise protects you. Repeat this tactic as you cut down all the nearby foes.
When only the Wraith remains, you can move into the plateau toward the landing site [9B] and begin firing at the Wraith [9C]. If you’re worried about damage, creep forward on the rise instead, and dart back just as before when the Wraith fires on you. Quickly accelerate or Boost if the Wraith fires on you, and fire on the tank until it explodes. The area should be clear, allowing you to rendezvous with the Marines on the other side of the landing site. Sift through the available equipment if you want any.


Tactic: Pride of the UNSC
Instead of a timid strategy, try a more direct approach, driving along the plateau’s left edge, past the Shade Turret, and rendezvous with the Marine pinned down behind the landing site structure. There are a few seconds to gather the supplies he has collected, including Frag Grenades, Health Packs, a Spartan Laser, and a Warthog. The Marine is carrying a Rocket Launcher, and this extra firepower soon becomes extremely useful. Exit your vehicle, and maneuver along the left wall until you spot some crates and a recently deceased Marine. If you don’t have a Spartan Laser, there’s one here. Quickly use it on the Wraith bearing down on you. Return to your Warthog, wait for a couple of Marines to join you, and clear the rest of the Covenant from this area, using the landing site as partial cover.
Tactic: Landing Site Massacre
Constant vehicular movement is key to not being struck by foes. If you’re driving a Warthog with a gunner, simply accelerate straight ahead as you reach the top of the cliff-side path, straight onto and over the landing-site platform, splattering any Covenant in your way. Drive down the other side, skid around, and enter the landing site again; do this repeatedly until your Gunner delivers killing blows to everything not Wraith-shaped in the area. You can opt to ram the Shade Turret, too. The Wraith itself can’t get an accurate shot on you if you’re continuously moving. Now your Gunner turns his attention to the Wraith, which can be destroyed by circling it in your vehicle, waiting for your passenger Marine (who should be armed with a Spartan Laser or other heavy weapon) to score a direct hit, or employing either of the previous Wraith-takedown tactics.
With the landing site cleared of all adversaries, locate the nearby Marines at the equipment cache, and dive into a new Warthog. On closer inspection, the dead Marine at the crates is the recently deceased Colonel mentioned in your objectives. Continue up the hill trail, but only after you’ve listened to an amusing conversation between a wounded Marine and a medic in this area.
Choke Point 10: Hilltop Attack


Slow down considerably as you near the crest of the hill and the last major choke point between the Uplift Reserve and New Mombasa’s streets. Ahead, a giant section of the elevator has crushed much of a Covenant attack force, but the remaining enemies are still a considerable threat. As you close on the crest of the hill, you may spot two retreating Brutes; try running them over as you ascend. You soon reach the first line of defenses [10A]—several Grunts hidden behind a line of Covenant barriers. There’s no rush; you don’t need to drift to the side of the defenses to defeat them; simply drop any Grunts that show their heads, then disembark from your vehicle and toss a Grenade over the barriers to flush out the rest. There’s an empty Ghost here if you want it.


Along the left side of the narrow opening to the crest of the hill are additional defenses: a row of barriers with more Grunts behind them and two Brutes manning Plasma Turrets [10B]. Employ the same tactics here, lobbing a Grenade in and tagging Grunts and Brutes with headshots. However, ignore the Brutes in favor of the real threat in this locale: the Chieftain wielding the Fuel Rod Cannon. You’ll know which Brute he is; you can’t quickly shake off his attack! Approach this cluster of foes and the incoming Wraith, using one of the following optimal tactics.
Tactic: Pedestrian Pulverizing
After tackling the Grunts at the first two sets of defenses, park your vehicle out of range of enemy fire (basically, at the neck of the second set of barriers), and back up until the Phantom leaves the scene. While on foot, rush out along the left wall, using the defenses near the Brute Plasma Turrets for cover if a Chieftain [10C] fires on you; then utilize any long-range weapon (Sniper Rifle, Rocket Launcher, Spartan Laser, or Fuel Rod Cannon) to take out the Chieftain first. Next, quickly sidle right, aiming a heavy weapon of your choice at the Wraith to the northwest [10D]; make sure it’s the one that’s still functioning; there’s a smoldering Wraith near the small rocky outcrop close to the Brutes. With the Wraith out of commission, lob a couple of well-placed Grenades at the Brutes with the Plasma Turrets, then retreat to your vehicle. Use it to mop up the remaining Brutes near the body of the Chieftain and anything left standing.
Tactic: Hitting and Running
While remaining firmly planted on the ground, drive your vehicle forward so that you or your gunner can get a shot off on the Chieftain [10C] before immediately retreating to avoid Fuel Rod fire and the Wraith’s mortar. Depending on the vehicle you’re using and the competence of the Marine Turret gunner, you may need to repeat the forward-and-back tactic numerous times. When the Chieftain finally falls, and you’ve edged back so nearby wreckage or rocks are protecting you, focus on any remaining Grunts and Brutes behind the second barrier [10B]; you don’t want Sticky Grenades landing on your craft. With the left side of this narrow opening cleared, choose any of the previous Wraith-tackling tactics, blasting it repeatedly as you strafe around its shots. Then escape heading north.
Tactic: Less Hitting, More Running
Pushing past the Covenant’s defenses and fleeing this choke point is another sound plan; it won’t win you any medals of bravery, but you won’t need to worry about them being awarded posthumously, either. With some adeptness at driving, you can push straight past the Covenant defenses before they have a chance to react; this means hitting this choke-point entrance hard from the trail, without stopping or slowing. Skid around the corner, and drive straight through the middle of the camp (northwest), aiming for the small rocky bump to the right of the Wraith, flying across the foes, skidding down the exit route, turning right, and heading for the opening in the wall [10E] and your escape.
Hit the rocky bump head-on, and try not to flip your vehicle, as you’ll be the recipient of Covenant fire from all angles, including the Fuel Rod Cannon-wielding Chieftain and the Wraith.