
Halo 3 ODST Guide Walkthrough Single Player Campaign
Tayari Plaza
Mission 02: Tayari Plaza
Buck Drop-Pod location to Tayari Plaza
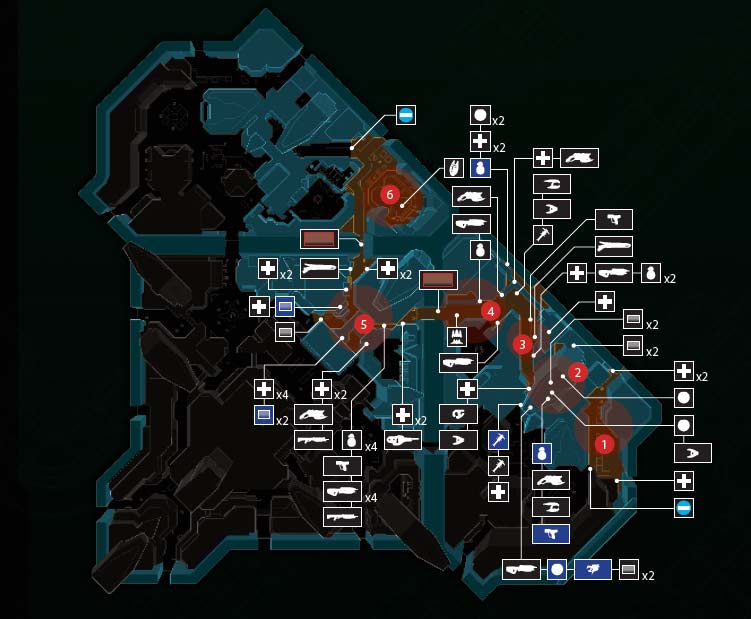
BUCK - Tayari Plaza - Immediately after drop
After a less-than-perfect landing, Buck disembarks from his Pod and immediately launches an assault on the Covenant, attempting to locate Dare’s Drop-Pod before the Covenant can reach it. Storming through a Phantom’s dropped forces, Buck meets up with a group of Marines; outwits a group of Brutes; pushes farther northwest, engaging in street-by-street combat; acquires a Plasma Turret but forgoes it for some sharpshooting to tackle a Watchtower and numerous Covenant Snipers; and finally faces down a pair of Hunters. This mission must not be compromised.
DATA STREAM
Tayari Plaza VISR Target Acquisition Mode Ratio: 10 percent*
*COMM Data Terminals are available only during Rookie missions.
Preferred Weapons
- Carbine
- Magnum
- Plasma Pistol
- Plasma Rifle
- Beam Rifle
Par Score
- 25,000
Mission Objectives
- TAYARI PLAZA Beat the Covenant to Dare’s crash site
- TAYARI PLAZA Find Dare’s crash site
- TAYARI PLAZA Open crashed Drop-Pod
Choke Point 1: Phantom Airdrop
Objective: TAYARI PLAZA Beat the Covenant to Dare’s crash site
Although you are instructed to open your VISR Intel Data (using BACK), which shows Tayari Plaza (and Dare’s crash site several city blocks to the northwest), it is better to ignore this command and concentrate on the enemies dropping out of the hovering Phantom ahead (north) of you [1A]. These Grunts and a couple of Brutes are easy pickings.
Tactic: Rooftop Camping
You have the Assault Rifle and Magnum and can easily shoot your foes’ heads using either firearm (although single, zoomed Magnum shots are by far the best method). Stay on the upper plateau, which has multiple Health Packs and sandbags [1A] that provide excellent cover. Duck back behind the sandbags if you’re struck by incoming fire, allowing your Stamina to recharge in a place where the Covenant cannot physically reach you. Continue this lengthy, long-range sniping until the enemies begin pulling back toward the building pillars to the right and the beacon [1B] in the distance.
Tactic: Left-Flank Charge
This involves maximizing your speed and Grenade-throwing prowess and takes some practice. Immediately jump down from the rooftop, and sprint down the stairs to your left (near the energy wall to the west that blocks your route). Move up along the road, closing in on the Phantom and watching its exit chute intently. As each Covenant squad disembarks, throw a Frag Grenade at the clustered foes; with careful aiming, you kill the Grunts and seriously wound the Brutes. This wipes out the majority of the foes before they can spread out, severely impeding their combat effectiveness.
Tactic: Additional Options


If you want to save your Magnum’s ammunition, short bursts from the Assault Rifle can also work. If you’ve decided to wait, take any Health Packs you need from the plateau (as you can’t return here), then drop down to the top of the road ramp, where a ruined Warthog is located. Check the ground for Grenades, and use the remains of the Warthog to gaze north, down the curved road ramp to some Covenant defenses and the beacon [1B]. If you’re too slow, Grunts may try to outflank you on the left, especially if you remain in cover for too long.
As foes begin pulling back, concentrate on clearing the right side of the street and the building. The cover itself is plentiful, with both concrete barriers and vehicles providing protection. You must advance carefully. Single Magnum shots or short Rifle bursts, along with optional Grenades lobbed at Brutes dug in behind the pillars, allow you to clear the right side. Move under the building, using the pillars as cover, then clear the left side of the street and the beacon. Keep strafing to avoid being targeted and struck by foes. There’s likely to be a Brute Shot or two to optionally grab before you continue.
Choke Point 2: Brute Force
Pass the S-27 sanitation truck and look northwest to the road barrier, and look northeast up a sloped road to a sealed tunnel. There is an Optican Kiosk up here. The only available route is to the northwest, where you meet two Marines who saw your crash landing [2A]. They haven’t seen your squad, but they do offer some advice on the incoming Covenant: There are buildings you can enter to outflank the Covenant roaming the streets. You can put this advice into practice almost immediately, as the two Marines set off down the side street to the southwest. Ready yourself for combat as soon as possible. The main roadway to the northwest dead end has an Optican Kiosk, but come back to that later; the Marines need immediate backup against a quartet of Brutes heading into this area.


Tactic: Heeding the Marine
The Marine mentioned exploring building interiors, and the door on the left (eastern) side of the side street [2B] is unlocked. Head inside and move up the stairs, pausing to retrieve any dropped weapons you want and to gather all Grenades. Look closer at the bodies and you can see Brutes and Elites have been fighting each other; interspecies animosity is always helpful to your cause. Step out onto the exit overlooking the street below, and begin defeating Brutes using your preferred weaponry; your foes are unable to physically reach you. If their attacks are trained on this location, step back into cover. Continue this peekaboo takedown until the Brutes fall.
Tactic: Stick It to Them
Cycle through your available (and previously collected) Grenades, picking either Plasma or Spike Grenades as you head around the corner [2C] at the end of the side street (assuming you didn’t wait for the Marines to go on ahead). If you’re fast enough, the Brutes are surprised that humans are still in this area, and you can use these few seconds of incredulity to expertly lob sticky projectiles onto them. Immediately fall back, switching to a favored firearm to finish the remaining Brutes. Utilize the two Marines now; they can draw fire away from you, allowing you to sneak up and melee or lob more Grenades at the remaining foes.
Tactic: Other Antics
Try staying behind the two Marines, using them to soak up damage while you pepper the Brutes with headshots, using the side-street pillar ([2B]) as cover. Or, wait halfway down the side street and launch ordnance at the Brutes using, for example, the Brute Shot; this can damage Marines just as easily as enemies, so watch your aim. Alternatively, dash in, moving around the concrete palm tree planter, and use the vehicles, pillars, and steps as cover, circling your foes while blasting them with your favored weapon. This ground-flanking maneuver is dangerous but allows you and your Marine buddies to cross fire on foes.
These two Marines are expendable and fall during this or subsequent battles, either by Covenant or your hands; it matters not.
If you stay up in the interior for too long during combat, the Brutes will chase after you and try to flank you. Keep an eye out for this!
Choke Point 3: Plasma Turret Blockade
Whether you utilized the side door into the building or not, head in there to secure additional weaponry, optionally returning to Optican Kiosks if necessary or investigating the steps to your left (west) for a Health Pack near a dead Marine. Then drop to the main street, heading north around the corner [3A]. Ready yourself for combat with four to six Grunts and a couple of Brutes stationed along the ground, using vehicles, concrete, and sandbag barricades as cover. The biggest problem, however, is a Grunt manning a Plasma Turret on the upper alcove to the right of the far stairs [3B]. Use the trash bin or concrete barricades and sidestep out, plugging Grunts with your Pistol while lobbing Grenades at them. Continue this until the remaining foes retreat up the sloping road. Now turn your attention to the Turret.


Tactic: Long-Range Lobbing
Leaving the Turret until last enables you to use the right street wall and nearby scenery as cover as you tag Grunts and force any Brutes to retreat. Now step out into the street [3A] and carefully aim one Frag Grenade so it lands at the feet of the Grunt manning the Turret. Check the ground for additional dropped Grenades if you need another attempt. However, projectiles are needed in combat to come, so don’t waste your Grenades. The Grunt usually dies, and the Turret falls to the ground on the corner of the alcove. If you fail in your lobbing, try the following tactic.
Tactic: Close-Assault Charging
With your foes in retreat, dart from cover to cover, then dive behind the pillar to the right of the sandbags, in front of the Turret. Recover your Stamina, then sprint to the low wall ahead, beneath the Turret. The Grunt can’t aim at you from this low angle, allowing you to stroll up the steps [3B] and melee or shoot the Grunt from behind or as it flees. Beware of any enemy stragglers near the stairs and the wrecked fuel truck as you secure the area.
Choke Point 4: Watchtower Assault


Advance in a westerly direction, using the left wall, street defenses, or walkway pillars as cover, and zoom in to scan the area ahead if you haven’t been attacked yet. To the west is an enclosed street with several Grunts, Shield Jackals, and a few Jackal Snipers stationed on or near a Watchtower; there are also the bodies of fallen Brutes and Elites from a previous firefight. Before going any farther, stop before you pass the parked container truck [4A], across from the stairs that lead northeast, up to the pedestrian walkway directly opposite the Watchtower [4C]. Your optimal tactical choices change, depending on your difficulty level:
Tactic: Beam Rifle Hunt
On Easy and Normal difficulty, you can obtain the devastating Beam Rifle by heading up the stairs and moving southeast along the pedestrian walkway. The Beam Rifle lies next to a dead Jackal [4B] (the weapon is missing on higher difficulty levels). Now take a position behind any available cover (or back up to extreme range), ideally after you deal with the Shield Jackals and other nearby nuisances, and tag the Jackal Snipers on top and around the base of the Watchtower [4C]; this makes a subsequent charge-in a little easier. Then search the remaining walkway area for Health Packs if you need them.

Tactic: Magnum Decapitations
On Heroic and Legendary difficulty, the only Beam Rifles available are being carried by Sniper Jackals on and around the Watchtower [4C], which is the biggest threat. Be sure nearer foes aren’t targeting you, and use your trusty Magnum in place of the Beam Rifle, tagging usually three Sniper Jackals on or near the Watchtower. As soon as you’ve done this, immediately retreat to the road’s right side to avoid incoming Grunt Grenades or ordnance. You can afford to lose a little Health; there’s a Pack next to the stairs and two more (plus a Frag Grenade) at the walkway’s northwest end.
Tactic: A Sticky Situation
Don’t have a Magnum or an expert throwing arm? Then use a Spike Grenade you should have gathered from previously downed Brutes or the building exploration. Lob it down the street so it sticks to the Watchtower, watching as the ensuing explosion rocks the structure and defeats foes standing on it. However, beware of other Sniper Jackals still prowling the ground level.
Tactic: Shield Jackal and Grunt Takedowns
With Brutes and Elites lying defeated, you should move to the ground by, on, and under the stairs, where you can expect to find a Spiker, a Plasma Rifle, and a Mauler. You can use any of these (ideally, an energy weapon like the Plasma Rifle) to shoot through the side gap in the Jackals’ Shields, after which you should attempt headshots. Or, you can lay down fire with the Brute Shot. Remember, the vehicles offer good cover you can move around, and crouching by the container truck and striking Jackals and Grunts from under the flatbed is another option. You can also saunter in using the heavy Plasma Turret you just appropriated; this is ideal for removing Jackal shields. As you move forward, stay on the right side as you close in on the Watchtower so you can use the building pillars as cover, allowing your Stamina to recharge. Execute Grunts with whatever weapons you have at hand, using the remaining charge of the Plasma Turret, Magnum headshots, or other violence. When the area is cleared, open the gate at the west end of the street.
Co-op Tactic: Shields Down
With a wide road and numerous cover positions, you can easily split your team to encroach along the street on both sides, giving you an advantage; the Shield Jackals can’t block fire from both directions, allowing for easier takedowns.
Choke Point 5: Snipers’ Walkway (Hunter Patrol)


The gate opens, allowing access into Zone 8, a road sloping down and west into an open plaza with a long walkway bisecting it. Ahead, you may see Marines fighting valiantly against Covenant forces by a wrecked Warthog; you can’t save them, and sprinting down into the plaza is futile, as the area has numerous enemies. Instead, head along the left sidewalk, passing an Optican Kiosk (which is useful to return to, as a Carbine is lying near it that you can pick up if you don’t have a long-range weapon), until you reach the Marine crouching by the concrete planter [5A]. She yells some sage advice: you should definitely cut through the building, and hit the forces from behind. The “forces” in question are:
Jackal Snipers on various upper balconies.
A Grunt manning a Plasma Turret [5C] directly opposite the Marine’s position.
Shield Jackals and Grunts milling around the walkway and plaza.
Brutes on the central walkway [5B] and lower plaza.
This is the optimal order you should attempt to defeat these enemies.
Tactic: View from the Bridge
On greater difficulty settings, tagging the Jackal Snipers is the first plan of attack. Head through the doorway left of the crouched Marine. This leads to a two-story building. At the entrance is a dead Marine, near a weapon cache of Assault Rifles, Shotguns, and some Pistol ammo. Armed with a Beam Rifle and a secondary weapon with ranged capabilities, enter the building. There’s a dead Marine, a dead Brute, and steps leading down. No weapon (the Shotgun and Spiker) or location is strategically safe, as the ground level is teeming with foes; however, there are two Health Packs to grab.
Instead, move to the doorway joining the central walkway [5B], and use it as cover. Scan and drop any foes at close range before poking your head out of the doorway cover just long enough to tag the three or four Jackal Snipers. These mill around the walkway structure and are on balconies to your left and right. Make sure you nullify them all before aiming at the Grunt behind the Plasma Turret on the opposite balcony. Now edge out onto the bridge, and pick off the milling Grunts and Jackals below using your Carbine or Pistol. If you have the Carbine, use that from this vantage point to dispatch the Brutes. Resist the temptation to lob Grenades; save them for the Hunter battle that occurs after you kill all Covenant in the area.


Tactic: Ground Combat
On lesser difficulty settings, you can opt to head downstairs from the building or even down from the road (which isn’t recommended when Snipers are lurking, as you have limited line of sight), and begin to engage foes at closer quarters. Naturally, the Brute Shot and Shotgun, coupled with circle-strafing, are your techniques to master. However, do this only after the Snipers and Plasma Turret are down.
Tactic: Exceptional Hunter Combat
A variation on the “View from the Bridge” tactic allows you to tackle foes at range and from cover for longer. Utilize the Carbine at the building doorway, until you nullify all long-range enemies. Then head out onto the walkway and across to the balconies where a Jackal was; pick up its Beam Rifle to punish the majority of remaining enemies from the cover of a balcony or building.
Hunter Tactic: Flight!
Two lolloping Hunters appear from the north gate and can seriously thwart your progress. Running away doesn’t gain you any points or bravery medals, but it keeps you alive and with minimal damage from their devastating Fuel Rod Cannons. Follow this route: Move across the walkway, then jump along the platforms by the left wall, heading north toward the recently opened gate. The Hunters are circumvented, and your Stamina can easily recover.
Hunter Tactic: Fight!
Facing the Hunters in the ground-level area [5D] is a more thrilling tactic. Move in close but not within their melee range. Produce either the Plasma or Spike Grenades you saved from earlier encounters, and precisely lob them onto each Hunter; this brings them down in moments. If you run out of Grenades or you’re inaccurate, dash across the walkway to the Plasma Turret [5C], wrenching it off its base so you aren’t a prone target, and lay waste with it.
Choke Point 6: Tayari Plaza Crash Site
Objective: TAYARI PLAZA Open crashed Drop-Pod


Head north through the gate and quickly head forward, looking right (east) to see a Phantom departing Tayari Plaza. Peer below; around four or five Grunts [6A] are shooting Dare’s Pod [6B]! As soon as you spot the Pod, your intel objective updates. Tactically, there’s little to worry about; tag their heads from this upper roadway overlooking the plaza, or wade in with closer-ranged weapons to stop the ones bombarding the Pod. Aside from the Pod itself [6B], the area is empty but is worth exploring (mainly because it’s the setting for Firefight location Crater and Crater Night). When you’re ready, pry open the Pod with (RB).