
Halo 3 ODST Guide Walkthrough Single Player Campaign
Prepare to Drop
Mission 01: Prepare to Drop
New Mombasa Distrcit 5: Rookie drop location to Tayari Square building (interior)
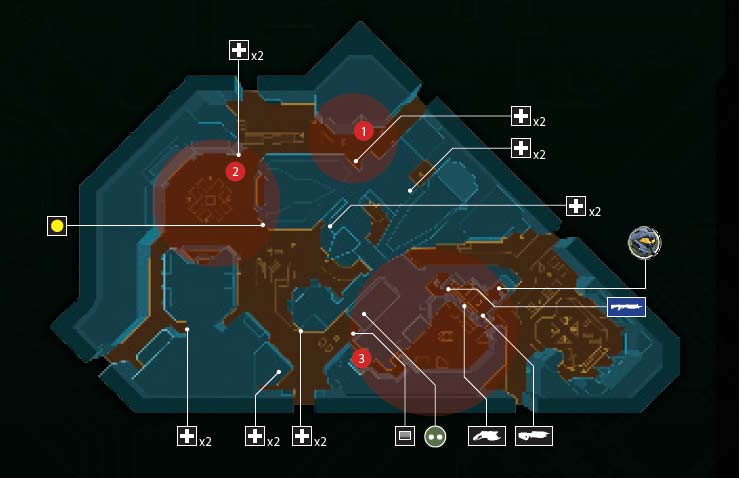
Occupied city center • ROOKIE • 6 hours after drop
After becoming separated from your ODST squad, you (as the Rookie) crash-land somewhere in one of the many districts of New Mombasa. After disembarking from your Pod, you are faced with exploring this massive hub and attempting to locate your team using different clues. You return to the city a number of times throughout the Campaign and are free to explore many of the districts. To do so, access the city map, located on some still-functioning COMM Terminals being run by a functioning Superintendent. Your first task is to find Tayari Plaza and seek evidence for your first ODST squadmate.
DATA STREAM
New Mombasa Visual Intelligence System Reconnaissance Class (VISR) Target Acquisition Mode Ratio: 95 percent
New Mombasa Hidden COMM Data: 0 (Total: 0/30)*
*The initial COMM Terminal doesn’t count as part of the data you’re optionally seeking.
Preferred Weapons
- Carbine
- Magnum
- Plasma Pistol
- Plasma Rifle
- Beam Rifle
Par Score
- 100,000*
*You cannot achieve this score until you’ve completed more of Mombasa Streets.
Level-Specific Achievements
Tourist: Access and download the city map to your VISR.
Mission Objectives
- NEW MOMBASA Explore the city at night
- NEW MOMBASA Contact city Superintendent
- NEW MOMBASA Search Tayari Plaza for ODST squadmate
Choke Point 1: Pod Landing Point

To exit the Pod, punch the emergency hatch release by arming the explosive bolts, adjusting your camera yaw and pitch in the process. When you have punched all four green bolts to arm (with RB), you drop to the ground, armed with an M7S silenced Submachine Gun and M6S Magnum. The fall causes your Stamina to reach low levels. Simply wait for the red edges of your HUD to recede, regaining your Stamina. To locate the Optican Medigel Dispensary Kiosk, turn right slightly and head to the dispenser [Waypoint 1A]. You automatically receive a Health Pack. Alternatively, you can inspect the ramp to the left, near the stationary police vehicle and buttress defenses. The ramp leads to a closed door, and the area straight ahead of your starting point is a brightly lit dead end, complete with anti-UNSC graffiti and a second Optican kiosk. Remember to return here if you need additional health.

Your HUD’s database isn’t completely operable yet (you have no map or compass), but you can flick on your VISR’s Target Acquisition mode using (X). The VISR is useful in low-light situations (such as now), so you should employ it consistently through this mission, especially as it helps with target identification.
Test out the target acquisition on your first enemies—a Brute and a Grunt patrol farther down the right roadway, toward a sloping section of road just past a wrecked coach liner [1B]. There are a variety of combat options to try:
- Run immediately toward the foes as soon as the mission starts; they are farther down the ramp, giving you a height advantage.
- Switch to your Magnum and tag the foes with headshots.
- Tag the Brute first, frightening the Grunts. This allows you to pick them off as they flee.
- Attack at range using the SMG or Magnum, ideally aiming for your foes’ heads. Use the wrecked coach liner on the road, the building pillars to your right, or the crates to your right as cover.
- Take this opportunity to throw a Grenade (using LT) at the feet of the group, ideally before you are spotted; then cut them down with SMG fire as they flee.
- Charge in and engage the Brute with a mixture of rapid-fire attacks followed by a melee pistol whip (using B) to finish him off.
- Afterward, you can return to the Optican Kiosk and grab the other Health Pack, or access the Optican Kiosk back at the dead-end side street.
Tactic: Pistol Packing
By far the most proficient way of dealing with this initial encounter is to switch to your Magnum, and tag the three Grunts patrolling in your direction with headshots. Wait a few moments so the squad moves closer, and you can inspect their corpses more easily, then grab a Plasma Pistol. Use overcharged shots from this weapon to devastate the Brute’s shields, and swap between the Plasma Pistol and Magnum to dominate (always end with a Magnum headshot); this combo is great for taking down otherwise armored targets. Use this tactic at Choke Point 2, too.
Choke Point 2: Accessing the Superintendent
If you’re quick enough, once you’ve nullified the initial Grunt and Brute patrol, you can spot two Phantoms pulling away from the roundabout and plaza at the ramp’s base. Use the upper ramp (leading to a locked door) for a great overview of the next area, which has seen heavy fighting from New Mombasa’s civil defense forces. Expect to face two Brutes and at least six Grunts in the lower roundabout area [2A] and a Brute and at least four Grunts on the higher left and right sloping roads of the plaza. In addition to the previously listed tactics, try any of the following combat techniques when attempting to secure the area:
- Prior to entering the roundabout, stand on the upper ramp at the top of the steps and use zoomed Magnum shots (press R, then RT repeatedly) to decapitate foes from extreme range. Let the enemies come to you!
- Enter the roundabout road, skirting the edges and using the building pillars (on the left) or the vehicles or metal defense shields (to the right) as cover, tagging foes on the roundabout island.
- Flush foes on the roundabout island by lobbing in well-placed Grenades, but watch for returning projectiles from this location.
- Rush the island, using the low concrete walls and palm trees as cover while constantly strafing so you aren’t an easy target to hit.
- Well-placed Plasma Grenades are a great way to end a Brute’s life. Remember, you can cycle through your Grenade types using (LB).
- Brute Shots are great at hammering into defenses. You can also try the familiar tactic of using a charged Plasma Pistol shot to remove Brute armor and using another to finish it off.
- During combat at the roundabout, expect to find Covenant weapons like the Needler, Carbine, and Plasma Rifle, all of which make great offensive weapons, depending on your combat style.
Tactic: Ground Control
For a most proficient takedown, perform the Plasma Pistol overcharge on Brutes, followed by a headshot. Use simple headshots for the Grunts. This works on any difficulty and uses only two shots (one from each weapon). If you want to damage a cluster of enemies, race to the Phantom dropping off the foes, and lob a Grenade at the ground where they drop to. You’ll have to ignore the foes in Choke Point 1 to reach this location in time, but this can severely damage multiple enemies with a single well-placed Grenade.


Objective
- NEW MOMBASA Contact city Superintendent
When the final Covenant falls in this area, your HUD updates, letting you know you are separated from your ODST squad and must contact the city Superintendent for assistance. After inspecting Covenant corpses for additional ordnance (especially Grenades), flick to your VISR mode, if you haven’t already, and look for the Data Terminal with the yellow outline [2B]. This is very difficult to spot without your VISR on. Hold (RB) to access the Data Terminal, and the City Map is downloaded into your VISR. Your VISR database is now accessible by pressing (BACK). Follow the NAV menu instructions for moving and zooming in on your map and placing a Waypoint, and notice that your compass has now appeared on your HUD, along with the location of Tayari Plaza—the last known location of an ODST squadmate. Check the Intel Data in your menu for your next objective.
Objective
- NEW MOMBASA Search Tayari Plaza for ODST squadmate
Choke Point 3: Building Infiltration

Aside from dead defense forces, the area is devoid of human life. Collect any dropped weapons, optionally heading through the smoking remains of vehicles to reach an Optican Kiosk to the south before taking a southeasterly route toward a side door. You’ll pass a second Optican Kiosk along the way. A side door is near the “Slow Down” signs in the middle of the road. Your VISR shows interesting Covenant hieroglyphs on the wall, hinting this is the correct way to go. Face southeast, and hold (RB) to open the security door [3A].
The dark corridors ahead are difficult to explore without HUD aid, so flick on VISR before continuing into the building, past the "Glass This" graffiti. Follow the corridor (and hieroglyphs) to a second security door to the northeast. Open this and enter a courtyard. A sleeping Grunt should easily fall to your preferred weapon, after which you have around four more Grunts to defeat. Standing on the upper pavement and lobbing Grenades (3B) is a better plan than wading into the long grass, as the Grunts like to fire their Plasma Pistols at you, and it is difficult to aim back as them with the grass in the way. Methodically massacre the Grunts, then locate and open the security door opposite the once you came from.


Enter the next building, which was the scene of a recent massacre. Step over the Grunt and Brute bodies, although you may wish to check out the ground floor; there’s an Assault Rifle if you want it. Then head west, under the pulsing light and up the stairs, brandishing a close-combat weapon. If you don’t have a suitable one, stop at the top of the stairs and turn right (southwest), and step into the dead-end corridor. At this corridor’s northwest end is a dead Marine. Grab the Shotgun from the corpse, and return to the main passage. Head up the stairs (marked “2” on the wall) to the next floor, and check the open door on the right (north). Execute the two Jackals lurking here [3C], using two quick Shotgun blasts from the main passage doorway.
Alternatively, you can sidestep and face the doorway, lob in a Grenade, and back away. Or, fire a shot to attract a Jackal, then execute it (ideally with a headshot) as it ventures into the main passage. You can also step into the chamber and strafe the Jackals with Assault Rifle (or Covenant weapon) fire.
Tactic: Strafe of Death
For a truly professional Jackal takedown, look for the dead Marine being illuminated by the flashing light. Strafe past the door opposite, which auto-opens, and throw in a Grenade. The door closes, and the Jackals are ripped apart in the ensuing, contained explosion.
There may be a Carbine and Beam Rifle to grab if you want them. Now continue up the stairs (marked “3” on the wall) to the upper floor, and maneuver straight along the passage; the rooms to each side are empty. You appear in a debris-strewn office with a window to your right (southeast) that offers impressive views of Tayari Plaza. However, of greater interest is the Recon Helmet half-embedded in the flicking info screen to your left [3D]. Hold (RB) to inspect the Helmet.
