
Mario Kart 8 Guide The Drivethrough The New Tracks
Mount Wario
Mount Wario isn’t like other tracks in this cup. Rather, it is one long road split into three sections, each filled with danger. It’s literally all downhill from here when you start! Remember, you only get one shot at performing well in each section. If you mess up early on, you’ll have to make up time as you keep going further down the mountain.
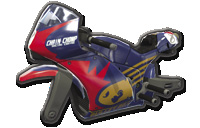
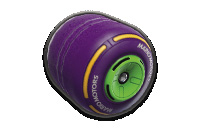
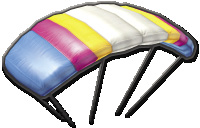
Kart of Champions
Nintendo’s Best Time Trial: 1:53.516 |
|||
Player: Jeff C. M. |
|||
 |
 |
 |
 |
|
Racer: Wario |
Body: Sport Bike |
Wheels: Cyber Slick |
Glider: Parafoil |
Grand Prix


You start the course by diving out of an airship—don’t forget to Jump Boost off the lip of the starting ramp. Note the lack of protective fencing along the sides of the course. This is how much of the first section is.

The course turns icy just as you reach the first real turn of the race, a sharp right. Stick to the inside as best you can. There’s a ramp you can Jump Boost off of for additional speed, and to align yourself to the upcoming turn.

Shortly after the first split is another on a hard left turn. The outside line has dash panels and Coins, so if you’re out in the front of the pack, consider taking the longer outside path just to deny your rivals some Coins!

The first section of Mount Wario ends with a final hairpin to the right. Start your drift early to make it easier to take the turn. If you’re a heavyweight racer and you’re in the middle of the group, this turn is your last chance to ram other racers off the course. Take advantage of that if the opportunity presents itself!

Section 2 begins by entering a massive cave. When you’re presented with a chance to jump off a regular ramp, or use a blue ramp to start gliding, take the blue ramp. If you have a glider part that grants you good speed, it’ll be much faster than dealing with the rougher terrain on the ground.

If you’ve chosen to glide, you can extend your air time by force landing on this dash panel ramp, and jumping just as you land. This grants you the boost, and keeps you gliding.


Wario Dam is your next stop as you take the winding track out of the caves. Water flows pour down the side of the dam, carrying dash panels with them. Try to aim for some of them, while making sure you aim at the tunnel that will take you away from the dam.

As you exit the dam, you reach a snowy forest, with two obvious paths to choose from. If you have a Mushroom, you can bypass the trees and get through the rough snow to use another blue ramp to glide straight into the next area.

Use these logs to Jump Boost for a little extra speed, but beware of being sent flying into trees, and be ready to handle the upcoming section filled with trees during the long turn to the right.

The final course section begins with some ramps to Jump Boost from, followed by a series of winding turns to slalom through.

The moguls just past the first series of turns can all by used for Jump Boosts. Get as many boosts as you can!

The home stretch begins at the top of one final hill filled with dash panels to hit. The hill ends with a launch panel that sends you gliding towards a set of rings—make sure you pass through them all! If rivals are close by, be ready to evade Green Shells. If you have a Banana, hold on to it for defense during this section.

As you land from your glider flight, there’s one last S-curve you have to deal with at the bottom of the hill. If you have held on to a Mushroom up to this point, you can cut this corner for a straighter shot at the finish line.
Time Trial Mode


Right after dropping from the airship, it seems obvious to collect the three Coins on the track. Instead, collect only the one in the rear while boosting over the rough terrain, aiming for the ramp at the center of the track just ahead. The ramp itself has another Coin you can collect.

There are four Coins on the outside track of the first major turn here, but the ice makes it tough to collect them all. It’s best to just cut the corner tight on the upper path, and Jump Boost off the ramp to save time.

Here is another split in the track, with four more Coins on the longer upper route. However, the dash panels there can offset the time difference between the inside and outside lines, and you need the Coins after passing up so many others.

This is a surprisingly tricky transition from the dash panels and ramp from the second turn onto a straightaway. You’ll want to already be drifting to the right so you can Mini-Turbo to safety if necessary.

Another tough turn, back to the right. Four more Coins line the center of the track, though once again the ice will be working against you. It might be faster to skip the Coins on this turn and stay on the inside of the track.

Stay centered as you enter the cave for the second track section to collect four more Coins. It is entirely possible to be at ten Coins at this point in the Time Trial.

Take advantage of the dash panel ramps inside the cave in order to maintain your speed, and Jump Boost off any ledges or ramps to drive over.

When driving along the walls of Wario Dam, make sure you start high on the dam to catch the dash panels on the waterfalls as you drive towards the exit of the dam. Ideally you can catch a boost on three panels.


After exiting the dam, don’t miss a chance to use a Mushroom to climb up this hill behind the trees so you can use a glide ramp to bypass more complex parts of the course. Just watch out for trees as you glide back towards the ground!


When racing past these logs, start guiding yourself towards the right side of the course. Cutting the next turn leading into the third and final section of the course will require some very precise driving and drifting between trees in order to avoid getting stopped cold!

The downhill slalom is best navigated by trying to keep tight inside each turn. If you drift out too wide, you’ll lose time even with a Mini-Turbo.

Jump boost on every mogul you can on the way down towards the final stretch. Just be sure you don’t ignore the upcoming turns that follow!

You need to hit seven dash panels on the way down towards the final glide ramp if you want to keep a good pace. After gliding through the rings, get back down to the snow to prepare for the final shortcut!

Mushroom boost across this snowy hill to cut one last corner and drive on towards the finish line!
TM & © 2014 Nintendo.