Prima Games eGuides
primagames.com Browse Redeem a code Help
Lego Star Wars: The Complete Saga eGuide
Sign in My Guides

Sign in or create an account

We'll email you a link. No password needed, and if you don't have an account yet, the link makes one.

By creating an account or signing in, you agree to our Terms of Service and Privacy Policy.

Have a password?

Had an account on the old eGuides site, or a code from a printed guide? Help and troubleshooting

Sign in with a password

By signing in, you agree to our Terms of Service and Privacy Policy.

Check your email

A sign-in link is on its way. It works once and expires in 15 minutes. Open it and you're in, with an account if you didn't already have one.

Contents

  • Essentials
    • Gameplay Basics
      • Introduction
      • Game Modes
      • Special Abilities
      • Weapons and items
      • Environment
    • Characters
      • Introduction
      • Jedi
      • Sith
      • Small characters
      • Activation panel droids
      • Super jump characters
      • Bounty Hunters
      • Ghost characters
      • Blaster characters
      • Other characters
    • Vehicles
      • Transportation
    • Super Secret Star Wars Stuff
      • Power Up Pick Up Locations
      • Achievements
      • 100 Percent Completion
  • Walkthrough
    • Mos Eisley Cantina
      • Cantina
    • Episode I: The Phantom Menace
      • Chapter 1: Negotiations
      • Chapter 2: Invasion of Naboo
      • Chapter 3: Escape from Naboo
      • Chapter 4: Mos Espa Podrace
      • Chapter 5: Retake Theed Palace
      • Chapter 6: Darth Maul
      • Episode I Bonus
    • Episode II: Attack of the Clones
      • Chapter 1: Bounty Hunter Pursuit
      • Chapter 2: Discovery on Kamino
      • Chapter 3: Droid Factory
      • Chapter 4: Jedi Battle
      • Chapter 5: Gunship Cavalry
      • Chapter 6: Count Dooku
      • Episode II Bonus
    • Episode III: Revenge of the Sith
      • Chapter 1: Battle Over Coruscant
      • Chapter 2: Chancellor in Peril
      • Chapter 3: General Grievous
      • Chapter 4: Defense of Kashyyyk
      • Chapter 5: Ruin of the Jedi
      • Chapter 6: Darth Vader
      • Episode III Bonus
    • Episode IV: A New Hope
      • Chapter 1: Secret Plans
      • Chapter 2: Through the Jundland Wastes
      • Chapter 3: Mos Eisley Spaceport
      • Chapter 4: Rescue the Princess
      • Chapter 5: Death Star Escape
      • Chapter 6: Rebel Attack
      • Episode IV Bonus
    • Episode V: The Empire Strikes Back
      • Chapter 1: Hoth Battle
      • Chapter 2: Escape from Echo Base
      • Chapter 3: Falcon Flight
      • Chapter 4: Dagobah
      • Chapter 5: Cloud City Trap
      • Chapter 6: Betrayal over Bespin
      • Episode V Bonus
    • Episode VI: Return of the Jedi
      • Chapter 1: Jabba’s Palace
      • Chapter 2: The Great Pit of Carkoon
      • Chapter 3: Speeder Showdown
      • Chapter 4: The Battle of Endor
      • Chapter 5: Jedi Destiny
      • Chapter 6: Into the Death Star
      • Episode VI Bonus
    • Bounty Hunter Missions
      • Bounty Hunting
  • Multiplayer
    • Multiplayer and Bonus Missions
      • Multiplayer
      • Bonus Missions

Lego Star Wars: The Complete Saga Guide › Walkthrough › Episode VI: Return of the Jedi

Chapter 5: Jedi Destiny

Luke Skywalker bravely turns himself over to the Empire to get a meeting with Darth Vader. Luke believes there is still good in his father, and is willing to try to convince him to change his ways.

Vader is adamant about what side of the Force he is on and he escorts Luke to his master, Emperor Palpatine. If Luke thought Vader was bad, he gets a rude awakening with Palpatine, who shocks him with evil electrical Force.

Unfortunately for the Emperor, that was just the trigger Vader needed to find his true self, Anakin Skywalker, within. Vader valiantly jumps into the path of the electrical attack waves hitting his son to try to save Luke.

After the mission starts, the Emperor charges in to take both father and son. Jump at your attacker and hit him with your lightsaber to cause him to lose one of his hearts of health.

He flies back across the room, but comes charging right back in again. Fly at him again and slice him with your weapon. Repeat this until you take away four of his hearts.

That’s when the Emperor tries a new trick and sends the electrical currents at you. When the currents surround your body, quickly switch over to Darth Vader, who is standing close by.

While the Emperor is still distracted by dealing with Luke, you can jump at Palpatine and hit him with your lightsaber. After the fifth hit, Palpatine goes flying across the room and runs to another area.

When the Emperor blasts you with electrical energy, switch over to your other playable character so you can keep up your attack.

Tip

The Emperor’s electrical blasts don’t have a lot of range. If your other character isn’t around for you to switch to, run to the end of the upper platform and fall to the lower area.

Palpatine can’t touch you there and you’ll avoid taking damage. Just run back up the stairs when you are ready to fight again.

Before you go chasing after Palpatine, run to the back of the throne room. Using the dark side of the Force, turn on the red lights on the wall, on both sides of the throne.

After you switch on the eighth light, a red power brick appears on the Emperor’s actual throne. Jump on the seat and add that red power brick to your collection.

Run to the room’s left side and use the Force to turn some floor panels into a large step. Jump to the top of the step you created, and from there, into the small alcove in the wall to collect a LEGO canister.

Jump on the large step you created at the side of the room to get those canisters.

Move to the stairs to the south of the throne room. On either side of the stairs are some tables with lots of blue lights. Smash each table and collect the studs and a power up that spill out.

Collect the rest of the goodies and then fight off any Imperial guards that rush in to put you down. When the upper throne room is treasure-free, head down the stairs to the area’s lower level.

On the bottom level, run underneath the upper throne room and gather all valuables on the ground, including the blue studs. Smash the pillars that are down there for more loot.

Explore the rest of the lower throne room and smash all the equipment you see. Collect the studs that litter the ground.

Run to the room’s left side and use the dark side of the Force to break the grate in the wall. Assemble the little pieces that fall to the floor into a red fan. Assemble a pile of gray LEGOs on the right.

After you have built them, use the Force to put the two pieces together to create a large fan on the ground. A path leads from the south of the throne room, but skip that area for now.

Jump on the fan so you can ride the breeze it creates into the air and over to a narrow walkway against the left wall.
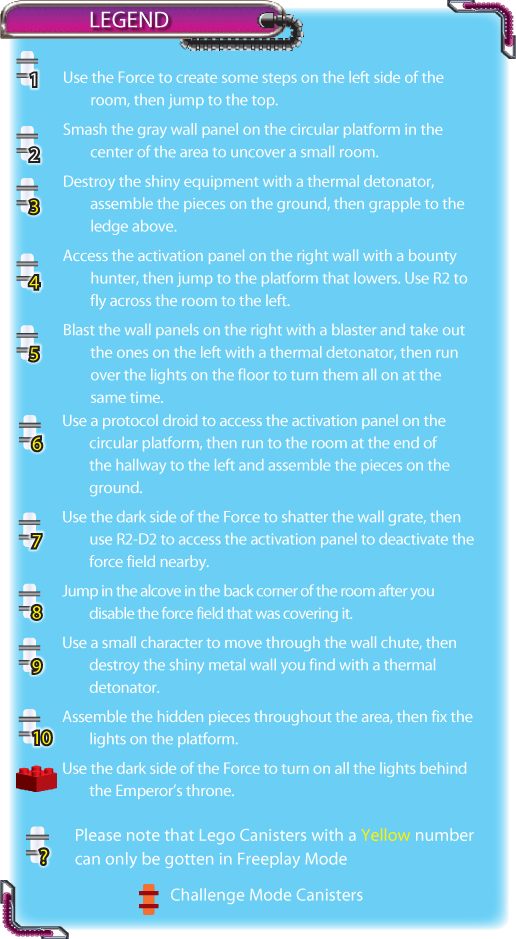
Freeplay Area

When you get to the throne room’s lower level, switch to a bounty hunter and throw a thermal detonator at the equipment along the right wall.

Assemble the loose LEGOs on the ground, which remain after the explosion, to create a red circle swirl pad. Use your ascension gun while standing on the pad to grapple to a ledge above. Grab the studs you find, as well as a LEGO canister.

Follow the trail of studs along the walkway until you get to a platform over the next room. Across the way, the Emperor is electrifying the five rows of floor panels to prevent you from crossing.

The good news is that he can’t cover the whole floor at once. Some panels constantly flicker with electrical energy, some flicker in and out, and some never become electrified at all.

Run to the back wall and jump to the two panels that are closest to the wall in the second row—they are safe.

Wait for the current to stop flowing to the rest of the second row, then run to the other end and jump on the first panel in the third row. That one is a safe panel because it never becomes electrified.

Step on the first panel in the fourth row next to find another safe spot. Wait for the electricity in the floor panels to die out again and then follow the safe panels all the way to the left.

Jump only to the unelectrified gray floor panels so you don’t get electrocuted.

You finally reach the Emperor again, so let him have it with your lightsaber. When he tries to blast you with energy, switch to your partner to continue the attack.

Keep hitting Palpatine until he takes enough damage and flies across the room to escape his fate.

Caution

Don’t try to jump the panels, because the charge they create will knock you off the platform.

Note

Make sure you have your friend with you when you fight the Emperor the second time—you’ll need backup. If your partner falls off the upper walkway at some point, you’ll have to jump down, find him, and then return to the fan to get back up to the upper walkway.

When the area is secure and floor panels are safe to walk across, smash all the equipment to find hidden treasure. Then head to the room’s right side.

Run along the back wall and, as you do so, quickly use the dark side of the Force to turn off each of the red lights.

If you are quick enough and turn off all 10 lights at once, some loose LEGOs appear on the narrow walkway you crossed earlier. Assemble them to create an activation panel for a bounty hunter.

Freeplay Area

Use a bounty hunter to access the panel. This creates some loose pieces on the ground in another room.

Run to the south and drop from the upper walkway down to the room below. Smash the equipment lying around the room, then pick up any loose studs that you see.

Assemble some loose LEGOs on the room’s right side to create an activation panel that only a bounty hunter can use. Use the dark side of the Force to pull a metal grate off the wall, then assemble the pieces that fall out.

This creates a large step on the ground. There’s nothing you can do with it now, so move through the open doorway in the north wall and collect the studs on the ground.

Freeplay Area

Use your bounty hunter to access the activation panel on the room’s right side. This lowers a walkway against the back wall. Jump on the platform you created and from there, jump to the new walkway.

Run to the left, and when the walkway ends, switch to R2-D2 and fly to the left. You land on a ledge where you can add a LEGO canister to your stash.

When you get to the back room, you see many green lights on the floor. Collect all the studs in the room before leaving.

Freeplay Area

After you smash the wall panels on the right wall, use a thermal detonator on the panels on the left wall. Once the panels are history, run over the green floor switches on the ground.

If you are fast enough, the lights stay on and a LEGO canister appears at the center of the room, in the center of the ring of lights.

The area under the canister is bottomless and you’ll die if you fall in, so double jump over the opening to grab the canister and land safely on the other side of the lights.

Exit through the same door you entered and follow the walkway to the south. This takes you to a circular platform in the center of the building.

Run around the pillar in the center of the circular platform and use the Force on the lights to uncover hidden goods. Smash some gray wall panels to reveal two small rooms.

One has a LEGO canister and the other, a stormtrooper activation panel. After you collect everything, follow the walkway around until you see the room where Palpatine waits for you.

Freeplay Area

Switch to a bounty hunter when you’re on the circular platform in the room’s center and access the activation panel on the wall.

This opens a door to the right of the panel, spilling some loose LEGOs across from the bounty hunter activation panel. Put the pieces together and then switch to C-3PO; have him access the activation panel you just created.

This extends a walkway to the left. Run into the little room at the end of the walkway and add some more goodies to your stash. Construct the loose LEGOs on the floor to collect another LEGO canister.

Along the same circular wall as the bounty hunter activation panel there were two long, gray, rectangular LEGO pieces that you destroyed earlier.

Run into the room that was revealed and access the stormtrooper activation panel. This causes some loose LEGOs to appear in another room.

While you’re on the circular platform in the center of the building, switch to a stormtrooper.

Use him to access the activation panel on the same wall as the other panel. A door opens to the right, so run into the alcove beyond to add some more studs to your stash.

When you get to the next room, the Emperor tries to blast you with his electrical attacks. Use the same switching-characters technique to get an uncontested hit on him. After taking a couple of hits, he flies to a walkway high above the room.

Before you go after him, collect the valuable blue studs around the room, then smash all the equipment for even more goodies. Smash the blinking wall panels on the right wall to find some more studs and a small travel chute.

Now move to the room’s left side and assemble the LEGOs on the ground to fix the elevator on the wall. Jump on the elevator and use the Force on the controls. Your partner does the same, and together you rise into the air.

When you get to the walkway above, jump off and slash at Emperor Palpatine, who has been waiting for you. He doesn’t like getting hurt and flies to the right side of the room.
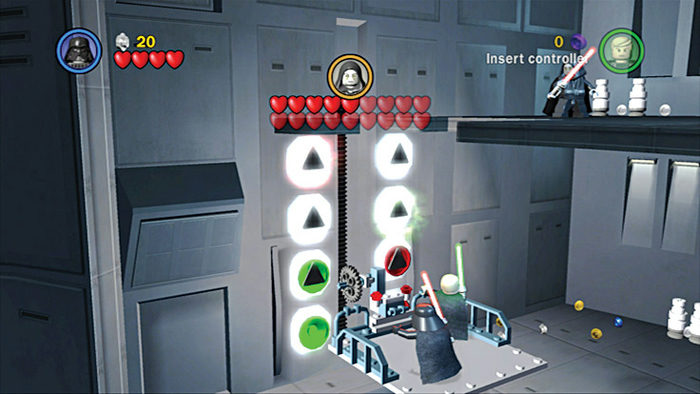
Please click to enlarge

Use the Force to move the elevator to the upper walkway.

Freeplay Area

Switch to a small character and jump into the small travel chute in the right wall. This takes you to a ledge above the room where you can push a box over the edge.

When the box hits the floor, it leaves behind a pile of debris. Use your lightsaber on the pile of debris to blast open the door behind you.

Head through the open door. Knock out the Imperial guards in this large Imperial palace room and collect the studs on the ground.

Smash the box to the left of the door you came through, then create an activation panel on the wall from the loose LEGOs on the ground. Have C-3PO use the panel to lower a platform along the back right wall.

Then throw a thermal detonator at the shiny metal LEGOs to the right of the entrance doorway; afterward, you find a red circle swirl on the ground.

Throw another thermal detonator at the shiny metal grate on the back wall, leaving LEGOs on the ground for you to assemble into an activation panel on the wall. Use the dark side of the Force to shatter the wall grate nearby.

Use an astromech droid on the panel to deactivate the small force field on the wall and grab the LEGO canister that was behind it.

Get to the ledge above by using the red circle swirl, then pull the lever on the wall. Some debris falls in the center of the room. Use a thermal detonator to destroy the shiny wall panels, leaving a black piece on the ground.

Next, double jump around the ledge to the right and assemble the pieces on the ground to form a travel chute on the wall.

Double jump back to the panels you just destroyed and use the dark side of the Force to move the piece on the ground and attach it to the travel chute to fix it. Now drop down and go over to the debris and turn it into a movable box.

Afterward, destroy the chairs in the center of the room for some hidden LEGOs. Assemble the pieces into a turnstile.

Now push the box along the path on the floor and onto the green circle nearby, then push the green side of the turnstile to turn the green circle and the box on top of it.

Keep turning it until the green arrow on the top of the box points to the right. Push the box off the green circle and along the rest of the path.

When you get to the right side of the room, you can see some green arrows on the ground, pointing to the right.

Push the box along the arrows and into the wall; this activates an elevator nearby that starts moving up and down. Ride the elevator to the ledges above the room.

Follow the ledge to the left. Make the force fields below you disappear by pulling the lever on the wall, then following the ledges to the right and pulling on another lever.

Drop to the ground and use the dark side of the Force on the black grates on the wall. When they shatter, collect the loot that spills out, then use the dark side of the Force again to turn the fans that were behind the grates.

Jump in the alcove over each fan, where the force fields used to be, to collect studs from the right alcove and a LEGO canister from the left one.

Head to the back of the room and use the Force to stack the large red chairs against the wall. Double jump to the top, where you can switch to a small character and enter the travel chute on the wall.

The chute takes you to a small chamber to the right. Destroy the gate inside and collect the LEGO canister behind it, then head back to the main room.

Before you leave, smash all the destructible chairs and use the Force on all the wall light fixtures to uncover more hidden studs.

Smash all the containers you find on the walkway and grab what spills out, including a power up. Then, use the Force on the lights on the back wall to find even more hidden treasure.

Double jump across the gap in the walkway on the right to get to the Emperor on the other side of the room. As soon as you land, jump at Palpatine and whack him with your weapon.

If you hit him, he flies away in fear to the room below. Use the Force again on the lights on the wall to find some hidden goods, and smash the containers you find.

Drop to the room below, where you fight a barely alive Palpatine some more. Switch characters when you start to get shocked and then cut him down.

After suffering a few hits, the Emperor retreats to the circular walkway in the center of the building. With one more direct hit, the Emperor is all out of health and his evil rule comes to an end.

Freeplay Area

If you accessed all the activation panels in the area, you find some loose LEGOs on the ground. Assemble the pieces to fix the lights in the wall and smash the covering over the far right one.

Use the Force to turn on the lights and a force field in the center of the room deactivates. Jump into the now-exposed area and grab the LEGO canister for your collection.

Double jump to the walkway on the right to fight the Emperor some more.

Keep reading with a free account

The first 3 sections of Lego Star Wars: The Complete Saga are open to everyone. An account opens the rest of it, and every other guide in the archive. It's free, and there's nothing to buy.

Bought guides on the old Prima Games site? Your account and every guide you own moved here, so there's nothing to buy again. Sign in.

Create a free account Or browse our free guides

PreviousChapter 4: The Battle of Endor NextChapter 6: Into the Death Star