Prima Games eGuides
primagames.com Browse Redeem a code Help
Lego Star Wars: The Complete Saga eGuide
Sign in My Guides

Sign in or create an account

We'll email you a link. No password needed, and if you don't have an account yet, the link makes one.

By creating an account or signing in, you agree to our Terms of Service and Privacy Policy.

Have a password?

Had an account on the old eGuides site, or a code from a printed guide? Help and troubleshooting

Sign in with a password

By signing in, you agree to our Terms of Service and Privacy Policy.

Check your email

A sign-in link is on its way. It works once and expires in 15 minutes. Open it and you're in, with an account if you didn't already have one.

Contents

  • Essentials
    • Gameplay Basics
      • Introduction
      • Game Modes
      • Special Abilities
      • Weapons and items
      • Environment
    • Characters
      • Introduction
      • Jedi
      • Sith
      • Small characters
      • Activation panel droids
      • Super jump characters
      • Bounty Hunters
      • Ghost characters
      • Blaster characters
      • Other characters
    • Vehicles
      • Transportation
    • Super Secret Star Wars Stuff
      • Power Up Pick Up Locations
      • Achievements
      • 100 Percent Completion
  • Walkthrough
    • Mos Eisley Cantina
      • Cantina
    • Episode I: The Phantom Menace
      • Chapter 1: Negotiations
      • Chapter 2: Invasion of Naboo
      • Chapter 3: Escape from Naboo
      • Chapter 4: Mos Espa Podrace
      • Chapter 5: Retake Theed Palace
      • Chapter 6: Darth Maul
      • Episode I Bonus
    • Episode II: Attack of the Clones
      • Chapter 1: Bounty Hunter Pursuit
      • Chapter 2: Discovery on Kamino
      • Chapter 3: Droid Factory
      • Chapter 4: Jedi Battle
      • Chapter 5: Gunship Cavalry
      • Chapter 6: Count Dooku
      • Episode II Bonus
    • Episode III: Revenge of the Sith
      • Chapter 1: Battle Over Coruscant
      • Chapter 2: Chancellor in Peril
      • Chapter 3: General Grievous
      • Chapter 4: Defense of Kashyyyk
      • Chapter 5: Ruin of the Jedi
      • Chapter 6: Darth Vader
      • Episode III Bonus
    • Episode IV: A New Hope
      • Chapter 1: Secret Plans
      • Chapter 2: Through the Jundland Wastes
      • Chapter 3: Mos Eisley Spaceport
      • Chapter 4: Rescue the Princess
      • Chapter 5: Death Star Escape
      • Chapter 6: Rebel Attack
      • Episode IV Bonus
    • Episode V: The Empire Strikes Back
      • Chapter 1: Hoth Battle
      • Chapter 2: Escape from Echo Base
      • Chapter 3: Falcon Flight
      • Chapter 4: Dagobah
      • Chapter 5: Cloud City Trap
      • Chapter 6: Betrayal over Bespin
      • Episode V Bonus
    • Episode VI: Return of the Jedi
      • Chapter 1: Jabba’s Palace
      • Chapter 2: The Great Pit of Carkoon
      • Chapter 3: Speeder Showdown
      • Chapter 4: The Battle of Endor
      • Chapter 5: Jedi Destiny
      • Chapter 6: Into the Death Star
      • Episode VI Bonus
    • Bounty Hunter Missions
      • Bounty Hunting
  • Multiplayer
    • Multiplayer and Bonus Missions
      • Multiplayer
      • Bonus Missions

Lego Star Wars: The Complete Saga Guide › Walkthrough › Episode V: The Empire Strikes Back

Chapter 2: Escape from Echo Base
Han Solo and Princess Leia have just had a moment that will last a lifetime. Unfortunately that life won’t be very long if they don’t get out of Echo Base fast.

Imperial troops have overrun the Rebel forces on the planet’s surface and have destroyed the field generator.

With the force field out of commission, the Imperial forces are storming the base. It’s time to make a hasty retreat.

The room you start in is falling apart fast as chunks of the ceiling come crashing down. Scour the floor for studs to add to your stash, then head to the room’s right side. When you get close, LEGOs fall from the ceiling and block the door.

Assemble the loose pieces into a bomb, which blows up and destroys the door and gives you some studs. Smash the containers along the wall and collect the loot inside before you move through the doorway into the next room.

Freeplay Area

Use R2-D2 to access the activation panel in the wall near your starting location. Run into the room and grab all the studs on the ground, including a valuable blue one.

Smash all the containers you see and collect the loot that litters the floor. Use the Force on the equipment in the room to open the compartment door, then quickly snatch all the blue studs that spill out.

Freeplay Area

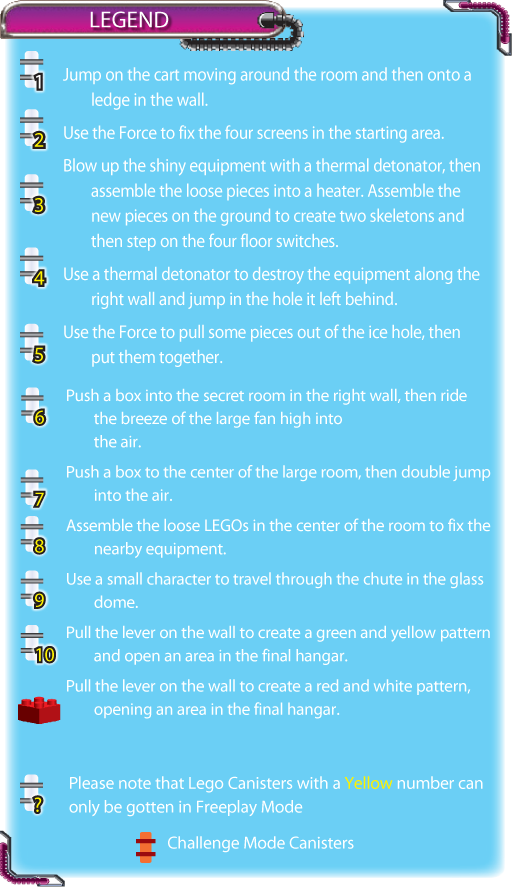
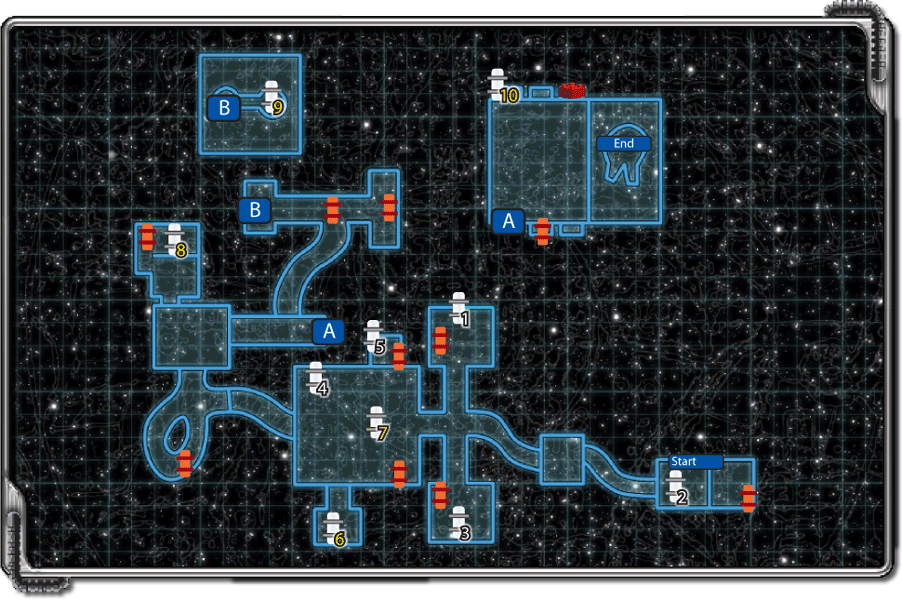
There are four broken screens around the room you start in. Use the Force to fix each one, and a LEGO canister appears in the center of the room for you to collect.

Follow the tunnel on the other side of the door and shoot the Imperial troops that rush toward you. The end of the tunnel is blocked, so assemble the loose LEGOs on the ground to make a heater.

Once your device is complete, shoot at it until it turns completely orange and melts the ice in the doorway behind it. Smash the heater and collect the loot that spills out before you move on to the next room.

This room looks like a cafeteria, with lots of tables for you to destroy. Pull the levers on the machine to the north for some hot brew before you collect all the studs on the ground. Get behind the heater along the right wall to collect a blue stud.

Then push the heater along the checkerboard pattern on the floor. The heater stops in front of the door, and thaws the ice around it so you can move on.
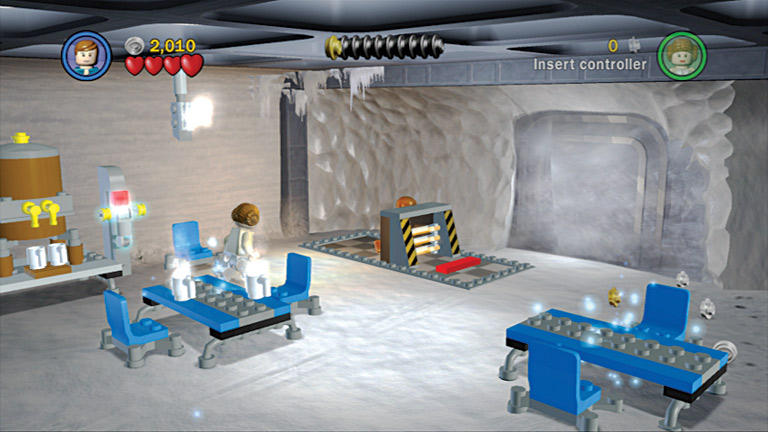
Push the heater in front of the door to melt the ice.

Freeplay Area

When you’re in the cafeteria, use the Force on all the chairs in the room to make them dance. When the dance is done, valuable studs spill out. Add them to your stash.

Follow the tunnel beyond the door as it heads up, and shoot the snowtroopers who come charging in on you. The tunnel comes to an intersection where a snowtrooper sitting in a mounted gun is waiting for you.

Let your natural dodging ability help you avoid getting blasted while you shoot the gun to destroy it and its gunner. When it’s out of commission, move to the intersection and collect the studs on the ground.

Assemble the loose LEGOs on the ground to put the mounted gun back together and blast the bars over the door behind you. Dismount from the weapon and drop any troops who heard the gun blast and rushed in to stop you.

The tunnel to the left is blocked with debris and the tunnel north has a door that only C-3PO can open, so move to the right. Blast the containers you find at the end of the tunnel and enter the room behind them.

Inside you find more containers to blast and more loot to collect. Put together the loose LEGOs along the north wall to complete a cart. It starts to follow the track around the room.

Jump on the cart as it moves, and from there, jump to a ledge on the north wall for some valuable studs.

Drop back to the floor, where you can catch a ride on the moving cart again. This time, jump to a ledge on the right wall to get a LEGO canister for your collection.
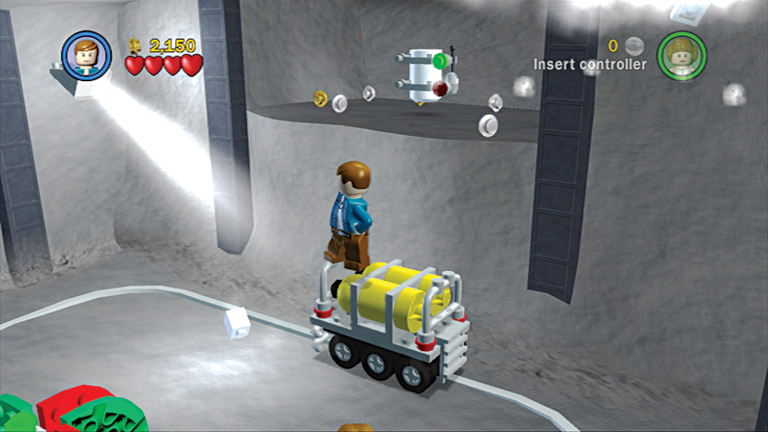
After you put the cart together, you can get to those hard-to-reach high places.

Now that the room has been cleared of goodies, move to the turnstile at the room’s center. Push on the green side to spin it and change the tracks on which the cart is moving.

After you change the tracks, the cart travels out the door you came in, continues down the tunnel past the mounted gun, and crashes into the debris blocking the far end of the tunnel.

Move through the doorway that was once blocked with debris. Hey, there’s C-3PO. He might come in handy. C-3PO joins your party. Shoot all the containers you find and grab the studs that spill to the floor.

Four floor switches need to be stepped on at the same time, but you only have three members in your party right now. Return to the tunnel and move toward the locked door with the picture of C-3PO on the activation panel.

Freeplay Area

In the room where you found C-3PO, you’ll also find some shiny metal LEGO pieces. Switch to your bounty hunter and toss some thermal detonators at each one to destroy them.

Both pieces of equipment leave behind some LEGOs for you to assemble. Each pile of LEGOs turns into a heater for you to shoot. Hit each one three times to turn it on and melt the ice.

Frozen in the ice are some more LEGO pieces to assemble. These pieces are bones, and after you put them together, you get two walking skeletons.

Now step on one of the four green floor switches in the room’s center and your buddy and those two dead dudes will step on the rest.

When all four switches are pressed, a LEGO canister appears in the room’s center. Shoot each heater before you leave the room to reveal more studs for your account.

After C-3PO unlocks the door, move inside to find a large checkerboard pattern on the floor and lots of guards. Move across the room, shooting the snowtroopers as you go. The room’s left side has two mounted guns pointed in your direction.

Shoot the equipment in the room’s center for a power up and blast the guns and the guards operating them to bits. Continue to shoot new guards as they enter the area to avoid taking damage.

Once the coast is clear, push the square boxes on the checkerboard pattern into the two square grates on both sides of the floor. This causes a fan in the ground between each set of grates to turn on and blast air upward.

With the fans working again, assemble the LEGOs in the room’s center to make a little cart and drive it next to one of the fans.

As you wait there, C-3PO will walk over the fan and be blasted into the air so he can land in the back of your cart.

Drive the cart to the ledge where you destroyed those mounted guns, and turn your vehicle so the back of the cart is facing the ledge. As soon as you exit the cart, C-3PO will step onto the ledge.

Those mounted guns are still in pieces, since you destroyed them, so put them back together. Shoot the bars covering the door in the wall and blast any soldiers that enter the area to stop you.

Destroy the gun again and collect more goodies. Use your droid to open the door. A door in the right wall can only be opened by R2-D2, so you’ll have to come back later. After the room is bare, go through the open door.

Freeplay Area

Use a thermal detonator to destroy the equipment to the right of the turret guns. Run into the hole that is left behind and grab the LEGO canister.

Freeplay Area

Move to the door with the picture of R2 next to it and have him use the activation panel to get in. Move into the next room and blast all the snowtroopers trying to ice fish.

Now that the enemies are gone, scour the icy floor for studs, and then assemble the loose LEGOs bouncing around in the room’s center. These turn into a sled; use the Force on it to make it slide around the room.

Use the Force again on the left hole in the ice to pull some LEGOs out and place them against the back wall. Assemble these to form a LEGO canister for your collection.

Freeplay Area

A pile of LEGOs blocks the checkered path leading into the left wall. Use the Force to move the loose pieces and turn them into a giant snowman and reveal a hidden door in the wall.

Because no one will ever get to see your creation, smash it to bits and grab the studs. Get behind one of the movable boxes in the main room and push it down the checkered pathway into the new room you discover.

Push the box over the grate in the floor to the right to activate the fan in the floor. Jump on the fan and collect the LEGO canister floating above the ground. Add the rest of the studs in the room to your stash before you go.

Freeplay Area

The boxes in the back of the room can only be moved by using the Force. Step on a box; your buddy will use the Force to lift you into the air.

When the box reaches its highest level you can jump to a ledge nearby. Use the dark side of the Force to open the cage you find. Grab the valuables that spill out and grab the LEGO canister.

Freeplay Area

A LEGO canister is floating in the air in the center of the room. Push one of the movable boxes next to the snow-covered area in the room’s center and jump on top of it.

From there, you can double jump into the center of the room and grab the canister for your very own.

As you run through the next hallway, don’t step on the white grates on the ground. If you step on one, they will all drop and take you with them.

When you get to the end of the hall, some debris falls from the ceiling. Put the loose LEGOs together to form a bomb that detonates and opens the door for you.

In the next room, the path leads you to an intersection. The door to the north is locked. The path to the south is too steep to scale. So follow the path to the left as it loops around the room and stop when the trail turns north.

Five red floor switches are located on the steep downward path to the north. You need to roll over them on your way down. Roll over as many as you can to turn them green.

If you don’t activate all of them, return to the top of the steep path and roll over the ones you missed. When all five switches are green, the door to the north opens.
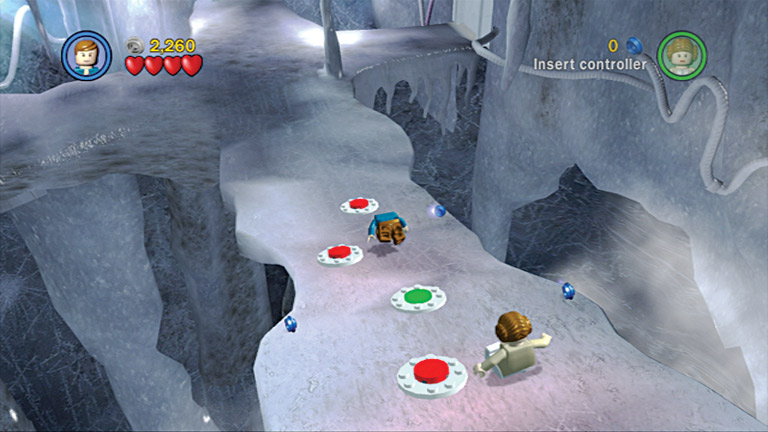
Roll over the red switches to turn them green.

In the next room, head to the south and collect all the studs you find, including a blue one. Just be careful that you don’t step over the ledge or you’ll fall to your doom.

Next, shoot all the containers in sight to collect even more hidden goods and reveal some red floor switches. Push the boxes in the room over two of the buttons and step on the other ones to open the door in the back wall.

Before you leave, use C-3PO to unlock the door in the left wall. Move inside and jump into the pink-lit alcoves on both sides of the room to collect some blue studs. Blast the containers you see and collect any additional studs on the ground.

The rest of the room is blocked for now, so return to the previous room and go through the door you opened by pressing the floor switches.

Freeplay Area

Some shiny debris is blocking the hallway in the left wall, so use a thermal detonator to blow it away. Collect the valuable studs on the ground as you move through the opening you created.

In the next room, assemble the LEGOs in the center of the room to fix the equipment nearby. This lowers the water tank to your left and reveals a LEGO canister for you to collect.

Move around the floor and collect all the studs you see. Use the Force on all the filing cabinets along the walls to uncover hidden goodies.

Move down the next hallway. You start to hear your old friend Chewbacca. A path leading off to the left is too steep to climb, so continue forward.

The door at the end opens and you see your buddy fighting off some Imperial troopers. Give him a hand and blast them to little bits before they start shooting at you.

Freeplay Area

The tunnel in the left wall leading up has a slippery slope that you can’t climb. Use the dark side of the Force to pull the black panels off the wall and create steps for you to jump to.

Jump from step to step, being careful not to land on the snow, or you will slide back down the slope. Collect the studs that are on the hillside. Beyond the fourth step, it is safe to walk on the trail again. Blast any troops that charge you.

Follow the trail north until the path splits left and right. Head left and move through the doorway and smash the equipment for studs.

Use your ascension gun on the red circle swirl pad in the center of the room to grapple to the level above. There you find yourself in a giant glass dome looking out.

Move to the other side of the dome. Switch to a Jawa so that you can move through the chute in the wall. Go through the tunnel on the other side until you get to another dome and can grab another LEGO canister for your collection.

Use the Force on the walls of the second dome to break them apart, then backtrack to the intersection you passed.

Since you went down the left passage first, it’s now time to travel down the right passage. Use R2 to access the activation panel on the door in the hallway. Run into the room and pull the lever on the right side.

Keep pulling the lever until the wheels spin and turn into a green and yellow pattern. A door with the green and yellow pattern over it opens in the hangar below.

Next, pull the lever on the left wall until you see a red and white pattern. This causes another door in the hangar to open.

After you’ve opened the two doors in the hangar, return down the slippery slope you came up in the first place.

Inside are the Millennium Falcon , a whole lot of guards, and two mounted guns. Grab a power up to the left of the door you came through and quickly blast your enemies to pieces before they can hurt you.

Once they are out of the way, pull the levers on the wall next to the door you came through. Some transparent blue doors along the wall nearby open up for you. Smash all the containers in the room and collect all the studs.

Reassemble the pieces near the Falcon to build the turret gun and blast the force field controls on both sides of the field to disable it. Collect all the studs that spill out.

Move into the alcoves behind each door to find two boxes that you can push across the room. Push each one into the black metal grates on the floor.

Another see-through blockade in front of you raises up. In the alcove beyond are two tauntauns. Jump on one and ride it to the Millennium Falcon .

Jump to the roof and assemble the loose pieces to fix the gun at the center of your ship, collect all the goodies there, then fall off the left side.

There, you can assemble more LEGOs to fix another part of the Millennium Falcon . As soon as the repairs are complete, run up the ramp on the left side to get out of there.
Caution

Getting too close to the Millennium Falcon only brings more Imperial troops down on you, so keep your distance.

Freeplay Area

The levers you pulled in the room above opened two doors in the hangar near the Millennium Falcon. Hidden inside one is a LEGO canister and in the other, a red power brick. Grab them.

Keep reading with a free account

The first 3 sections of Lego Star Wars: The Complete Saga are open to everyone. An account opens the rest of it, and every other guide in the archive. It's free, and there's nothing to buy.

Bought guides on the old Prima Games site? Your account and every guide you own moved here, so there's nothing to buy again. Sign in.

Create a free account Or browse our free guides

PreviousChapter 1: Hoth Battle NextChapter 3: Falcon Flight