
Lego Star Wars: The Complete Saga Guide Walkthrough Episode V: The Empire Strikes Back
Chapter 4: Dagobah

One minute you’re hanging around with your friends and the next minute the form of Obi-Wan Kenobi tells you to go to Dagobah to find Yoda. Ben forgot to mention that Dagobah was nothing but swamp with no place to land safely.
At least no one got hurt, and since you’re not going anywhere anytime soon, you had better go find Yoda the Jedi Master.
Since Dagobah is just a swamp, plenty of plants grow here. Shoot the tall spiky ones and collect the studs that spill out. Only R2 can take a dip in the swamp behind you, so fly over the swamp to the right.
There you find an island covered in valuable studs. After you’ve collected them all, head back to your starting location. Go north and assemble the loose LEGOs to form some ramps leading up and over the boulders.
Follow the path over the rocks until you get to the next trail. Ahead, black bats are flying in the air above the trail, so blast them before they swoop down on you and take away your health.
Follow the trail while smashing the spiky plants as you go. Be sure to grab all the studs on the ground before moving on. The path curves around to the right where you can see another watery part of the swamp.
Shoot the plants and the bats in the area and collect any loot on the ground. As you do so, a giant snake slithers out of the water. Start shooting it as soon as you see it; the snake requires many shots to take it down.
A spiky plant along the water’s edge has a red circle swirl hidden under it. After the plant is gone, use your ascension gun to swing over the water to the trail on the other side.
There, you’ll find more plants to shoot and more studs to pick up. Continue to follow the path as it leads to the left until a break in the trail stops you. Send R2-D2 to hover across the water to the left and access the activation panel.
This raises a bridge out of the swamp so Luke can get across. Blast the tall spiky plants nearby and follow the trail as it bends to the left under the stone archway.

Because of the dangerous water in the way, Luke must use his ascension gun to swing across.
On the other side of the archway are some loose LEGOs and, surprise, dirty water. Put the LEGOs together to form a red switch on the ground. Step on the switch to make a pillar rise out of the swamp.
The pillar has another red switch. Use R2-D2 to hover out to the pillar and land on the switch. A shorter pillar rises out of the swamp in between the two previous switches.
As you wait, Luke jumps on this new switch, raising yet another pillar and bridge farther out in the swamp. Cross the bridge and step on that red switch. A low pillar rises to the left of the bridge with another red switch.
Roll R2 back onto the bridge and watch as Luke jumps on the new switch. This raises one more pillar out of the swamp to the north. Now Luke and R2 can safely make it across the swamp to Yoda’s hut.
Before now, all Luke had to defend himself with was his blaster. Learning the ways of the Force will make him even more powerful. And with a powerful Jedi like Yoda training him, Luke should be able to learn to master the Force in no time.
Hopefully he won’t let all that power go to his head. As a Jedi, Luke will no longer be using his blaster because Jedi Knights only use the lightsaber.
Because you are a Jedi in training, your powers are still weak. To fully use the Force you need Yoda’s help, and for him to give it, he needs to ride along on your back.
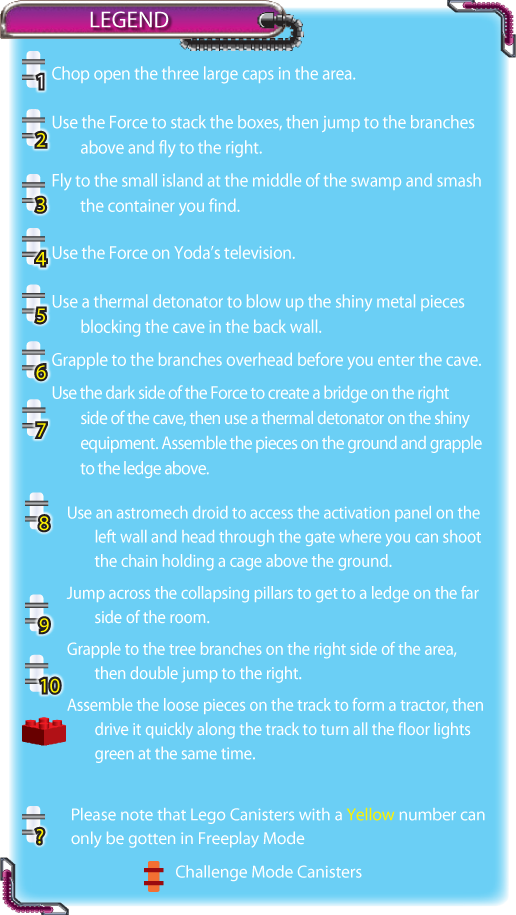
With Yoda firmly settled on your back, hack at the large cap on the ground until it opens. You have opened one of three caps around the area that lead to a surprise.
Unfortunately, you also let out a lot of bloodthirsty bats, so chop them to bits with your new lightsaber.

Why must Yoda ride on your back for the training? Don’t ask questions: He’s the Jedi Master.
A few bunches of plants in the area need to be trimmed up. With Yoda’s help, use the Force to pull up some of the plants from the ground. Plants that can’t be manipulated using the Force must be hacked apart with your lightsaber.
Under each bunch of plants are some boards. Use the Force to move all three groups of boards into the swamp to form a bridge that you can cross.
The bridge leads to a small island with some spiky plants for you to chop up. Collect the loot on the ground, then hack at the giant cap on the ground until you open the area’s second cap.
Back up, and when the bats swarm out, hack them to pieces with your lightsaber. Jump on the small platform in the swamp to the north and step on the red switch on top.
This causes another platform to rise out of the water in front of you. Continue to move from platform to platform (as you raise them out of the swamp using the Force) until you get to the other side.

Use the Force to lift the platforms out of the water so that you can cross the swamp.
When you get to solid ground again, chop at the giant cap on the ground to the left. This is the third and final one you need to open. After you do so, a LEGO canister appears in the air to the right.
Collect the canister and chop up the bats that fly out of the open cap. Wipe out the plants in the area and collect the studs on the ground as you move to the right.
Run to the right side of the clearing where you can see two large mushrooms. Use the Force to lower the smaller mushroom and then the taller one. Switch to R2-D2, then roll onto the cap of the smaller ‘shroom.
After a while, it rises back into the air. From there, fly to the left and land on the top of the taller mushroom.
Wait for it to rise into the air, then fly to the platform on the left, where R2 can access an activation panel. After he activates the controls, the gate in the wall opens up and you can pass through.

Help R2-D2 get to the controls so that he can open the gate for you.
Yoda is quite the teacher. Luke is fast on his way to becoming a True Jedi and can already use the Force on his own without always having Yoda on his back.
When you get to the new area through the gate, use the Force to smash a rock near the cave for some studs, then follow the dirt trail south. You’ll come back to this area in a little while.
On your way south, smash all the spiky plants that you see and collect the studs on the ground. Collect the blue stud at the end of the trail. Then jump down to the ground below to find yourself back at the area near Yoda’s hut.
Use the Force on the plants in the area to pull them out of the ground. Collect the studs hidden underneath them. Hack apart with your weapon any plants that aren’t affected by the Force.
Now, use the Force to stack three stones in the center of the area. Jump to the top, then double jump in the air to grab a valuable blue stud.
Use the Force again on Yoda’s dwelling to pull some LEGOs off the sides and turn them into a step in front of the ledge from which you came.
Go into Yoda’s place because he has some valuable studs lying around his pad. Grab them, smash the rest of his stuff, then return to the swamp.
Outside the hut, run to the right and use the Force to pull up more plants. Congratulations! You found the parts to an old bike. Follow the muddy trail to the right until you find more swamp water.
You can’t do anything else here for now, so backtrack the way you came and use the step you made from pieces of Yoda’s house to return to the high ledge from which you came.
Follow the narrow path that leads back to the north. This takes you back to the area beyond the gate that R2 unlocked earlier. Head north and use the Force to pull a tractor and a cart out of the swamp.
Use the Force again to turn that cart into a ramp to the north. Steer R2-D2 up the ramp you just made. From there, have him hover around the tree through the air to the left until he lands on an old wooden dock.
Access the activation panel to make a platform rise from the swamp behind you, allowing Luke and Yoda to follow you. Jump along the roots of the trees to the left until you get to a cave in the hillside. Go inside.

Use R2-D2 to hover around the tree where Luke and Yoda can’t go.
The cave might be dark and scary, but you’re a Jedi now so you should have nothing to fear. Follow the narrow path along the left side of the cave. When the trail ends at the deep, dark chasm, you find a platform floating in front of you.
Double jump to the platform to lower it, and from there, double jump again to the next one floating nearby. From the second platform, jump to a ledge along the left wall. Chop up the plants to uncover a hidden red circle swirl.
Because you can’t use the circle swirl, jump to the next platform ahead and then onto the next part of the rocky trail. Follow the trail until you get to another dangerous chasm. Use R2 to hover to the wooden platform to the north.
Hover from platform to platform to get across and Luke and Yoda will join you. Follow the trail up as it heads north until you reach the top.

Carefully jump from platform to platform to get to the other side.
That trail leads you to...Vader! What is he doing here? When Vader rushes in to get you, grab the power up on the left and jump at him and slash him with your lightsaber.
Quickly get some distance between the two of you, then jump attack him again to send him retreating to a ledge on the left.
Now that you have some breathing room, assemble the LEGO pieces on the ground into a box. Use the Force to move the three boxes on the room’s right side to a spot against the wall to the right.
Jump on one of the boxes on the left. Yoda jumps on the other. As soon as both of you are on boxes, use the Force to raise each other’s boxes into the air. The boxes lift you to the ledge above where you can once again fight Vader.
Remember to block his attacks before you take one swing with your lightsaber. Only swing once before blocking again to avoid getting hit. After he takes a couple of hits, Vader flies across the room to a ledge above the right wall.
Climb the boxes you stacked over there and attack Vader until he jumps to the ground. Follow him and keep up your attack.
When he loses all of his health, he disappears and the large gate in the back wall opens up. Collect the studs on the ledge and run through the open gate.

Move the boxes in the area so you can get to Vader as he moves about the room.
The gate brings you back outside to the swamp and to another bat for you to take out. Smash all the spiky plants. A blue stud is hidden behind one growing on the area’s right side.
Next, use the Force on the plants in the center of the area to uncover some hidden loot and loose LEGOs. Put the pieces together to create a turnstile. Push on the green side of the turnstile to raise a bridge out of the swamp ahead.
When you get to the other side, use the Force to assemble the loose LEGOs to create a ramp at the end of the bridge so that R2 can cross. Dangerous bats are flying around the sky in this area, so chop them up whenever they get close.
Move to the left after you get off the bridge until you see a large cap on the ground. Use the Force to open all the caps for some studs to collect and bats to fight off. Use the Force to pull some equipment out of the water to the left.
Next, use a thermal detonator to blow that stuff apart and assemble the leftover pieces into a motorcycle. Use another thermal detonator to blow up that sweet ride and run to the ledge to the south.
From there, use R2 to hover across the water to the left and grab some valuable studs on the roots of a nearby tree.
When you get back to dry land, run along the left side of the area until you find two boxes on the ground. Jump onto one and Yoda jumps onto the other. Use the Force to lift his box.
He will do the same to yours until both of you can reach the platform high above you. Jump to the platform above the ground and push the box you find there along the platform until the box falls to the ground and shatters into tiny pieces.
Return to the ground and turn those LEGO pieces into some equipment with an activation panel. Use an astromech droid on the panel and the gate nearby shatters.
Hidden in the swamp to the right are some more LEGOs. Use the Force to pull them out of the water to make a washing machine. Now use the Force to activate the machine, making it shake this way and that until it breaks into a whole lot of LEGOs.
Now, smash all the spiky plants left in the area and collect all the studs on the ground before you run through the open gate. In the swamp beyond the gate is your X-wing. Use the Force to lift it out of the water.