
Lego Star Wars: The Complete Saga Guide Walkthrough Episode IV: A New Hope
Chapter 4: Rescue the Princess

Finding the planet Alderaan blown into a billion pieces was a little disappointing. And then, being pulled into the Death Star didn’t really make things any better.
But all is not lost, because your stormtrooper disguises worked: Nobody knows you’re here. Now maybe you can snoop around and find out what is going on around here.
After you start, blast all the containers in the room and collect the studs that spill on the floor. The wall to the north is lined with destructible panels and long blue lights.
Blast them to little bits to spill treasures on the ground and reveal a little nook inside. Use the Force on the machine in there to get some valuable studs.
After you collect everything, use the Force on the door in the right wall to turn it into a TIE fighter.

The machine hidden behind the wall has many goodies inside.
Enter the hallway and destroy the stormtroopers and containers you see. Collect the loot that litters the floor. Move through the open door in the right wall, and use one of the human characters to jump into the crane’s controls.
In the distance, you can see the hangar where the Millennium Falcon is being guarded. Move the crane’s claw around until you see its black shadow rest on the unsuspecting guard below it.
Drop the claw and pick up the guard. Then move the claw and the captured guard over the opening in the hangar’s center and drop the guard to his death.
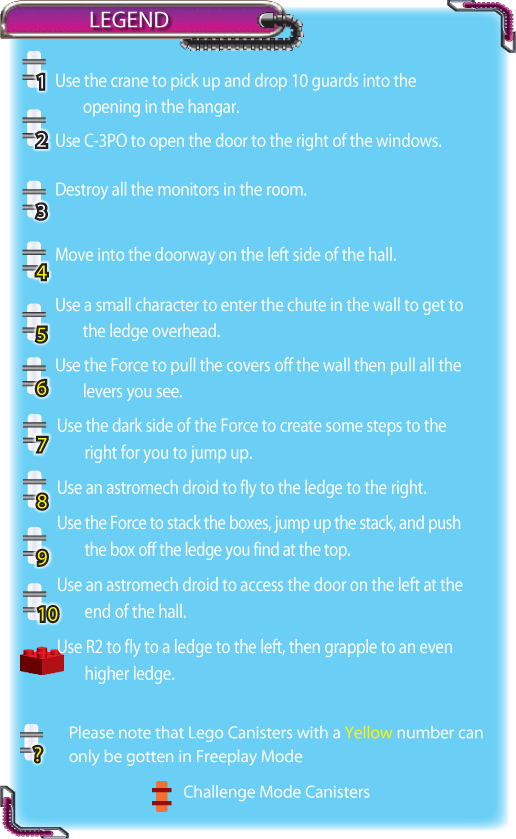
Toss 10 guards away all in the same manner, and a LEGO canister appears below. Direct the crane’s claw over the canister and pick it up to add it to your collection.

The LEGO canister appears after you dispose of 10 guards.
Move back to the hall and pull the lever on the left wall to get a stormtrooper helmet. With your new disguise, you can use the activation panel to open the door at the end of the hall.
After you enter the room, blast the guards standing near the windows to the right. Run to the left of the doorway and collect a blue stud, then assemble the loose LEGOs nearby into a mini Star Destroyer.
Destroy the nearby containers, then move around the room to find more loose LEGO pieces on the floor. Assembled, they form a set of controls with a picture of R2-D2 on the activation panel.
Move past this for now, and blast the colored lights on the wall the guards were standing near to find some hidden loot. Have C-3PO use the activation panel to the right of the windows to open the nearby door.
Enter and grab the LEGO canister inside. Now use R2-D2 to access the panel you passed earlier and you see a picture of Princess Leia. Obi-Wan moves off to take care of some business and the droids hide, leaving Luke, Han, and Chewy to find the princess.
Run into the next hallway that opened up to the left of the control panel. Blast the guards in the distance before they see you. When the coast is clear, move down the hall.
Destroy containers and the orange and gray pillars along the wall to reveal valuable studs inside. The end of the hall could drop you down to your death, so head into the doorway in the left wall.
In the next hall you come under attack again by Imperial troops, so take them out quickly. Move down the hall and blast the orange and gray side pillars to find a power up and blue studs underneath.
A door in the right wall has a blue stud to collect. There’s also a LEGO canister behind some glass, which prevents you from getting it for now, so continue moving down the hall.
Shoot more guards in the hall and pull the lever on the right wall to put on another stormtrooper mask.
Follow the hall to a walkway where you find more stormtroopers. Shoot them as they come out of the elevators in the right wall. The stormtroopers keep coming until you break the security camera over each elevator, so destroy the cameras.
Now keep moving down along the walkway. At the walkway’s end, you can see Ben Kenobi fighting with more stormtroopers across a chasm in the distance.
Ben’s enemies are your enemies, so fire at those Imperials. After the last one drops, Ben uses the Force to create a LEGO bridge for you to cross.

Ben Kenobi looks like he is in trouble, so you had better help him out.
While Ben does his thing, cross the bridge he created and pick up the studs on the other side. Blast any containers you find and follow the walkway to a lever on the right wall. It gives you a new helmet.
Across from the lever, some enemy stormtroopers use a grappling hook to get over the fence. These troops are tough and require two shots to take them down.
Use your friends as cover and drop the enemies quickly, then blast the hook they are using to get up so that no more can enter the area. When the area is secure, pull the lever to put on your mask.
Run down the rest of the walkway until you get to a block in the road. Shoot at the blockade until it explodes. Run past the doorway in the right wall and continue down the hall, blasting orange and gray pillars while collecting all the studs on the ground.
At the end of the hall, run through the door on the right. Shoot the guards in black when you get to the next area, as well as the hook on the fence that they are using to grapple.
Run to the right of the door, and with your stormtrooper mask on, access the activation panel on the wall to open the door. When the door is open, smash any containers in the area and collect all the studs before moving along.
Pass through the doorway and run across the narrow walkway. At the circular platform in the middle of the area, assemble the loose LEGOs to make a turnstile.
Push the green side of your creation to move that narrow walkway you crossed over to a platform against the back wall. Quickly run across the newly moved narrow walkway before it moves back to its original location.
Once you get to the newly discovered platform, use your ascension gun to reach the platform above you. If you don’t have a stormtrooper helmet yet, you can get one here.
Now grapple to a higher ledge and blast the guards on the ledge to the right. Jump to that ledge and fall off its right side; you land on a ledge with a door you can enter.
Move through the door to find a room full of enemy troops. Run to the left and drop the two stormtroopers there. When they’re gone, focus on the troops on the other side of the room without having to worry about anyone shooting at your back.
When the coast is clear, run around the room shooting out the red and green blinking monitors and collecting the studs along the walls. After the last monitor is history, a new one opens up showing a scary march of stormtroopers.
A LEGO canister appears below it; add it to your collection. Assemble the nearby pile of LEGOs to form an activation panel for the door. While wearing your stormtrooper helmet, access the panel to open the door.
Blast the guards on the other side of the door and assemble the loose LEGOs on the left side of the hall. Run down the hall, blasting orange and gray pillars, as well as any container you find.
More guards are posted in the next area, so blast them when they get in range. Also, blast more containers on the floor.
When the area is clear, open the first elevator while still wearing your stormtrooper mask. This takes you to the lounge where stormtroopers go to relax and take hot baths with each other.
They may be wearing nothing but swimsuits and helmets, but these stormtroopers are packing, so quickly shoot them dead. Once the bathing area is free of enemies, run to the back wall.
Three panels open when you get close, exposing a lever behind each one. Pull each lever to take a nice shower before you leave via the elevator you came up.
After you get off the elevator, run to the left and enter the elevator to ride it down. As soon as you enter the next room, start blasting the guards inside. As you fire, more guards enter the room from the elevators in the back.
Keep shooting until all the enemies are gone. Above each elevator is a security camera. Fire at these cameras a few times until they break into tiny pieces. More guards will use the elevators to enter the room until each camera is destroyed.

Destroy those security cameras over the elevators to stop the guards from storming in.
Now move through the room shooting containers and collecting studs. Move to the room’s center and put the loose LEGOs together to form the control panel.
Collect all the goods that spill to the floor before you pull the levers on the equipment you just put together. This opens a door in front of you.
Before you go charging down the corridor behind the door you opened, jump into one of the elevators. Both elevators take you to a room with the controls to a couple of turret guns on the outside of the Death Star.
Jump into the controls of a turret and start firing at the TIE fighters flying around outside. Shoot in their general direction and don’t let up.
After you destroy 10 crafts, a boatload of blue studs drops on the floor between the two guns. Quickly grab them before they disappear.

Use the turret guns to drop those TIE fighters like flies.
Ride an elevator back to the room you came from and head into the corridor leading into the prison block. Guards at the back of the corridor charge at you, so fire as they approach until they fall to pieces.
While the coast is clear, pull a lever on the right side of the hall; one of your friends will pull the other, opening the door between the two of you. Run inside the cell to collect the valuables on the floor.
Return to the corridor and shoot more guards charging you. Pull the levers across from those you just pulled and clean out the inside of the cell.
In between pulling levers and cleaning out cells, always be sure to shoot the guards as they charge you. Now, head down the corridor to the next set of levers. Pull the levers on the left wall and enter the cell.
Assemble the LEGOs on the ground to put together the skeleton of some poor prisoner who never tasted freedom again. At least he left you studs to collect.
Go to the next set of levers and pull the ones on the left wall for some studs. Pull the levers on the right wall to find the cell holding Princess Leia. The last set of levers down the corridor can be opened only by droids.
Go into the cell with Leia. Step on one of the floor switches in front of her. One of your friends will step on the other to disable the force field and set her free.