
Medal of Honor Guide Walkthrough Campaign
Running With Wolves...
Mission Achievements/Trophies
| Image | Name | Description | Gamerscore | Trophy |
|---|---|---|---|---|

|
Develop the Situation
|
Complete Running with Wolves...
|
15 | Bronze |

|
Dropping Deuce | Jump 7.5 meters high on the ATV | 10 | Bronze |

Zone 1


As a Special Forces operator, your team will be infiltrating the enemy lines on your ATVs.
1. Reach the Outpost
This mission puts you in control of a different character. You are now part of an Army Special Forces team—AFO Wolfpack. After the team leader gives your orders, climb onto your ATV.
Dusty is your teammate during the mission. As he takes off on his ATV, follow him. There are no enemies around at first, so use this time to get acquainted with the controls for the ATV.
To help mask your movement, Dusty will take you down into a wadi.
2. Avoid Being Seen by the Trucks

As you are riding on the ATV, stay down in the wadi and listen to Dusty. He will let you know about obstacles and enemies ahead of you.
Listen carefully to Dusty. Since he is riding point, he will see enemies ahead before you do. After you have been riding for about a minute, he tells you to slow down.
Enemy trucks are driving across a bridge over the wadi. Stay back until they pass by. When Dusty gives you the all clear, then move out.
Keep following him and as you approach the checkpoint, Dusty tells you to go soft and turn off your headlights. There are some hostiles in a village up ahead. Slow down and go dark. Park your ATV next to Dusty's and dismount.
Zone 2

3. Secure Perimeter of Outpost
Follow Dusty up onto a ledge overlooking the village. Take some time to look around at the village to get a feel for the layout. It is important that you maintain stealth as much as possible during this mission.
Luckily, both your submachine gun and your rifle are equipped with sound suppressors. As you hold in this spot look for the other two members of your team, Vegas and Panther.
Cover them as they get into position on the other side of the village.
4. Kill Guard

Use your silenced rifle to make a long-range shot at the guard in the tower.
Switch to your M110 rifle to look for hostiles around the village. There is a lone guard up on a tower. Take careful aim for a head shot.
You want to take out this tango with a single shot before he can raise an alarm or get off a shot of his own. There is no rush, so take your time and focus on accuracy.
5. Follow Dusty
Once the guard is toast, switch to your MP7A1 submachine gun and follow Dusty along the ridge and down to the village. He knifes a hostile in a short alley and then moves through a small building.
Continue outside and down some stairs. There are two enemies to the left of the stairs. Take aim at one of them and fire. Dusty drops the other.
6. Eliminate the Fighters
Follow Dusty to a wooden gate. Here you two separate. While he goes to the right, you must enter the building to the left. Make sure it is clear and then crouch down and move over to the window.
Switch to your M110 again and locate the guard up in a tower directly ahead of you. Once again, take careful aim and neutralize the tango with a single head shot.
Listen to Dusty as he calls out a second target on the roof to the right. One more shot—one more kill.

Silently take out some more guards. If you have trouble locating the enemies Dusty is calling in to you, press the HUD button to bring up an icon over these targets.
7. Rally Up with Team
After taking out the guards, more tangos enter the courtyard in front of you. Don't worry about them. Your team will take them out. Once it is clear, exit the building and move out across the courtyard.
Your teammates are waiting in another building. Inside you find lots of enemy intel. It looks like the tangos have a lot more than expected.
8. Return to the ATVs
It's time to bug out. Follow Dusty back through the village and all the way to the ATVs where you parked them. Climb aboard and get ready to roll. You still have a lot of work to do tonight.
Zone 3
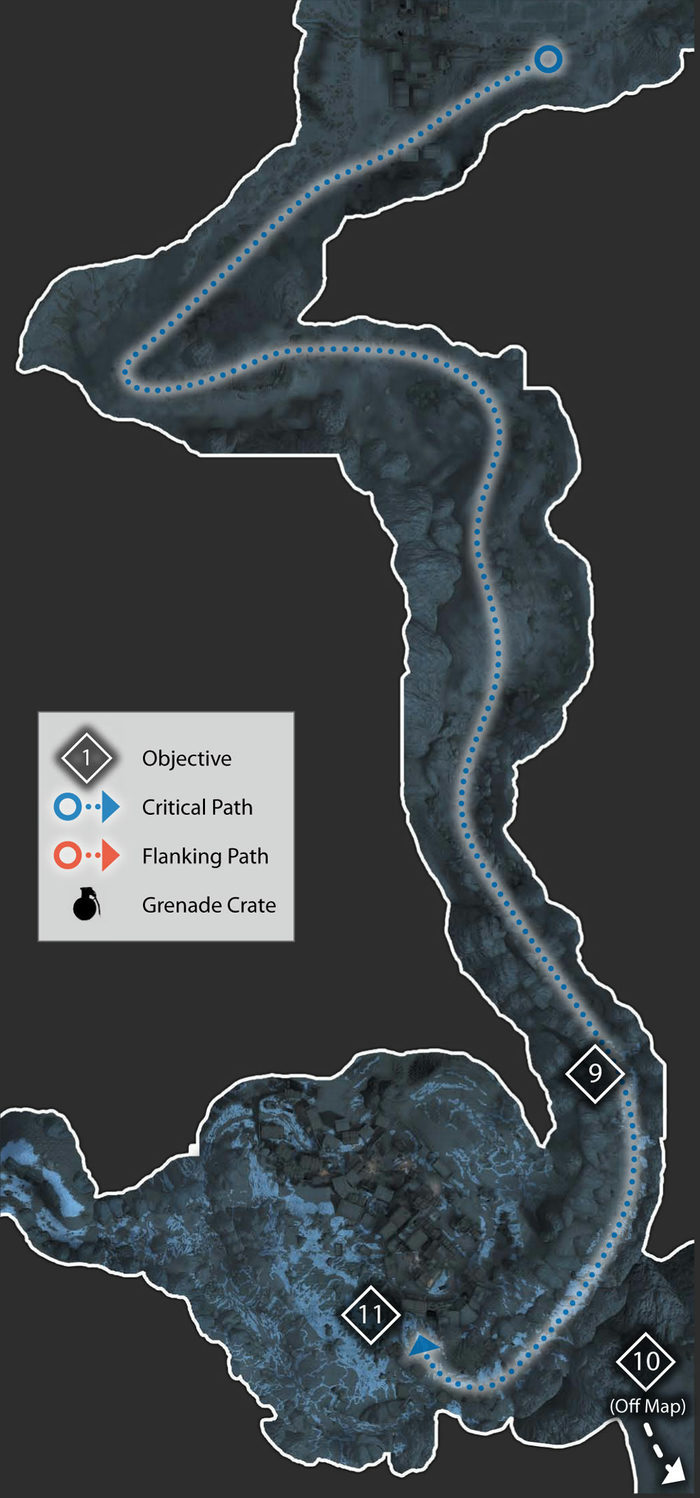
9. Follow Dusty to Menjawar
Dusty leads the way on his ATV. Follow him as he maneuvers around rocks and other obstacles. He gives you a verbal head's up when there are sharp turns or sudden drops, so listen and be ready for these areas along the path.
As you near Menjawar, your other teammates inform you there is an outpost outside of the village that needs to be cleared of enemies.
10. Eliminate Enemies with M82
Bring your ATV to a halt when Dusty stops. As the team sniper, your job is to engage hostiles at extreme ranges.
Your M82 sniper rifle has the range and stopping power to kill enemies at long distance with a single shot—whether you get a head shot or not.
Since it is night, it can be difficult to find the targets. Switch your scope to white hot mode so that the warm bodies of your targets appear white against the black background.
There are a couple hostiles along the right side of the camp—near the fire and the doorway of the building.
The third is on a tower to the left. He is tough to see because he is behind some wooden walls. However, you can see his feet using your thermal optics. Aim above his feet and fire.
Your .50 caliber round will penetrate the wall and take down this tango.
Another tango comes up the stairs to the top of the tower to check on the enemy you just killed. Wait until he stops and then pop him.

Switch your scope to white hot thermal mode to detect and target enemies more easily.
11. Get to Menjawar
Now that the outpost has been cleared, it is time to ride some more. Follow Dusty all the way to the gates of Menjawar village. Dismount and make sure you have your SMG selected. Dusty leads the way into the village.
Zone 4

12. Search for Trucks in the Village
Follow Dusty through some ruins and down into the village. As you approach some stairs leading down to the ground level, hold while a patrol of enemies walks past the first truck.
After they have passed, quietly take out the guard in the doorway on the opposite side of the truck. Dusty will mark the truck with a beacon and then head further into the village. Follow him.
13. Mark Second Truck

You have to plant beacons on two of these trucks. The first one is in the clear.However, you will have to sneak around to the far side of the other so the nearby tangos don't see you.
Stay in the shadows as you approach another open area. There are lots of hostiles walking around out there. Stay near Dusty and you won't be seen. Dusty will let you know when it is all clear.
Continue following him into a building. Turn to the left and look through the other doorway to see two tangos located outside. Take aim and kill one of them while Dusty takes out the other.
Stay in the doorway while Dusty moves ahead and onto the rooftops.
When he calls all clear, move forward, following the pathway around to the second truck. Walk up to it and plant a beacon on it. Two down, one more to go.

Sneak up behind this tango in the building and knife him.
14. Mark Last Truck
After you mark the truck, a couple hostiles come walking towards you. Dusty will give you a head's up. Take out one of them while Dusty smokes the other. It is time to get out of this courtyard.
Move to the wall with a lit lantern hanging nearby. Dusty will give you a buddy boost up. Follow him until he tells you to halt. There are more tangos in the area around the last truck. Wait for the patrols to pass.
When Dusty gives you the all clear, move quickly and quietly across to the building on the opposite side. Enter and knife the hostile standing near the other doorway. Stay low and move up to the truck to plant the beacon.
15. Return to ATVs
You now have to backtrack all the way to Dusty. As you enter the building again, another tango is inside. Sneak up behind him and take him down with your knife.
Before exiting the building, wait for a hostile outside to walk away and then make your way back to Dusty who will give you another buddy boost. Follow Dusty back towards the second truck and then through a building.
The hostiles are out in the courtyard and on the upper levels of the building on the opposite side of the courtyard. Stay in the doorway, using it for cover, and shoot at the hostiles in those locations.
Move forward onto the patio area and clear out more enemies while taking cover behind the low wall.
Once it looks clear, head down the stairs to the left and move through the courtyard. There may be one or two tangos hiding in corners, so be ready to take them out.

You have to fight your way out of the village. There are a couple areas where groups of hostiles block your way and you will have to clear them out.
Head around to the left and then up the stairs. Follow the balcony walkway around. Knife the hostile with his back to you along the way and continue to the end where you overlook another courtyard.
There are more hostiles down below. Pick them off before dropping down and crossing to the gate. Dusty opens it for you. Follow him past the first truck and back through the way you first entered the village.
Get a boost from Dusty to get to the top of a wall, and then help him up as well. Continue back to the ATVs and mount up.
Zone 5

16. Rally Up with Team

Ride your ATV along a narrow path to get to the rally point where Panther and Vegas are waiting for you.
All you have to do now to complete the mission is to follow Dusty as he leads the way on his ATV. Keep going until you reach the rest of your team who are waiting for you.
Completing this missions earns you the Develop Situation achievement/ trophy.