
Assassin's Creed: Revelations Guide Multiplayer Multiplayer
Basics
With a wide range of new features, functions and destinations, the Assassin’s Creed Revelations multiplayer suite may seem a little daunting to a first-time player. In this chapter, we provide a wealth of tips, tricks and tables that will help you to play at a competitive level from your very first foray into this engrossing play mode.
Game Principles
First things first: it is points, not kills, that are used to determine winners in Assassin’s Creed Revelations multiplayer. While a high kill count is certainly an accomplishment, performing well in each match is a matter of how you perform your assassinations – not your final body count. With special bonuses acknowledging noteworthy feats, particularly those that involve stealth and subtlety, there is a definite onus on playing the mode in the way its creators intended.
While time spent inside the Animus completing the single-player adventure will certainly help to familiarize you with certain multiplayer concepts, it is important to recognize that this is a very different experience. The focus here is on free running, social stealth and assassinations, with a greatly simplified combat engine. Instead of open brawls, you will use a range of unlockable skills known as Abilities to hunt and kill targets, or evade aggressors.
Once a multiplayer session has been launched, your character will appear somewhere on the chosen map. You will notice that all citizens around you resemble one of the many playable characters, or “skins” (referred to as Persona in the game). In most Game Modes, some will look identical to you. All you know at first is that other human players are out there, hiding among the crowds, and you will be assigned a contract to kill one of them.
However, you will regularly find yourself cast in the dual role of hunter and prey. As you walk the streets in search of your contract, other Agents are likely to be tracking you. Naturally, stealth is of paramount importance. The new Approach Meter (situated in the upper right corner of the screen) starts at Discreet and can fluctuate between Incognito and Reckless in accordance with your actions. The former is always the most desirable state to operate in. A covert approach can be employed to evade the attention of your victims and potential executors, but you must always be ready to adapt your tactics and flee or hide if a rival assigned to kill you is closing in fast.
Another factor that you must take into account is that you may not be the only assassin hunting your prey. Multiple contracts can be awarded on the same target, so you will lose out if a rival beats you to the kill. This also means that you can be stalked by more than one competitor at once.
Finally, try to plan your assassination to get the best bonuses but always be ready for improvisation, and it is imperative that you keep moving at all times. Never linger in one place for too long, or think that you can lurk in wait for your target. Somebody, somewhere, is moving towards your location, and drawing closer by the second…
Onscreen Display
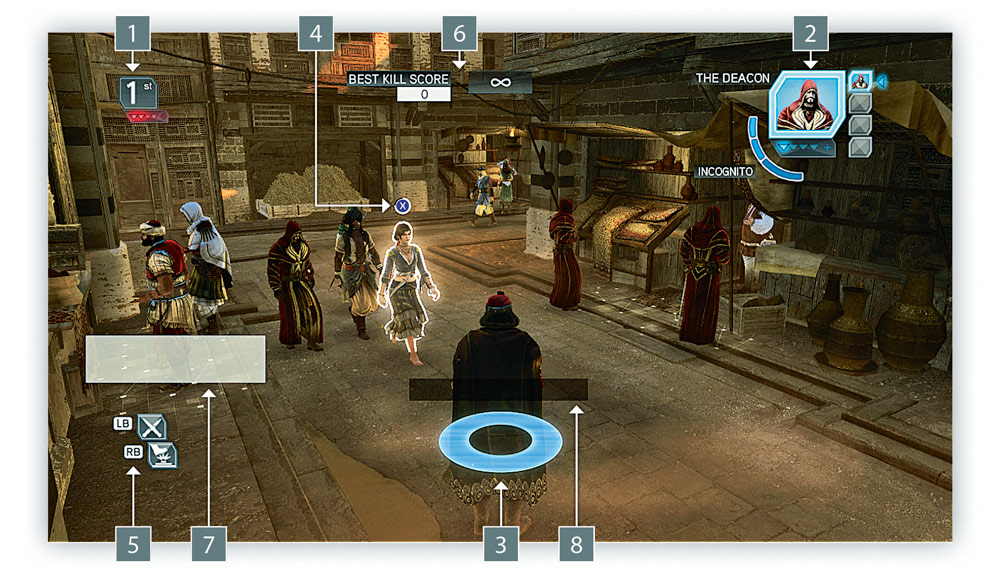
Player Data: 1
The number shows your current scoring position. Victory is handed to the player with the most points at the end of the round.
The number of red markers indicates how many Agents are stalking you.
An Escape sequence begins when your pursuer reveals themselves.
Target Data:2
This portrait shows the skin (referred to as Persona in the game) of the Agent you have been contracted to find and kill. Beware of lookalikes and disguises. It will take a little while to become acquainted with all characters, but you’ll soon gain the ability to recognize your target with a brief glance at his or her picture.
The outline around the portrait becomes blue when your target is in your line of sight – but this may also mean that your victim can see you as well. The background of the portrait becomes blue when you are close to your target.
The players hunting your target appear as blue markers below the picture. One arrow means that you are the only pursuer on this target.
The Approach Meter shows your level of discretion and directly affects your kill bonus. The more careful the approach, the greater the bonus. Subtle, Low Profile actions (such as walking or hiding) gradually fill up the Approach Meter – from Discreet, to Silent and then Incognito. Conversely, performing High Profile actions (such as running) will cause your Approach Meter to empty to the Reckless level. A Chase sequence will ensue when your Approach Meter is fully depleted.
Compass:3
The primary function of this directional indicator is to show the approximate position of your contracted target. The width of the “fill” arc increases as you approach your target, becoming a full blue disc when you are in close proximity. It will turn bright blue whenever your target is in sight.
Arrows may also appear on the outer edge of the Compass, indicating secondary targets in team missions (blue), and enemy pursuers (red).
There is no Compass in Easy Deathmatch and Deathmatch modes.
Assassinate Button and Lock Button Icons:4
A contextual visual prompt over a character’s head ( ) indicates
when a kill can be performed by pressing the Primary Weapon button.
You can also lock on to a target by pressing the Target Lock button when the corresponding symbol appears over their head ( ). The lock lasts while your target is in your line of sight, or until manually disabled. It will break if you lose sight of the target for more than a few seconds.
Abilities and Streaks:5
Icons in these slots show which Abilities and Streak bonuses are currently available to you.
Abilities in Cooldown (that is, recharging after use) are replaced by a timer until available.
Session Information:6
This shows the countdown to the end of the round.
You will also find information specific to your game mode here, such as team scores.
Players List:7
This shows the list of players in the current session, as well as their score. The list will disappear after a few seconds.
Session Events:8
This provides rolling news of Kills, Session Bonuses and other events as they occur.
Controls
|
XBOX 360 |
PS3 |
BUTTON DEFINITION |
COMMAND |
|---|---|---|---|
|
Left stick (L) |
Left stick (L) |
|
Basic Movement |
|
Right stick (R) |
Right stick (R) |
Camera Control |
|
|
D-pad |
D-pad |
Quick Inventory Buttons |
Switch Targets in Team modes; select Abilities Set |
| A |
X |
Legs Button |
Fast Walk; Sprint/Jump (High Profile mode only) |
| B |
0 |
Empty Hand Button |
Stun; Shove (High Profile mode only) |
|
X |
|
Primary Attack Button |
Assassinate |
|
LT |
L1 |
Target Lock Button |
Lock Target |
|
RT |
R1 |
High Profile Button |
High Profile Mode |
|
LB |
L2 |
Assassin Signal Button |
Use Ability 1 |
|
RB |
R2 |
Weapon Selector Button |
Use Ability 2 |
|
RS |
R3 |
Center Camera Button |
Center Camera |
|
start |
start |
Pause Button |
Pause Menu |
|
back |
select |
Map Button |
Display extra information, such as the Players List, scores or Ability names |
Control Notes:
The Fast Walk command (hold Legs button) enables you to increase your movement speed by a barely perceptible degree, which can be invaluable for closing the gap on a victim, or pulling away from a would-be aggressor. This incurs no Approach Meter penalties.
If you are forced to flee, the Empty Hand button can be held to bash through civilians in your path as you run.
While walking through crowds, you will notice that the Assassinate button icon can appear above any civilian when you face them in close proximity. Killing innocents leads to the loss of your contract, so this is where the Lock function comes in useful. Press Lock when your suspected target is in your immediate sight, or hold Lock to aim at the target from a distance. A blue padlock ( ) will then appear over your target’s head ( fig 01). The advantage of the Lock function is that the Assassinate icon only appears for this individual, meaning that you cannot accidentally strike an innocent. The Lock will break if you lose sight of a target for more than a few seconds.
If an enemy makes a High Profile move while in plain sight, a Lock button icon will appear over their heads to enable you to focus your attention with ease.
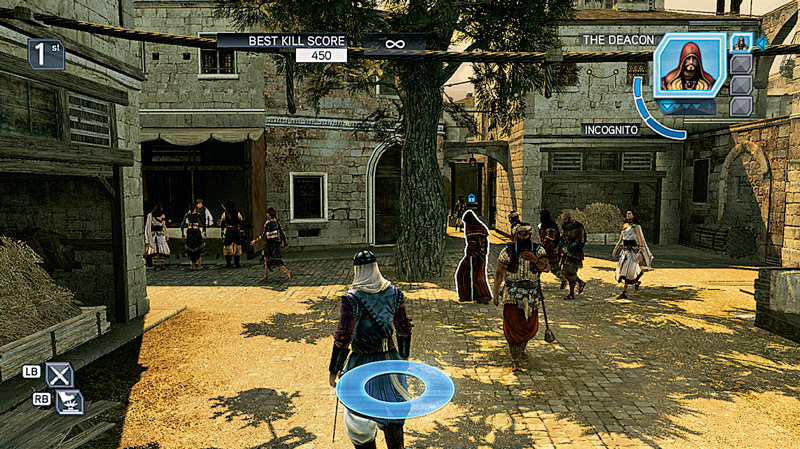
fig 01
Chases and Escape
In all modes but Deathmatch, Easy Deathmatch and Steal the Artifact, a Chase sequence begins when a pursuer’s Approach Meter is fully depleted. This is usually caused by performing High Profile actions while in the target’s line of sight.
Pursuer: Once you trigger a Chase, the Chase Timer appears on your HUD. You must now kill your target before they can hide from you. If you can keep your target in sight, they will be unable to hide. However, as soon as they turn a corner or disappear from view, the Chase Timer will begin to fill. If it fills up completely, they will have achieved an Escape – and you will have lost both the Chase sequence and the contract.
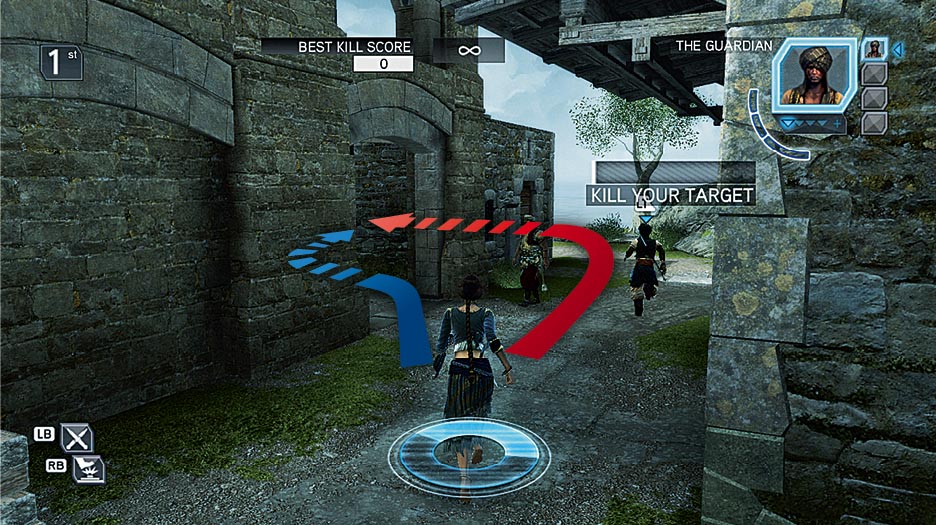
fig 02
Once a Chase begins, it’s often a good idea to start free running and ascend to higher ground. Not only will your target have to work harder to hide, but you’ll also increase the effective range of assassination through free running tackles and aerial kills. You could also try to use shortcuts whenever you have a good idea of where your target intends to run next ( fig 02), or employ relevant Abilities at your disposal, such as Closure. You only have to regain sight of your target for a moment to refill the Chase Timer completely. As exhilarating as a Chase can be, note that protracted pursuits will waste valuable match time.
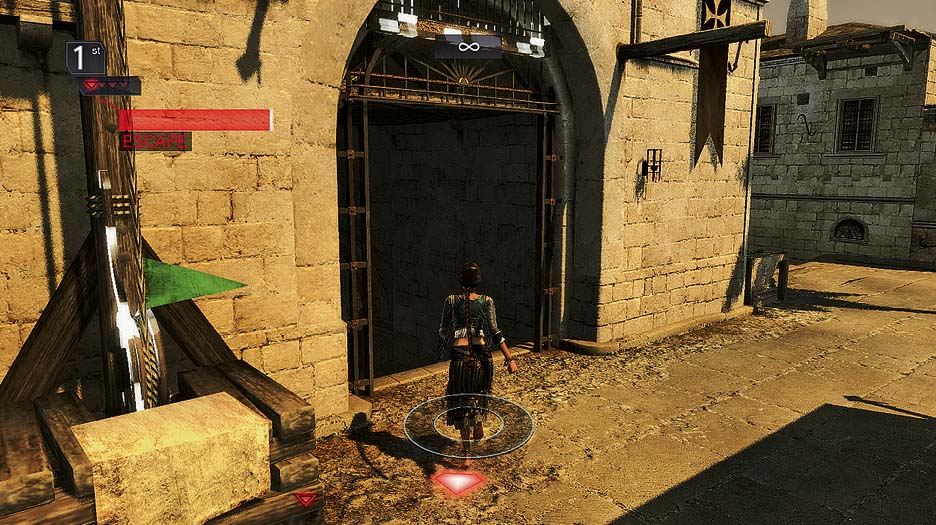
fig 3
Target: When you are made aware that an assailant is closing in to assassinate you, an Escape Timer appears and the race begins. You must now attempt to leave your opponent’s line of sight by turning corners, entering buildings or dropping out of view. Use Chase Breakers to gain distance ( fig 03). If you succeed, the Escape Timer will turn yellow and begin to recede. When this occurs, you can slip into a hiding spot to turn the bar blue. The blue bar will decrease rapidly while you are hidden. If the assigned killer fails to catch you before the Escape Timer expires, you will have achieved an Escape and your hunter will lose the contract on your head. Successful Escapes earn extra points.
Even if a pursuer is hot on your heels, hope remains right up until they hit the Assassinate button. With a little luck, good reflexes or tactical sense (if you lure them to a hiding spot, for example), you can strike them first with your character’s Stun move. This will incapacitate them for a few seconds, earning you a momentary reprieve – and extra points.
Chase Breakers
Each map features a number of Chase Breakers to enable competitors to briefly evade opponents in pursuit. There are three types to look for, readily identified by the white shimmer of their Animus matrix outline. Chase Breakers are triggered by any High Profile activity such as running, so you can pass them stealthily without incident. They also reset after a short period of time, so you must always make good use of the valuable seconds of grace they offer.
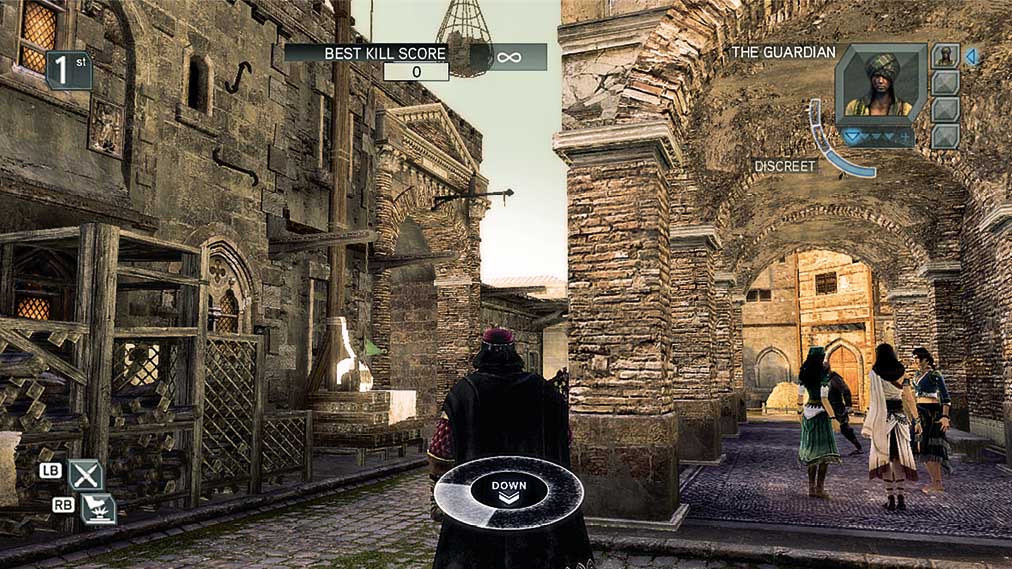
Lifts: Collide with the front of these devices to trigger them, and the counterweight will propel you instantly to roof level. Note that you can also drop onto a Lift from above – a tactic of great merit when a rival is almost directly behind you.
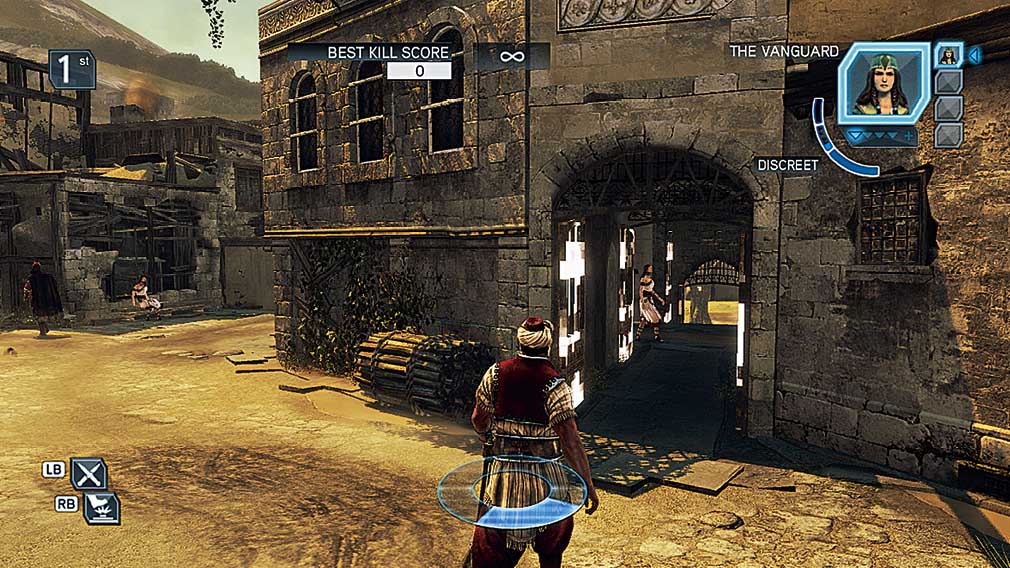
Closing Gates: Running through these passages will cause doors to swing shut or portcullis grates to fall. Time your entry carefully, and these Chase Breakers will slam shut in the face of your would-be assassin and force them to take another path.
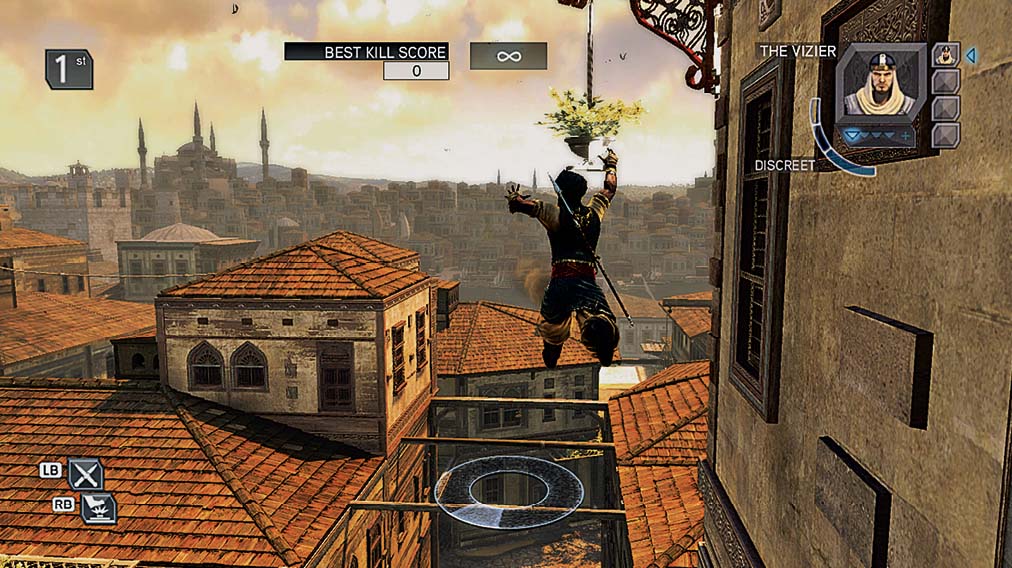
Corner Helpers: As you bound over beams and balconies, these swinging handholds will not only break a vital element of the free running route behind you, but will often slip you immediately into the yellow “out-of-sight” status as you round the corner.
Hiding Spots
Hay-filled carts and straw piles
are the most obvious hiding spots featured in the multiplayer game, and completely remove you from view when you jump inside. All kills made from such places of concealment lead to generous bonuses
( fig 04), but with the obvious drawback that you must remain stationary while another Agent may be closing in on your position. Furthermore, entering and leaving these hiding spots is clearly not the behavior of a civilian: such acts telegraph your intentions to anyone who happens to glance in your direction.
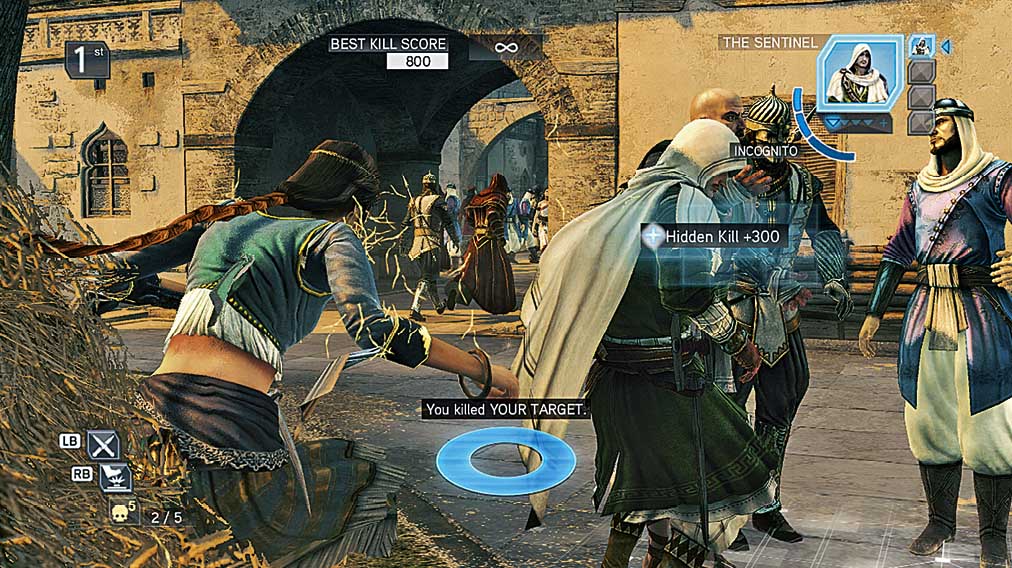
fig 04
Social stealth is the most common method of finding a hiding spot, either by blending with a crowd of bystanders or by sitting on a bench. It is easy to make Low Profile transitions from one group to another, and you need only move briefly through a passing crowd when closing in on your target to earn a related kill bonus. Use the Fast Walk move to catch up with groups of citizens walking ahead of you.
A good hiding spot is the fastest way to end a Chase. Your judgment on whether to stay put or flee in such situations should be dictated by the time left on the Escape Timer, and the likelihood of whether your opponent can reach your hiding spot before it expires. If you successfully escape after a pursuit, it will not matter if your pursuer knows your location or even approaches you, as they will have lost the contract on your head.
Game Modes
Introductory Session 1 & 2
|
Players: |
1 |
|
Duration: |
Infinite |
|
Objective: |
Practice kills, stuns, and Escape sequences. |
|
Notes & Tips: |
These sessions are only intended as one-off tutorials. However, you can replay them as many times as you like to experiment with different approaches. |
Manhunt
|
Players: |
4-8 players split into 2 teams |
|
Duration: |
2 rounds of 5 minutes |
|
Objective: |
Achieve the highest team score, hiding together as targets, and performing valuable kills as hunters. |
|
Notes & Tips: |
Both teams take a turn as hunters and the hunted. While hunted, blend with a crowd of civilians and use Morph to confuse your pursuers with a crowd of lookalikes. Fortify your position with a well-placed Tripwire Bomb, or employ a Smoke Bomb instead. Complete your defensive Abilities Set with the Blender and Enhanced Autobash Perks. Hiding with your team is the best way to rack up noteworthy points totals. If one of you is killed, there will always be someone on hand to score an easy Stun before fleeing. When on the offensive, coordinate with your allies to perform multiple kills. Firecrackers are the best way to identify your target in a crowd when you are in pursuit. Use Throwing Knives if your target decides to break cover and run. Add the Hot Pursuit and Sentry perks for a well-rounded offensive Abilities Set. |
Training Ground
|
Players: |
1-8 |
|
Duration: |
Infinite |
|
Objective: |
Find and kill assigned targets in any way you see fit. |
|
Notes & Tips: |
This is a non-competitive mode. Use it to explore maps and practice your Abilities. |
Assassinate
|
Players: |
4-8 |
|
Duration: |
1 round of 10 minutes |
|
Objective: |
Identify, acquire and assassinate the target of your choice to achieve the highest score. |
|
Notes & Tips: |
As soon as you acquire a target, you vanish from his or her Compass but also lose sight of other Templars. It takes time to acquire your target, so be cautious. Identifying your pursuer with a Lock exposes them and empties their Approach Meter. |
Wanted
|
Players: |
4-8 |
||
|
Duration: |
1 round of 10 minutes |
||
|
Objective: |
Achieve the highest score by killing assigned targets. |
||
|
Notes & Tips: |
You are both predator and prey, but you may only kill your contracted target. The higher your rank, the more pursuers will hunt you. Use your Compass to anticipate a target’s route through an arena, and you may be able to catch him or her out as they round a corner. It’s harder to hide in Wanted than in Deathmatch as your pursuer has a Compass. However, there are duplicates of your Persona wandering around, making it easier to blend and lure your pursuer into killing a civilian. When you blend with a group, try to pick one with at least one duplicate of your character. It can sometimes be more efficient to take the time to identify and escape a pursuer before tracking your own target. Staying alive enables you to complete Streaks and earn more points. |
||
Corruption
|
Players: |
4-8 |
|
Duration: |
3 rounds of 5 minutes each |
|
Objective: |
Achieve the highest score. |
|
Notes & Tips: |
When you start the session as Corrupted, kill your targets as fast as you can to prevent them from scoring. When Uncorrupted, hide and survive for as long as possible. You earn a greater bonus if pursuers are close to you – and the more Templars hunting you, the better the bonus will be. Defensive Abilities such as Decoy, Morph or Bodyguard can help you to survive longer when you are Uncorrupted. Avoid direct confrontations with Corrupted players at all costs: a contested kill will still corrupt you. |
Deathmatch
|
Players: |
4-8 |
|
Duration: |
1 round of 10 minutes |
|
Objective: |
Achieve the highest score by killing assigned targets. |
|
Notes & Tips: |
You are both predator and prey, and can only kill your assigned target. You cannot trigger Chases, but your Approach Meter still allows you to earn Kill Bonuses. There is no Compass for any player in this mode. Deathmatch maps are very small, so it pays to get into static or moving cover as soon as you spawn. Your pursuer is never very far away. Each player’s Persona is the only one of its kind in this mode, though you can use Abilities or Perks that create duplicates. The higher your rank, the more pursuers will hunt you. Disguise is a vital part of your Abilities Set in Deathmatch. The tiny maps make it easy to find and kill your target while the Ability is active, so you shouldn’t have to watch your back for your pursuer. Just be sure to activate it when you are in a quiet spot. With no Compass, Deathmatch is all about line of sight and paying attention to your target’s portrait outline. Find a static blend group near a corner of the map and you will only need to keep an eye on two directions. However, don’t forget to scan the rooftops from time to time. Blender is a great Perk to have in Deathmatch, creating a civilian doppelganger every time you mingle with a crowd. |
Artifact Assault
|
Players: |
4-8 players split into 2 teams |
|
Duration: |
1 round of 10 minutes |
|
Objective: |
The team with the highest number of captured artifacts wins. |
|
Notes & Tips: |
You will score by stealing the other team’s artifact from their base and carrying it back to yours. You are a pursuer while in your territory, but become a target once in enemy territory. When you are carrying the artifact, enemies can kill you even in your own territory. When you defend your team’s artifact, your Compass will blur each time you move too close to your home base, rendering it useless. Stealing the enemy artifact in a stealthy way will mean that you will not be immediately marked with an artifact icon above your head (). It is vital that you learn the safest route back to base after stealing the artifact. Using Chase Breakers can be crucial to your success. Throwing Knives are particularly useful when defending, as they enable you to stop a fleeing enemy in his tracks and recover your artifact. Set a Tripwire Bomb at the nearest Chase Breaker to your base. Use the Disguise or Morph Abilities to blend in before making a dash for the enemy artifact. Drop a Firecracker or Smoke Bomb to facilitate your escape. While attacking, it’s best not to use the Blender Perk – if you inadvertently brush against a crowd your opponents may spot one of the civilians transforming, revealing your position. Look out for Tripwire Bombs when you approach the enemy artifact, and while escaping the immediate vicinity. Use the Closure Ability to trigger all nearby Chase Breakers immediately after an enemy steals your artifact, making a swift escape more difficult. The Enhanced Autobash and Hot Pursuit Perks are particularly useful, especially if you adopt a defensive role, giving you the edge when chasing a fleeing enemy. |
Easy Deathmatch
|
Players: |
4-8 |
|
Duration: |
1 round of 10 minutes |
|
Objective: |
Achieve the highest score by killing assigned targets. |
|
Notes & Tips: |
This is a simplified version of Deathmatch. The rules are broadly the same, though you cannot access your Abilities Sets. Each player’s Persona is the only one of its kind in this mode. As Abilities and Perks are unavailable in Easy Deathmatch, this means that targets are very easy to identify. Easy Deathmatch is the best mode for new players to familiarize themselves with basic multiplayer concepts. Complexities such as the Compass and Abilities are disabled, the maps are tiny, and each competitor is assigned a unique character. With no Abilities or Perks at your disposal, blending with moving groups is the key to success on these small, congested maps. |
Steal the Artifact
|
Players: |
4-8 |
|
Duration: |
1 round of 10 minutes |
|
Objective: |
Steal the Artifact and keep it for as long as you can to achieve the highest score. |
|
Notes & Tips: |
Once you steal the Artifact, you will remain a target until you are killed. When you run while holding the Artifact, an icon reveals your location to your pursuers (). When you carry the Artifact, the more pursuers chase you, the greater the bonus. If you manage to survive two minutes as a carrier, you will receive an extra bonus. You will earn a bonus if you hide while carrying the Artifact. Hiding is much more profitable than running, especially if your pursuers are near you. The Templar who kills the carrier automatically becomes the new carrier. |
Escort
|
Players: |
4-8 players split into 2 teams |
|
Duration: |
2 rounds of 5 minutes each |
|
Objective: |
Achieve the highest score by killing VIPs, or by escorting them to checkpoints. |
|
Notes & Tips: |
Coordinate your attacks on the two VIPs at the same time for maximum efficiency. The Tripwire Bomb and ranged Abilities can help you eliminate a VIP without being killed. Communication is vital in this play mode. When you escort a VIP, encourage your team to spread out and protect the VIP from all angles: rooftops, alleyways, hiding spots. If you have a teammate broadly in all directions, each participant can warn their allies when they spot an enemy entering their line of sight. You do not have an Approach Meter when you defend, so do not waste time in preparing your approach. |
Chest Capture
|
Players: |
4-8 players split into 2 teams |
|
Duration: |
2 rounds of 5 minutes each |
|
Objective: |
Achieve the highest score by capturing the enemy team’s chests, and by killing members of the opposing team before they reach yours. |
|
Notes & Tips: |
It takes less time to capture a chest with your allies than it does when you’re alone. When you are defending chests, your Compass blurs each time you get too close to them. Create a perimeter just beyond this point. The line of sight indication in your Target Data HUD is a great tool while protecting a chest. Keep the chest in view and you will immediately know that an enemy is poised to capture it whenever you see the outline around your target’s portrait turn blue. |
Simulation Categories
Simulation Categories are Game Modes or combinations of Game Modes linked thematically.
|
Name |
Theme/Rule |
Game Types |
Limitations |
|---|---|---|---|
|
Easy Deathmatch |
Learn the basics |
Easy Deathmatch |
No abilities |
|
Free For All |
Solo play |
Wanted, Assassinate, Deathmatch, Steal the Artifact, Corruption |
- |
|
Team Objectives |
Team play |
Manhunt, Chest Capture, Escort, Artifact Assault |
- |
|
Private |
Custom games with friends |
All |
No XP or Abstergo Credits awarded |
Playable Characters & Customization
Though weapons and animations may differ between each avatar, there is no functional difference between them. Your choice of Persona, therefore, is very much a matter of personal preference – and, as you unlock further options, an opportunity to show off your experience with items that aren’t immediately available. Level progression rewards you with custom packs that enable you to alter the in-game appearance of every character with different costumes and colors. Use the Characters section in the Data Hub to change or customize weapons (some unique to a character, and each having specific animations), appearance, clothes, colors and animations – including Taunts and Stun moves. Note that selecting your character’s favorite weapons triggers special animations when used in matches.
The Count
|
Name: |
Vlad the Impaler |
|
Availability: |
Default |
The Vanguard
|
Name: |
Oksana Razin |
|
Availability: |
Default |
The Guardian
|
Name: |
Odai Dunqas |
|
Availability: |
Default |
The Vizier
|
Name: |
Damat Ali Pasha |
|
Availability: |
Default |
The Deacon
|
Name: |
Cyril of Rhodes |
|
Availability: |
Default |