Prima Games eGuides
primagames.com Browse Redeem a code Help
Battlefield 3: Back to Karkand DLC eGuide
Sign in My Guides

Sign in or create an account

We'll email you a link. No password needed, and if you don't have an account yet, the link makes one.

By creating an account or signing in, you agree to our Terms of Service and Privacy Policy.

Have a password?

Had an account on the old eGuides site, or a code from a printed guide? Help and troubleshooting

Sign in with a password

By signing in, you agree to our Terms of Service and Privacy Policy.

Check your email

A sign-in link is on its way. It works once and expires in 15 minutes. Open it and you're in, with an account if you didn't already have one.

Contents

  • Maps
    • Conquest
      • Stike at Karkand (Conquest)
      • Gulf of Oman (Conquest)
      • Sharqi Peninsula (Conquest)
      • Wake Island (Conquest)
    • Rush
      • Strike at Karkand (Rush)
      • Gulf of Oman (Rush)
      • Sharqi Peninsula (Rush)
      • Wake Island (Rush)
    • Team Deathmatch
      • Strike at Karkand (Team Deathmatch)
      • Gulf of Oman (Team Deathmatch)
      • Sharqi Peninsula (Team Deathmatch)
      • Wake Island (Team Deathmatch)
    • Squad Rush
      • Strike at Karkand (Squad Rush)
      • Gulf of Oman (Squad Rush)
      • Sharqi Peninsula (Squad Rush)
      • Wake Island (Squad Rush)
    • Squad Team Deathmatch
      • Strike at Karkand (Squad Team Deathmatch)
      • Gulf of Oman (Squad Team Deathmatch)
      • Sharqi Peninsula (Squad Team Deathmatch)
      • Wake Island (Squad Team Deathmatch)
  • Essentials
    • Primer
      • What's New
    • Basics
      • Introduction and Interface
      • Spawn Screen
      • Movement Fundamentals
      • Combat
      • Game Modes
      • Squad Play
      • Multiplayer Tactics
      • Persistence System
      • Battlelog
      • Specializations
      • Camo Patterns
    • Back to Karkand Content
      • Weapons
      • Vehicles
      • Achievements/ Trophies
    • Compendium
      • Contents

Battlefield 3: Back to Karkand DLC Guide › Essentials › Basics

Spawn Screen

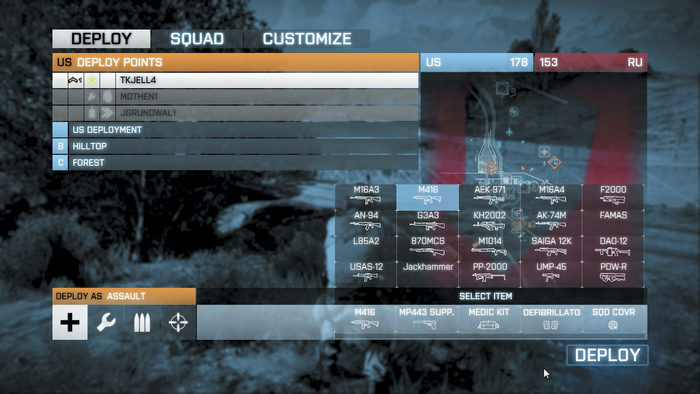
When you first join a game, the spawn screen is where it all begins. Before immediately jumping into the game, take a few seconds to choose your class and gear.

It’s possible to switch primary weapons from the spawn screen, but if you want to make more adjustments to your kit, choose the Customize option. This opens a new screen allowing you to select different sidearms, gadgets, and specializations.

You can also customize your primary weapon with accessories you’ve unlocked.

Once you’re finished adjusting your loadout, return to the spawn screen and figure out where you want to join the fight. If you’re in a squad, you can spawn on any living squad member.

Or if a recon squad member has deployed a Radio Beacon, you can spawn at its location. Depending on the game mode, there are also bases, deployment areas, and control points where you can spawn.

New to Battlefield 3, if there are jets or helicopters available, you can spawn directly into the pilot’s seat of these idle aircraft.

US troops can also spawn directly into the AAV-7A1 AMTRAC, an armored vehicle that serves as a mobile spawn point. As you can see, the spawning options are numerous. In most instances you should spawn on or close to your squad so you can provide support.

But if your squad is in a tense firefight, sometimes it’s safest to spawn at a less dangerous location, otherwise you may get killed as soon as you spawn into the game.

Keep reading with a free account

The first 3 sections of Battlefield 3: Back to Karkand DLC are open to everyone. An account opens the rest of it, and every other guide in the archive. It's free, and there's nothing to buy.

Bought guides on the old Prima Games site? Your account and every guide you own moved here, so there's nothing to buy again. Sign in.

Create a free account Or browse our free guides

PreviousIntroduction and Interface NextMovement Fundamentals