
Prima Games eGuides
primagames.com Browse Redeem a code Help
Battlefield 3: Back to Karkand DLC eGuide
Sign in My Guides

Sign in or create an account

We'll email you a link. No password needed, and if you don't have an account yet, the link makes one.

By creating an account or signing in, you agree to our Terms of Service and Privacy Policy.

Have a password?

Had an account on the old eGuides site, or a code from a printed guide? Help and troubleshooting

Sign in with a password

By signing in, you agree to our Terms of Service and Privacy Policy.

Check your email

A sign-in link is on its way. It works once and expires in 15 minutes. Open it and you're in, with an account if you didn't already have one.

Contents

  • Maps
    • Conquest
      • Stike at Karkand (Conquest)
      • Gulf of Oman (Conquest)
      • Sharqi Peninsula (Conquest)
      • Wake Island (Conquest)
    • Rush
      • Strike at Karkand (Rush)
      • Gulf of Oman (Rush)
      • Sharqi Peninsula (Rush)
      • Wake Island (Rush)
    • Team Deathmatch
      • Strike at Karkand (Team Deathmatch)
      • Gulf of Oman (Team Deathmatch)
      • Sharqi Peninsula (Team Deathmatch)
      • Wake Island (Team Deathmatch)
    • Squad Rush
      • Strike at Karkand (Squad Rush)
      • Gulf of Oman (Squad Rush)
      • Sharqi Peninsula (Squad Rush)
      • Wake Island (Squad Rush)
    • Squad Team Deathmatch
      • Strike at Karkand (Squad Team Deathmatch)
      • Gulf of Oman (Squad Team Deathmatch)
      • Sharqi Peninsula (Squad Team Deathmatch)
      • Wake Island (Squad Team Deathmatch)
  • Essentials
    • Primer
      • What's New
    • Basics
      • Introduction and Interface
      • Spawn Screen
      • Movement Fundamentals
      • Combat
      • Game Modes
      • Squad Play
      • Multiplayer Tactics
      • Persistence System
      • Battlelog
      • Specializations
      • Camo Patterns
    • Back to Karkand Content
      • Weapons
      • Vehicles
      • Achievements/ Trophies
    • Compendium
      • Contents

Battlefield 3: Back to Karkand DLC Guide › Essentials › Back to Karkand Content

Vehicles

One of the highlights of any Battlefield game is the vehicles. Nothing can be more entertaining than hopping into a tank and cruising across the landscape, laying waste to both enemy vehicles and structures.

Many of the vehicles from Battlefield 3 have returned in the Back to Karkand maps, along with some new vehicles that were originally featured in Battlefield 2 .

Skid Loader

Nationality - Neutral

The Skid Loader is a small four-wheeled construction vehicle capable pushing or carrying material with its front-mounted bucket.

These compact vehicles are extremely agile and maneuverable, making them easy to use in crowded construction sites.

Speed
Armor
Firepower

Occupancy

Seat Position Weapon
1 Driver None
2 Passenger Troop Kit
3 Passenger Troop Kit

Field Notes

Unlike the other vehicles, the Skid Loader is completely new to the Battlefield series and can usually be found on maps with construction sites.

These vehicles are not affiliated with either side and spawn independently, regardless of which team controls nearby flags. Although it has no weapons, the Skid Loader can be used as a light transport; it is capable of carrying three soldiers at a decent speed.

The view from the cramped cockpit is rather limited, so always switch to an external view when driving one of these vehicles.

DPV

Nationality - US

Designed as a fast attack vehicle for Special Operations units, the DPV is known for its lightweight yet rugged construction. While it’s not effective against armored vehicles, it poses a significant threat to infantry.

Speed
Armor
Firepower

Occupancy

Seat Position Weapon
1 Driver None
2 Gunner Heavy Machine Gun
3 Passenger Troop Kit

Field Notes

What the DPV (Desert Patrol Vehicle) lacks in armor it makes up for in speed and agility. Like the other light vehicles, the DPV is best utilized for high-speed flanking attacks, and is ideal for raiding distant control points during Conquest matches.

The open cockpit design offers zero protection against small arms fire, so avoid driving through large concentrations of enemy infantry. Instead, stay off-road, moving through the less traveled areas of the map to avoid enemy vehicles and mines.

BTR-90

Nationality - RU

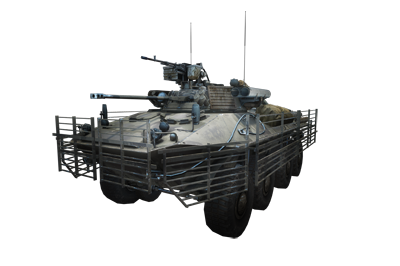
The BTR-90 is the Russian Army’s next-generation armored personnel carrier. Presented publicly for the first time in 1994, the BTR-90 is larger and more powerful than its predecessors.
Vehicle Performance

Speed
Armor
Firepower

Occupancy

Seat Position Weapon
1 Driver 30mm Cannon
2 Gunner 12.7mm Machine Gun
3 Passenger Machine Gun
4 Passenger Machine Gun
5 Passenger Machine Gun
6 Passenger Machine Gun

Field Notes

The BTR-90 is a Russian Infantry Fighting Vehicle (IFV) sporting a powerful 30mm cannon as well as a turret-mounted heavy machine gun. The cannon can fire six high-explosive rounds in quick succession. But after six rounds are fired, there is a brief pause while a new rack of ammo is loaded.

Make an effort to fully reload the cannon after each use. This can be done manually by pressing the reload button or simply by emptying the current magazine. The BTR-90 benefits from the same upgrades, weapons, and gadgets as the other IFVs, so don’t forget to customize the vehicle’s loadout prior to spawning into the game.

F-35B Joint Strike Fighter

Nationality - US

Designed as a fast attack vehicle for Special Operations units, the DPV is known for its lightweight yet rugged construction. While it’s not effective against armored vehicles, it poses a significant threat to infantry.

Vehicle Performance

Speed
Armor
Firepower

Occupancy

Seat Position Weapon
1 Pilot 25mm Cannon

Field Notes

The VTOL functionality of the F-35B makes it a unique jet in the game. By throttling down, the jet enters VTOL mode, allowing it to both land and take off vertically. But the VTOL function can also come in handy during combat.

While dog fighting, VTOL mode can be activated sporadically to rapidly decrease air speed and thus allow for tighter turns. This also is helpful if an enemy fighter is on your tail; enter VTOL mode to cause them to cruise right by, instantly turning the tables.

VTOL mode can also be used to slow the aircraft during strafing runs. However, think twice before entering a stable hover over enemy territory. While hovering, the F-35B is not as agile as a helicopter, which makes it vulnerable to attacks from the ground.

Keep reading with a free account

The first 3 sections of Battlefield 3: Back to Karkand DLC are open to everyone. An account opens the rest of it, and every other guide in the archive. It's free, and there's nothing to buy.

Bought guides on the old Prima Games site? Your account and every guide you own moved here, so there's nothing to buy again. Sign in.

Create a free account Or browse our free guides

PreviousWeapons NextAchievements/ Trophies