
Nintendo Land Guide Walkthrough Solo Attractions
Yoshi’s Fruit Cart
A Fruitful Journey
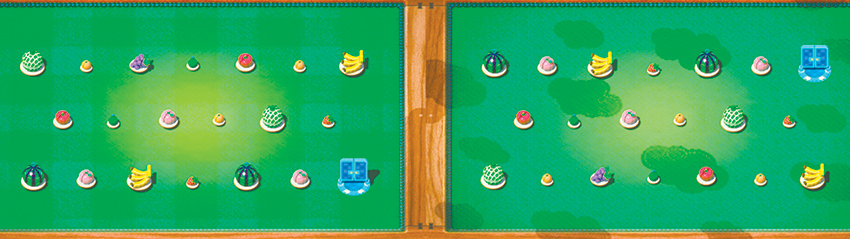
When is a line more than a line? When it’s the exact route that an adorable, awesome little dinosaur (or a cart approximation thereof) takes in a quest to gobble up fruit and make a break for the exit. Yoshi’s Fruit Cart is perhaps the most unique game in Nintendo Land , as it leverages the touch screen capability of the GamePad in conjunction with your TV to create a game that’s easy to understand in seconds, but will take dozens of hours to master. With 20 distinct challenges to start and many times more waiting for those that can pass the initial challenges, Yoshi’s Fruit Cart is the perfect introduction to what makes the Nintendo Wii U different from any other console.
Controls
Gamepad Controls
| Remove Object | Use Wii Remote to point at object, then press A Button (can only be used once per Gate) |
Assisted Play Controls
| Draw Path | Use Stylus to trace path |
| Erase Path | Tap or hold Eraser icon |
| Start Walking | Tap Go! button on touch screen |
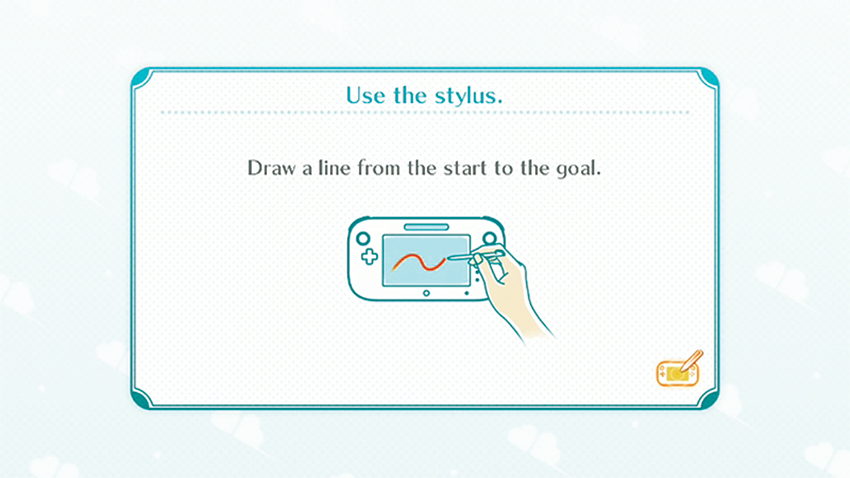
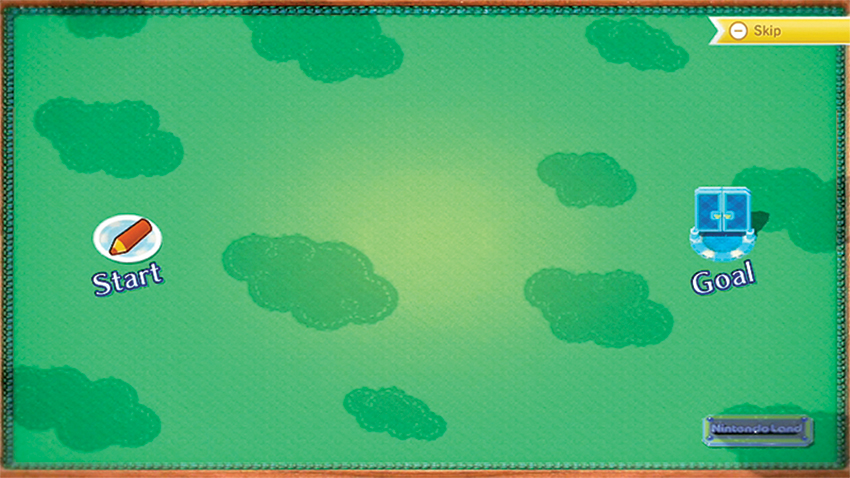
The GamePad and your TV are used in complete harmony for Yoshi’s Fruit Cart . There’s a very specific reason for this: while you draw a path for Yoshi to travel on the GamePad touch screen with the Stylus, the actual objects to be collected only appear on the TV. In this way, both the TV and the GamePad are essential in determining the path that Yoshi will travel.

The First 20
Well with a title like that, you know Yoshi has more in him than just 20 Gates. In fact, there’s a whole lot more, but first things first. Rather than detailing the exact strategies for every single Gate, we’re going to stick to the ones that introduce something new. In this way, you can get a feel for the spacial relationship between what you can see on the GamePad and what’s on the TV. Don’t worry, we’re not going to leave you to try to figure everything out yourself, but understand that learning just how big an arc to draw, or how tight a circle should be, or when a right angle is actually needed must be learned by each player personally. Just telling you isn’t going to help relate those measurements that come with time and practice, so don’t get discouraged if you’re struggling on a particular Field. Practice is the only way to learn these lessons first-hand.
Gate 1
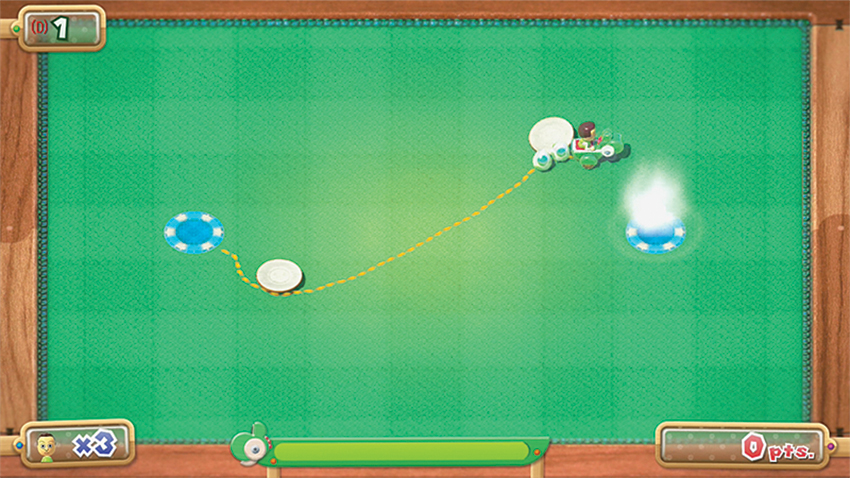
There’s not much to worry about here. Just make sure the path is nice and curved—think waves instead of squares. Pay careful attention to the checkerboard pattern on the ground; you’re not going to find a better means of comparing the GamePad and TV views, but try to get a feel for how you can use the patterns as points of reference. You’ll use this skill in the Fields to come.
Gate 3
Gate 4
Gate 5
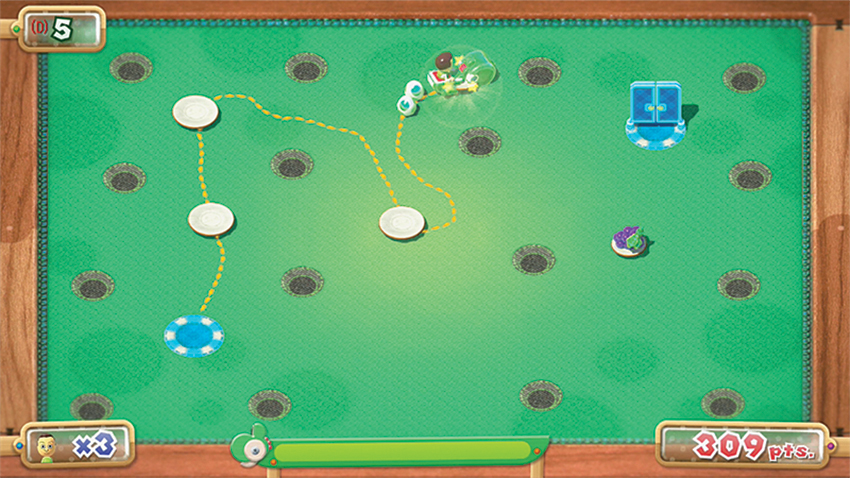
The Holes return! This time, though, they’re much smaller. Take note of the offset placement of the Fruit and Present Box; don’t draw straight lines or you might miss them. Instead, use the dark green circles on the Field as reference and try to slip between the Holes.
Gate 6
Gate 7
Gate 8
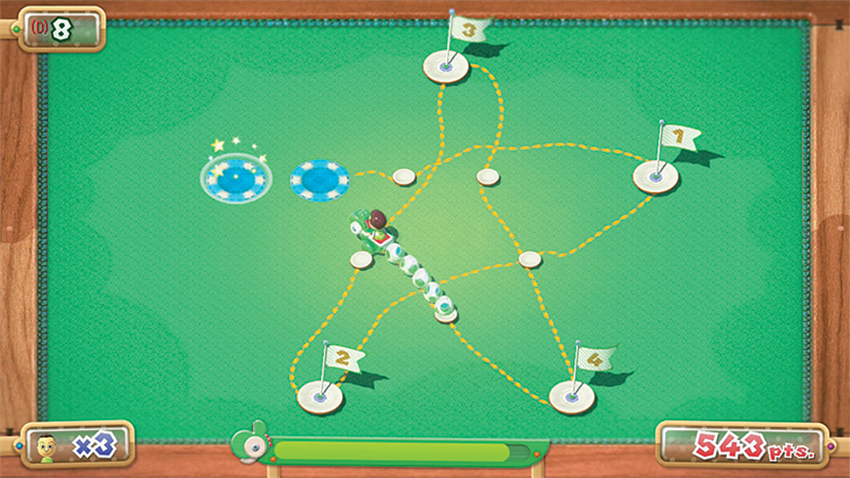
There’s something special about the arrangement of all these Fruit. In fact, if you trace out the pattern on the Touch Screen before pressing the Go! Button, you’ll see it’s a star! Simple patterns are common in Yoshi’s Fruit Cart , so don’t be afraid to look for ways they can be applied to future Fields.
Gate 9
Gate 10
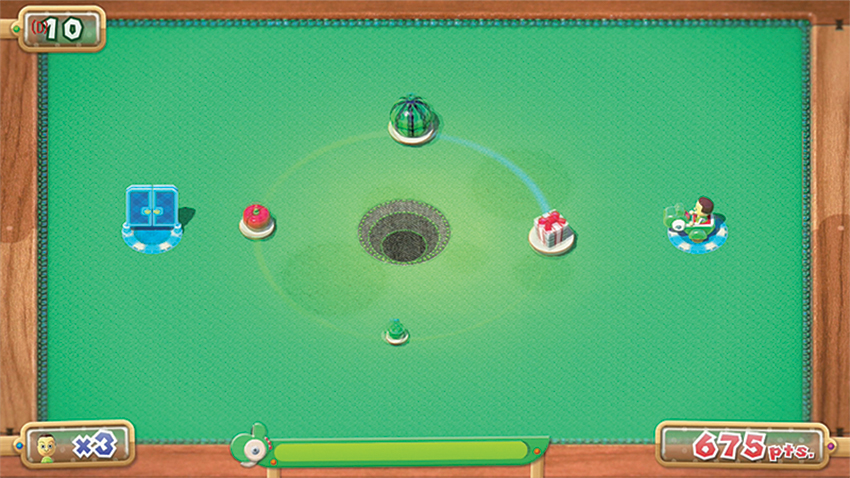
It’s another combination of hazards on this Field, but since you’ve already got this whole tracing-lines-in-opposite-orbits thing down, you’ll have no trouble here. Just make sure to use the darker spots on the Field for reference to avoid falling into the Hole.
Gate 12
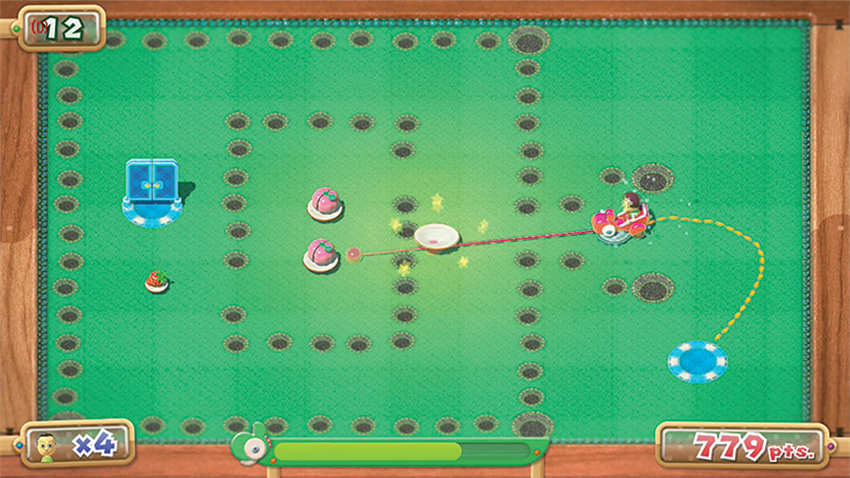
Not much to worry about here, but be sure that the path you draw is nice and curved—think waves instead of squares.
Gate 13
Gate 16
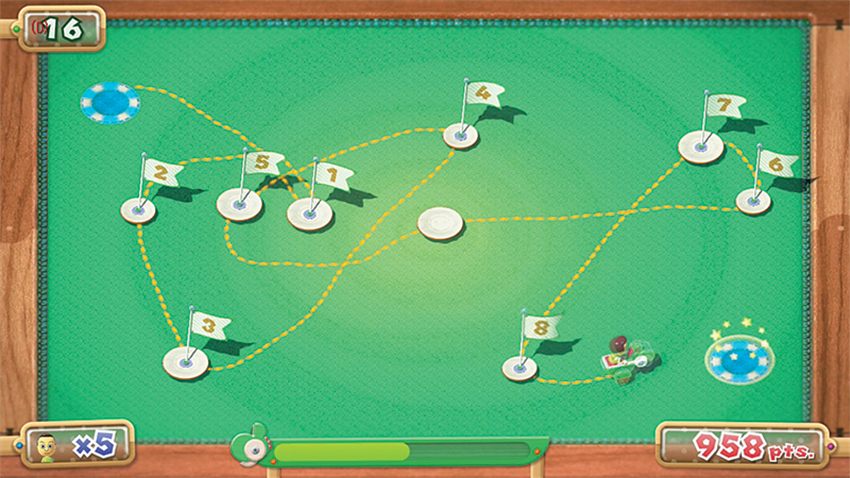
This little Field is meant to educate you on the importance of Fruit in relation to distance. See, the Yoshi Cart can move only so far before it runs out of fuel—fuel that’s provided by those Fruit. With just one bite, quite a bit of fuel is restored, but it starts dropping immediately. Trace out the path, using the concentric circles of the Field to keep track of positioning and you’ll discover a zigzagging but rewarding path.
Gate 17
Gate 20
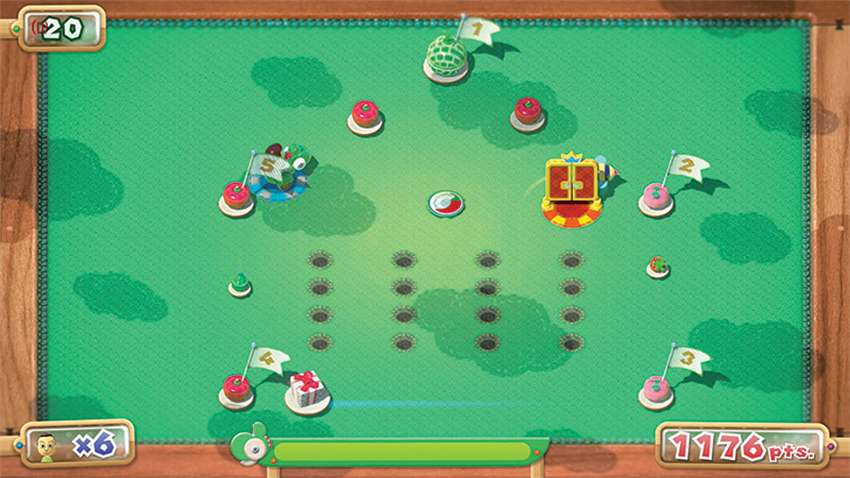
This is it, the last of the initial Gates Yoshi’s Fruit Cart has to offer, and though it might look daunting now, you’ll quickly come to find it’s one of the easier ones to get through—after you figure out the path. The key is that Chili Plate and the Bee just past it. By drawing a line straight up from the goal through the nearby Fruit, up to the first Flag Fruit and back down at about a 90 degree angle (this time it’s good to use one), then double back to eat the Chili Plate from the opposite side of the Bee, you’ll remove the threat entirely. From there, it’s just a set of straight lines down and around the Holes, back up, and into the Goal Gate. Nice work!
The Next 30
Yeah, you read that right, thirty more challenges await after you pass the first 20 and get a Star. Monita unlocks a new set of challenges. Are you ready for a mind-bending marathon?
Gate 1
Gate 21
Gate 22
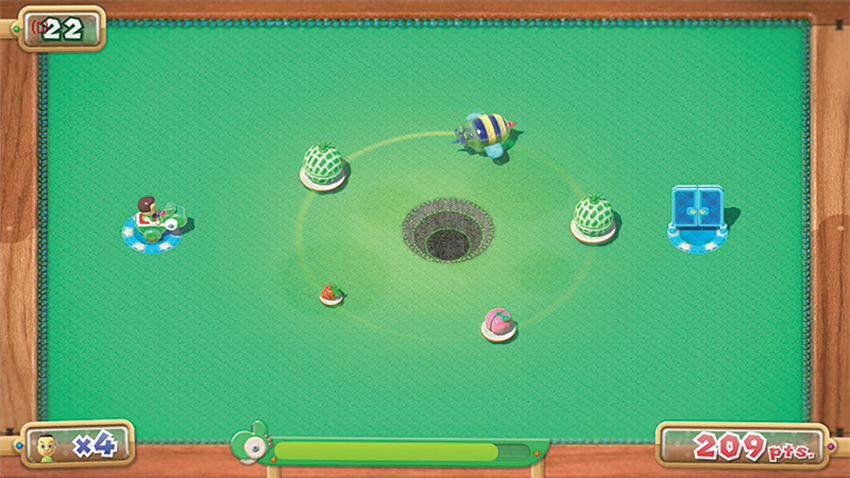
The key to slipping past the Bee in this little race around the Hole is to draw a simple circular path around the Hole in the same direction as the Fruit is traveling. Trace a path directly out toward the Melon in front of the Bee and make one full revolution around the Hole, then break off and head for the Goal Gate. Wait to press the Go! button until the Bee is at about the 7 o’clock position. Because Yoshi is slightly faster than the Fruit and Bee’s speed, he’ll eat up all the Fruit before crashing into the Bee.
Gate 23
Gate 25
Gate 29
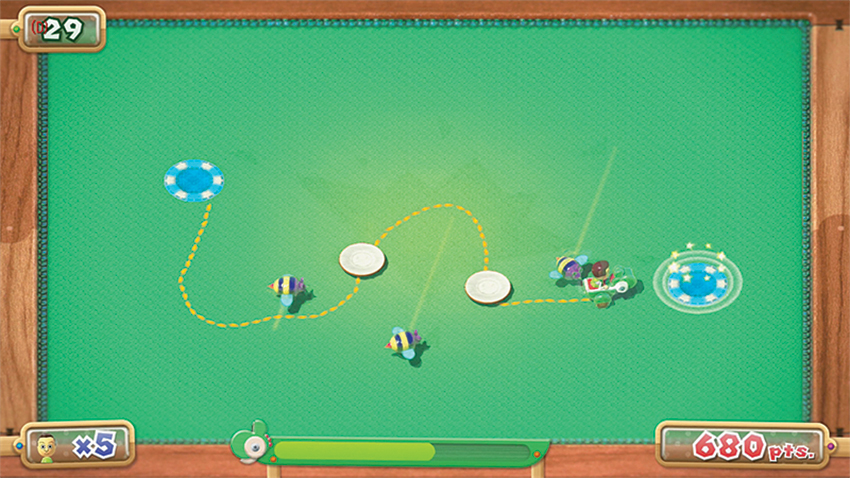
The previous Gates were trying to teach you a few lessons—lessons that are extra important here. Specifically, they were trying to show you how proper timing combined with clean lines can lead to a very short, easy victory. Consider the fact that (for once) these Fruit aren’t moving, only the Bees are. Use the pattern to locate the Fruit positions on both the GamePad and TV, then draw a line that curves down and around the first Bee’s path, up to the first Fruit, then directly over to Present, and on to the Goal Gate. There’s actually a bit of wiggle room here (as seen in the screenshot), but don’t waste too much time or the Bees will get in the way.
Gate 30
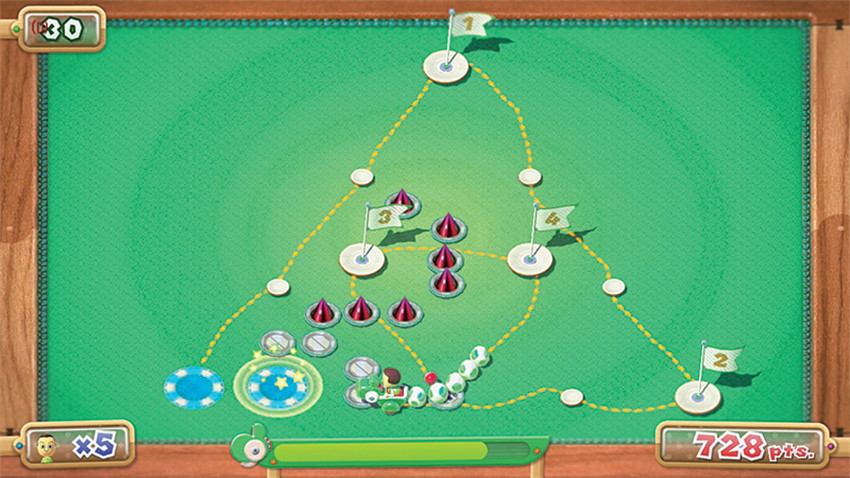
The smaller Fruit are the key to making the long trek up to the first Flag Fruit, down to the second, over to the Lever for the third, across to the fourth, and then back to the Lever to lower the Spikes in front of the Goal Gate. Be careful when drawing the path here! Although this seems like a pretty straightforward Field, a single missed Fruit (or forgetting to touch the Lever a second time) will mean wasting one try.
Gate 35
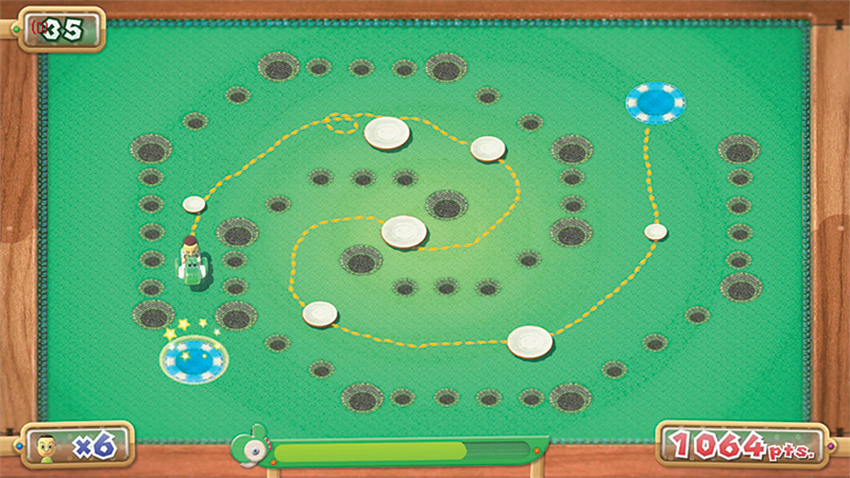
The last few Gates have been pretty straightforward; use the patterns on the ground to pinpoint where the fruit are, draw clean paths, and the rest is cake. This time, however, the path has a little wrinkle: A lone moving Melon makes a little arc near the top of the Field. When drawing your path, be sure to throw a little spin around the area of the Fruit to make sure Yoshi snags it before moving on. Ideally, it would be a circle counter to the orbit of the Melon, though as you can see in the screenshot, being fairly close can still work. Don’t let a few extra steps mean the difference between sailing through this Gate and having to run that whole path again!
Gate 38
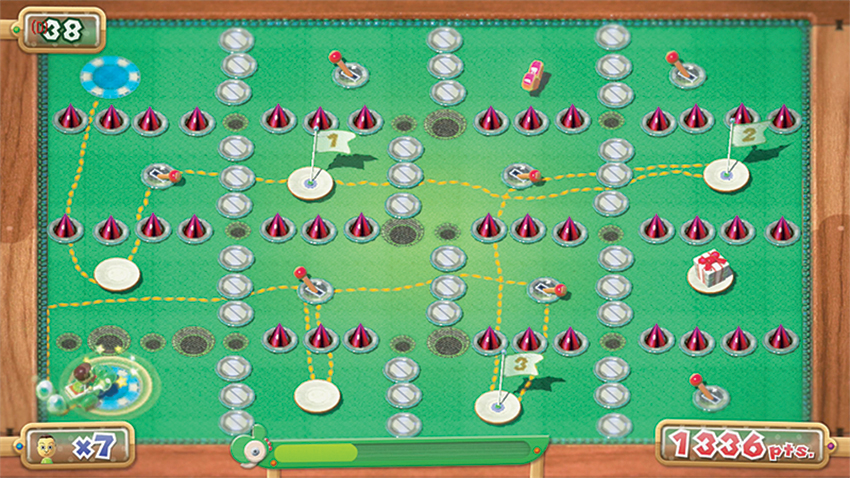
Don’t be too hasty when working through the mental gymnastics required for this bit of spatial reasoning. Remember that Flag Fruit numbers only refer to the Flag Fruits themselves; you can still eat other Fruits in between them so long as the Flag Fruits are eaten in the proper order. Keeping that in mind, try to step through the various layers of Levers and Spikes, and pause while drawing your line to mentally “flip” the Spikes before considering the next move. You’ve got nothing but time here, and careful planning will mean you don’t even need the Heart if your path is neat enough.
Gate 39
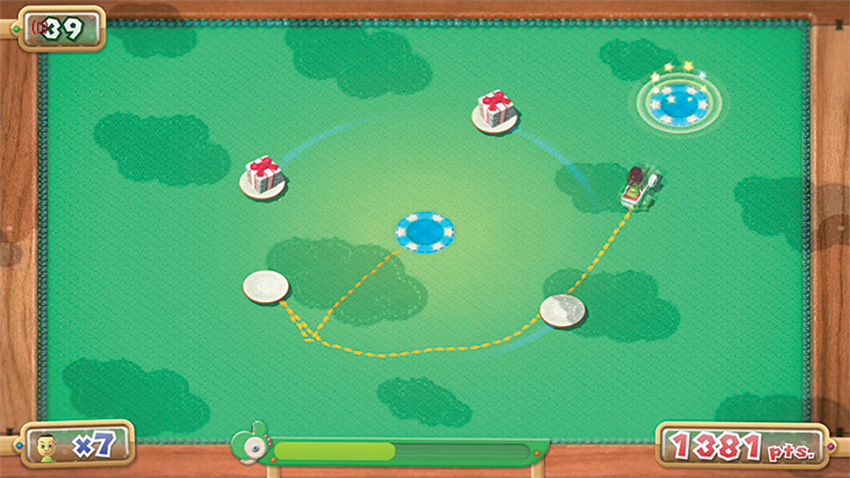
Don’t let greed get the better of you here. Depending on how much fuel you have left after getting the bonus for making it through Gate 38, it may be smarter to grab just one Present in addition to the Melon orbiting the central starting point. Each piece of Fruit eaten adds more fuel, but Presents do not, and Yoshi’s reserves drain very quickly on this Gate.
Gate 41
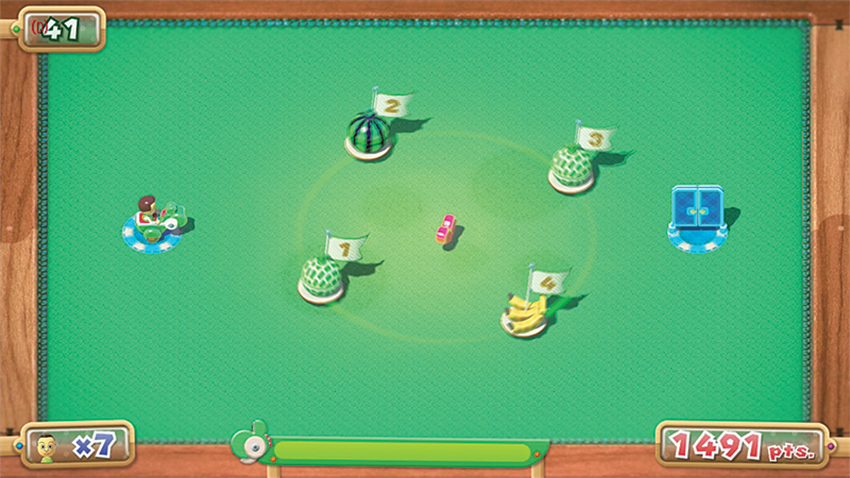
Don’t let the simplicity of this Gate fool you! All four Fruits need to be eaten before the Goal Gate will open, so take note of the darker circles to Field out a route that will take you around the Fruits’ orbit in the same clockwise direction. Do a complete circle, starting at the 9 o’clock position, going all the way around, and finishing at 3 o’clock before turning in to grab the Heart and doubling back toward the Goal Gate. The Heart can be saved for last, so long as you grab all four Fruits in one go.
Gate 42
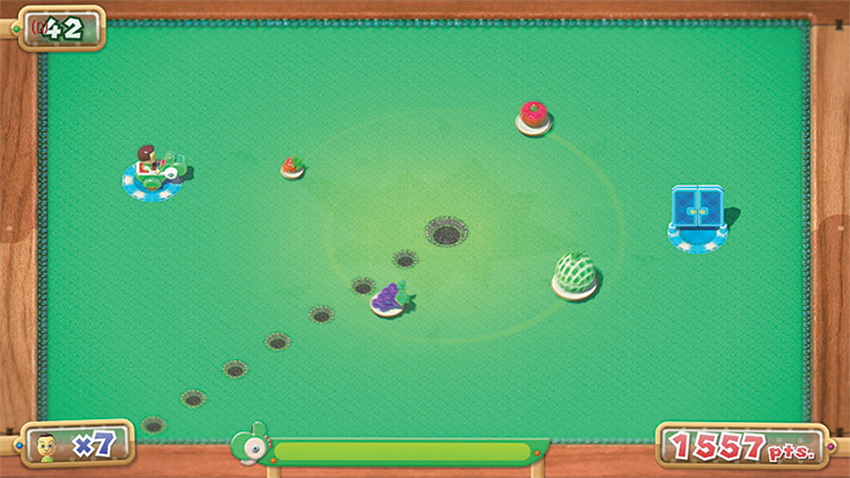
A repeat of the last level introduces two new problems: The line of Holes means that making a full revolution is impossible, and the Fruits actually follow a tightening orbit around their center, moving inward slightly. Watch the Strawberry and Apple carefully, as they follow the same orbit. Then contract in slightly to grab the Melon and finally tighten further to nab the Grapes before you turning around and head for the Goal Gate. Introducing a small loop near the top of the Fruits’ orbits can help with any missed grabs, but the most important part of this Field is to leave the Start point only when the Strawberry is nearing your position.
Gate 43
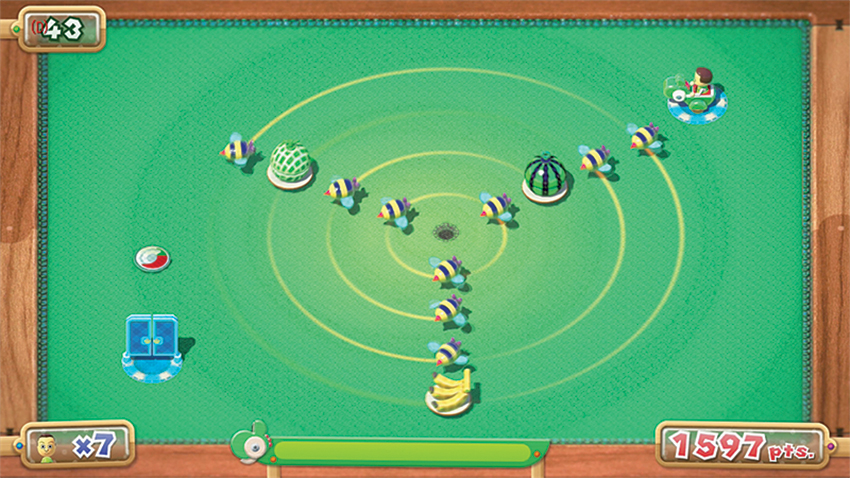
A repeat of the dastardly Gate 21, this familiar set of Fruits and Bees has gotten harder with the addition of a third spoke. The lessons you learned in the original Field still hold true here, though. Study the exact routes in relation to the concentric circles. The Banana skirts the inside of the outermost circle, while the Melon hugs the inside of the next one in, and finally the Watermelon completes the inner orbits. Start drawing a path to intercept the Banana when it’s at about the 6 o’clock position, then tighten to grab the Melon when it’s at 9 o’clock and finally follow the innermost circuit to grab the Watermelon at about 12 o’clock. After all three have been snagged, curve upward toward the very top of the Field and around the Bees’ orbit to the Goal Gate. Alternatively, you can try grabbing the Banana at 6 o’clock, then sweep around the closed Goal Gate and angle up to the Chili Plate to let Yoshi munch on a ton of Bees and the Fruit in the process. The angle of approach to the Chili Plate needs to be angled toward the Start point to grab both Fruits amid all the Bees, so it’s a significant risk.
Gate 44
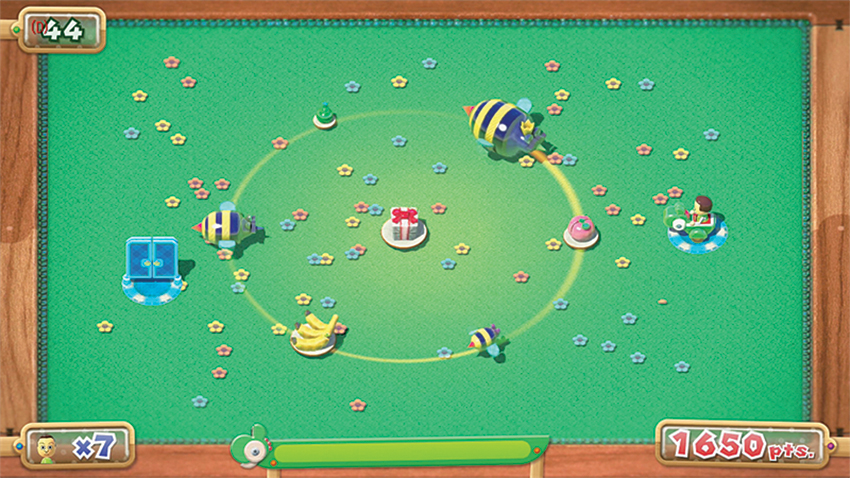
Timing is everything here. Draw a path straight out to intercept the first fruit when it hits the 3 o’clock mark, continue on into the middle to get the Present Box, then draw a small teardrop shape toward 6 o’clock, then back up to the center and out to 9 o’clock before heading for the Goal Gate. The trick is widening the arc toward the outer edge of the 6 and 9 o’clock positions to avoid having to be razor precise, but don’t make them too large or the arcs will put you right in the path of a Bee.
Gate 45
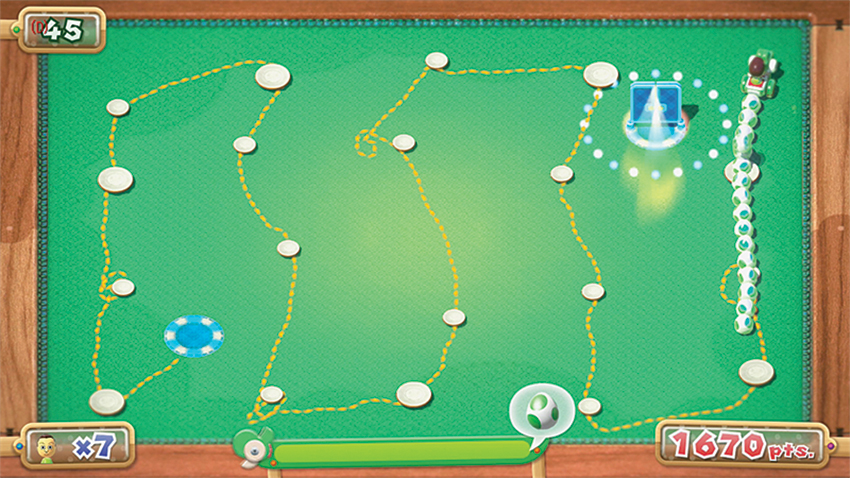
This is a fairly straightforward path, but a few of the smaller Fruits like to make little orbits, so when drawing the path near them, let Yoshi spin counter to their orbits one full revolution. This is less about timing and more about making sure you’re really using the reference points of the pattern on the Field. Draw a clean enough line, and by the end Yoshi will be towing a massive trail of Eggs!
Gate 46
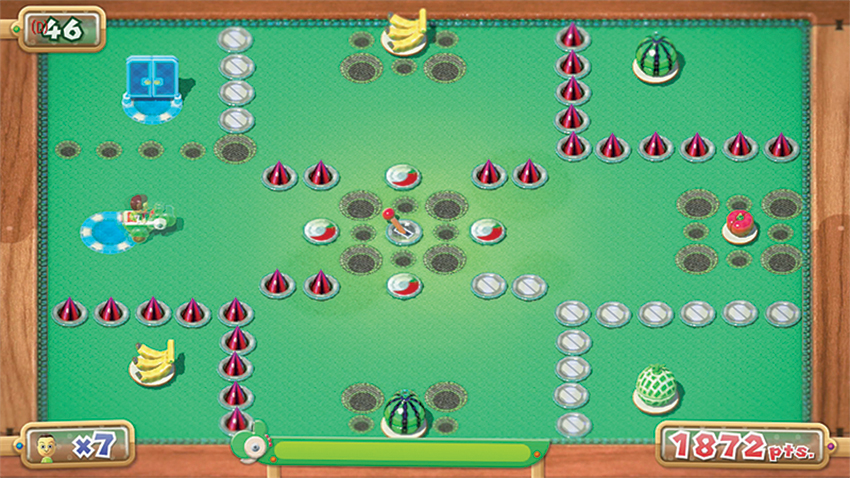
Thinking ahead is the only way to make it through this Gate in a single try. Start by approaching the left Chili Plate from straight on, flipping the Lever and reversing the Spikes. Then, head up and around the top Chili Plate, swinging wide to grab the Watermelon in the upper-right corner. Then head down and grab the right Chili Plate to grab the Lever and flip the Spikes again. Move down to grab the Melon in the lower-right. Approach the bottom Chili Plate from directly below to flip the Lever and Spikes (plus eat the Banana at the top of the Field), then draw out to the lower-left to grab that Banana, and back up to the top Chili Plate that was originally skipped to flip the Lever and grab the lower Watermelon. Then head for the Goal Gate.
Gate 47
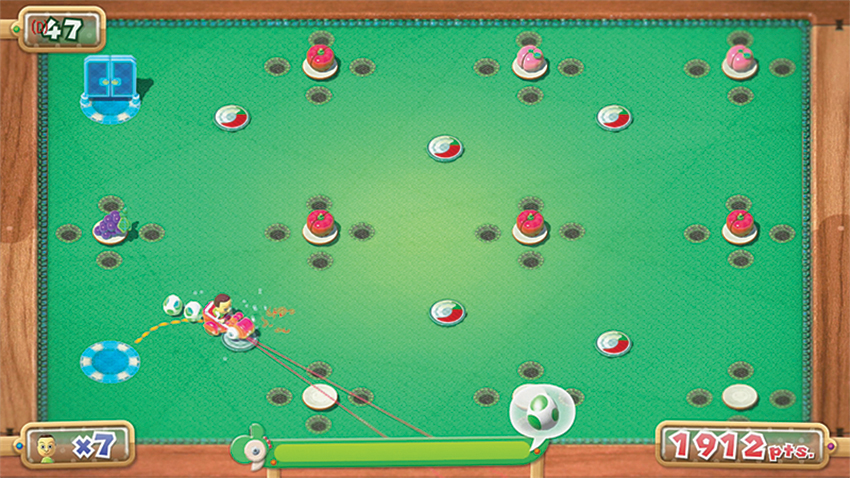
The hardest part about this Gate is making sure the angles of approach toward the Chili Plates are true—no easy task when there’s nothing to go on but the geometric patterns on the Field. Approach the lower-left Chili Plate from roughly the same angle as the line that crosses through it, toward the Apple in the bottom-right corner of the Field. Move up toward the top-left Chili Plate and approach it from the roughly the same angle as the line crossing through it, toward the Peach in the upper-right corner of the Field. Head back down to the bottom-middle Chili Plate and approach it while looking between the two middle-right Apples, then sweep up and approach the top-middle Chili Plate angled down between the Grapes and final Apple. Breathe a sigh of relief when the Goal Gate opens, and kiss this seriously stressful Gate goodbye.
Gate 48
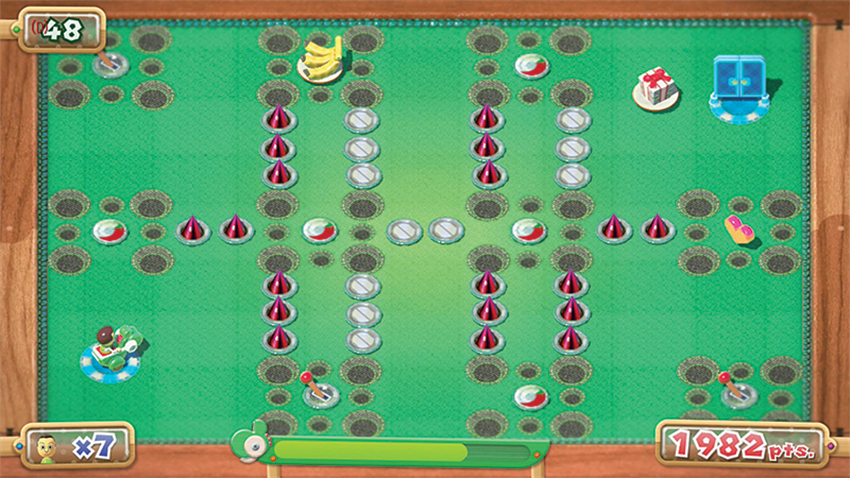
Is your brain wrinkling yet? There’s more planning and visualization that needs to be done here before you even attempt this challenge. Walk through the steps in your head, then carefully read the patterns on the ground to avoid the Spikes and Holes littering the Field. The points where there aren’t any Holes near the Chili Plates are your clues. Move straight up to the first Chili Plate to flip the Lever, then head up toward the second Chili Plate, aiming down to hit the Lever to flip the Spikes, then grab the Chili Plate facing toward the Heart, and then the one below it facing a Lever to flip the Spikes again. Then head up toward the Present and the final Chili Plate that lets Yoshi gobble up the final Banana and exit via the now-open Goal Gate.
Gate 49
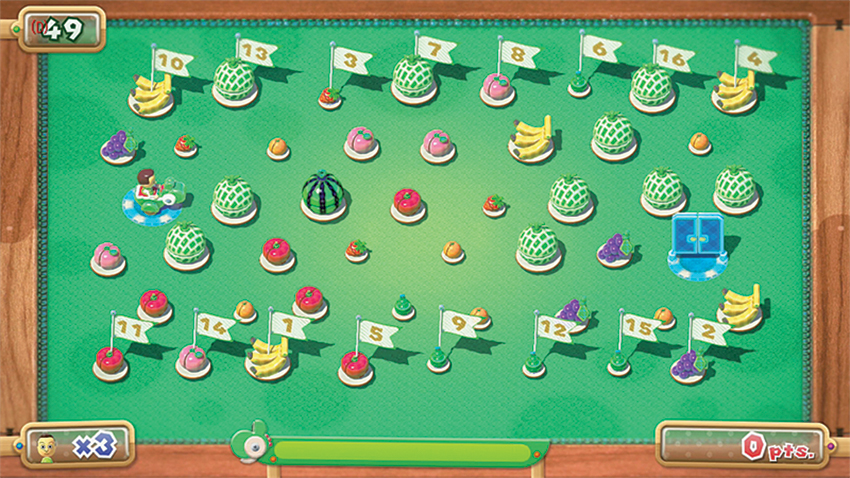
This is the final challenge, and it’s a sea of Fruit! Tackling this Field is a mind-bender, but can be done in a single go with enough planning. Head down at an angle toward the Banana Flag Fruit, then sweep around to the Grape Flag Fruit, avoiding the other Flag Fruit in the way. The hardest part of this challenge is just being precise enough to avoid accidentally eating the Flag Fruit out of order, so when in doubt, use the top and bottom of the Field to stay well clear. After grabbing the second Flag Fruit, head up toward the Banana, then cut right in a flat line toward the Orange between Flag Fruits 9 and 12. Head up at an angle straight toward the Strawberry Flag Fruit 3, then skirt the upper part of the Field while heading right to the Banana Flag Fruit 4. Move down to the Orange below, and cut left again to the Banana, then angle down toward Flag Fruit 5, an Apple. Cut back and follow your path back up to Flag Fruit 6, then hop over Flag Fruit 8 and gobble up Flag Fruit 7, move right to grab 8, and down to 9. From Flag Fruit 9, move up to the Pear above it, head left to the Apple, then angle up toward Flag Fruit 10, eating all the Fruit along this short trip. Swing down and eat the Grapes and Peach on either side of the Start point to Flag Fruit 11. Flag Fruit 12 is next, so hug the bottom of the Field to avoid 14 and gobble up 12 before drawing a line that cuts through the Strawberry, Watermelon, and Orange on the way to Flag Fruit 13. Head back down, eating the Strawberry and Melon near the Start point to reach Flag Fruit 14. Cut right all the way over to Flag Fruit 15, a Pear, and the go up to 16, making sure to draw a wide enough line to get the nearby Melons. By now, your screen is a mess of crisscrossing lines, but carefully look to make sure you didn’t miss any Fruit in the middle. This route will have taken you through most of them, but a few in the center may remain depending on how precise your path was. Make sure to draw lines through the nearby Melons if your previous lines didn’t get close enough, then step into the Goal Gate with our applause.
The Final 50
So you thought that was easy, eh? Just a bit of delicious Fruit munching fun? To reward your perseverance, Monita has decided to allow you to play through all of the Gates again with one small difference: the Fields are now blue—and are completely lacking any patterns, splotches, or other means of creating reference points. This is going to take teamwork, so grab a friend and have them use the Wii Remote in Assisted Play to pick up one Fruit per Gate that you might have missed while blindly navigating these hazards all over again. Good luck!