
Hyrule Warriors Guide Walkthrough Adventure Mode
D
D-1
Defeat the Shield Moblin Forces!
Limited Warrior: Zant (Recommended Level: 35)
UnlockablesZant—Heart Container (in the North Palace Keep) Zant—Piece of Heart (in the Southeast Square Keep) Search Item |

Adventure Battle Scenarios are almost identical to the Scenarios in Legend Mode. You have the full battlefield at your disposal, an enemy Captain/Warrior to defeat to win the Scenario, and teammates to assist you. The key difference is that you typically have only a single mission that appears at the start of the battle, which makes up the bulk of the entire fight. Once that mission is completed, you need only to defeat the enemy Commander to win the Scenario.
Palace of Twilight
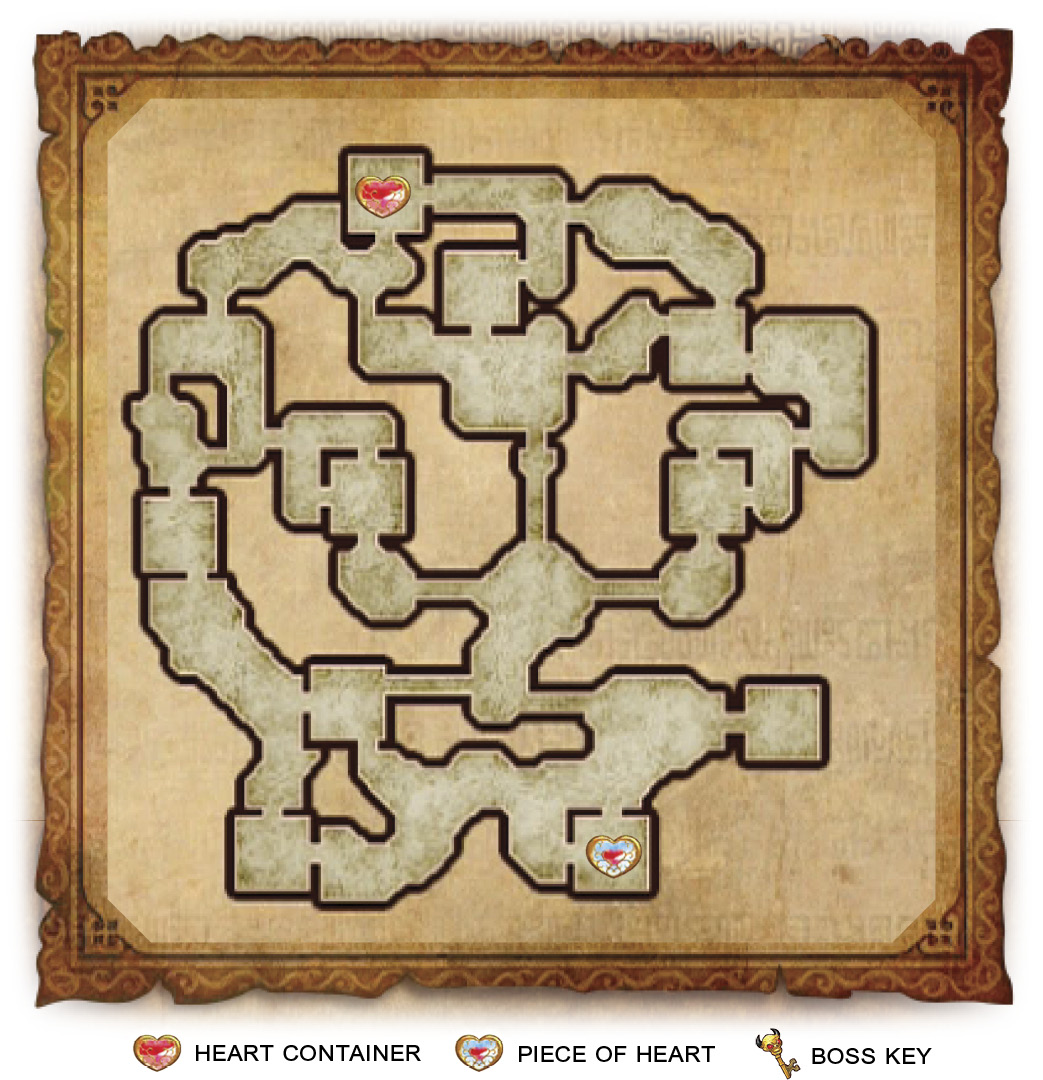
Defend allied Keeps and defeat enemy forces
Your job is to stop the enemy forces from taking any of your Keeps. If they do, they’ll gain a morale boost, making the battle that much harder, and you’ll then be tasked with recapturing that Keep.
There are three Bombchus on the map that will begin going after your Keeps one at a time. Take out the southwestern one first, since it’s right by your starting location. Afterwards, head for the southeastern Bombchu, then the northeastern one. Be quick about it; if the Bombchus are allowed to detonate inside one of your Keeps, it’ll be immediately captured for the enemy forces.
A Cucco will appear on the battlefield and begin following you around after you’ve destroyed all the Bombchus. Avoid attacking this one to the best of your abilities. It’s not friendly and it will call in a regiment of Cuccos to fight you. Having to challenge so much perilous poultry will make getting an A-Rank much harder.
Defeat the enemy Commander
You can find Shield Moblin in the Enemy Base Keep.
D-2
Defeat all enemies!
Defeat all Enemies! Scenarios are incredibly straightforward. If you’ve done Quiz and Defeat X Enemies Within X Time Scenarios, you’re pretty much prepared for what these will throw at you. Your job is to fight two or more Captains/Warriors/Bosses at the same time, defeat them, and then move on to another Keep to fight a new set of Captains/Warriors/Bosses. Avoid taking too much damage and defeat the enemies swiftly and you’ll walk out of these battles with an A-Rank.
Mission Briefing
The biggest obstacles in this Scenario are likely the Deku Babas that appear in each of the three Keeps you’ll visit. The best way to deal with these enemies is to stand just outside the door of the Keep, equip your Bow, and fire at them. As soon as you enter the Keep, the doors will slam shut and enemies will appear, making it far more difficult to take out the Deku Babas. If you can target the Deku Babas before entering the Keep, however, it’ll make each fight much easier.
A Big Poe and an Icy Big Poe
These enemies are slow and rather easy to manipulate. Try to stay behind them to avoid their attacks, then attack them. They will teleport after being hit a few times, and if you don’t immediately start attacking again, they’ll typically charge up an attack that will reveal their Weak Point Mark at the attack’s conclusion. Let them charge up, stay behind them, and then when that Mark appears, let them have it!
Two Icy Big Poes
These enemies are just tougher versions of Big Poes. Use the same strategy you used in the previous Keep and you’ll have these enemies defeated in no time.
Two Icy Big Poes and a Stalmaster
You already know how to handle the Icy Big Poes, so we’ll focus on the Stalmaster. To defeat this bony swordsman, simply hit it once or twice to trick it into blocking, then roll behind it. This will dizzy the Stalmaster and reveal its Weak Point Mark. Perform a Weak Point Smash or two and this bonebag will be dust.
D-3
Defeat 600 enemies within 10 minutes!
This is one of the more straightforward Scenario types in Adventure Mode. Defeat the listed number of enemies in the given amount of time to win. Don’t linger on individual enemies and do your best to ignore enemy Warriors, Captains, and Bosses; they are only there to distract you from your goal. Enemy Warriors and Captains will boost the morale of the enemy troops currently in the battlefield, but unless you’re struggling to survive, you can feel free to carry on defeating enemies as usual.
D-4
Watch out! All attacks are devastating!

Watch Out! Scenarios can get pretty hairy if you don’t, well, watch out! Any enemy in these battles—even the basic soldier—can take you down to a quarter heart in a single hit. Basically, you can take two hits before you fail the Scenario. Luckily, these are incredibly straightforward fights, working similarly to the Defeat all enemies! Scenarios. Your goal is to defeat a certain number of Captains. Your best bet is to stick to ranged weapons and use your Bow and Arrow frequently. Carve your way into groups of enemies, instead of running through them, and don’t linger. You’ve got this!
Defeat 20 enemy Captains!
All of the enemy Captains for this Scenario are Big Poes. They have limited range in their attacks and are pretty slow. Using Link and his Master Sword is very helpful for this battle. Using Link’s ^^% attack with the Master Sword shoots out three beams that damage and knock foes back, making cleaning out entire groups of enemies effortless.
D-5
Rescue the allied forces!
Limited Warrior: Ghirahim (Recommended Level: 35)
UnlockablesGhirahim—Heart Container (in the Southeast Keep) Ghirahim—Piece of Heart (in the Southwest Keep) 1,000 KO Gold Skulltula Second Gold Skulltula Search Item |

Adventure Battle Scenarios are almost identical to the Scenarios in Legend Mode. You have the full battlefield at your disposal, an enemy Captain/Warrior to defeat to win the Scenario, and teammates to assist you. The key difference is that you typically have only a single mission that appears at the start of the battle, which makes up the bulk of the entire fight. Once that mission is completed, you need only to defeat the enemy Commander to win the Scenario.
Sealed Grounds
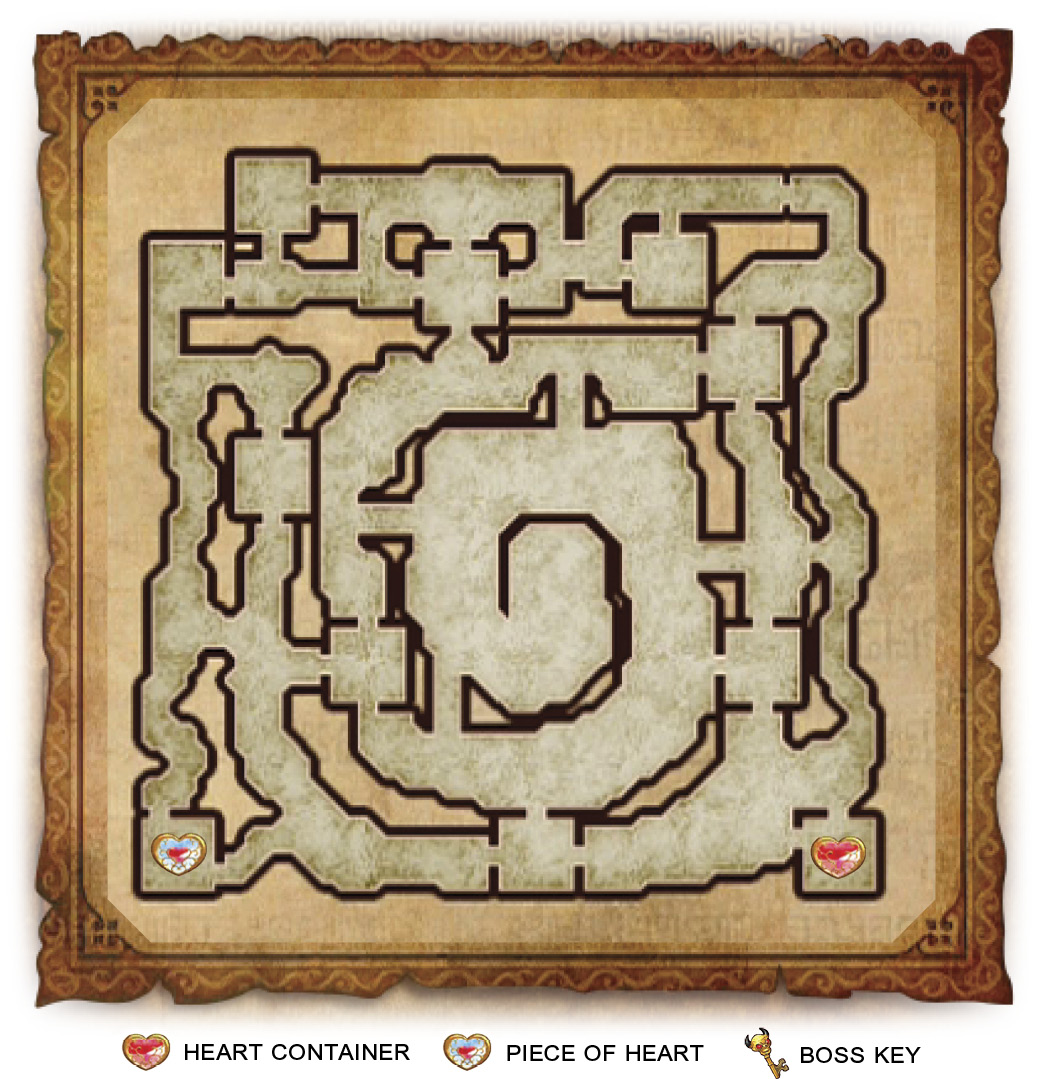
Save the stranded allied forces!
One of your allies is stuck on the west side of the battlefield. You need to get over there and defeat the marked enemy Captains to free your ally.
Capture one of the Keeps and break through!
To reach your ally, you’ll first need to capture either the West Cannon or Temple Entrance Keep to gain access to the center of the map.
After you capture one of the marked Keeps, another pair of marked Keeps will appear. You need to capture either the South or East Keep to reach your ally. Once you defeat the marked enemies that are attacking your ally, the mission will be finished.
A Cucco will appear on the battlefield and begin following you around after you’ve captured the first Keep. Avoid attacking this one to the best of your abilities. It’s not friendly and it will call in a regiment of Cuccos to fight you. Having to challenge so much perilous poultry will make getting an A-Rank much harder.
Defeat the enemy Commander
You can find Ganondorf in the Enemy Base Keep.
D-6
Defeat 600 enemies within 10 minutes!
This is one of the more straightforward Scenario types in Adventure Mode. Defeat the listed number of enemies in the given amount of time to win. Don’t linger on individual enemies and do your best to ignore enemy Warriors, Captains, and Bosses; they are only there to distract you from your goal. Enemy Warriors and Captains will boost the morale of the enemy troops currently in the battlefield, but unless you’re struggling to survive, you can feel free to carry on defeating enemies as usual.
D-7
Fight as a Warrior of darkness!
UnlockablesZant—Heart Container (in the Southeast Square Keep) Zant—Piece of Heart (in the Central Square Keep) Search ItemWater Bombs: Agitha (Victory Reward) |

Adventure Battle Scenarios are almost identical to the Scenarios in Legend Mode. You have the full battlefield at your disposal, an enemy Captain/Warrior to defeat to win the Scenario, and teammates to assist you. The key difference is that you typically have only a single mission that appears at the start of the battle, which makes up the bulk of the entire fight. Once that mission is completed, you need only to defeat the enemy Commander to win the Scenario.
Palace of Twilight
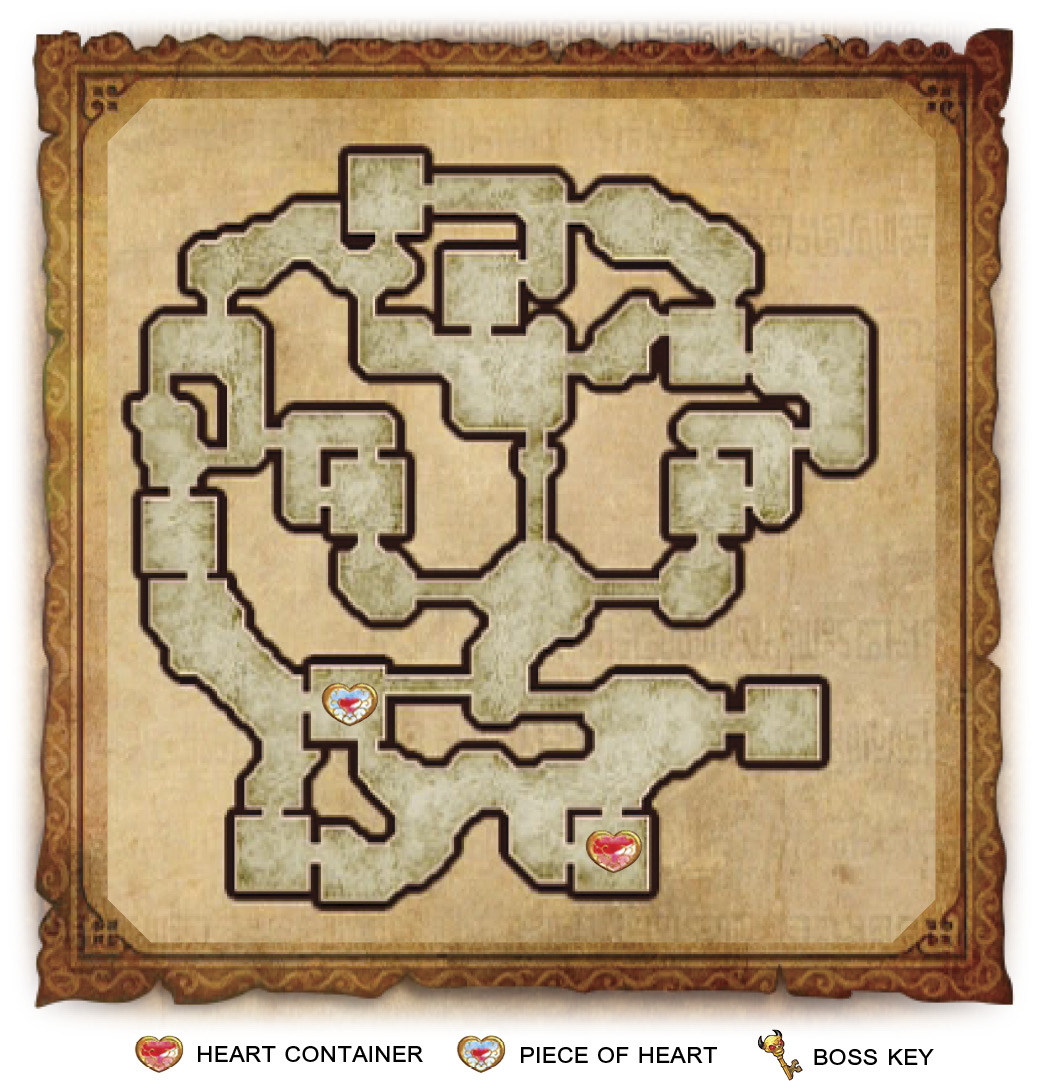
Defeat all enemy Captains to lure the Commander
You need to defeat the three Captains that are marked on your minimap to progress the mission.
Provide support for the Hylian Captain
Shortly after the Scenario begins, an allied Hylian Captain will appear on the battlefield, behind enemy lines. When his health gets low, he’ll attempt to retreat to the Allied Base and will request your aid in accomplishing that goal. If you fail to bring him back to the Allied Base, he’ll return as a vengeful spirit, dead set on bringing you to the underworld with him. Make sure to race to his aid the second you see the mission pop up; the Hylian Captain will have very low health at this point and can be defeated by enemy forces in a very short amount of time.
Defeat the enemy Commander
You can find Zant in the Enemy Base Keep.
D-8
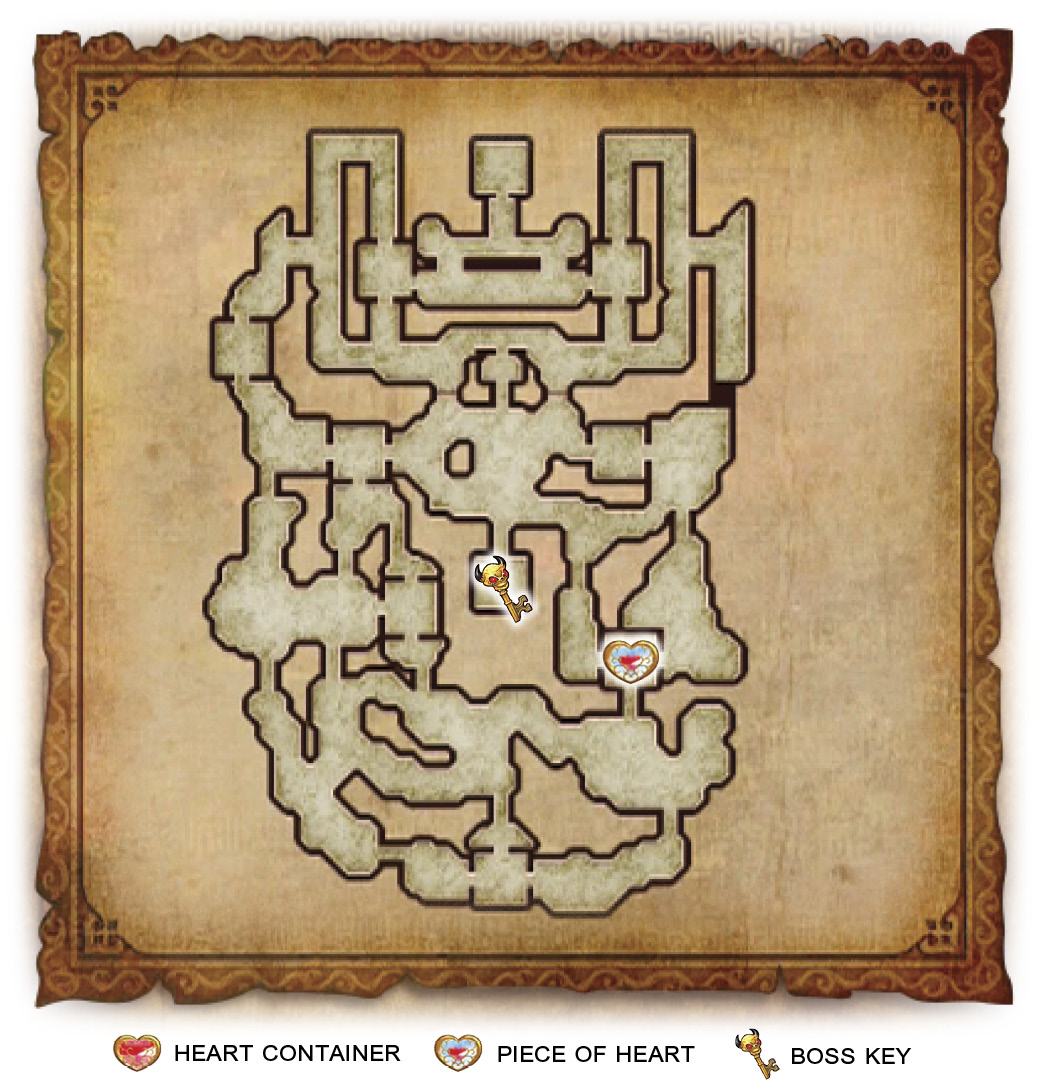
Dungeon 1: Defeat the island beast!
UnlockablesPower Bracelet Zant—Piece of Heart (in the South Square Keep) 1,000 KO Gold Skulltula Second Gold Skulltula Boss Key (in the North Square Keep) Search ItemNone |
Dungeon Scenarios play the same as Adventure Battles, but with a twist: There’s a Giant Boss at the end of each one of them, and you must grab the Boss Key hidden in one of the enemy Keeps to open the Enemy Base’s gates. Other than that, you can expect the same kind of battle you’d get from an Adventure Battle.
Eldin Caves
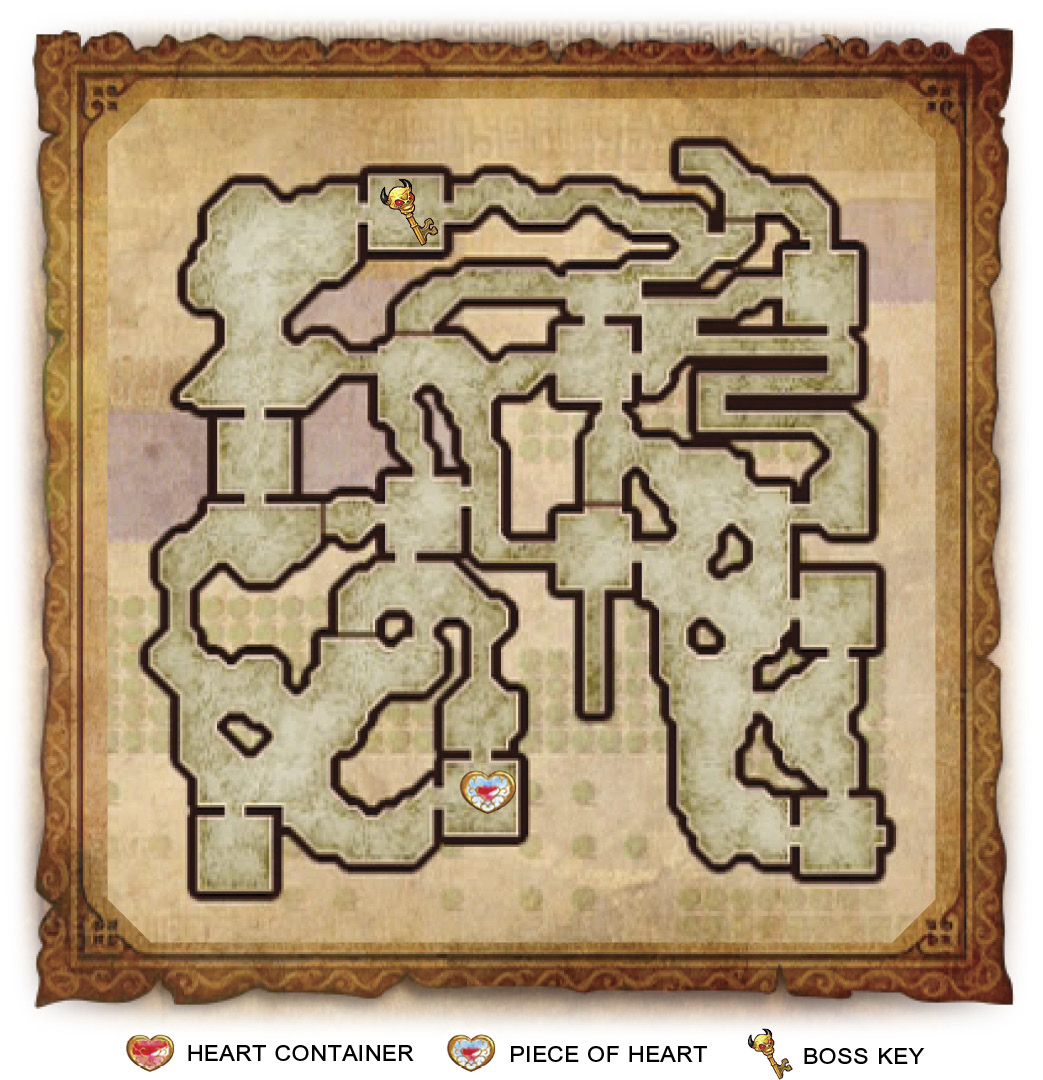
Victory ConditionsDefeat Big Poe. Defeat ConditionsIf Zelda flees or the Allied Base falls. |
Defend allied Keeps and defeat enemy forces
Your job is to stop the enemy forces from taking any of your Keeps. If they do, they’ll gain a morale boost, making the battle that much harder, and you’ll then be tasked with recapturing that Keep.
There are two Bombchus on the map that will begin going after your Keeps one at a time. The northeastern Bombchu will move first, followed by the southwestern one. Take them out in that order and waste no time doing so; if one of them blows up in a Keep, you will instantly lose it.
Defeat the Gold Cucco
An enemy Cucco will appear on the battlefield almost immediately after the Scenario starts and will begin eating everywhere it goes. As it eats it grows more and more powerful. Make a point to defeat the Gold Cucco immediately to keep it from growing stronger and causing you unnecessary problems.
Defeat the enemy Commander
You can find Ruto in the Enemy Base Keep. You’ll need to grab the Boss Key from the North Square Keep before the Enemy Base will open for you. After you grab the Boss Key, approach the Enemy Base Keep’s gates and they’ll open automatically for you.
Defeat King Dodongo to win
Keep your distance from King Dodongo and wait for him to open his mouth. The second you see his orange, gaping maw, slide in and toss a Bomb in there to get him to show his Weak Point Mark. Repeat this to take him out.
D-9
Watch out! All attacks are devastating!
Watch Out! Scenarios can get pretty hairy if you don’t, well, watch out! Any enemy in these battles—even the basic soldier—can take you down to a quarter heart in a single hit. Basically, you can take two hits before you fail the Scenario. Luckily, these are incredibly straightforward fights, working similarly to the Defeat all enemies! Scenarios. Your goal is to defeat a certain number of Captains. Your best bet is to stick to ranged weapons and use your Bow and Arrow frequently. Carve your way into groups of enemies, instead of running through them, and don’t linger. You’ve got this!
Defeat 10 enemy Captains!
All of the enemy Captains for this Scenario are Shield Moblins. They have only one ranged attack (when they throw their spear), so defeating them is just a matter of bringing a Bow to a sword fight. Using Link and his Master Sword is very helpful for this battle. Using Link’s 
 attack with the Master Sword shoots out three beams that damage and knock foes back, making cleaning out entire groups of enemies effortless.
D-10
Defeat all enemies!
Defeat all Enemies! Scenarios are incredibly straightforward. If you’ve done Quiz and Defeat X Enemies Within X Time Scenarios, you’re pretty much prepared for what these will throw at you. Your job is to fight two or more Captains/Warriors/Bosses at the same time, defeat them, and then move on to another Keep to fight a new set of Captains/Warriors/Bosses. Avoid taking too much damage and defeat the enemies swiftly and you’ll walk out of these battles with an A-Rank.
A Dinolfos and a Darknut
These two are likely the easiest Captains in the game. Both of them have very easily revealed Weak Point Marks that can almost always be deplete in one try. For Dinolfos, attack it until it knocks you back with a Force Blast. It will very likely either shoot out a line of fire directly in front of itself, or it’ll create a wall of fire in a quarter circle, then do a lunge attack; both attacks will reveal its Weak Point Mark.
You can reveal the Darknut’s Weak Point Mark by facing it, hitting one time while near it, then quickly dashing behind it. If the Darknut lifted its shield to block your attack, it’ll become dizzy when you roll behind it, making its Weak Point Mark appear.
A Dinolfos and Dark Ruto
Ruto is only a threat at long-range. If you’re near her, however, she’ll struggle to hit you with attacks, almost all of which can be blocked. Just stand near her with your guard up to get her to attack with a Combo Attack and subsequently reveal her Weak Point Mark. Be careful when she does her Combo Attack that creates a dome of water around her; that attack can break your guard, but it’s easily avoided by dashing away.
A Dinolfos, an Aeralfos, and Ruto
You already know how to beat Dinolfos and Ruto, so we’ll focus on Aeralfos. Like Dinolfos, to reveal Aeralfos’ Weak Point Mark, you just need to attack it relentlessly. If you continuously attack it, it’ll fly into the air. Stand behind or to the side of it and wait for it to attack. It’ll either do a downward stab with its weapon or sweep the area in front of it with its fire breath. Both attacks will reveal its Weak Point Mark once the Aeralfos drops to the ground. Hit it with a Weak Point Smash or two and it’ll be done for.
D-11
Watch out! All attacks are devastating!
Watch Out! Scenarios can get pretty hairy if you don’t, well, watch out! Any enemy in these battles—even the basic soldier—can take you down to a quarter heart in a single hit. Basically, you can take two hits before you fail the Scenario. Luckily, these are incredibly straightforward fights, working similarly to the Defeat all enemies! Scenarios. Your goal is to defeat a certain number of Captains. Your best bet is to stick to ranged weapons and use your Bow and Arrow frequently. Carve your way into groups of enemies, instead of running through them, and don’t linger. You’ve got this!
Defeat 20 enemy Captains!
The Captains you must defeat in this Scenario are Fiery Aeralfos. Aside from the ability to spit a fireball while on the ground, they don’t have any methods of attacking you that really pose a threat. Stick to a ranged weapon or the Bow Sub-Weapon and pick them off one at a time and you’ll be fine.
D-12
Defeat all enemies!
Defeat all Enemies! Scenarios are incredibly straightforward. If you’ve done Quiz and Defeat X Enemies Within X Time Scenarios, you’re pretty much prepared for what these will throw at you. Your job is to fight two or more Captains/Warriors/Bosses at the same time, defeat them, and then move on to another Keep to fight a new set of Captains/Warriors/Bosses. Avoid taking too much damage and defeat the enemies swiftly and you’ll walk out of these battles with an A-Rank.
Two ReDead Knights
These enemies are pretty easy to defeat. Use ranged attacks if you have them, or move in for close-range attacks. When they begin to suck light blue air into their mouths, roll away. They’ll spit their stun breath in a circle around them, which will freeze you if you’re caught in it. As soon as the breath subsides, their Weak Point Mark will appear. Deplete it to do a Weak Point Smash.
Wizzro and a Big Poe
You can attack either enemy first, but just know that Wizzro is great at blanketing an area with his projectile attacks, so make sure to keep your eyes on him as much as possible. If you manage to fill up your Special Attack bars, use them on Wizzro. It’s hard to get him to reveal his Weak Point Mark, but he is quite susceptible to Special Attacks.
Volga, a ReDead Knight, and a Fiery Aeralfos
Volga is the fastest of these enemies, so you can challenge him first so long as you draw him away from his allies. Hit him repeatedly until he does his lunge attack. His Weak Point Mark will appear as soon as he completes the attack, so be ready to deplete it. Hit him with a few Weak Point Smashes and he’ll be finished in no time.
D-13
Dungeon 2: Defeat the cliff beast!
UnlockablesRaft Ruto—Piece of Heart (in the East Temple Keep) 1,000 KO Gold Skulltula Second Gold Skulltula Boss Key (in the Fairy Fountain Keep) Search ItemNone |
Dungeon Scenarios play the same as Adventure Battles, but with a twist: There’s a Giant Boss at the end of each one of them, and you must grab the Boss Key hidden in one of the enemy Keeps to open the Enemy Base’s gates. Other than that, you can expect the same kind of battle you’d get from an Adventure Battle.
Valley of Seers
Defeat all enemy Captains to lure the Commander
You need to defeat the three Captains that are marked on your minimap to progress the mission.
Defeat the enemy Commander
You can find Ruto in the Enemy Base Keep. You’ll need to grab the Boss Key from the Fairy Fountain Keep before the Enemy Base will open for you. After you grab the Boss Key, approach the Enemy Base Keep’s gates and they’ll open automatically for you.
Defeat Gohma to win
Gohmas are probably the easiest of the Giant Boss monsters in Hyrule Warriors. Wait until they fire their laser, dodge it and then shoot them in the eye with the Bow to make their Weak Point Mark appear. Perform a Weak Point Smash. Rinse. Repeat.
D-14
Defeat 500 enemies within 10 minutes!

This is one of the more straightforward Scenario types in Adventure Mode. Defeat the listed number of enemies in the given amount of time to win. Don’t linger on individual enemies and do your best to ignore enemy Warriors, Captains, and Bosses; they are only there to distract you from your goal. Enemy Warriors and Captains will boost the morale of the enemy troops currently in the battlefield, but unless you’re struggling to survive, you can feel free to carry on defeating enemies as usual.
D-15
Watch out for thieves!
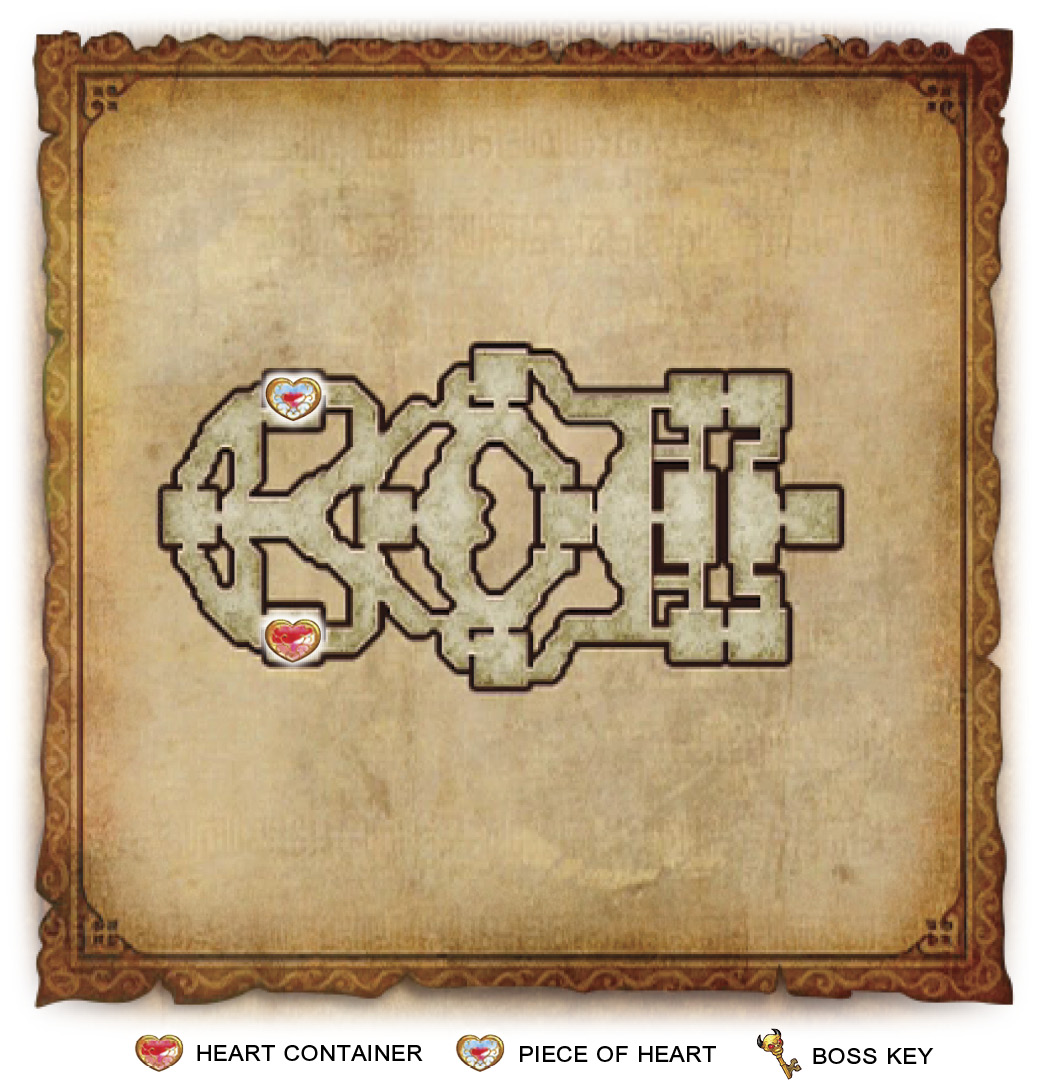
Limited Warrior: Impa and her Naginata (Recommended Level: 35)
UnlockablesImpa—Heart Container (in the S. Entrance Keep) Impa—Piece of Heart (In the N. Entrance Keep) Search Item |

Adventure Battle Scenarios are almost identical to the Scenarios in Legend Mode. You have the full battlefield at your disposal, an enemy Captain/Warrior to defeat to win the Scenario, and teammates to assist you. The key difference is that you typically have only a single mission that appears at the start of the battle, which makes up the bulk of the entire fight. Once that mission is completed, you need only to defeat the enemy Commander to win the Scenario.
Temple of the Sacred Sword
Save the stranded allied forces!
One of your allies is stuck on the west side of the battlefield. You need to get over there and defeat the marked enemy Captains to free your ally.
Capture one of the Keeps and break through!
In order to reach your ally, you’ll first need to capture either the N. Temple or S. Temple Keep to gain access to the west side of the map.
After you capture one of the marked Keeps, another pair of marked Keeps will appear. You need to capture either the North or South Square Keep to reach your ally. Once you reach your ally, the mission will be complete.
Watch for the Item Thief’s approach
An enemy Captain known as Item Thief will enter the battlefield and make its way directly to you. If it reaches you and manages to land an attack you, it’ll steal one of your Sub-Weapons and disappear. It’ll eventually reappear on the map, which will give you the chance to get back what was stolen from you. Defeat the Item Thief to reacquire your stolen goods.
Defeat the Item Transporter and take the treasure.
An Item Transporter enemy Captain will appear on the battlefield. These enemies drop Weapons and Materials when defeated. Use the Battlefield Info screen to locate them on the battlefield.
Defeat the enemy Commander
You can find Zant in the Enemy Base Keep.
D-16
Defeat all Giant Bosses within 10 minutes!
Defeat all Giant Bosses! Scenarios require you to do just that: defeat all giant bosses on the map within the time limit. These Scenarios almost always consist of two or three of the same boss attacking different corners of a confined map at once. Pick your strongest Warrior and challenge the Giant Bosses one at a time and you’ll be fine. Just try to divide up your time evenly for each of the bosses. If you notice that fighting any monster is taking more than half of your time for any monster, quit the Scenario, level up your character, and try again. If that still doesn’t cut it, unlock some of the stronger Weapons in Adventure Mode and come back at a later time.
Mission Briefing
In this fight you’ll have to fight Gohma, Argorok and The Imprisoned. Defeating three Giant Bosses in under ten minutes is pretty intense, so you’re going to have to fight smart. Make sure to defeat the Magic Jar Transport Captain when it appears. You can activate Focus Spirit and immediately end it with a Focus Spirit Attack by pressing #. This attack will reveal the Weak Point Mark of almost any Captain, Warrior, or Giant Boss if used on them, so make sure to use it on one of the Giant Bosses with a full Weak Point Mark in this Scenario. Just be sure not to use it on The Imprisoned; it doesn’t work on it at all.
It also doesn’t hurt to grab the Triforce Pieces from the Triforce Piece Transport Captain. If your Special Attack does a decent amount of damage to a giant boss, then use it rapidly whenever waiting for the opportunity to go after a Giant Boss’s Weak Point Mark. Just make sure not to use your Special Attack when the Giant Boss’s Weak Point Mark is out; it won’t deplete the Mark very quickly and you’ll lose an opportunity to perform a Weak Point Smash.
Gohma
Gohmas are probably the easiest of the Giant Boss monsters in Hyrule Warriors. Wait until they fire their laser, dodge it, and then shoot them in the eye with the Bow to make their Weak Point Mark appear. Perform a Weak Point Smash. Rinse. Repeat.
The Imprisoned
In order to defeat The Imprisoned, you need to destroy its toes. You’ll need to watch out for the shock waves it creates when it steps, so alternate between feet whenever The Imprisoned is walking. Once you destroy all of its toes, it’ll fall over and its Weak Point Mark will appear. Repeat this and perform a handful of Weak Point Smashes to win.
Argorok
Stay to the side or behind Argorok to avoid most of its attacks. Use your Hookshot on it every time its tail glows blue to pull it out of the air and reveal its Weak Point Mark. Perform some Weak Point Smashes to bring Argorok down for good.