
Hyrule Warriors Guide Walkthrough Adventure Mode
B
B-1
Stop the healers from, well, healing!
Limited Warrior: Link and his Great Fairy (Recommended Level: 50)

Adventure Battle Scenarios are almost identical to the Scenarios in Legend Mode. You have the full battlefield at your disposal, an enemy Captain/Warrior to defeat to win the Scenario, and teammates to assist you. The key difference is that you typically have only a single mission that appears at the start of the battle, which makes up the bulk of the entire fight. Once that mission is completed, you need only to defeat the enemy Commander to win the Scenario.
Ganon’s Tower

|
Victory Conditions Defeat Cia. Defeat Conditions If Zelda flees or the Allied Base falls. |
Mission Briefing
This is one of the hardest Scenarios in which to get an A-Rank. The Great Fairy is very capable of mopping up Keeps in no time flat, but her speed and lack of attack power makes her hard to use against enemy Captains and Warriors. You’ll have to be selective with your Special Attack usage and rely on her Combo Attacks—specifically 
 and to quickly clear Keeps and defeat stronger enemies. Make sure you take a trip to the Smithy and power up the Great Fairy’s Combo Attacks with Strength Weapon Skills if possible. Hang in there! You’ve got this!
Capture all Keeps and weaken the enemy
In order to complete this mission, you must first capture the Castle, North Field, South Field, and Mountain Keeps.
Defeat the Fortifier Captains
Shortly after the Scenario begins, Fortifier Captains will enter the battlefield. Take them out immediately or else they’ll fortify any Keeps they come across, which makes it a royal pain to capture them.
Defeat the Siege Captains
Siege Captains will appear on the battlefield after you capture your first marked Keep. They can capture your Keeps at a remarkable pace. That is why taking them out as they appear on the battlefield should be near the top of your list.
Defeat the Healers
Two Healers will enter the battlefield after you capture your second marked Keep. They’ll roam around the map healing any of their allies that need it. To prevent this from happening, you must hunt down the Healers and defeat them.
Defeat the enemy Commander
You can find Cia in the Enemy Base Keep.
B-2
Fight through the royalty quiz!
Quizzes are Scenarios where you have to answer three questions about a specific Zelda title or element in Hyrule Warriors. The questions will always be answered by defeating the enemy that matches the description. For example: a question could say, “Defeat the enemy that holds a shield.” Two enemies will appear: a Big Poe and a Shield Moblin. Just defeat the enemy holding the shield and you’ll have successfully answered the question. It’s that easy. Just be careful not to defeat the wrong enemy while fighting the right one and you’ll have no issues with these challenges.
Defeat the King of Twilight
The correct answer is Zant.
Defeat the servant of the royal family
The correct answer is Impa.
Defeat the royal Commander
The correct answer is Zelda.
B-3
Be like a magician and make your foes disappear!
Limited Warrior: Zant (Recommended Level: 40)
|
Unlockables Zant—Heart Container (in the E. Mountain Keep) Zant—Piece of Heart (in the W. Mountain Keep) 1,000 KO Gold Skulltula Second Gold Skulltula Search Item |

Adventure Battle Scenarios are almost identical to the Scenarios in Legend Mode. You have the full battlefield at your disposal, an enemy Captain/Warrior to defeat to win the Scenario, and teammates to assist you. The key difference is that you typically have only a single mission that appears at the start of the battle, which makes up the bulk of the entire fight. Once that mission is completed, you need only to defeat the enemy Commander to win the Scenario.
Death Mountain
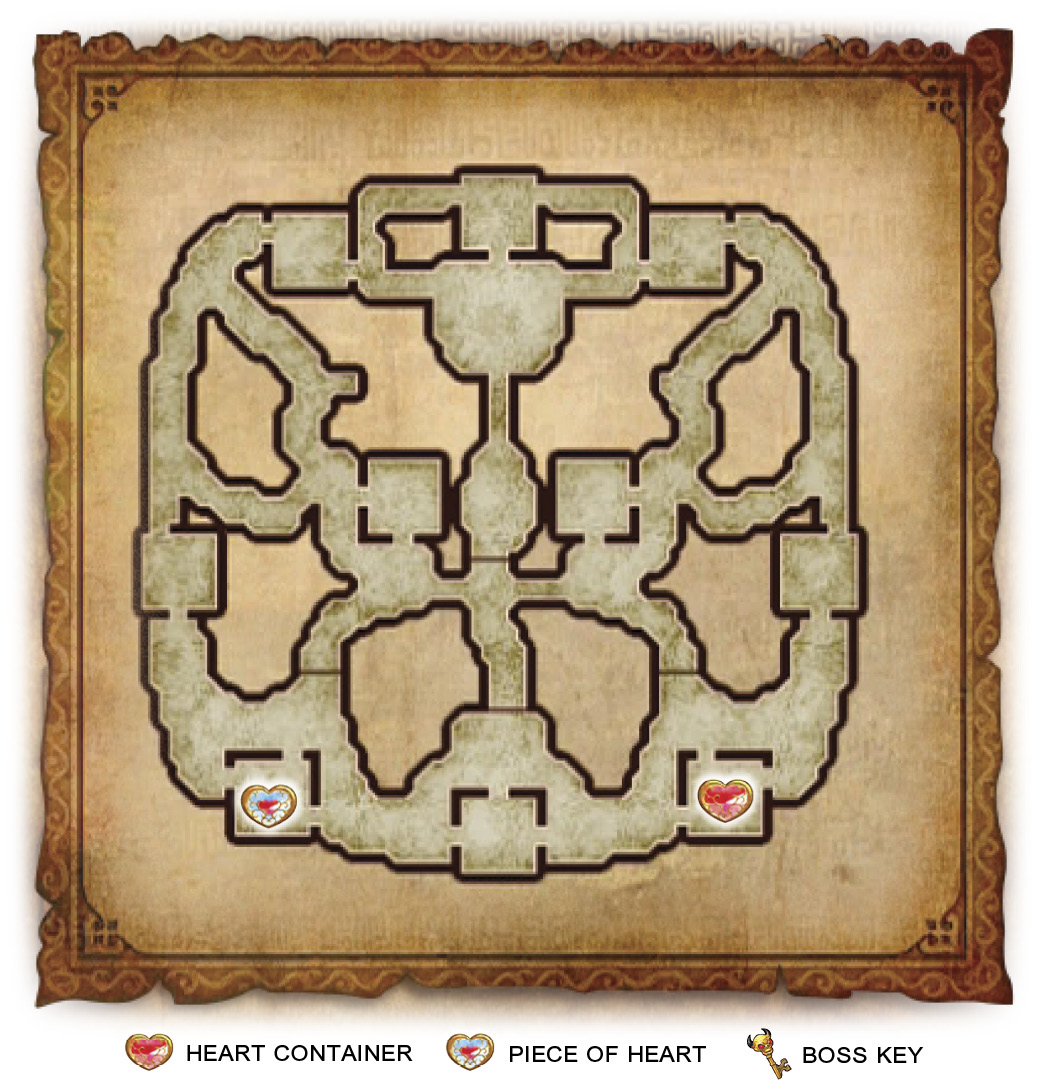
Defeat all enemy Captains to lure the Commander
You need to defeat the three Captains that are marked on your minimap to progress the mission.
Defeat the Manhandla Stalks
Shortly after starting the Scenario, Manhandla Stalks will appear on the map and begin pelting the Allied Base with seeds. Don’t delay: Look for their location on the Battlefield Info screen and take them out immediately.
Defeat the Scout Captain before Scout Troops can be called
A Scout Captain will enter the field while you’re working on your mission. If the Scout Captain is left to his own devices, he’ll call in Scout Troops to aid in the fight. To stop this from happening, race to the Scout Captain and defeat it swiftly.
Defeat Fiery Aeralfos immediately
A Fiery Aeralfos with boosted morale will enter the field shortly after you defeat all three marked Captains. It’ll go directly for the Allied Base, stopping to make trouble in any Keep you own along the way. After a short while, it’ll disappear from the field, then reappear in the Allied Base. Don’t let it attack the Allied Base—or not for long, at least. The Manhandla Stalks undoubtedly did some damage to it, which means it’ll be easy pickings for the Fiery Aeralfos.
Defeat the enemy Commander
You can find Ghirahim in the Enemy Base Keep.
B-4
Dash gallantly into battle!
Limited Warrior: Lana (Recommended Level: 40)
|
Unlockables Lana—Piece of Heart (in the South Square Keep) 1,000 KO Gold Skulltula Second Gold Skulltula Search Item |

Adventure Battle Scenarios are almost identical to the Scenarios in Legend Mode. You have the full battlefield at your disposal, an enemy Captain/Warrior to defeat to win the Scenario, and teammates to assist you. The key difference is that you typically have only a single mission that appears at the start of the battle, which makes up the bulk of the entire fight. Once that mission is completed, you need only to defeat the enemy Commander to win the Scenario.
Eldin Caves

|
Victory Conditions Defeat Icy Big Poe and Stalmaster. Defeat Conditions If Cia flees or the Allied Base falls. |
Defeat a valued enemy Captain
A Captain from both enemy armies will appear on the map. Find the nearest one and defeat it to gain access to that Captain’s Commander.
Defeat the Scout Captain before Scout Troops can be called
A Scout Captain will enter the field while you’re working on your mission. If the Scout Captain is left to his own devices, he’ll call in Scout Troops to aid in the fight. To stop this from happening, race to the Scout Captain and defeat it swiftly. Just make sure that you do it only after the Bombchus have been dealt with.
Defeat the enemy Commander
Once you’ve dealt with one of the forces, head to the remaining Commander in either the Rogue Base or the Enemy Base. In order to open the gates to the remaining base, you must first defeat the valued Captain that was marked at the start of the battle. This can be a bit tricky to find it since it’s no longer marked, but you’ll eventually find the right one if you begin taking out each of the remaining enemy Captains.
B-5
Attend the Festival of Cuccos!
Limited Warrior: Ganondorf (Recommended Level: 40)
|
Unlockables Ganondorf—Heart Container (A-Rank) Ganondorf—Piece of Heart (in the Abandoned Fort Keep) Search Item None |
Adventure Battle Scenarios are almost identical to the Scenarios in Legend Mode. You have the full battlefield at your disposal, an enemy Captain/Warrior to defeat to win the Scenario, and teammates to assist you. The key difference is that you typically have only a single mission that appears at the start of the battle, which makes up the bulk of the entire fight. Once that mission is completed, you need only to defeat the enemy Commander to win the Scenario.
Ganon’s Tower

|
Victory Conditions Defeat Cia. Defeat Conditions If Lana flees or the Allied Base falls. |
Defeat all enemy Captains to lure the Commander
You need to defeat the three Captains that are marked on your minimap to progress the mission.
Escort Cucco Chick to Adult Cucco
The Cucco Chick starts in a random Keep; look up its location in the Battlefield Info screen. Approach the Cucco Chick to get it moving. Escort it to its destination to complete the mission. If you fail to rescue it, the Adult Cucco will become enraged, attacking everyone everywhere it goes. If you succeed, Adult Cucco will begin attacking the enemy forces.
Defeat the two Cuccos
Two Cuccos will enter the battlefield and begin battling it out. If you want to keep them from hurting your troops and damaging your Keeps, you’ll have to head to their location and break up the fight by defeating them. If they were left uninterrupted, the winner will take over whatever Keep they were fighting in and begin to create Cucco troops that will move out and attack both your forces and enemy troops. This will repeat until you defeat them or until they capture three Keeps.
A Cucco will appear on the battlefield and begin following you around after you’ve destroyed all the Bombchus. Avoid attacking this Cucco to the best of your abilities. It’s not friendly and it will call in a regiment of Cuccos to fight you. Having to challenge so much perilous poultry will make getting an A-Rank much harder.
Defeat the enemy Commander
You can find Cia in the Enemy Base Keep.
B-6
Defeat all Giant Bosses within 10 minutes!
Limited Warrior: Ganondorf (Recommended Level: 40)
Defeat all Giant Bosses! Scenarios require you to do just that: defeat all giant bosses on the map within the time limit. These Scenarios almost always consist of two or three of the same boss attacking different corners of a confined map at once. Pick your strongest Warrior and challenge the Giant Bosses one at a time and you’ll be fine. Just try to divide up your time evenly for each of the bosses. If you notice that it is taking more than half of your time for any monster, quit the Scenario, level up your character and try again. If that still doesn’t cut it, unlock some of the stronger Weapons in Adventure Mode and come back at a later time.
Ganon
Pay attention to Ganon’s attacks: He emulates every Giant Boss except for The Imprisoned and you must hit him with the item that the Giant Boss he’s emulating is weak to. As a refresher, if he holds out his right hand and begins charging a fireball, race in and throw Bombs at his hand. If he lifts his left hand and begins charging a blue energy ball, dodge out of the way of the attack and shoot his hand with the Bow. If his shoulder spikes open up and begin firing small spikes, hit them with the Boomerang as soon as they are finished firing. If he flies into the air, pull him down with the Hookshot.
Once you’ve destroyed each of Ganon’s parts, he’ll begin performing attacks that make the gem on his head glow. When you see it glow, shoot him with your Bow to make him reveal his Weak Point Mark. Perform some Smashes and you’ll defeat him. Defeating Ganon means you have successfully won the Scenario. Congratulations!
Gohma
Gohmas are probably the easiest of the Giant Boss monsters in Hyrule Warriors. Wait until they fire their laser, dodge it, and then shoot them in the eye with the Bow to make their Weak Point Mark appear. Perform a Weak Point Smash. Rinse. Repeat.
King Dodongo
Keep your distance from King Dodongo and wait for him to open his mouth. The second you see his orange, gaping maw, slide in and toss a Bomb in there to get him to show his Weak Point Mark. Repeat this to take him out.
B-7
Capture the enemy Keeps!
Limited Warrior: Link (Recommended Level: 40)
|
Unlockables Link—Heart Container (in the Fairy Fountain Keep) Search Item |

Adventure Battle Scenarios are almost identical to the Scenarios in Legend Mode. You have the full battlefield at your disposal, an enemy Captain/Warrior to defeat to win the Scenario, and teammates to assist you. The key difference is that you typically have only a single mission that appears at the start of the battle, which makes up the bulk of the entire fight. Once that mission is completed, you need only to defeat the enemy Commander to win the Scenario.
Skyloft
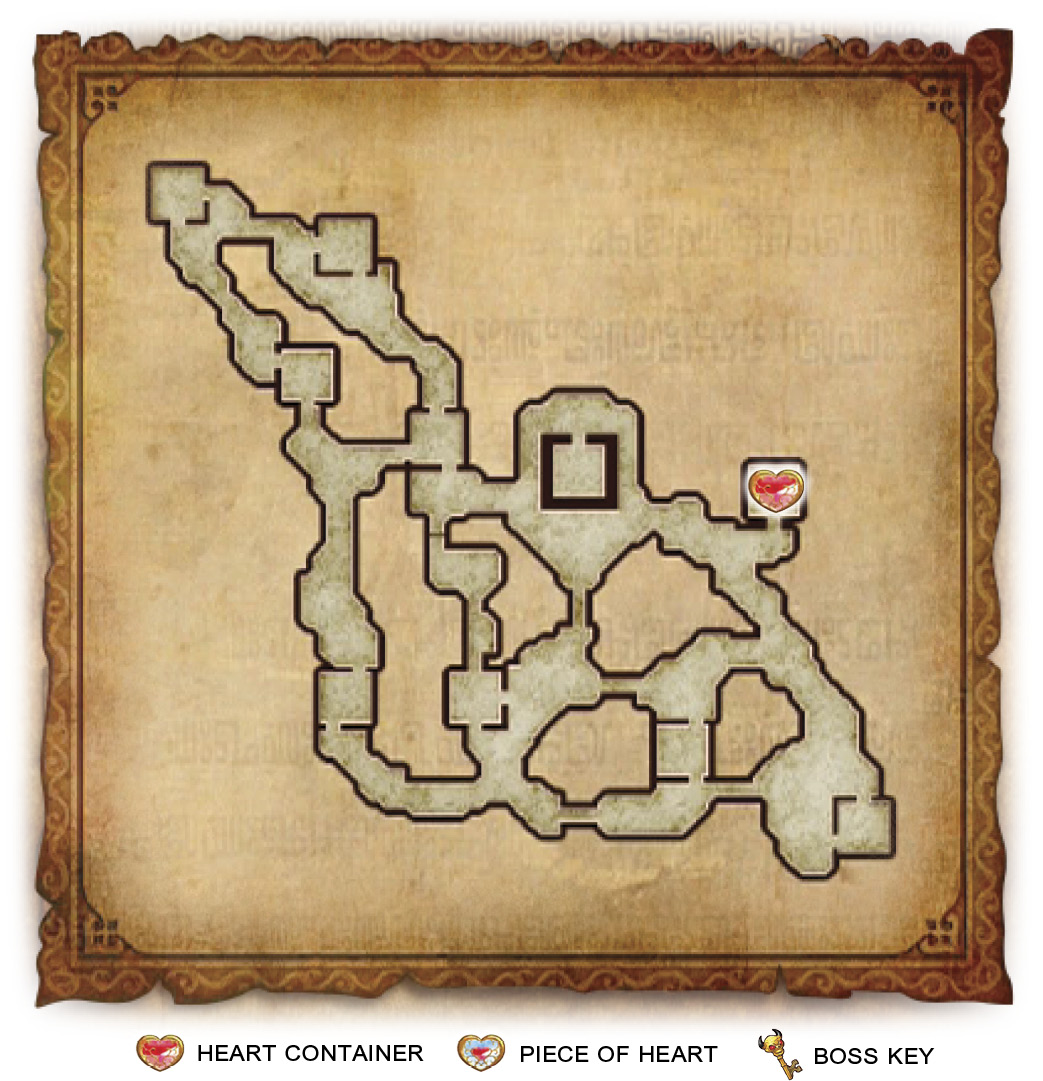
|
Victory Conditions Defeat Ganondorf. Defeat Conditions If Cia flees or the Allied Base falls. |
Capture all Keeps and weaken the enemy
In order to complete this mission, you must first capture the Town Center, Statue, West Town, and Central Square Keeps. The Keeps will regularly create Aeralfos Captains with boosted morale, so don’t delay in capturing these Keeps!
Defeat the Fortifier Captains
Shortly after the Scenario begins, Fortifier Captains will enter the battlefield. Take them out immediately or else they fortify any Keeps they come across, which makes it a royal pain to capture them.
Defeat the enemy Commander
You can find Ganondorf in the Enemy Base Keep.
B-8
Deal with the uninvited guests!
Limited Warrior: Ganondorf (Recommended Level: 40)
|
Unlockables Ganondorf—Heart Container (in the South Garden Keep) Ganondorf—Piece of Heart (in the Northwest Keep) 1,000 KO Gold Skulltula Second Gold Skulltula Search Item |

Adventure Battle Scenarios are almost identical to the Scenarios in Legend Mode. You have the full battlefield at your disposal, an enemy Captain/Warrior to defeat to win the Scenario, and teammates to assist you. The key difference is that you typically have only a single mission that appears at the start of the battle, which makes up the bulk of the entire fight. Once that mission is completed, you need only to defeat the enemy Commander to win the Scenario.
Temple of Souls

Defeat all enemy Captains to lure the Commander
You need to defeat the three Captains that are marked on your minimap to progress the mission.
Defeat the Manhandla Stalks
After capturing your second marked Keep, Manhandla Stalks will appear on the map and begin pelting the Allied Base with seeds. Don’t delay: Look for their location on the Battlefield Info screen and take them out immediately.
Convince Moblin to join you
A Moblin will appear on the map. Make a point to get to it as swiftly as possible to prevent it from being defeated by the enemy army, or yours. All you need to do is approach it and it’ll join your side of the conflict.
Defeat the Scout Captain before Scout Troops can be called
A Scout Captain will enter the field while you’re working on your mission. If the Scout Captain is left to his own devices, he’ll call in Scout Troops to aid in the fight. To stop this from happening, race to the Scout Captain and defeat it swiftly. Just make sure that you do it only after the Bombchus have been dealt with.
Defeat the enemy Commander
You can find Agitha in the Enemy Base Keep.
B-9
Deal with the uninvited guests!
Limited Warrior: Ghirahim (Recommended Level: 40)
|
Unlockables Ghirahim—Heart Container (in the Southeast Keep) Ghirahim—Piece of Heart (in the Northeast Keep) Search Item |

Adventure Battle Scenarios are almost identical to the Scenarios in Legend Mode. You have the full battlefield at your disposal, an enemy Captain/Warrior to defeat to win the Scenario, and teammates to assist you. The key difference is that you typically have only a single mission that appears at the start of the battle, which makes up the bulk of the entire fight. Once that mission is completed, you need only to defeat the enemy Commander to win the Scenario.
Temple of Souls
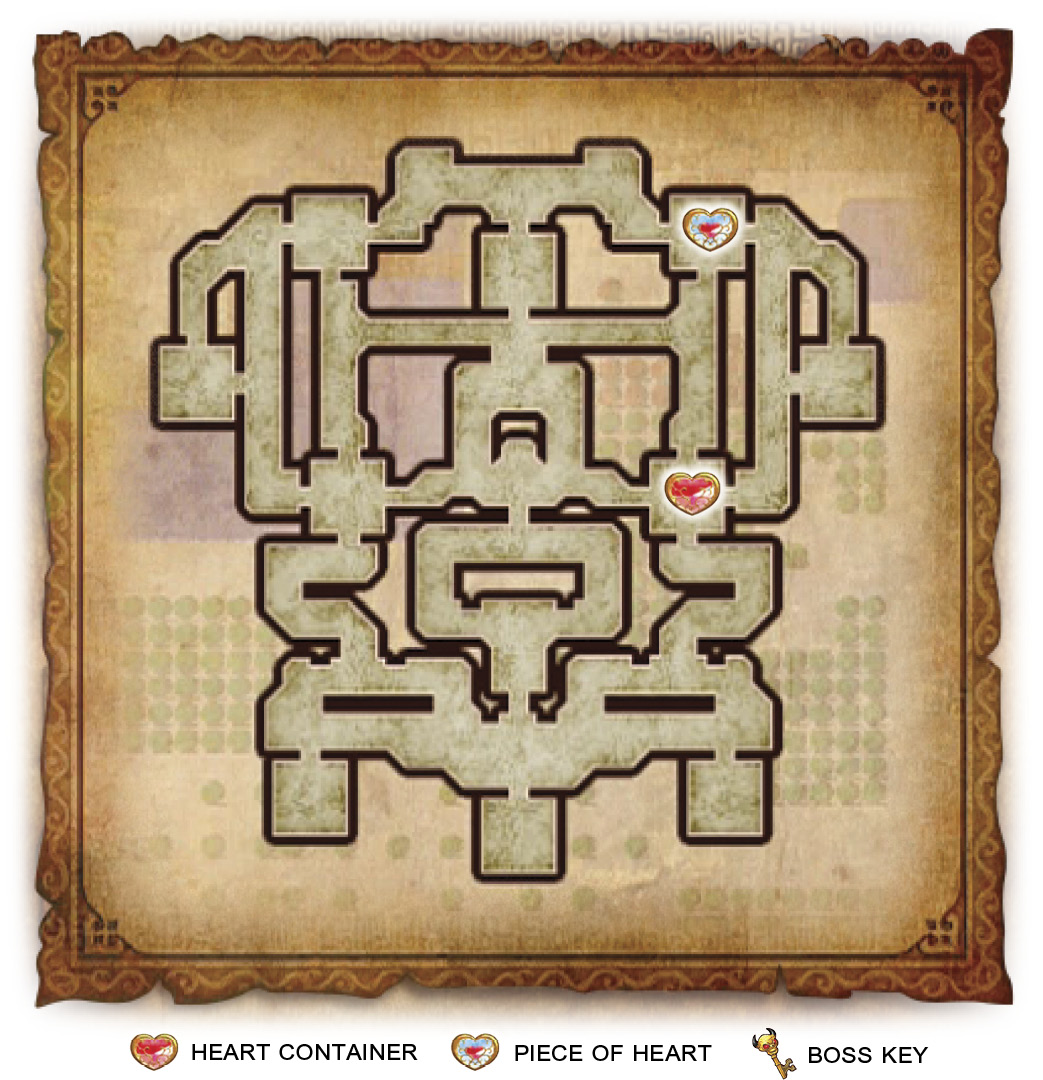
Defeat all enemy Captains to lure the Commander
You need to defeat the three Captains that are marked on your minimap to progress the mission.
Provide support for the Hylian Captain
Shortly after the Scenario begins, an allied Hylian Captain will appear on the battlefield, behind enemy lines. When his health gets low, he’ll attempt to retreat to the Allied Base and will request your aid in accomplishing that goal. If you fail to bring him back to the Allied Base, he’ll return as a vengeful spirit, dead set on bringing you to the underworld with him. Make sure to race to his aid the second you see the mission pop up; the Hylian Captain will have very low health at this point and can be defeated by enemy forces in a very short time.
Defeat Gibdo immediately
A Gibdo with boosted morale will enter the field shortly after you defeat all three marked Captains. It’ll go directly for the Allied Base, stopping to make trouble in any Keep you own along the way. After a short while, it’ll disappear from the field, then reappear in the Allied Base. Don’t let it attack the Allied Base—or not for long, at least.
Defeat the enemy Commander
You can find Ganondorf in the Enemy Base Keep.
B-10
Fight through the women’s weapons quiz!
Quizzes are Scenarios where you have to answer three questions about a specific Zelda title or element in Hyrule Warriors. The questions will always be answered by defeating the enemy that matches the description. For example: a question could say, “Defeat the enemy that holds a shield.” Two enemies will appear: a Big Poe and a Shield Moblin. Just defeat the enemy holding the shield and you’ll have successfully answered the question. It’s that easy. Just be careful not to defeat the wrong enemy while fighting the right one and you’ll have no issues with these challenges.
Defeat the book wielder
The correct answer is Lana.
Defeat the blue-haired sorceress
The correct answer is Lana.
Defeat the one with magic hair
The correct answer is Midna.
B-11
Defeat all Giant Bosses within 10 minutes!
Defeat all Giant Bosses! Scenarios require you to do just that: defeat all giant bosses on the map within the time limit. These Scenarios almost always consist of two or three of the same boss attacking different corners of a confined map at once. Pick your strongest Warrior and challenge the Giant Bosses one at a time and you’ll be fine. Just try to divide up your time evenly for each of the bosses. If you notice that it is taking more than half of your time for any monster, quit the Scenario, level your character up and try again. If that still doesn’t cut it, unlock some of the stronger Weapons in Adventure Mode and come back at a later time.
Manhandla
To defeat Manhandla, you need to wait until its stalks turns green and then hit them with the Boomerang. Once you’ve hit all four, Manhandla will uproot and its Weak Point Mark will be revealed. Hit it with a handful of Weak Point Smashes and you’ll make short work of the monstrous man-eater.
Two Argoroks
Stay to the side or behind Argorok to avoid most of its attacks. Use your Hookshot on it every time its tail glows blue to pull it out of the air and reveal its Weak Point Mark. Perform some Weak Point Smashes to bring Argorok down for good.
B-12
Defeat all Giant Bosses within 10 minutes!
Defeat all Giant Bosses! Scenarios require you to do just that: defeat all giant bosses on the map within the time limit. These Scenarios almost always consist of two or three of the same boss attacking different corners of a confined map at once. Pick your strongest Warrior and challenge the Giant Bosses one at a time and you’ll be fine. Just try to divide up your time evenly for each of the bosses. If you notice that it is taking more than half of your time for any monster, quit the Scenario, level your character up and try again. If that still doesn’t cut it, unlock some of the stronger Weapons in Adventure Mode and come back at a later time.
Two Gohmas
Gohmas are probably the easiest of the Giant Boss monsters in Hyrule Warriors. Wait until they fire their laser, dodge it, and then shoot them in the eye with the Bow to make their Weak Point Mark appear. Perform a Weak Point Smash. Rinse. Repeat.
B-13
Fight through the Ocarina of Time quiz!

Quizzes are Scenarios where you have to answer three questions about a specific Zelda title or element in Hyrule Warriors. The questions will always be answered by defeating the enemy that matches the description. For example: a question could say, “Defeat the enemy that holds a shield.” Two enemies will appear: a Big Poe and a Shield Moblin. Just defeat the enemy holding the shield and you’ll have successfully answered the question. It’s that easy. Just be careful not to defeat the wrong enemy while fighting the right one and you’ll have no issues with these challenges.
Defeat the passionate brother
The correct answer is Darunia.
Defeat the musician
The correct answer is Sheik.
Defeat the aquatic one
The correct answer is Ruto.
B-14
Capture the enemy Keeps!
Limited Warrior: Ganondorf (Recommended Level: 40)
|
Unlockables Ganondorf—Piece of Heart (in the Rocky Square Keep) Search Item |

Adventure Battle Scenarios are almost identical to the Scenarios in Legend Mode. You have the full battlefield at your disposal, an enemy Captain/Warrior to defeat to win the Scenario, and teammates to assist you. The key difference is that you typically have only a single mission that appears at the start of the battle, which makes up the bulk of the entire fight. Once that mission is completed, you need only to defeat the enemy Commander to win the Scenario.
Twilight Field
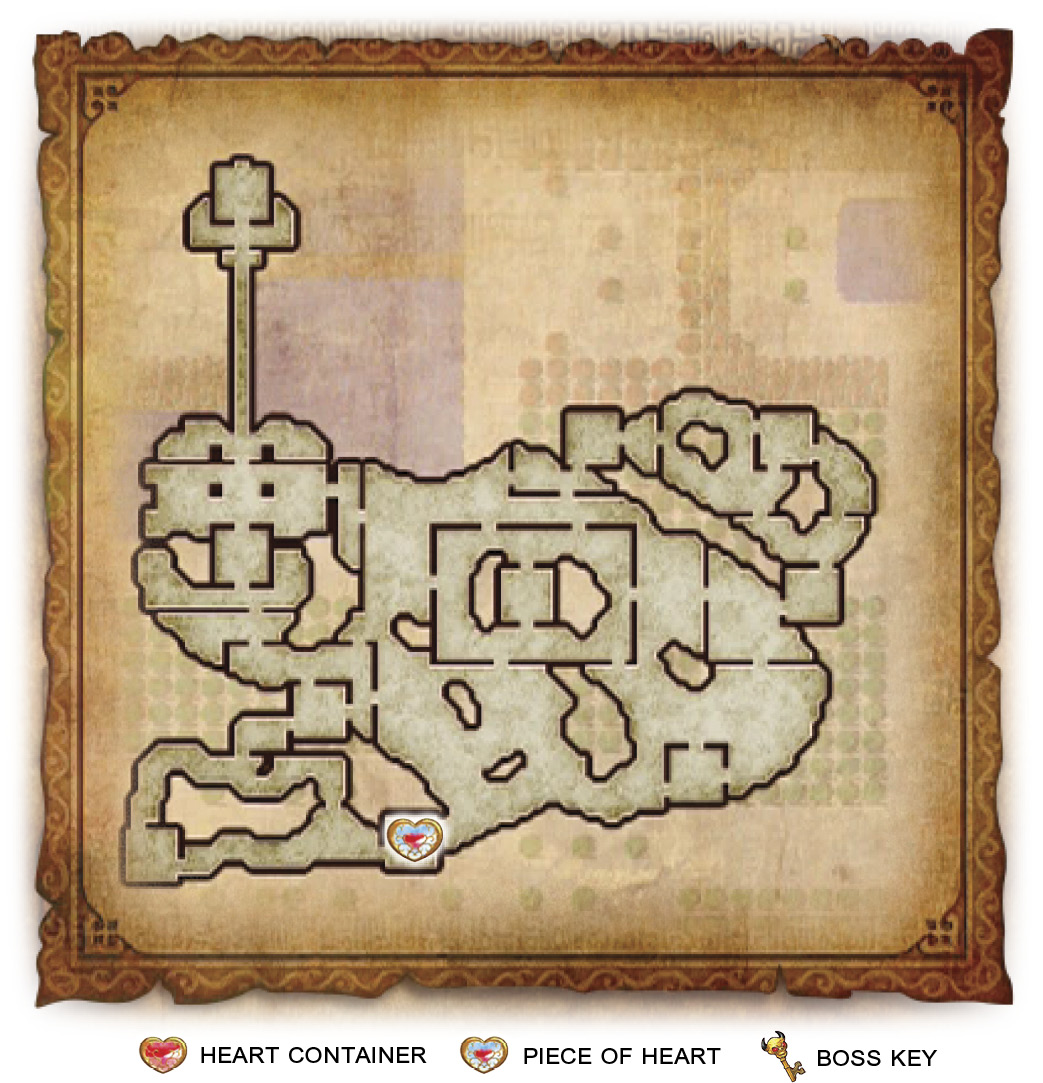
Capture all Keeps and weaken the enemy
In order to complete this mission, you must first capture the South Field, West Field, Rocky Square, and Central Keeps.
Defeat the Fortifier Captains
Shortly after the Scenario begins, Fortifier Captains will enter the battlefield. Take them out immediately or else they fortify any Keeps they come across, which makes it a royal pain to capture them.
Defeat the Scout Captain before Scout Troops can be called
A Scout Captain will enter the field while you’re working on your mission. If the Scout Captain is left to his own devices, he’ll call in Scout Troops to aid in the fight. To stop this from happening, race to the Scout Captain and defeat it swiftly. Just make sure that you do it only after the Bombchus have been dealt with.
Defeat the enemy Commander
You can find Zant in the Enemy Base Keep.
B-15
Capture the enemy Keeps!
Limited Warrior: Sheik (Recommended Level: 40)
|
Unlockables Sheik—Heart Container (in the Abandoned Fort Keep) Sheik—Piece of Heart (in the Castle Keep) Search Item |

Adventure Battle Scenarios are almost identical to the Scenarios in Legend Mode. You have the full battlefield at your disposal, an enemy Captain/Warrior to defeat to win the Scenario, and teammates to assist you. The key difference is that you typically have only a single mission that appears at the start of the battle, which makes up the bulk of the entire fight. Once that mission is completed, you need only to defeat the enemy Commander to win the Scenario.
Ganon’s Tower

Save the Stranded Allied Forces!
One of your allies is stuck on the northwest corner of the battlefield. You need to get over there and defeat the marked enemy Captains to free your ally.
Capture one of the Keeps and break through!
To reach your ally, you’ll first need to capture either the Central or East Field Keep to gain access to the center of the map.
After you capture one of the marked Keeps, another pair of marked Keeps will appear. You need to capture either the West Field Keep or Abandoned Fort Keep to reach your ally. Once you defeat the marked enemies that are attacking your ally, the mission will be finished.
Watch for the Item Thief’s approach
An enemy Captain known as Item Thief will enter the battlefield and make its way directly to you. If it reaches you and manages to land an attack you, it’ll steal one of your Sub-Weapons and disappear. It’ll eventually reappear on the map, which will give you the chance to get back what was stolen from you. Defeat the Item Thief to reacquire your stolen goods.
Defeat the enemy Commander
You can find Ganondorf in the Enemy Base Keep.
B-16
Play as a Warrior of water
|
Unlockables Zelda—Piece of Heart (in the W. Mountain Keep) 1,000 KO Gold Skulltula Second Gold Skulltula Search Item |

Adventure Battle Scenarios are almost identical to the Scenarios in Legend Mode. You have the full battlefield at your disposal, an enemy Captain/Warrior to defeat to win the Scenario, and teammates to assist you. The key difference is that you typically have only a single mission that appears at the start of the battle, which makes up the bulk of the entire fight. Once that mission is completed, you need only to defeat the enemy Commander to win the Scenario.
Death Mountain
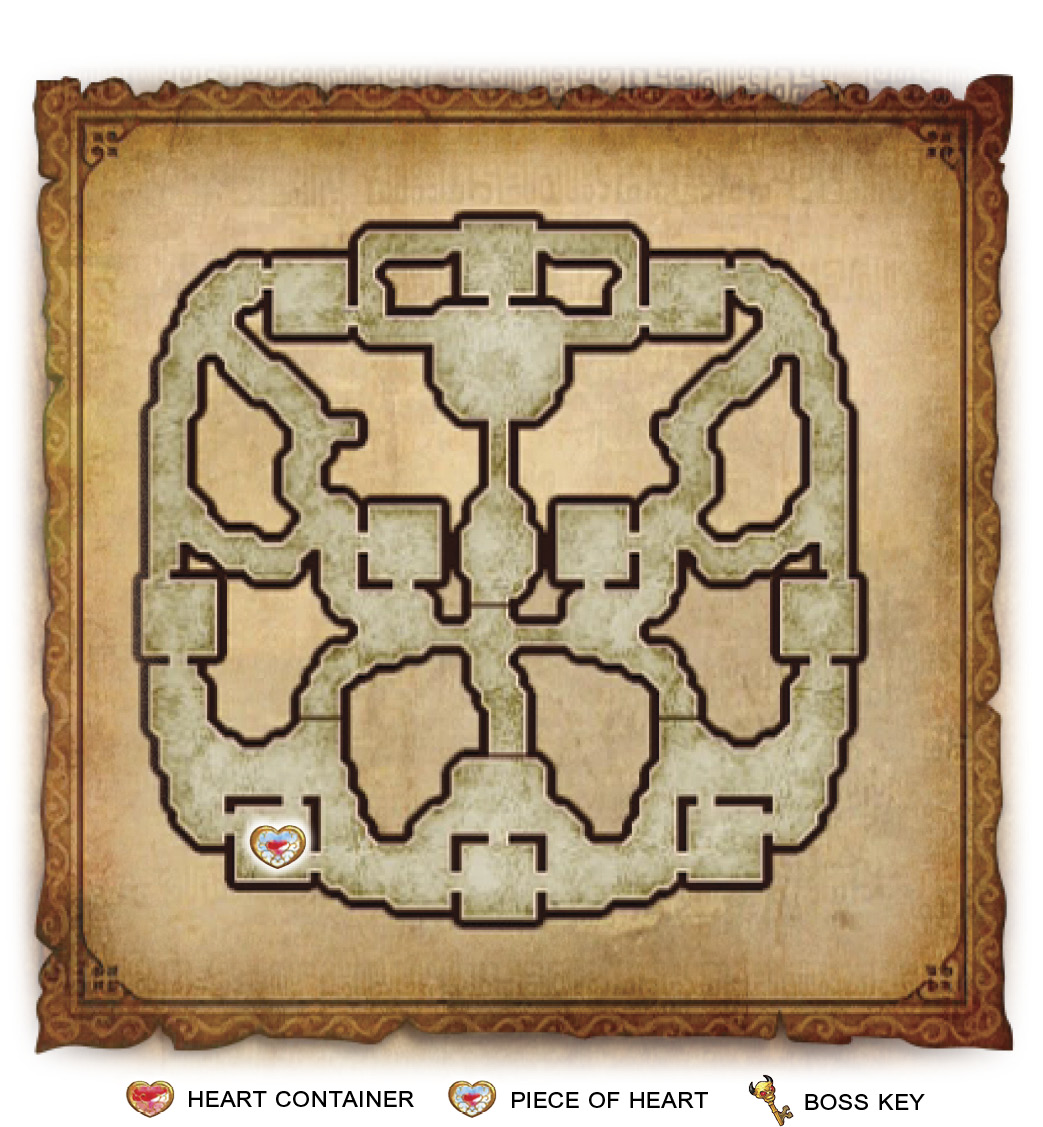
Save the Stranded Allied Forces!
One of your allies is stuck on the north side of the battlefield. You need to get over there and defeat the marked enemy Captains to free your ally.
Capture one of the Keeps and break through!
To reach your ally, you’ll first need to capture either the East or West Keep to gain access to the center of the map.
After capturing one of the marked Keeps, another pair of marked Keeps will appear. You need to capture either the West or East Goron Keep to reach your ally. Once you defeat the marked enemies that are attacking your ally, the mission will be finished.
Defeat the enemy Commander
You can find Darunia in the Enemy Base Keep.