
Assassin's Creed: Brotherhood Guide Walkthrough Side Quests
Secondary Memories
War Machines
As with the War Machine memory played during the main story, note that each of the three optional War Machines begins with a War Plans prelude where Ezio kills a Templar Overseer. We provide tips for these throughout this section in addition to the main War Machine walkthrough.
Note: The few Treasure Chests encountered on War Machine memories do not contain Trade Items and so, given the stringent Desynchronization conditions in the few areas that they appear, are rarely worth the effort to collect.
Loose Cannon
WAR PLANS:
The memory start position is in the far west of the Centro district. The Templar Overseer can be found in a small but heavily guarded Restricted Area. Sneak up and engage the target, then use the Kick move at least once to fulfill the Full Synch condition before you kill him. Now travel to the waypoint at Porta Metronia.
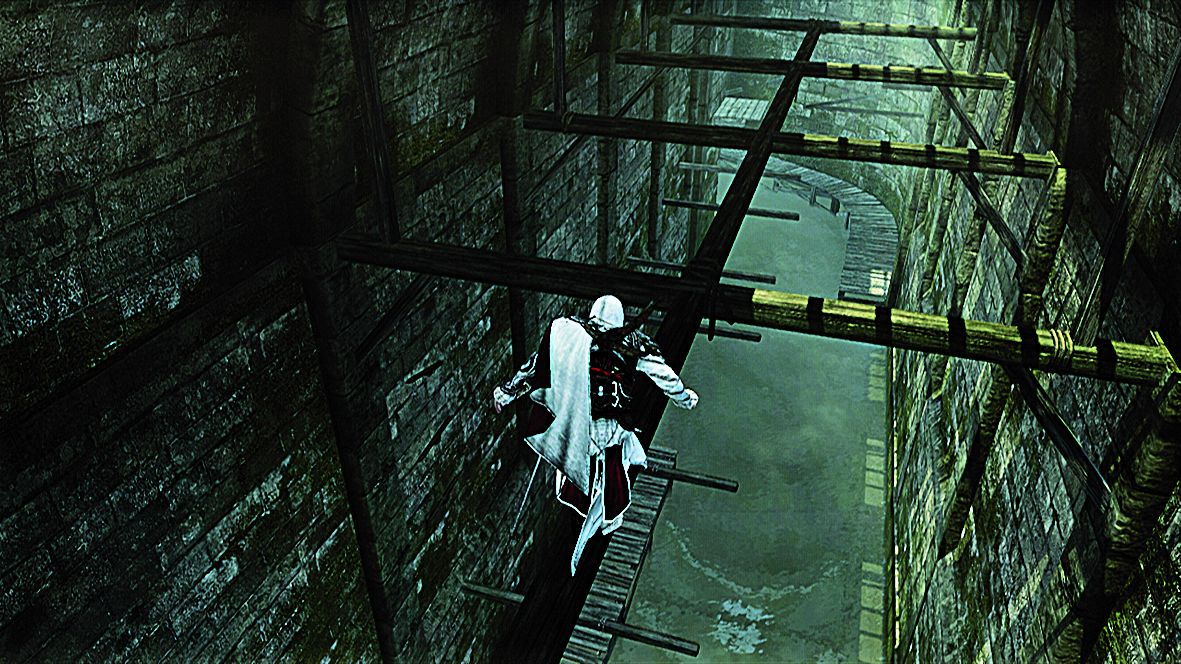
Figure 01
1: Swim on the left-hand side of the area, killing the two guards as you pass them to reach Eduardo at the waypoint. Dive into the water and swim ahead of his gondola into the tunnel, then aim to assassinate the first guard before he arrives at your position. Scale the low wall on the left-hand side of the tunnel, then climb onto the beams above. You can now free run out of sight above Eduardo for most of the remaining journey, taking the most elevated route possible (Fig. 1). Only kill those guards that Ezio must pass at close range. Others can be ignored as long as you slip by quickly.
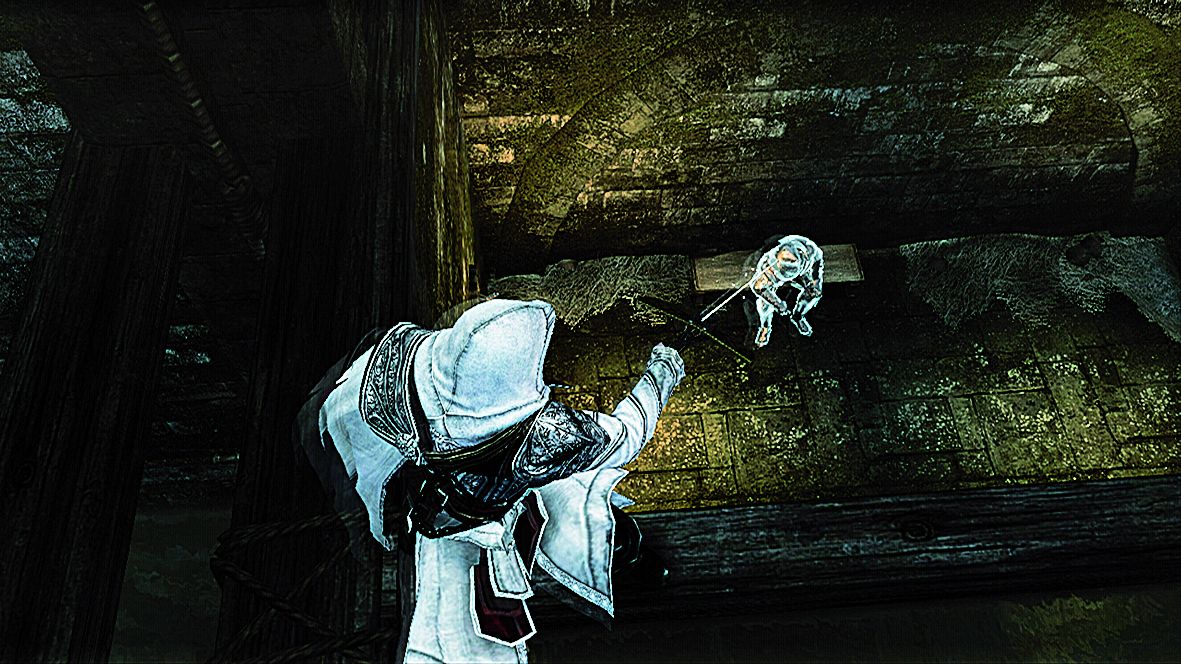
Figure 02
2: After passing the second gate, run ahead of Eduardo (but not too far – this causes a Desynch) to reach a third barrier. Kill the Brute sitting on the bench with the Crossbow (Fig. 2), then drop down and open the gate to complete the Full Synch condition. For the final leg of the tunnel journey, kill or avoid guards as applicable: those with a high chance of detecting Ezio should be dispatched with the Crossbow or a ledge assassination. As previously, don't forget that the Submerge move (hold the Legs Button) is an easy way to avoid the gaze of a nearby enemy.
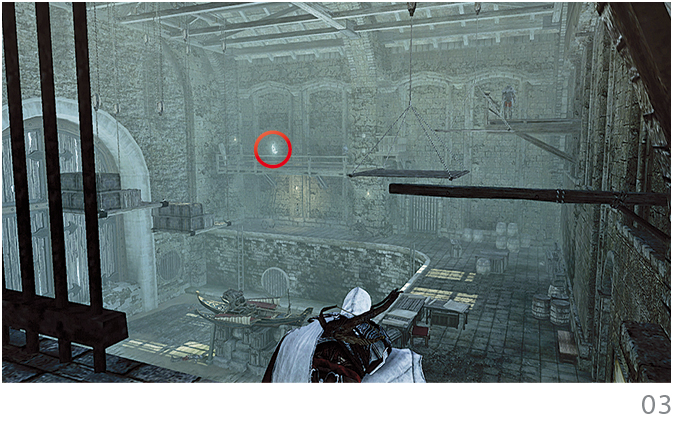
Figure 03
3: Once Eduardo departs through a final gate, use the nearby lever to open the way forward. The restriction on Ezio being detected is lifted here, but you can still use stealth tactics in the following room: climb the ladder to the right of the entrance, use the beams above to cross silently over the guards below, then kill the Brute by the exit with an air assassination. Open the next gate to trigger a cutscene. Once it ends, the best strategy is to run forward and engage the guards, clearing the room quickly. Climb up and destroy the blueprints. After operating the lever to raise a platform, free run to the room to the northwest; note that there is a Treasure Chest in here. At the final waypoint, operate the mechanism to flood the dry dock (Fig. 3).
NAVAL CANNON TIPS:
- Press the Empty Hand Button to propel the vessel forward; tap the Weapon Hand Button to move into firing position. When you need to row again, press the Empty Hand Button.
- To destroy the Borgia Ships, you need only destroy their three sails. Everything else (including guards) is a distraction that should be ignored.
- The cannons on Da Vinci's War Machine have a limited range. The best tactic is to row towards each Borgia ship at speed and, just before you move sufficiently close, switch to the firing position. The momentum of the vessel will make it harder for targets to hit Ezio as he unleashes his opening salvos. You may also benefit by angling your approach to the fore or aft of each ship.
Flying Machine 2.0
WAR PLANS:
The memory start position is in the south of the Antico district. Locate the Templar Overseer in the highlighted area, use a Smoke Bomb to stun him to complete the Full Synch condition, then finish him off with a Hidden Blade assassination. Run from the area and become anonymous before you approach the waypoint in front of Porta Tiburtina.
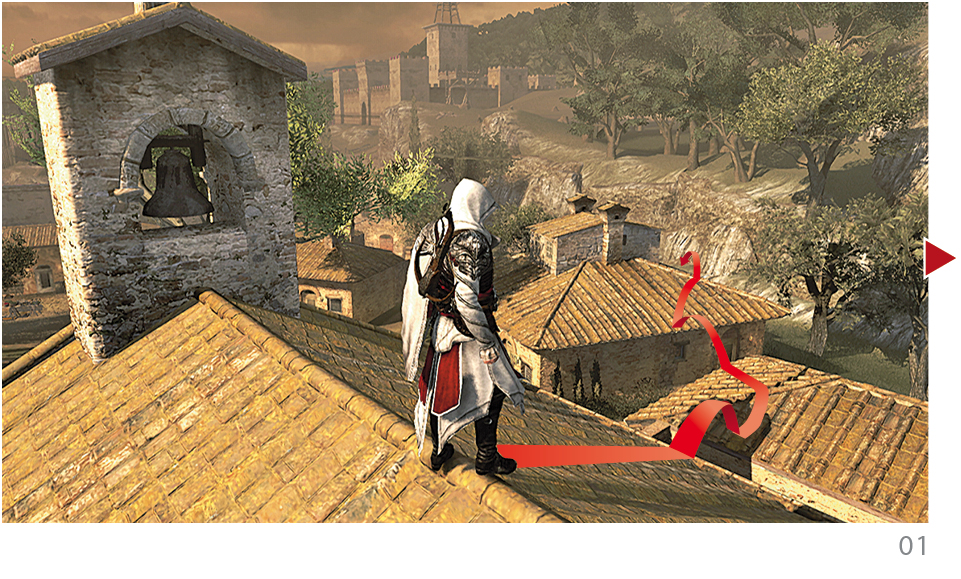
Figure 01
1: Wait on top of the church by the steeple and watch the area to the south through Eagle Vision until you espy the architect. As he heads west, carefully free run over the rooftops and drop down once prompted when he reaches a secluded area (Fig. 1). Attack him with fists to trigger a cutscene.
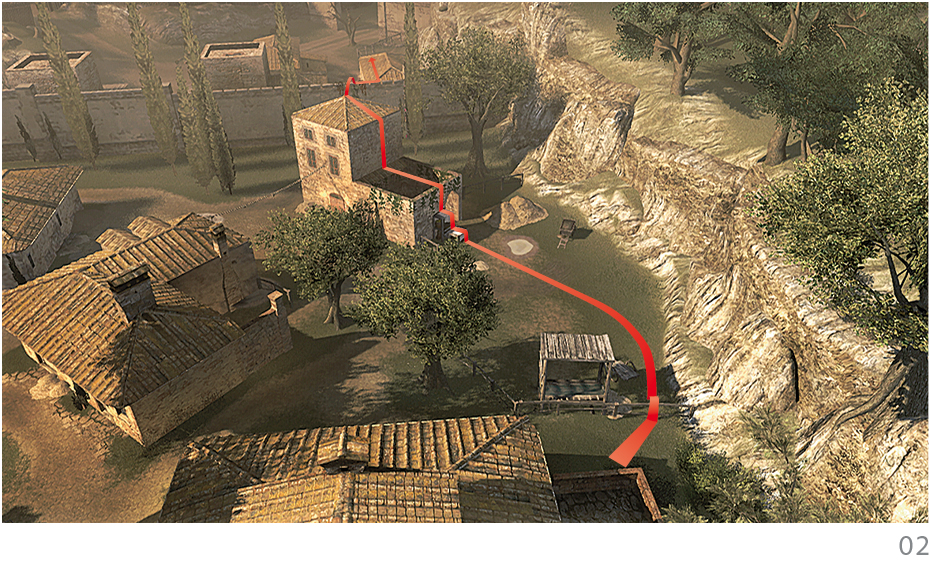
Figure 02
2: After beating up the architect, climb the tall building to the south (Fig. 2). Observe the sentry in the tower further south (and any patrols that may pass below), and then leap over to the wall when they face elsewhere. Traverse to the right and, when the coast is clear, climb up and leap over to the rooftop directly ahead. Drop down on the right-hand side of the building. The blueprints are a short walk away.
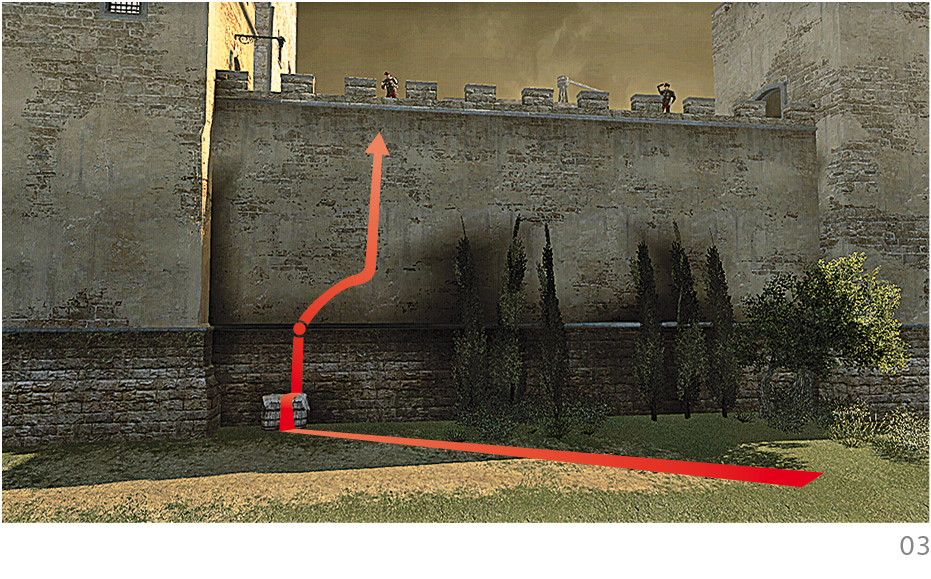
Figure 03
3: Blend with a group of civilians to safely pass the guards on the approach to the castle, then continue to walk until you pass the main entrance. Leave the Blend and approach the unguarded southwest wall. Wall run from on top of the barrels, then leap to the right to grab the wooden beam; now climb to the top of the ramparts and kill both sentries above with ledge assassinations (Fig. 3).
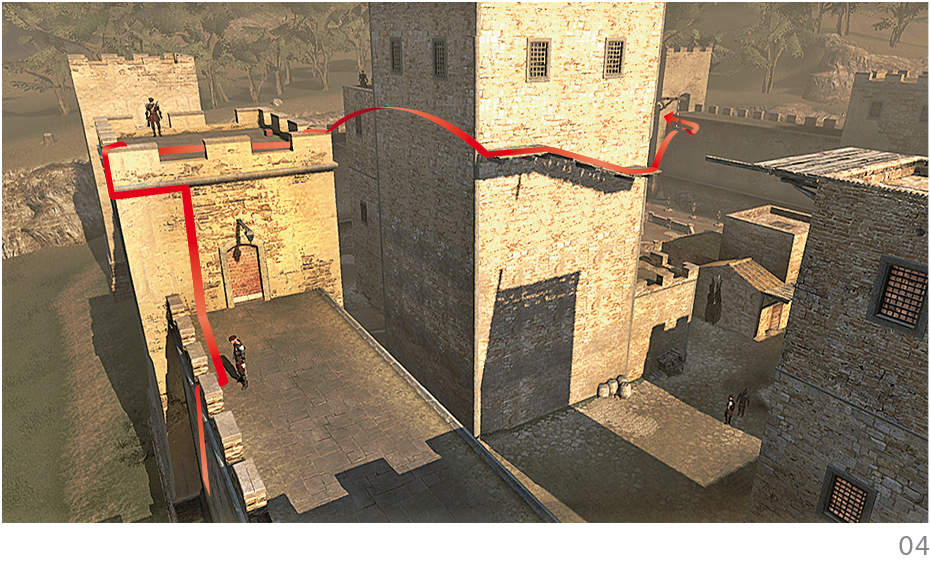
Figure 04
4: Wait until the sentry to the northeast faces away from Ezio, then scale the central tower on this wall (Fig. 4). Traverse to the outer face of the tower, then kill the Crossbowman above when he approaches the edge. Watch the sentry to the northeast again. When his back is turned, leap to the wooden platform on the side of the central tower. Align this jump carefully: it's only just within the limits of Ezio's capabilities. Run down the slope and swing around the corner; kill the guard below with a projectile, then quickly drop down and head through the waypoint and door. Climb the inner walls of the tower, then move outside through the opening near the top. When you reach the roof, operate the mechanism to send the guards plummeting to their doom. Finally, use the ladder to reach the waypoint.
BOMBER TIPS:
- Use the Movement Stick to control the Bomber, and the High Profile Button to fire its cannon.
- Unlike the Flying Machine used in Assassin's Creed II, the Bomber actually maintains altitude rather well – but only at the expense of speed. You can shoot the ground and swoop down over the resultant fire at any time to regain altitude and velocity.
- Guards stationed in towers will fire on Ezio throughout this set-piece. You can destroy their platforms with a single shot if they happen to be on the flight route, but it's just as easy to avoid them.
- During the first stage, pick a workshop (the targets marked on the map), then shoot it twice to destroy it. Swoop down over the fire to restore both altitude and momentum, then move on to the next objective.
- When you reach the second stage, shoot the construction carts before they reach the fortress. There are two checkpoints here, so it's more important to preserve the Full Synch requirement than to successfully destroy the targets.
- The final challenge is to shoot a mounted messenger. Aim ahead of him to score a successful hit. If he should move out of range, repeatedly shoot at the ground and swoop over fires to maximize speed during the pursuit.
Hell on Wheels
WAR PLANS:
The memory start position is located in the northern Campagna district. Climb onto the lower roof of the church in the marked area and face south. When the Templar Overseer walks beneath (use Eagle Vision to identify him), shoot him with the Pistol. If you move out of sight rapidly, you can avoid detection completely. Now run to the waypoint at Porta Settimiana.
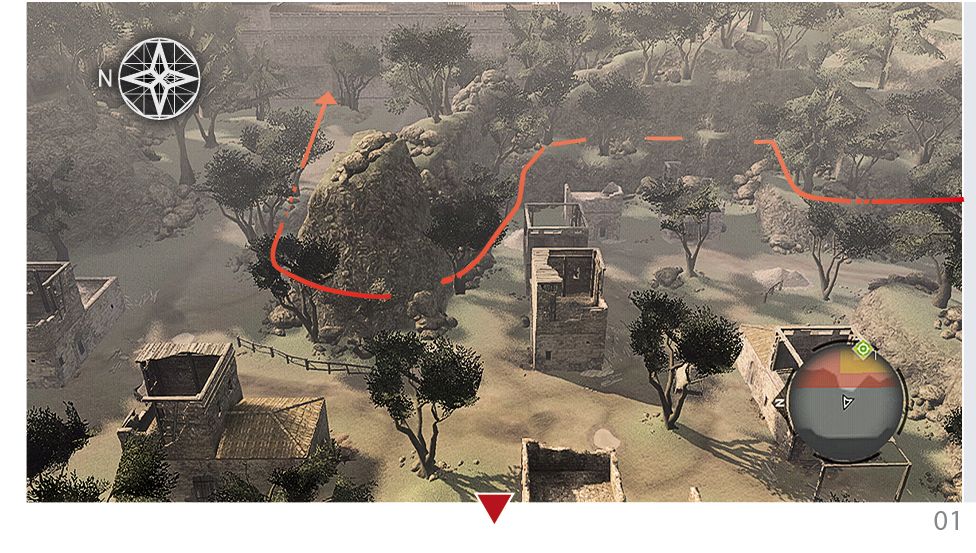
Figure 01
1: In the first part of this memory, Ezio must remain undetected as he follows the architect and his Brute bodyguard through an area teeming with soldiers. Though the arrangement of potential foes may seem intimidating, it's actually possible to take a short and direct route (Fig. 1). Stick to the rock face on Ezio's right and disable lone soldiers you pass with the Crossbow. When you emerge into the open after the initial group of buildings, calmly walk to the haystack and stealthily assassinate the nearby guard. Now Fast Walk around the corner to head east on the right-hand side of the rocky outcrop before Ezio arouses suspicion. Should a guard move to investigate him at this point, wait for him to draw near before you silence him, unseen, with the Crossbow.
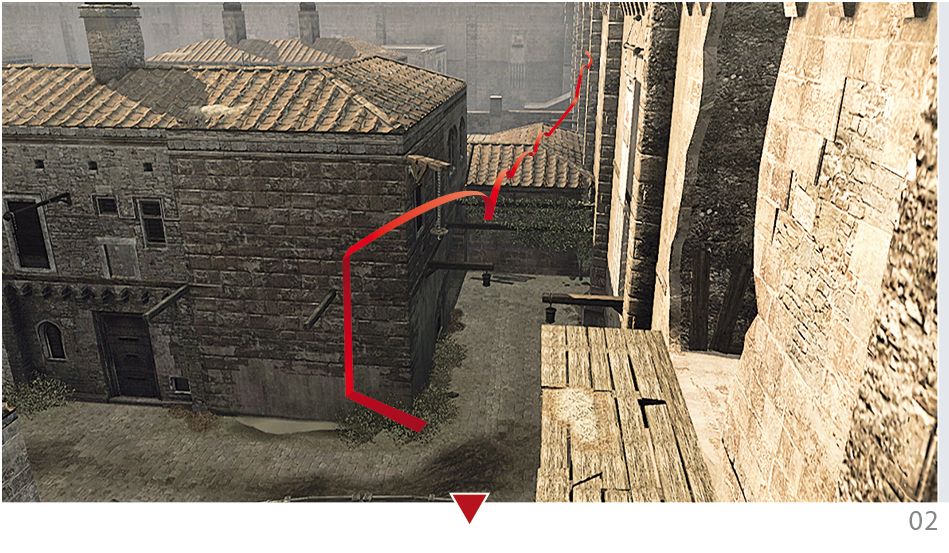
Figure 02
2: When you reach the gate, Fast Walk to the free run elements to the right until you pass out of view of the two guards. Swing around the corner and hop over the beams to reach a hole in the outside wall, then – while keeping Ezio out of sight – align the camera to reestablish contact with the architect before the timer expires. When the Brute departs, jump down and quickly beat up the architect. To reach the blueprints, climb onto the beam protruding from the house to the east, then swing around the corner; you can then free run over the path to avoid a guard below and reach the waypoint via the rooftops (Fig. 2).
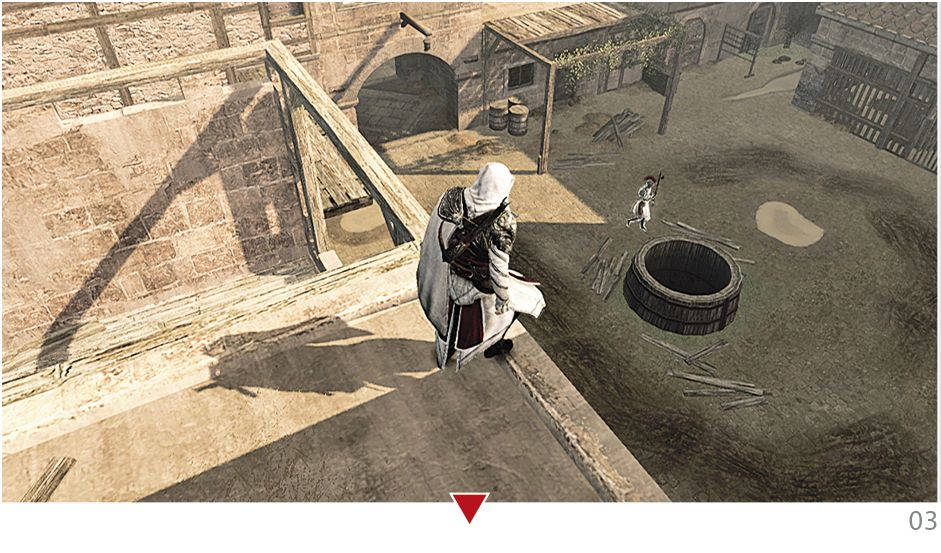
Figure 03
3: Climb the building to the north and carefully kill the two Crossbowmen on the rooftops. There is a Seeker who periodically checks the well outside the prison (Fig. 3), so wait for his arrival and kill him from above before you free the Mercenaries. There are two brawls to successfully negotiate after the cutscene. If possible, you can stand on the periphery of both encounters as the guards engage the escapees and pick off opponents with the Pistol or Crossbow.
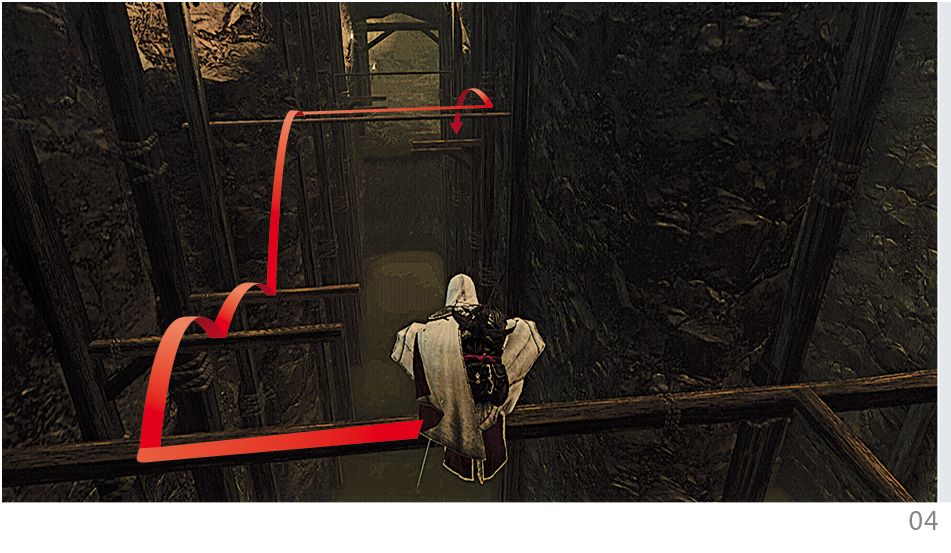
Figure 04
4: In the basement area, Ezio must reach and operate three levers to open up a route for the Mercenaries to follow. These are fairly straightforward free run courses, but there is one twist: you will find that shorter beams and poles in certain sections invite disastrous plunges into the depths below unless you carefully align specific jumps (Fig. 4). Note that there is a Treasure Chest in the corridor opened by the first lever. When you reach the bridge, climb the west wall, then Back Eject to the beams. Free run to the other side to lower the bridge, then walk into the waypoint to enter Da Vinci's final War Machine.
Tank Tips:
- Use the Movement Stick to move the Tank, and the High Profile Button to fire.
- Round each corner carefully to line up shots on targets. Strafe back in and out of cover to destroy cannons without sustaining damage.
- Shoot explosive barrels to disable nearby hostiles.
- When you encounter the first enemy Tank, circle it constantly in one direction to avoid its shots.
- After blasting through the gate leading to the final confrontation, destroy the Tank directly ahead. A second vehicle will attack from the northeast corner, so move to the south (right-hand side of the compound) to circle it as it approaches. Once this vehicle has been destroyed, a third will break free of a scaffold in the southeast of the compound.
Once all three War Machines have been destroyed, Da Vinci will automatically award Ezio with the Parachute on his return to Rome.
Assassination Missions
| Memory |
|---|
| Two's Company |
| Availability |
| Sequence 03 |
| Brief |
| An easy opening mission. Travel to the target markers and assassinate both individuals with the Hidden Blade. |
| Memory |
|---|
| Tactical Correction |
| Availability |
| Sequence 03 |
| Brief |
| Call a horse and canter to the target markers. Kill the mounted guard with a horse-to-horse assassination, then slay the remaining soldiers. |
| Memory |
|---|
| ...And Three's a Crowd |
| Availability |
| Sequence 03 |
| Brief |
| A short and simple assignment. Ensure that you have a full stock of Throwing Knives before you begin, then approach and kill each of the three Gunmen with a single projectile. Pick a route that sees you approach all three in a line to complete the Full Synch time condition. |
| Memory |
|---|
| Serf's Turf |
| Availability |
| Sequence 03 |
| Brief |
| Travel to the marked area and use Eagle Vision to identify the targets. Climb onto a roof by the three cantering around a field, then perform an air assassination as one passes. Chase down each remaining rider in turn and tap the Weapon Hand Button when you move within range to perform horse-to-horse assassinations. |
| Memory |
|---|
| The Three AMICI* |
| Availability |
| Sequence 05 |
| Brief |
| Ezio must slay Brute, Agile and Seeker instructors, then either escape or disable their trainees. |
| Full Synch Tips |
| Achieving successful Hidden Blade kills is a matter of approaching each target in the right way. Stay out of sight and watch the Agile carefully, then identify the best time to move in and strike before he or his trainees react. With the Seeker, run to the back of the stables, then hide in the well when his back is turned; assassinate him when he draws near. The Brute is the easiest of the three: just stride up behind him (avoiding his direct field of view) and execute him. |
| Memory |
|---|
| Red Letter Day |
| Availability |
| Sequence 05 |
| Brief |
| Kill the two designated targets. |
| Full Synch Tips |
| The timer begins as soon as the memory has been accepted. Sprint to the targets, approaching them via the road that leads to the east side of the plaza (next to the Spanish Steps). An immediate Arrow Storm order may slay both targets instantly. If you do not have sufficient Assassin Signals, adept use of the Hidden Blade and Smoke Bombs could also suffice. |
| Memory |
|---|
| The Merchant of Rome |
| Availability |
| Sequence 05 |
| Brief |
| The target stands in a small Restricted Area with guards stationed at the south and west entrances. Approach the south entrance and wait for the merchant to approach the two guards. Order a Guild Assassination on the sentries, then immediately draw the Crossbow or Throwing Knives to complete the mission before the merchant can flee. |
| Memory |
|---|
| Bearers of Bad News |
| Availability |
| Sequence 05 |
| Brief |
| Kill the six designated targets. |
| Full Synch Tips |
| There is a guard patrol that passes the archway to the north of the square; wait until these pass before you strike. Instantly dispatch the southernmost group (including the Agile) with the Flying Knives Special Attack, then kill the Agile in the second group. This will prevent him from running for reinforcements. Dispatch the remaining Brutes in any way you see fit. |
| Memory |
|---|
| Turning the Tables |
| Availability |
| Sequence 08 |
| Brief |
| Travel to the waypoint marker and kill all designated targets. |
| Full Synch Tips |
| As Seekers are vulnerable to the Disarm move, it's easy to grab a polearm and kill its former owner. Taunt one of the two Brutes to render him susceptible to a Disarm attempt. With the two Papal Guards, kill one of the pair, grab his weapon, then dispatch the second. |
| Memory |
|---|
| Brutes and BRUTALITY* |
| Availability |
| Sequence 08 |
| Brief |
| A thoroughly easy memory: just approach the Brutes, then call an Arrow Storm to kill them all instantaneously. |
| Memory |
|---|
| Graduation |
| Availability |
| Sequence 08 |
| Brief |
| The Papal Guards are located in the courtyard that Ezio passes through at the start of the Castello Crasher memory. Travel through Castel Sant'Angelo to reach it, then pick off all four targets from above with the Crossbow or Pistol. Should Papal Guards reach Ezio's position, call an Arrow Storm for an easy finish. |
| Memory |
|---|
| Cardinal Sin |
| Availability |
| Sequence 08 |
| Brief |
| Ezio must not be detected during this memory, so stealth is of utmost importance. Move through the streets of the Vaticano district, Blending with crowds and using benches to avoid guards as you travel to the search zone. Once you approach the plaza at the far east of the district, climb the last building to the south. Identify the Cardinal with Eagle Vision (he's close to the Herald below), then quickly execute him with a Crossbow bolt before he can march out of range. |
Courtesan Missions
| Memory |
|---|
| Property Dispute |
| Availability |
| Sequence 03 |
| Brief |
| Run to the waypoint marker and beat up Santino with Ezio's Fists before he can knock the Courtesan out. Pick the unconscious bully up, then avoid guard patrols as you carry him to the Pantheon's fountain. |
| Memory |
|---|
| Old Habits Die Hard |
| Availability |
| Sequence 03 |
| Brief |
| Locate Giuletta with Eagle Vision, then trail her from a safe distance. She's very suspicious: be ready to hide Ezio behind walls whenever she turns to check the path behind. |
| Full Synch Tips |
| When the target is revealed, sneak behind him and enter the well. Assassinate him with the Hidden Blade. |
|
Memory |
|
The Morning After |
|
Availability |
|
Sequence 03 |
|
Brief |
|
Follow the Courtesan. She will gesture to three targets during your journey. Ensure there are no nearby guard patrols, then switch to Ezio's fists and beat each one up in turn. Speak to the Courtesan to conclude the memory. |
|
Memory |
|
Running Scared |
|
Availability |
|
Sequence 05 |
|
Brief |
|
Approach Giuletta, then chase her to locate the Spanish ambassador. She will call for help as she flees, causing guards on the route to attack Ezio. When the target is revealed, kill him and become anonymous before you speak to the disgraced Courtesan. |
|
Full Synch Tips |
|
Use Smoke Bombs at choke points such as alleyways and archways to hold Ezio's pursuers at bay. When you reach the ambassador, kill him then climb onto the back of the Pantheon and perform a Leap of Faith into the haystack to become anonymous. |
|
Memory |
|
Malpractice |
|
Availability |
|
Sequence 05 |
|
Brief |
|
The time limit for this memory is extremely tight: Ezio must sneak up to Doctor Tommaso and pickpocket him, then escape and return to a position close to the Guild before it elapses. Use a horse. You can plan the most efficient route there and back by placing manual waypoint markers at the map screen. |
|
Memory |
|
Live Bait |
|
Availability |
|
Sequence 05 |
|
Brief |
|
Ezio must remain undetected throughout this mission, so stay out of sight or Blend to allay suspicion when you reach each target. Climb up and kill the first ambassador with a ledge assassination, then follow the guide via the rooftops for a short while to avoid any possible implication in the murder. Slay the second ambassador after the Courtesan lures him into a courtyard. For the final target, sit on the nearby bench, then perform a low profile assassination as he walks by. |
|
Memory |
|
Closing In |
|
Availability |
|
Sequence 05 |
|
Brief |
|
The ambassador is extremely twitchy; maintain your distance at all times. After passing the checkpoint, climb the outer wall of the Mausoleo di Augusto, then leap onto the raised area at its center. Drop down behind the target and sneak over to perform a Hidden Blade assassination. |
|
Memory |
|
Bad Politics |
|
Availability |
|
Sequence 06 |
|
Brief |
|
Follow the Courtesan on horseback until the targets are revealed. To cut the battle short and complete the Full Synch objective, just use an Arrow Storm to topple all aggressors immediately. |
|
Memory |
|
Troublemakers |
|
Availability |
|
Sequence 06 |
|
Brief |
|
When you near the target markers, climb to a rooftop to get a clear view of the guards below. Use the Arrow Storm ability to clear the initial group of guards, then hold off the waves of reinforcements until the timer expires. |
|
Full Synch Tips |
|
Bring a group of Mercenaries to the fight – you can hire these by renovating (or reassigning) a Guild Building to the northwest before you approach the captives. Use the Pistol or Crossbow to disable mounted opponents rapidly. |
|
Memory |
|
Ghostwriting |
|
Availability |
|
Sequence 06 |
|
Brief |
|
Pickpocket the courier, take the letter to the waypoint, then chase down the target one more time to return the letter – again, with the Pickpocket ability. |
|
Full Synch Tips |
|
Call a horse as soon as the memory begins, then canter along the clifftop in the direction of the courier. When you draw near, dismount and leap over the edge – Ezio will survive the fall, and you'll save precious seconds. You should also use a horse for the final two sections of the memory. |
Thief Missions
|
Memory |
|
Lost Pup |
|
Availability |
|
Sequence 03 |
|
Brief |
|
Mount a horse, then canter to the specified house; a manual waypoint on the main map will help you to find your way. Hire the Mercenaries when you arrive, then order them to attack the two nearby guards. Select the Pistol, then run to the east side of the house where Aldo faces a firing squad; swiftly kill a member of this group with a single shot to distract them and foil the execution. |
|
Memory |
|
A Clash of Interests |
|
Availability |
|
Sequence 03 |
|
Brief |
|
Using Ezio's Fists only, attack and knock each target out in turn. Counters can be employed for swift takedowns; in other instances, five-hit combos will suffice. Use the Kick move if an assailant dodges regularly. |
|
Memory |
|
Up to Speed |
|
Availability |
|
Sequence 03 |
|
Brief |
|
As befits the first of three Thief races, this is a fairly simple course. It appears within a Restricted Area if you have yet to clear the Borgia Tower here, but guards will not trouble you if you stick to the specified route. Each waypoint bubble contains an arrow that points to the next marker. Take the course steadily, and you should complete the Full Synch time on your first attempt. |
|
Memory |
|
Class Warfare |
|
Availability |
|
Sequence 06 |
|
Brief |
|
Locate and kill three bandits situated on rooftops in the marked areas. Each target will flee once identified with Eagle Vision or if Ezio approaches them. |
|
Full Synch Tips |
|
To kill each target with the Pistol without extended chases, climb a tall building on the periphery of the search zone and identify them beforehand. Examine the architecture around them, and try to approach from higher ground, increasing the likelihood of a clear shot from the start of the pursuit. |
|
Memory |
|
Pointing Fingers |
|
Availability |
|
Sequence 06 |
|
Brief |
|
Galvano can be found on a rooftop at the first waypoint marker. Use the Lift to ascend to his level, then kill the target stealthily. Loot his body to obtain the evidence, hurl it to the streets below when prompted, then find Vincenzo. Approach him from behind and tap the Legs Button to plant the incriminating material. |
|
Memory |
|
Eye on the Prize |
|
Availability |
|
Sequence 06 |
|
Brief |
|
The documents are located in a courtyard inside a small Restricted Area, with guards blocking all entrances. Loot the container to obtain them, then return to a Thief at a final waypoint marker. |
|
Full Synch Tips |
|
Climb the building at the east side of the Restricted Area and kill all Crossbowmen in the vicinity. Watch the courtyard closely. A patrol will periodically enter to examine the container. When they depart, there is approximately one minute for Ezio to descend quietly, open the chest and climb back up. |
|
Memory |
|
Young at Heart |
|
Availability |
|
Sequence 06 |
|
Brief |
|
This is a demanding rooftop checkpoint race with a complicated course and a surfeit of aggressive Crossbowmen. Only practice will make perfect: expect to replay this at least a few times as you learn the optimum route. |
|
Full Synch Tips |
|
Use Guild Assassinations and Throwing Knives to deal with Crossbowmen while you learn the course; a timely Arrow Storm could also work. Other than that, the only way to achieve Full Synch is through dedication and repetition. |
|
Memory |
|
Downsizing |
|
Availability |
|
Sequence 07 |
|
Brief |
|
Follow the Thief on the free run course over the rooftops. You can kill any sentries you encounter with the Crossbow, though – with a little luck – it's usually possible to run straight past. If you drop to the streets, follow him at ground level. At the final waypoint, kill all hostiles and become anonymous to end the memory. |
|
Full Synch Tips |
|
When he turns on Ezio, kill the Thief with a Hidden Blade assassination (or a Counter or Execution if you cannot reach him before he enters combat). |
|
Memory |
|
A Blanket Finish |
|
Availability |
|
Sequence 07 |
|
Brief |
|
After you reach the first waypoint, canter in pursuit of the riders. Cut corners to close in on them, then perform horse-to-horse assassinations when you draw level. The third leader will leave the Circo Massimo and set off on a route that makes him extremely hard to catch. If you cannot assassinate him in time, other gang members will join him in attacking Ezio at a predetermined location. Ensure that you use a Hidden Blade assassination, Counter Kill or Execution on the final target to achieve Full Synch. |
|
Memory |
|
For the Fans |
|
Availability |
|
Sequence 07 |
|
Brief |
|
This checkpoint race is much less difficult than the Young at Heart memory played earlier. After dropping to the lower level of the Colosseum, Ezio must travel through waypoints en route to the Leap of Faith position far above. |
|
Full Synch Tips |
|
Reaching the first checkpoint is much easier if you have completed all four War Machines memories and have the Parachute for a measured descent. If not, use Drop and Catch Back on the outer Colosseum wall. |
Templar Agents
|
Memory |
|
Down to Earth |
|
Availability |
|
Sequence 06 |
|
Brief |
|
Lanz can be found in the southwest corner of the highlighted zone. Approach his position from the south and climb up. When he runs, stay close until he reaches a rooftop, then strike with a Hidden Blade assassination. |
|
Memory |
|
Counter-Propaganda |
|
Availability |
|
Sequence 06 |
|
Brief |
|
You can tear down each piece of propaganda as if it were a wanted poster. When you reach Porta Flaminia, kill the browsing guards before you remove the poster. Oberlin will run out to attack with his guards. |
|
Full Synch Tips |
|
Dispatch Oberlin with a Hidden Blade Counter Kill or Execution. |
|
Memory |
|
Excommunication |
|
Availability |
|
Sequence 07 |
|
Brief |
|
When you arrive at the search zone, use the Lift on the west side of the buildings to reach the rooftop. Activate Eagle Vision to identify Brother Ristoro in the enclosed courtyard below, then perform an air assassination once he moves into view. |
|
Memory |
|
Firing Line |
|
Availability |
|
Sequence 06 |
|
Brief |
|
Sprint parallel to Gaspar de la Croix, using the posts to cross the lake and avoid all guards. Swim to the nearby Lift to reach his position rapidly. Finish him with a Hidden Blade kill to complete the memory. |
|
Memory |
|
Red-Handed |
|
Availability |
|
Sequence 07 |
|
Brief |
|
Lia de Russo is located next to the Tunnel Entrance in the highlighted search zone. She will run if she spots Ezio, or if he identifies her with Eagle Vision. If you stealthily climb to the arch above her position, though, it's possible to perform a Hidden Blade assassination within seconds of the chase commencing. |
|
Memory |
|
The Ringer |
|
Availability |
|
Sequence 06 |
|
Brief |
|
Call a horse after this memory begins. On arrival at the Circo Massimo, canter over to Mancini and perform a horse-to-horse assassination before he can react. |
|
Full Synch Tips |
|
To become anonymous should mounted guards give chase, canter for the Tiber. Dive in and swim to the far bank to end the memory. |
Cristina Memories
|
Memory |
|
A Second Chance |
|
Availability |
|
15% Total Synch |
|
Brief |
|
Tail Cristina from a safe distance, taking refuge behind walls or other obstructions whenever she turns. There are no sentries, so you can take to the rooftops if you like. Beat up Vieri with a flurry of punches after the cutscene outside Casa di Vespucci. |
|
Memory |
|
Last Rites |
|
Availability |
|
30% Total Synch |
|
Brief |
|
Beat up the guard at the waypoint, then proceed to the next marker. After the cutscene ends, climb the nearby ladder and perform a Leap of Faith into the leaf-filled cart to the south. While carefully avoiding the guard patrols, carry and place Federico, Giovanni and Petruccio on the boat. |
|
Memory |
|
Best Man |
|
Availability |
|
45% Total Synch |
|
Brief |
|
Run to the waypoint before the timer expires, then kill Manfredo's attackers. Concentrate on protecting Cristina's fiancé from a watery death as a priority, as a few blows can land him in the river. |
|
Memory |
|
Persona Non Grata |
|
Availability |
|
60% Total Synch |
|
Brief |
|
Locate Cristina with Eagle Vision at the Squero di San Trovaso. Detection will result in Desynchronization, so stay out of her field of view. Sneak up behind Cristina and press the Legs Button to plant the letter, then head to the new waypoint. |
|
Memory |
|
Love's Labour's Lost |
|
Availability |
|
75% Total Synch |
|
Brief |
|
Race to the waypoint, then try to kill a few of the marked assailants before Cristina flees. As you give chase, use Smoke Bombs to deter any other guards that attempt to engage Ezio, and employ Throwing Knives or assassinations to cut down any remaining targets. |
Copernico Memories
Note: These free DLC side quests are exclusive to the PS3 version of Assassin's Creed Brotherhood.
|
Memory |
|
False Censorship |
|
Availability |
|
Sequence 03 |
|
Brief |
|
Defend Copernico against waves of guards until the timer expires. |
|
Full Synch Tips |
|
Disarm a Seeker to obtain his polearm, and you can dispatch all enemies with careful Counter Kills – even branching into Execution Streaks if you feel sufficiently confident. If you use the Replay Memory feature after Sequence 04, calling Assassins into the fray makes the battle exponentially easier. |
|
Memory |
|
Out of Orbit |
|
Availability |
|
Sequence 03 |
|
Brief |
|
Lead Copernico to the waypoint, protecting him from guard attacks. |
|
Full Synch Tips |
|
Use every trick at your disposal to dispatch assailants swiftly: the Flying Knives Special Attack and Crossbow work particularly well. If you play (or replay) during a later Sequence, Guild Assassinations are a blessing; Smoke Bombs can also be employed to disable the initial groups for quick Hidden Blade assassinations. |
|
Memory |
|
Intelligentsia* |
|
Availability |
|
Sequence 03 |
|
Brief |
|
Deliver a letter to a scholar. Use Eagle Vision to identify him; he can be found by a monument just southeast of a Blacksmith on the west side of the search zone. |
|
Full Synch Tips |
|
Call a horse and canter to the search zone; use manual waypoints to plot a direct path. |
|
Memory |
|
Honorary Degree* |
|
Availability |
|
Sequence 03 |
|
Brief |
|
Reach the waypoint marker and deliver the letter. When the scholar is killed, try to target and shoot his murderer immediately; if you miss, take to the rooftops and chase down his assassin. Use projectiles (or, if available, a Guild Assassination) to cut the pursuit short. |
|
Full Synch Tips |
|
Use manual waypoints and a horse to beat the time limit. |
|
Memory |
|
Expedited Post* |
|
Availability |
|
Sequence 03 |
|
Brief |
|
Ezio must deliver messages to three separate individuals. The second of these is the most difficult to find; he's standing on a mezzanine above the alley below. |
|
Full Synch Tips |
|
Route planning, practice and a trusty steed are all prerequisites for Full Synch. |
|
Memory |
|
Man in Red |
|
Availability |
|
Sequence 03 |
|
Brief |
|
Identify the Cardinal on the Ponte Sant'Angelo with Eagle Vision, then Blend with a group or sit on the nearby bench to avoid detection as he approaches. Stay far out of sight while trailing him: he's highly suspicious, and the route is littered with Harassers. |
|
Full Synch Tips |
|
Sitting Ducks begins immediately after the completion of this memory. |
|
Memory |
|
Sitting Ducks |
|
Availability |
|
Sequence 03 |
|
Brief |
|
Locate and assassinate six targets in the Centro district. |
|
Full Synch Tips |
|
Killing the six targets within the tight time limit is a question of knowing where they can be found, and choosing the correct approach. Use of the Crossbow to perform kills on Agiles and a horse to canter between each search zone are both essential. If you play (or replay) this memory once the Assassins Guild is available, an Arrow Storm will enable you to curtail any unwanted hostilities with patrols.
|
|
Memory |
|
Close the Book |
|
Availability |
|
Sequence 03 |
|
Brief |
|
The Master of the Sacred Palace can be found strolling through the streets of the Centro district. As you near his position, climb to the rooftops. You can then finish with an air assassination. After escaping the area, head to the next waypoint. When guards attack, run straight past to Copernico's position and pick them off with Crossbow bolts as they approach. Watch carefully for the arrival of the assassin commissioned to murder Copernico. A single well-placed shot is sufficient to dispatch him. |
* The Intelligentsia, Honorary Degree and Expedited Post memories can be completed in any order.
Borgia Towers
Pietro da Siena
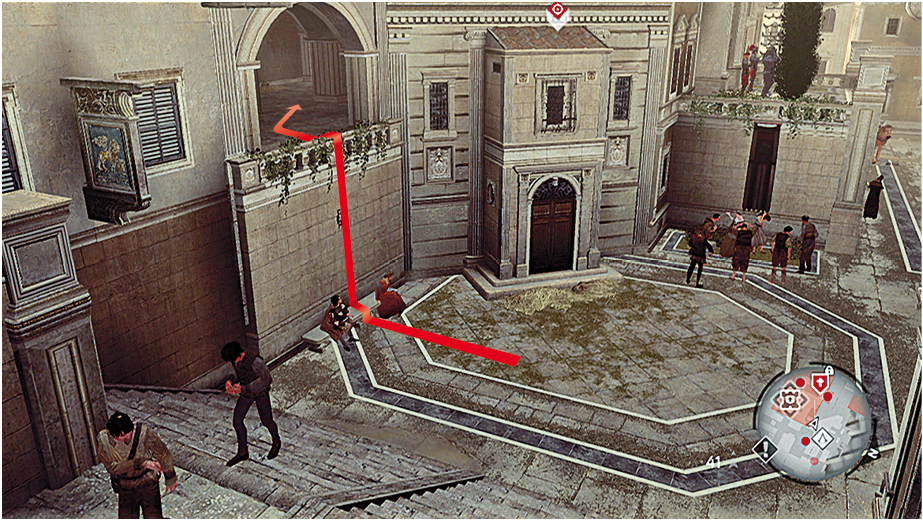
Figure 01
- The cowardly Pietro da Siena is under cover and surrounded by bodyguards. There is an unguarded opening above a bench in the northeast corner of the Restricted Area, not far from the Ponte Sant'Angelo (Fig. 1).
- After climbing into the room sneak over to Da Siena's position, using the columns as cover. You can now either slay the Captain with a Guild Assassination (though you may well need to assist your recruits in the conflict that ensues), or disable his guards with a Smoke Bomb before delivering a more personal coup de grâce. His escape point is mere seconds away, so there's absolutely no margin for error.
DOMENICO da Padova
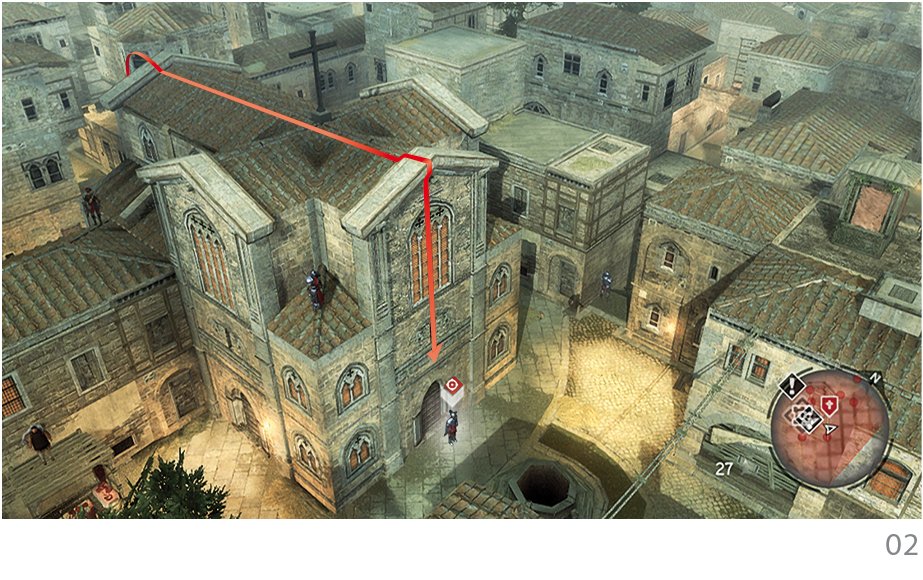
Figure 02
- The craven Da Padova is stationed in front of the main door at Santi Apostoli.
- Approach the Restricted Area from the west and, avoiding patrols, climb the back of Santi Apostoli to reach the upper roof (Fig. 2). Killing the Crossbowmen is optional: you can actually run to the ledge above the front entrance to the east and perform an immediate air assassination.
Belardino da Verona
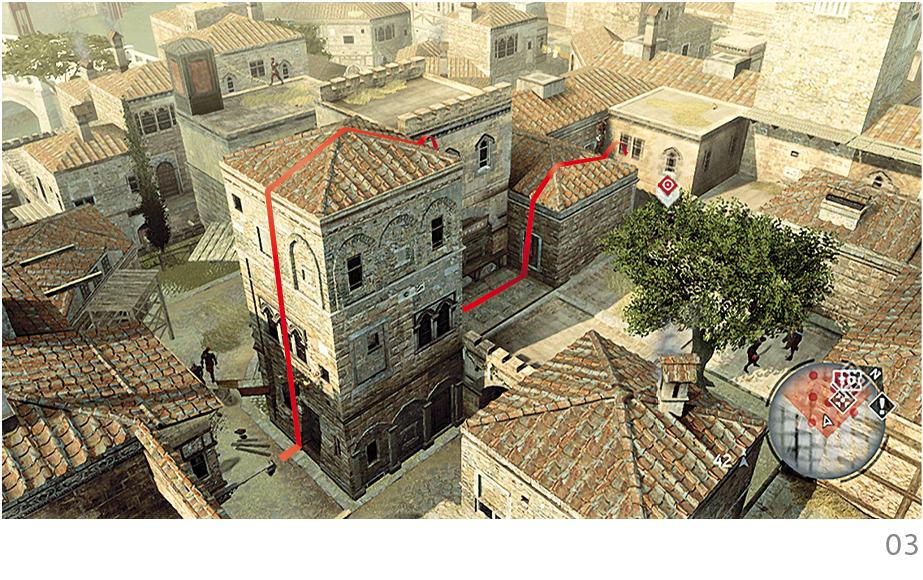
Figure 03
- Belardino will stand and fight, so a direct assault on his territory is possible if you prefer.
- For a less dangerous kill, approach the Restricted Area from the south. Climb onto a roof, disable nearby Crossbowmen, then approach a small gap in the rooftops to the north with a pile of hay below (Fig. 3). Drop into this from a ledge when the coast is clear; leap out to assassinate the Borgia Captain as he moves within range. Drop a Smoke Bomb to incapacitate his bodyguards afterwards, and you should find that you can return to the rooftops and begin the tower climb with no further combat.
Valentino da Siena
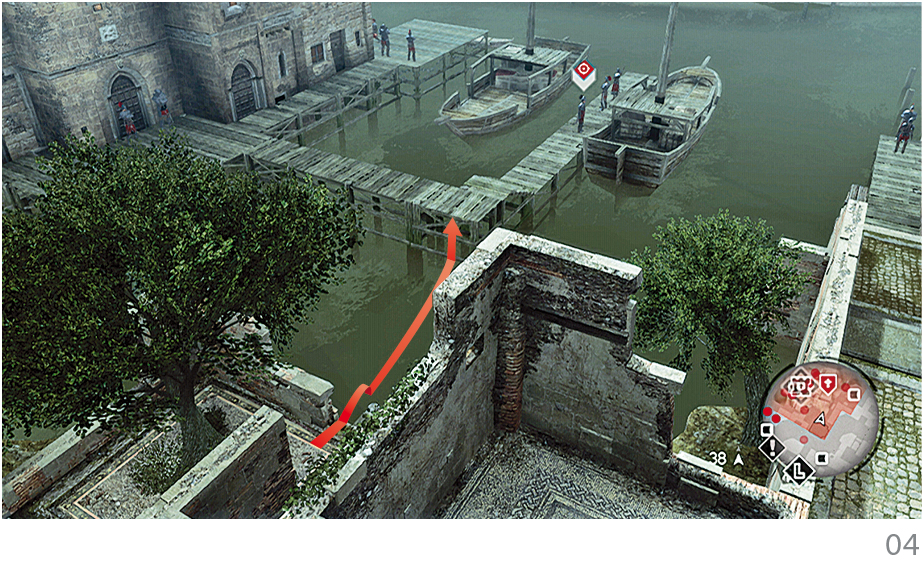
Figure 04
- Valentino patrols the boardwalks near the river, and will flee to escape via a nearby door if alerted to Ezio's presence. We strongly advise that you do not use Assassins in this area: falling into water will kill them instantly.
- There are a number of ways to approach Valentino's position, but the most reliable strategy is to enter the Restricted Area via an alley in the northwest corner. Kill the nearby Crossbowman, then watch the Borgia Captain's patrol route. When he walks over to the left-hand boardwalk, dive into the water and swim to a secluded position (Fig. 4). Climb up to hang from the ledge as he draws near, then use a ledge assassination.
Francesco DA VELLETRI
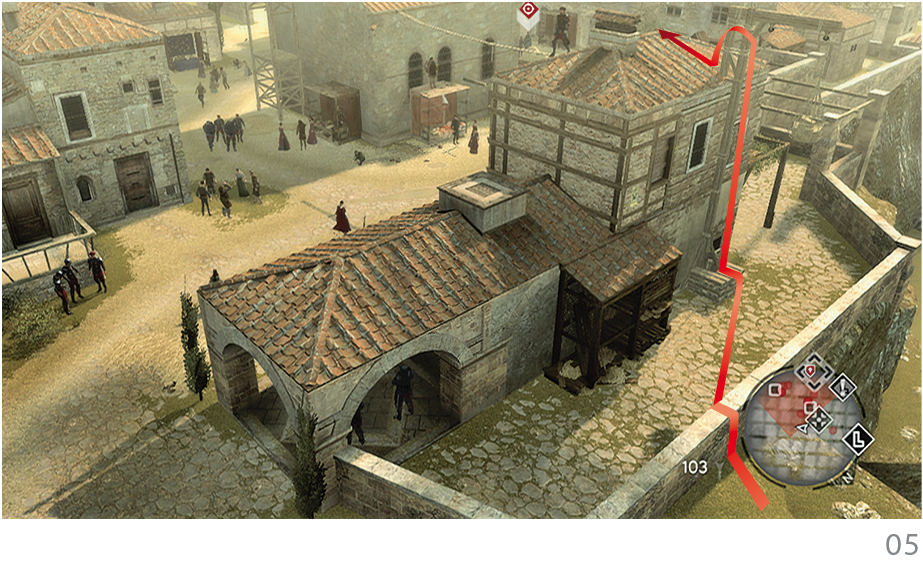
Figure 05
- Francesco da Velletri will fight Ezio if confronted, but a stealth attack will negate any need for a brawl.
- Approach the northeast corner of the Restricted Area and climb the tallest part of the building (Fig. 5). Don't use the lift: instead, scale the wall and perform a ledge assassination to dispose of the Crossbowman. You can now either wait for Da Velletri to walk beneath or move over to the church in the center of the area. An Arrow Storm is the quickest way to kill the Captain and reach the tower, though you can use an air assassination if you do not have sufficient Assassin Signals.
Antonio da Fiorentino
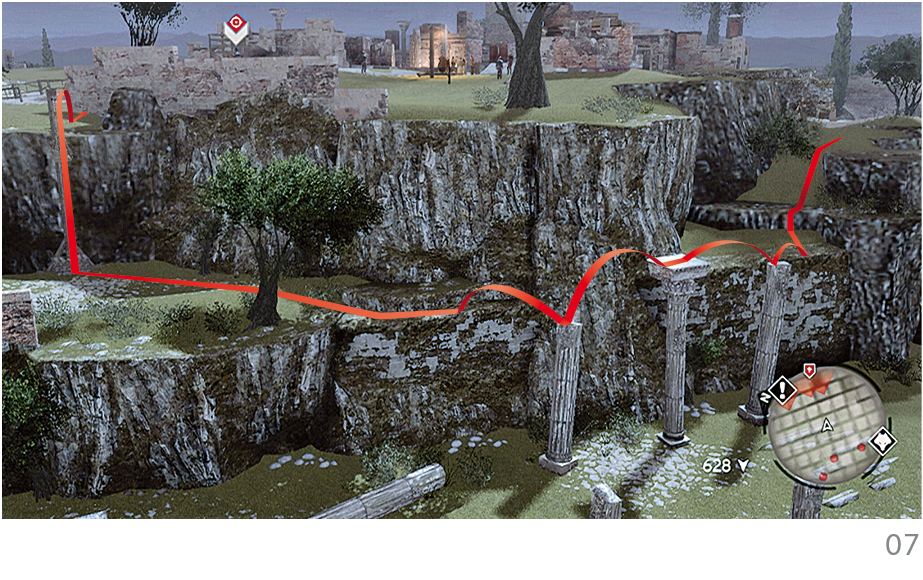
Figure 06
- This Borgia Tower is inaccessible until the beginning of Sequence 06.
- Approach the west side of the Restricted Area and watch the movements of the Borgia Captain on the tower. When he moves to the east side of the structure, climb the nearby building and wait on the ledge beneath the wooden platform (Fig. 6). When Da Fiorentino presents his back to Ezio, stride behind him and perform a silent assassination.
FERDINANDO di Napoli
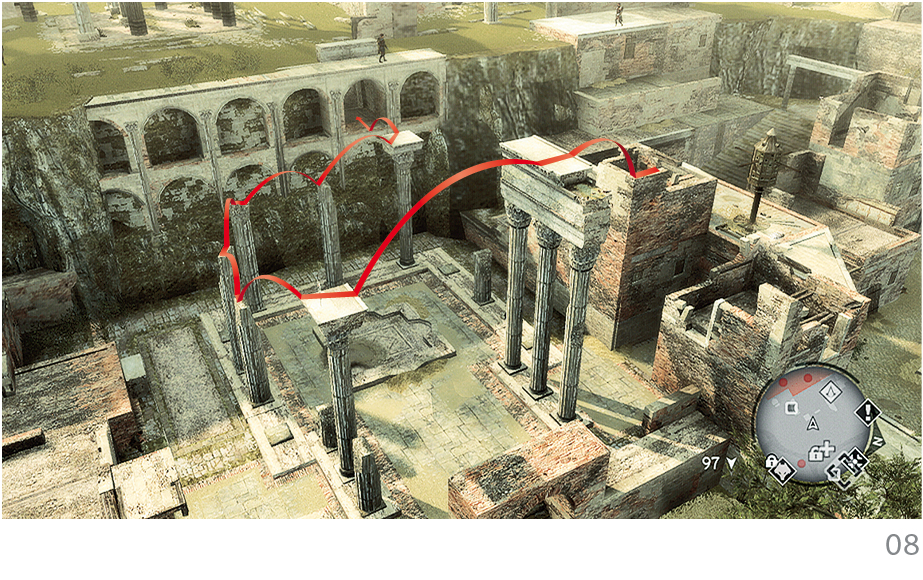
Figure 07
- This Borgia Tower is inaccessible until Sequence 06.
- Ferdinando patrols the outer edge of his territory on horseback. Approach from the south or west, and you can perform an Arrow Storm for an easy kill. Cantering behind him for a horse-to-horse assassination is an alternative strategy of note.
- The tower is heavily defended at its base. Be sure to disable sentries in the vicinity before you scale its walls to ignite it. You will need to employ the Drop and Catch Back techniques midway through the climb when you reach the east face if you do not have the Climb Leap Glove.
TOMMASO di Viterbo
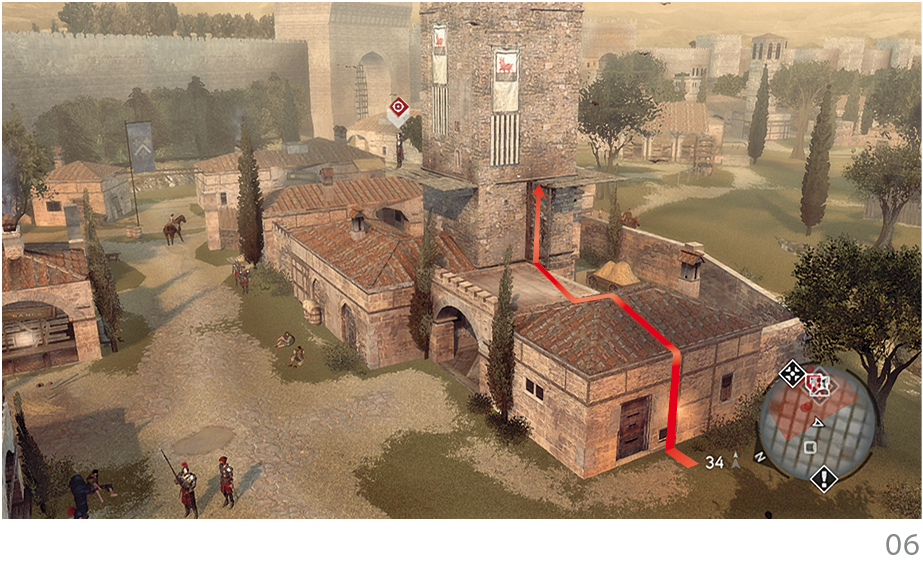
Figure 08
- The fainthearted Tommaso is easy to apprehend if you approach him from a particular direction. Begin at the southeast corner of the large Restricted Area, and move west until you reach a sloped path. Follow this (disabling the group of guards if necessary as you pass them) until the path turns right. Continue west to reach a cliff edge overlooking a selection of ruined pillars, then use these to reach an otherwise inaccessible ledge to the north (Fig. 7).
- Use the nearby Lift to scale the cliff edge rapidly, then take cover behind the wall and observe the Borgia Captain. As he approaches Ezio's position, hang from the outside of the wall; once within range, climb up and perform an air assassination before cantering to the tower.
Prospero da Siena
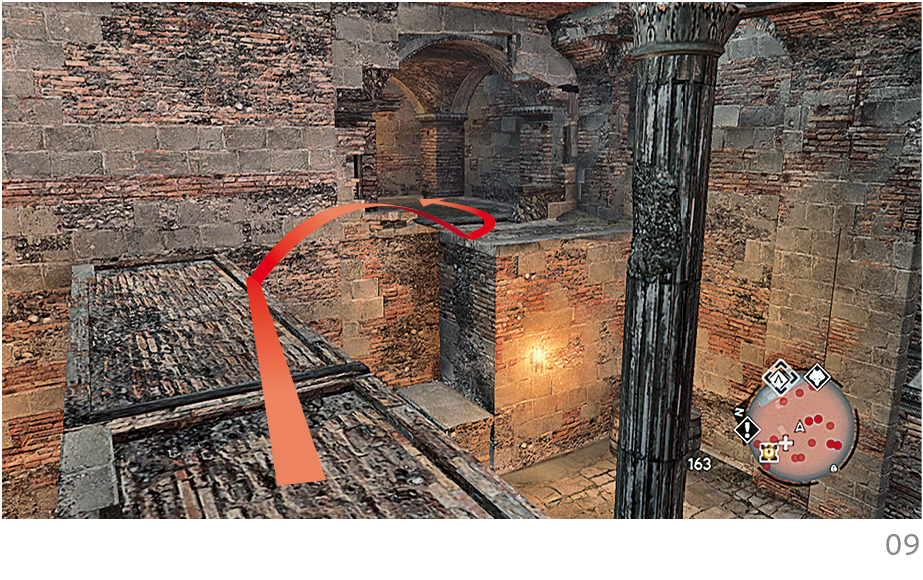
Figure 09
- This Borgia Captain is located in a network of underground corridors. He's cowardly and difficult to reach, so ensure that you're prepared before you enter. Three Smoke Bombs, full Crossbow ammunition and at least one Assassin Signal are all essential provisions.
- To infiltrate his bolthole with a minimum of combat, use the columns close to the east corner of the Restricted Area to reach a secret entrance (Fig. 8). When you jump from the highest platform, hold the Empty Hand Button to grab the tip of the column with a Borgia Flag on top of it. If necessary, kill the Crossbowmen on the cliff above from distance as you approach the entrance.
- Run straight ahead until you reach a guard with his back turned. Dispatch him with a Crossbow bolt, then drop down to the lower level. Incapacitate the two guards with a Smoke Bomb before they can react, then kill both immediately.
- Prospero is located just beyond these two soldiers. Use another Smoke Bomb to disable the pair of guards closer to him, then instantly order a Guild Assassination on the Captain. Run in to perform a Hidden Blade kill to be doubly sure.
- The room where Prospero is located has a hole in the upper wall (Fig. 9). This leads to a storeroom where the Armor and Dagger of Brutus are locked away. Complete all five optional Followers Lairs, and you can return here to collect these prizes at a later date.
IPPOLITO di Foligno
- This Borgia Tower is inaccessible until Sequence 07.
- On arrival, kill Crossbowmen and Gunmen on the rooftops near the base of the tower, then climb to the top. Kill the Borgia Captain with a ledge assassination.
Leaving the Animus
You can select the Leave Animus option in the Animus Desktop Pause menu at any point between Sequence 02 and the end of the Pax Romana memory in Sequence 09 to return to modern-day Monteriggioni. Doing so will enable you to view interactions between Desmond and his Assassin cohorts, view emails and embark on a scavenger hunt outside the Sanctuary.
Optional Conversations
Returning to the present after certain milestones unlocks conversations between Desmond, Lucy, Rebecca and Shaun. The accompanying table details when these are available.

|
# |
Unlock Conditions |
|
1 |
Available after Desmond interferes with Monteriggioni's power grid. |
|
2 |
Reach Sequence 02. |
|
3 |
Reach Sequence 04. |
|
4 |
Reach Sequence 05. |
|
5 |
Reach Sequence 08. |
Emails
If you exit the Animus between Sequence 02 and the end of the Pax Romana memory, you can use the vacant computer in the Sanctuary to view assorted emails sent between Lucy, Rebecca and Shaun – plus a few messages sent by tantalizingly mysterious outside parties. You can only access Desmond's account at first, but a later message supplies him with passwords to snoop on his companions' emails.
Scavenger Hunt
If you leave the Sanctuary, Lucy will give Desmond a strict curfew for a walk in Monteriggioni. You can use this time to find five special artifacts in locations around the town. Once collected, these appear as souvenirs on the shelves to the left of the computer where Desmond can access his emails (Fig. 10).
|
Artifact |
Location |
|
Maria's Feather Chest |
Upper roof of Villa Auditore |
|
Ezio's Belt |
On top of the lower roof in the southwest corner of Monteriggioni |
|
Medici Cape |
Inside the church, to the east of Monteriggioni's main street |
|
Mario's Sword |
Under a tree, to the west of Monteriggioni's main street |
|
Claudia's Record Book |
Mario's study, inside Villa Auditore – just to the right of the rear door as you enter from outside |
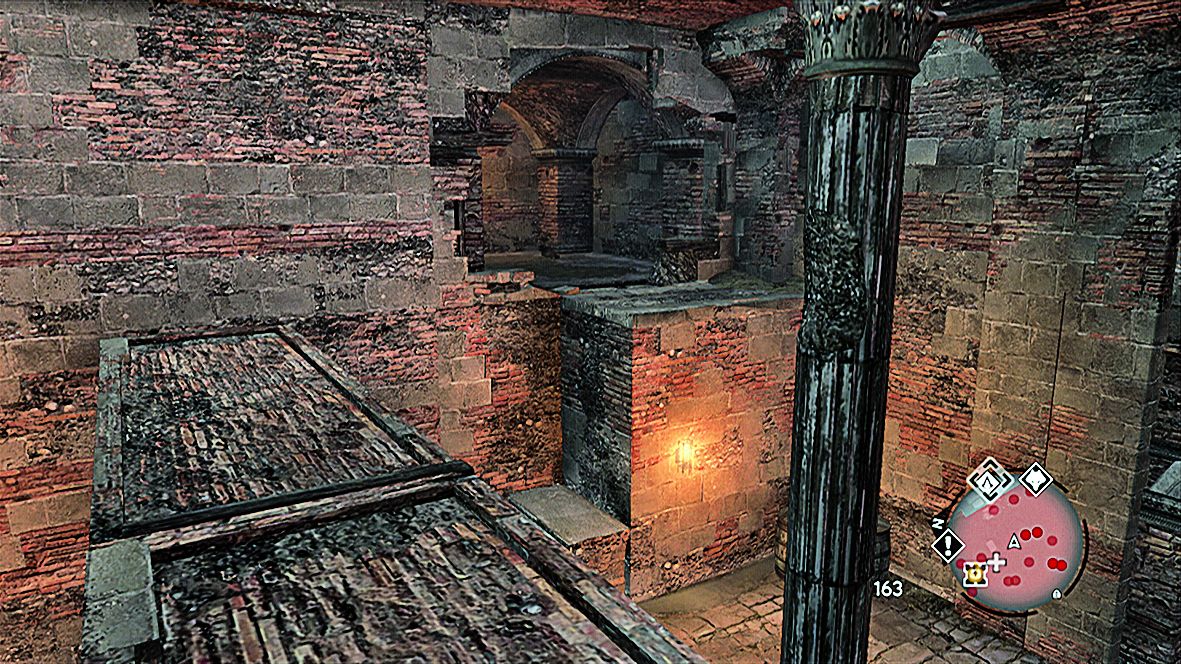
Figure 10
Virtual Training
You can tackle Virtual Training exercises at any time that Ezio is not directly engaged in a memory by selecting the corresponding option in the Animus Desktop Pause menu. Though some are certainly tough, playing main story memories and side quests will provide the practice and experience you need to complete them. Obtaining a Bronze Medal in every challenge unlocks the Raiden outfit, which can be equipped at the Inventory menu.
Fight Ring
After renovating the Mercenaries HQ in Sequence 03, Ezio can partake in unarmed brawls in the Barracks basement. If you have a knack for fist fights, this minigame can be a fantastically simple way to raise funds during the early stages of the story.
- Before you worry about placing wagers, unlock the four higher fight levels. Try to get a feel for the pace of the brawls. With unarmed combat, tapping the Weapon Hand Button with a measured rhythm leads to more instant takedowns than frantic bashing. Counter Kills may not always succeed, but they're always better than sustaining damage, and could well offer an instantaneous finish. We found that the best strategy is to pick a single target and pummel him with combos, only stopping to attempt Counter Kills when other Mercenaries attack. Mixing kicks in with flurries of punches can be surprisingly effective.
- At higher levels, certain Mercenaries will throw sand at Ezio to stun him. You can prevent this with a punch, or evade with a well-timed Dodge. With the fleet-footed Mercenary who seems to sidestep Ezio's every attack in the most difficult bout, wait for him to attempt to throw sand to break his guard.
-
Place a maximum bet on the most challenging fight, and you can earn approximately
650 florins per minute. If you're keen to get started with Rome renovations, or have a hankering for expensive equipment, mastery of the fight ring can supply funds for purchases that might otherwise remain out of reach until later in the story.
Guild Challenges
You can view your progress in all four sets of Guild Challenges in the DNA Menu. The majority of these tasks are self-explanatory, but there are a few that warrant further advice or suggestions.

Mercenaries Guild
- These challenges are unlocked during Sequence 03. The completion reward is Bartolomeo's Axe.
- Wooden scaffolds are dotted around the city. You can kill guards instantly by hurling them into these after performing the Grab move. If you travel to the Art Merchant just south of the Pantheon, you will find a scaffold and a group of guards a short walk to the east (Fig. 11).
- If you are struggling to hit your quota of Papal Guards, a group of four appear at the plaza to the left of the main Castel Sant'Angelo entrance during later Sequences.

Courtesans Guild
- Courtesan challenges are unlocked during Sequence 03. The completion reward is Maria's Dagger.
- A "guard post" is any position where soldiers stand with their arms crossed, usually blocking an entrance. These can often be found in Borgia Zones. If you need to complete this challenge later in the story, replay the French Kiss memory in Sequence 06. You can find numerous guards of this type in the French army camps.
- Use the "Hijack" ability to commander a mounted guard's horse without killing him. This is easier to perform while anonymous. To be doubly efficient, try to return to anonymous status by using hiding spots to complete the "Enemies evaded using the crowd and other hide spots" challenge at the same time.

Thieves Guild
- These challenges are unlocked during Sequence 03. The completion reward is La Volpe's Bite.
- For the two "beam"-related challenges, search for suitable wooden beams that either have guard patrols passing beneath, or offer an easy approach route that a mounted Ezio can canter towards. Tap the Legs Button to stand on the horse then hold the High Profile and Legs Buttons to leap to an overhead beam.
- You can complete the dive challenge by leaping from the tower close to the Barracks into the water below. Don't forget to press the Legs Button at the start of the jump.

Assassins Guild
- These challenges are unlocked during Sequence 04. The final reward is the Sword of Altaïr.
- Completing these challenges is a simple matter of using recruits regularly in combat.
Shop Quests
- Certain vendors on Tiber Island offer special Shop Quests where, in return for specific Trade Items, they will supply Ezio with a valuable reward. In the accompanying table, we reveal how to obtain the objects they require.
- The "Unique Contract" column refers to special Assassins Guild assignments. These offer a single Trade Item in addition to the standard payment in XP and florins.
- Borgia Couriers, Pickpockets, Wolfmen and Bandits all yield Trade Items when caught or looted after combat. The "Loot" column reveals which of these may relinquish an object you need. While they will always drop something, the probability of obtaining a specific Trade Item is rather low (3% to 13%).
- Trade Items can be found in Treasure Chests both in Rome and in Secret Locations.
Where/How to obtain
|
Shop Quest |
Trade Item |
Unique Contract |
Loot |
Treasure Chest: Rome |
Treasure Chest: Secret Locations |
|
Faith |
Terracotta Pot (x3) |
Exodus |
- |
Antico, Centro, Campagna |
Wolves Among the Dead, Thrown to the Wolves |
|
Totem (x2) |
Destructive Criticism |
Pickpocket |
Antico, Centro, Campagna |
- |
|
|
Buddhist Prayer Beads (x2) |
On the Trail |
- |
Antico, Centro, Campagna |
Thrown to the Wolves, A Wolf in Sheep's Clothing |
|
|
Exotica |
Shrunken Head (x2) |
- |
- |
Antico |
The Sixth Day |
|
Elephant Ivory (x3) |
Closure |
- |
Antico, Centro |
Wolves Among the Dead, The Halls of Nero |
|
|
Indian Diamond (x3) |
Star Chamber |
Borgia Courier, Bandit, Wolfman |
Campagna, Antico |
Wolves Among the Dead |
|
|
Blood Money |
Vlad the Impaler Coins (x7) |
Scapegoats & Dousing Fires |
Borgia Courier, Bandit, Wolfman |
Campagna, Vaticano |
Wolves Among the Dead, Shopaholic* |
|
Pulling Threads |
Silk (x8) |
Gone Silent |
Pickpocket |
Antico, Campagna, Vaticano |
Wolves Among the Dead, Thrown to the Wolves |
|
Cardinal's Purple Dye (x5) |
Man Down |
Borgia Courier, Bandit, Wolfman |
Centro |
Thrown to the Wolves, Leader of the Pack, A Wolf in Sheep's Clothing |
|
|
Trendsetting |
Pomander (x2) |
My Enemy's Enemy |
Pickpocket |
Centro, Campagna |
A Wolf in Sheep's Clothing |
|
Ambergris (x3) |
Picking up the Pieces |
Borgia Courier, Bandit, Wolfman |
Centro, Antico, Vaticano |
Liquid Gold* |
|
|
Papaver Silvaticum (x1) |
- |
Borgia Courier |
Antico |
The Sixth Day, Leader of the Pack, Shopaholic* |
|
|
Venomous |
Tomatoes (x5) |
- |
Pickpocket |
Antico, Centro, Campagna |
The Halls of Nero |
|
Nutmeg (x3) |
- |
Pickpocket |
Centro, Antico |
- |
|
|
Aconite (x2) |
- |
Borgia Courier |
- |
- |
* The Shopaholic and Liquid Gold Templar Lairs only appear in special limited edition versions of Assassin's Creed Brotherhood.