Assassin's Creed: Brotherhood Guide Walkthrough Side Quests
Metagames
Rebuilding Rome
As we introduce in the Walkthrough chapter, burning down each Borgia Tower enables Ezio to invest florins in opening or restoring Shops, amenities and landmarks in their general vicinity. In this section we take a closer look at the Rome rebuilding metagame and its underlying economic structure, and present an efficient path to 100% completion.
Though ostensibly very similar to the Monteriggioni restoration side quest in Assassin's Creed II, Assassin's Creed Brotherhood's equivalent challenge has a far grander scale. Employing an efficient upgrade strategy that offers the maximum return in profits for the lowest possible investment is therefore an essential step on the road to 100% completion. If you can dedicate time to restoring Rome's infrastructure at a few key points in the story, its thrice-hourly dividends can make Ezio a very rich man indeed.
Renovating Rome also offers other benefits. Opening Blacksmiths, Tailors, Doctors and Art Merchants can lead to notable discounts on expensive Shop purchases, while the final rewards for upgrading all possible sites (the Auditore Cape, which disables Notoriety growth while equipped, and an Achievement/Trophy for 100% completion) certainly warrant the effort.
Restoration Strategy
At full price, the total cost of all Rome upgrades is approximately 577,125 florins. With a 25% discount applied after a story development in Sequence 06, this drops to a more manageable (but still considerable) 432,750 florins outlay. To put these sums into context, Ezio's cumulative income from all main story memories and side quests is in the region of 140,000 florins, while the peak dividend from Rome is around 20,850 florins per 20-minute period (with a maximum Vault Capacity of 80,000 florins). It should therefore be abundantly clear that making Rome pay for itself is an important strategy.
Here is our suggested procedure for an optimum path to 100% restoration:
1. After opening the three Guilds in Sequence 03, visit the Barracks to partake in the organized fights that are held in its basement. With a little practice, you can earn over 650 florins per minute by placing the maximum possible wager before each bout. We would suggest that dedicated players take the time to amass approximately 20,000 florins here to create a "seed fund" for Rome upgrades. If the fights don't work for you, focus on completing side quests to raise florins instead.
2. Following the Human Cargo memory in Sequence 04, Ezio gains the ability to send his Assassin recruits on special assignments. At this stage, clear all seven available Borgia Towers and recruit Assassins to make use of this feature to generate income. Though the sums may seem small, the cumulative total over an hour of play can be significant. See the "Assassins Guild" section overleaf for further details. After liberating each Borgia Zone, invest florins in all Shops (including Banks), Horse Stables and Tunnel Entrances unlocked in its vicinity before you move on to the next Tower.
3. The start of Sequence 06 is notable for two reasons: Campagna is fully unlocked, and Ezio receives a blanket 25% discount on all renovations. Liberate the two new Borgia Towers straight away. You should now – finances permitting – unlock all possible renovations with the exception of the phenomenally expensive Landmarks. These make the lowest contribution to the Rome metagame dividends, and so should be left until last.
4. The sealed areas of the Antico district are unlocked at the start of Sequence 07, so liberate the remaining Borgia Tower as a priority. You should now attend to all remaining renovations. With Rome dividends approaching maximum and a full complement of 12 Assassins working on Contracts, you will soon raise sufficient funds to complete all Landmarks.
Reference Tables
These two tables reveal all the structures that you must renovate in order to restore Rome to its full glory, along with the cost of each investment and its contribution to the income received by Ezio every 20 minutes.
Shop Restorations
|
Shop |
Renovation |
Initial Cost (f) |
Discounted Cost (f) |
Income Bonus (f) |
Notes |
|
Blacksmiths
|
#1 |
- |
- |
+10 |
- |
|
#2 |
800 |
600 |
+275 |
||
|
#3 |
900 |
675 |
+275 |
||
|
#4 |
1,000 |
750 |
+275 |
||
|
#5 |
1,125 |
844 |
+275 |
5% discount |
|
|
#6 |
1,260 |
945 |
+275 |
||
|
#7 |
1,400 |
1,050 |
+275 |
||
|
#8 |
1,575 |
1,181 |
+275 |
||
|
#9 |
1,775 |
1,331 |
+275 |
||
|
#10 |
1,990 |
1,493 |
+275 |
10% discount |
|
|
#11 |
2,215 |
1,661 |
+275 |
||
|
#12 |
2,500 |
1,875 |
+275 |
||
|
#13 |
2,500 |
1,875 |
+275 |
||
|
#14 |
2,500 |
1,875 |
+275 |
||
|
#15 |
2,500 |
1,875 |
+275 |
||
|
#16 |
2,500 |
1,875 |
+275 |
15% discount |
|
|
#17 |
2,500 |
1,875 |
+275 |
||
|
Sub-totals |
29,040 |
21,780 |
+4,410 |
||
|
Doctors
|
#1 |
- |
- |
+4 |
- |
|
#2 |
- |
- |
+3 |
||
|
#3 |
- |
- |
+3 |
||
|
#4 |
650 |
488 |
+250 |
5% discount |
|
|
#5 |
730 |
548 |
+250 |
||
|
#6 |
815 |
612 |
+250 |
||
|
#7 |
915 |
686 |
+250 |
||
|
#8 |
1,025 |
769 |
+250 |
10% discount |
|
|
#9 |
1,150 |
863 |
+250 |
||
|
#10 |
1,280 |
960 |
+250 |
||
|
#11 |
1,440 |
1,080 |
+250 |
||
|
#12 |
1,610 |
1,208 |
+250 |
||
|
#13 |
1,800 |
1,350 |
+250 |
||
|
#14 |
2,025 |
1,519 |
+250 |
15% discount |
|
|
#15 |
2,260 |
1,695 |
+250 |
||
|
Sub-totals |
15,700 |
11,775 |
+3,010 |
||
|
Tailors
|
#1 |
- |
- |
+10 |
- |
|
#2 |
800 |
600 |
+250 |
||
|
#3 |
880 |
660 |
+250 |
||
|
#4 |
975 |
731 |
+250 |
5% discount |
|
|
#5 |
1,080 |
810 |
+250 |
||
|
#6 |
1,195 |
896 |
+250 |
||
|
#7 |
1,320 |
990 |
+250 |
||
|
#8 |
1,460 |
1,095 |
+250 |
10% discount |
|
|
#9 |
1,610 |
1,208 |
+250 |
||
|
#10 |
1,780 |
1,335 |
+250 |
||
|
#11 |
1,970 |
1,478 |
+250 |
15% discount |
|
|
#12 |
2,170 |
1,628 |
+250 |
||
|
Sub-totals |
15,240 |
11,430 |
+2,760 |
||
|
Art Merchants
|
#1 |
- |
- |
+10 |
- |
|
#2 |
900 |
675 |
+275 |
||
|
#3 |
1,010 |
758 |
+275 |
5% discount |
|
|
#4 |
1,130 |
848 |
+275 |
||
|
#5 |
1,265 |
949 |
+275 |
||
|
#6 |
1,415 |
1,061 |
+275 |
||
|
#7 |
1,585 |
1,189 |
+275 |
10% discount |
|
|
#8 |
1,775 |
1,331 |
+275 |
||
|
#9 |
1,990 |
1,492 |
+275 |
||
|
#10 |
2,230 |
1,673 |
+275 |
15% discount |
|
|
Sub-totals |
13,300 |
9,975 |
+2,485 |
||
|
Banks
|
#1 |
- |
- |
+10 |
Vault: 5,000 |
|
#2 |
900 |
675 |
+300 |
Vault: 7,500 |
|
|
#3 |
1,050 |
788 |
+300 |
Vault: 12,500 |
|
|
#4 |
1,230 |
923 |
+300 |
Vault: 20,000 |
|
|
#5 |
1,440 |
1,080 |
+300 |
Vault: 30,000 |
|
|
#6 |
1,690 |
1,268 |
+300 |
Vault: 40,000 |
|
|
#7 |
1,975 |
1,481 |
+300 |
Vault: 50,000 |
|
|
#8 |
2,310 |
1,733 |
+300 |
Vault: 60,000 |
|
|
#9 |
2,700 |
2,025 |
+300 |
Vault: 70,000 |
|
|
#10 |
3,160 |
2,370 |
+300 |
Vault: 80,000 |
|
|
Sub-totals |
16,455 |
12,341 |
+2,710 |





Amenity and Building Restorations
|
Type |
Renovation |
Initial Cost (f) |
Discounted Cost (f) |
Income Bonus (f) |
|
Tunnel Entrances
|
#1 |
- |
- |
+2 |
|
#2 |
- |
- |
+2 |
|
|
#3 |
- |
- |
+3 |
|
|
#4 |
- |
- |
+3 |
|
|
#5 |
350 |
263 |
+120 |
|
|
#6 |
400 |
300 |
+120 |
|
|
#7 |
465 |
349 |
+120 |
|
|
#8 |
530 |
398 |
+120 |
|
|
#9 |
615 |
461 |
+120 |
|
|
#10 |
705 |
529 |
+120 |
|
|
#11 |
810 |
607 |
+120 |
|
|
#12 |
930 |
698 |
+120 |
|
|
#13 |
1,070 |
803 |
+120 |
|
|
#14 |
1,230 |
923 |
+120 |
|
|
#15 |
1,230 |
923 |
+120 |
|
|
#16 |
1,230 |
923 |
+120 |
|
|
#17 |
1,230 |
923 |
+120 |
|
|
#18 |
1,230 |
923 |
+120 |
|
|
Sub-totals |
12,025 |
9,018 |
+1,690 |
|
|
Horse Stables
|
#1 |
- |
- |
+10 |
|
#2 |
700 |
525 |
+150 |
|
|
#3 |
780 |
585 |
+150 |
|
|
#4 |
880 |
660 |
+150 |
|
|
#5 |
990 |
743 |
+150 |
|
|
#6 |
1,100 |
825 |
+150 |
|
|
#7 |
1,235 |
926 |
+150 |
|
|
#8 |
1,380 |
1,035 |
+150 |
|
|
#9 |
1,550 |
1,163 |
+150 |
|
|
Sub-totals |
8,615 |
6,461 |
+1,210 |
|
|
Aqueducts
|
#1 |
3,500 |
2,625 |
+110 |
|
#2 |
3,500 |
2,625 |
+110 |
|
|
#3 |
3,500 |
2,625 |
+110 |
|
|
#4 |
3,500 |
2,625 |
+110 |
|
|
#5 |
3,500 |
2,625 |
+110 |
|
|
#6 |
3,500 |
2,625 |
+110 |
|
|
#7 |
3,500 |
2,625 |
+110 |
|
|
#8 |
3,500 |
2,625 |
+110 |
|
|
Sub-totals |
28,000 |
21,000 |
+880 |
|
|
Guild HQs |
Courtesans |
2,500 |
- |
+70 |
|
Thieves |
- |
- |
+60 |
|
|
Mercenaries |
- |
- |
+60 |
|
|
Sub-totals |
2,500 |
- |
+190 |
|
|
Guild Buildings
|
#1 |
1,200 |
900 |
+60 |
|
#2 |
1,200 |
900 |
+60 |
|
|
#3 |
1,200 |
900 |
+60 |
|
|
#4 |
1,200 |
900 |
+60 |
|
|
#5 |
1,200 |
900 |
+60 |
|
|
#6 |
1,200 |
900 |
+60 |
|
|
#7 |
1,200 |
900 |
+60 |
|
|
#8 |
1,200 |
900 |
+60 |
|
|
#9 |
1,200 |
900 |
+60 |
|
|
Sub-totals |
10,800 |
8,100 |
+540 |
|
|
Landmarks
|
Basilica di Massenzio |
29,000 |
21,750 |
+70 |
|
Colosseo |
46,200 |
34,650 |
+100 |
|
|
Mausoleo di Augusto |
28,350 |
21,263 |
+60 |
|
|
Pantheon |
49,750 |
37,313 |
+110 |
|
|
Campidoglio |
38,100 |
28,575 |
+105 |
|
|
Mercati di Traiano |
30,300 |
22,725 |
+85 |
|
|
Piramide Cestia |
28,400 |
21,300 |
+60 |
|
|
Arco di Tito |
27,000 |
20,250 |
+50 |
|
|
Colle Palatino |
28,700 |
21,525 |
+60 |
|
|
Terme di Traiano |
30,200 |
22,650 |
+70 |
|
|
Terme di Caracalla |
35,000 |
26,250 |
+75 |
|
|
Thermae Diocletiani |
29,750 |
22,313 |
+70 |
|
|
Arco di Costantino |
27,200 |
20,400 |
+50 |
|
|
Sub-totals |
427,950 |
320,963 |
+965 |





Assassins Guild: Training Strategy

With relatively little effort, completing Assassins Guild contracts can help bankroll the restoration of Rome and make recruits much more effective when called into combat. For those seeking to achieve 100% game completion in a timely fashion, exploiting this metagame from an early stage in the main story is a very smart move.
We cover the essential basics of the Assassins Guild metagame in the Walkthrough chapter, so we'll jump straight into a step-by-step guide to training recruits and securing high levels of income from Sequence 04 onwards.
Step 1: Train Two Primary Recruits
The ability to send Assassins out on assignments is introduced after the Human Cargo memory during Sequence 04. You have one top priority at this stage: to develop your first two recruits to the maximum Assassino rank by following the training schedule defined in Table 1.
Table 1: Assassin Ranks & Training Schedule
|
Level |
Rank |
XP Required |
Training Schedule |
|
1 |
Recluta |
0 |
Send both recruits on individual contracts.
|
|
2 |
Servitore |
10 |
Send both recruits on cooperative contracts.
|
|
3 |
Assistente |
30 |
Send both recruits on individual contracts.
|
|
4 |
Milite |
80 |
Send both recruits on cooperative unique contracts.
|
|
5 |
Discepolo |
180 |
Send both recruits on individual unique contracts.
|
|
6 |
Mercenario |
350 |
Send both recruits on individual unique contracts
|
|
7 |
Guerriero |
600 |
Send both recruits on cooperative contracts; add a third Assassin if required.
|
|
8 |
Veterano |
1,200 |
Send both recruits on cooperative unique contracts.
|
|
9 |
Maestro |
2,000 |
Send both recruits on individual contracts
|
|
10 |
Assassino |
3,500 |
Maximum rank: no further XP gain possible. |
Step 2: Enlist More Recruits
As you level up your first two recruits, leave main story memories aside and take the time to liberate all available Borgia Towers. Table 2 reveals which Borgia Leaders can be confronted at this stage in the main storyline.
Table 2: Borgia Leaders (Sequence 04)
|
Name |
Location |
|
Pietro da Siena |
Northwest Centro district, south of the Ponte Sant'Angelo |
|
Domenico da Padova |
Santi Apostoli, Centro district |
|
Belardino da Verona |
Southwest Centro district |
|
Valentino da Siena |
Southeast Centro district, close to the river |
|
Francesco da Velletri |
Close to the Campagna/Centro district border |
|
Prospero da Siena |
Antico district, southeast of Ezio's Hideout |
|
Tommaso di Viterbo |
Southwest Antico district |
After you clear each Borgia Tower, secure the services of a new recruit immediately. Visit a Pigeon Coop or Assassin Tower (a cleared Borgia Tower) to assign new contracts before you tackle the next Borgia Leader.
Keep focusing on XP growth for your two original Assassins, following the "Training Schedule" suggestions in Table 1 to pick missions suitable for their ability level. Your new recruits, on the other hand, should be assigned to quick and easy or contracts that can be completed by a single Assassin. Send them on these assignments as regularly as you can.
Step 3: Use Your Two Original Recruits as "Trainers"
Once you have cleared all seven Borgia Towers available in Sequence 04 you should continue with main story memories, stopping off at Assassin Towers and Pigeon Coops to send Assassins out on new contracts whenever possible. When your first two Assassins reach the maximum XP total in the Maestro level, they do not automatically attain the Assassino rank. Instead, you must return to Ezio's Hideout to witness an initiation ceremony.
With your two original recruits elevated to Assassinos, you can use them as "trainers" to vastly accelerate the development of all other novices: If you send a single Recluto on a  contract (or a suitable "unique" contract – see box-out) with your two Assassinos, he or she can gain several levels at once, even with XP divided between all participants.
Step 4: Maximize Your Income
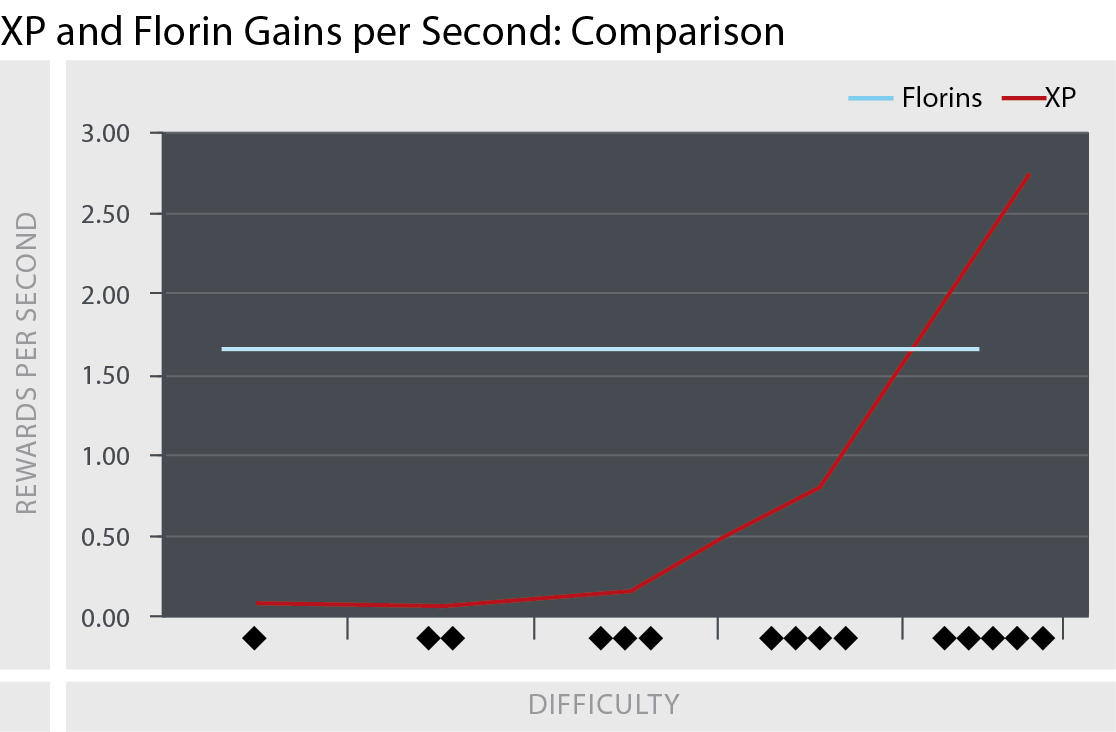
Study Table 3 and the associated diagram. As you can see, higher difficulty missions offer excellent XP returns, but no improvement in payment. The secret to earning greater sums of florins is to assign all Assassins (with the exception of your two "trainers") to easy contracts that they can successfully complete without assistance – ideally those with the longest Synch Duration.
If you continue to use the majority of your recruits to finish quick and assignments, focusing on training one individual to Assassino rank at a time, you can accumulate florins with very little effort. The two Borgia Towers in Campagna are unlocked at the start of Sequence 06, with the final Tower in the Antico district following at the start of Sequence 07. If you liberate these immediately, you can have a full complement of Assassins generating huge amounts of florins while you complete all remaining memories.
Table 3: Generic Contract Details
|
Contract |
Duration in seconds (min-max) |
Average XP per second |
Average Florins per second |
|
|
180-600 |
0.07 |
1.67 |
|
|
240-720 |
0.08 |
1.67 |
|
|
300-900 |
0.18 |
1.67 |
|
|
360-1,080 |
0.83 |
1.67 |
|
|
420-2,000 |
2.57 |
1.67 |
XP and Florin Gains per Second: Comparison
Unique Contracts
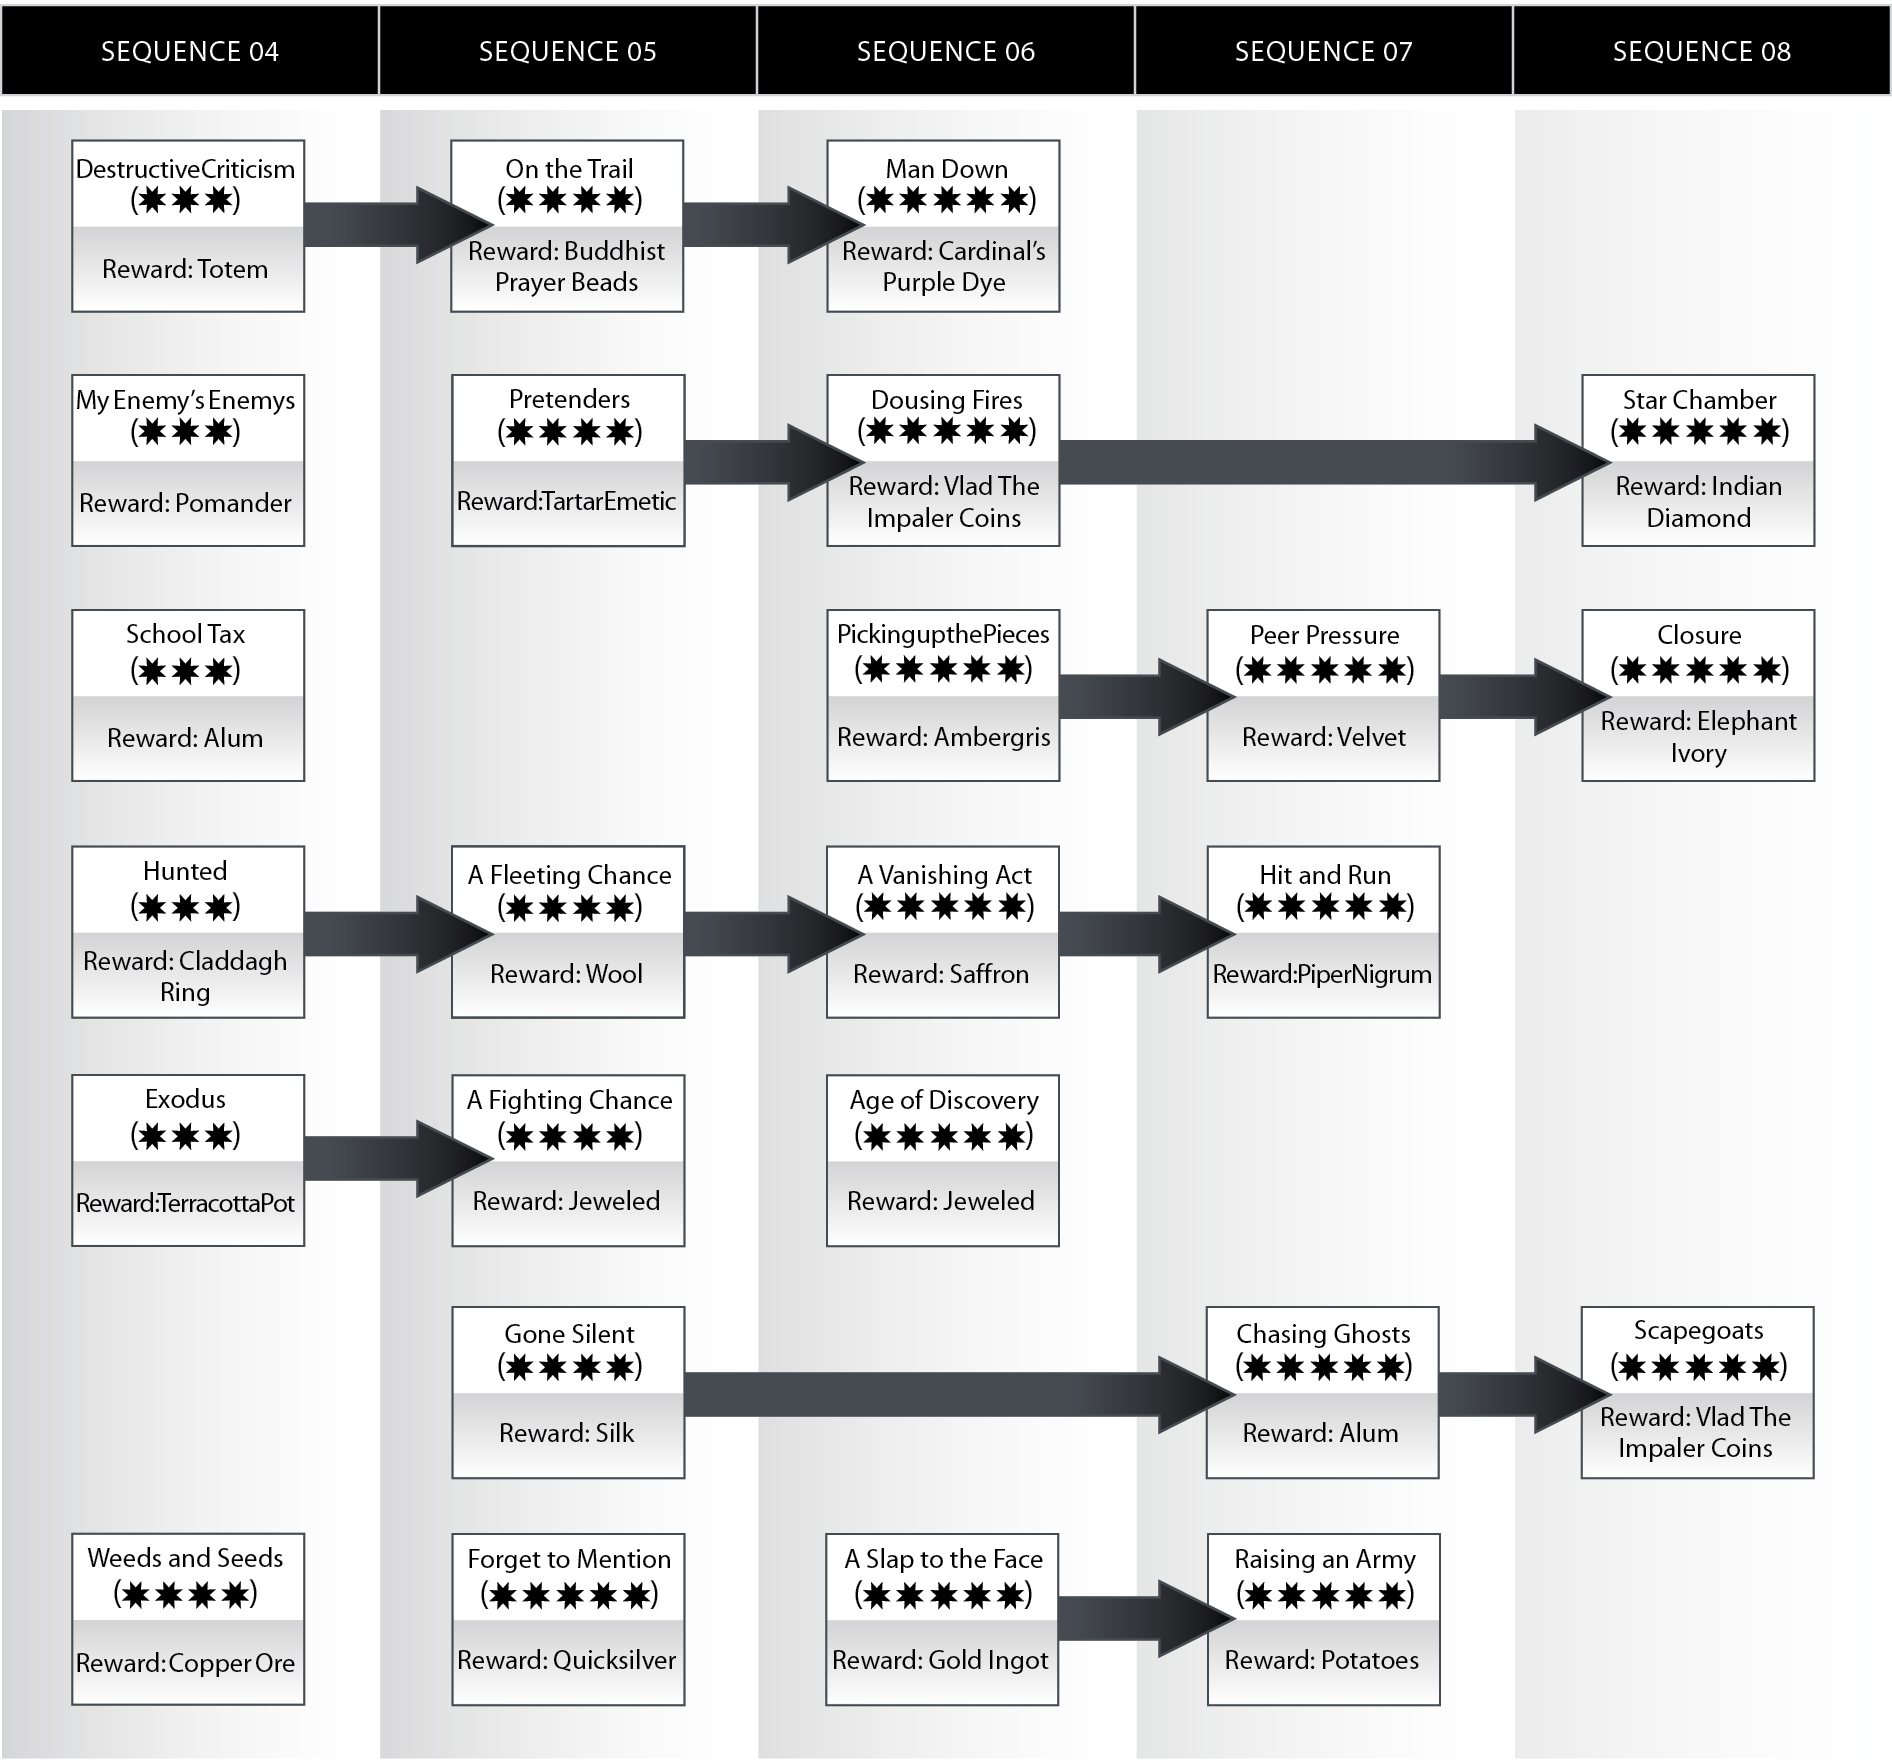
From Sequence 04 until Sequence 08 you will encounter a growing selection of "unique" contracts in the list of potential commissions. These can be identified by their star ratings (  to – distinct from the diamonds used for generic assignments), and offer increased financial rewards and XP gains, as well as sometimes Trade Items. However, they are also much more difficult, and usually take longer to complete. The high-level unique contracts are extremely useful for training novices rapidly (with Assassinos to accompany them, of course), and make fairly significant contributions to Ezio's purse.
The following diagram reveals in which Sequence each unique contract becomes available, with arrows representing how earlier missions must be completed to unlock later commissions.