
Star Trek Guide Essentials Allies, Enemies, and Weapons
Allies, Enemies, and Weapons
The universe isn’t always a friendly place. In these circumstances, it’s good to know a little bit about your friends and enemies. Before starting your adventure, take a moment to review the dossiers of the Enterprise crew, including the field notes on all weapons in the Federation arsenal. Profiles of all Gorn enemies are also included, offering descriptions and vital counter tactics necessary for defeating each ferocious unit, as well as tips for turning their own weapons against them.
Enterprise Crew
Commanded by Captain James T. Kirk, the crew of the U.S.S. Enterprise are young but experienced, thanks to their critical success in saving Earth from an attack by the Romulan Nero and his mining vessel, the Narada. Despite their successes, many in Starfleet still view the young Enterprise crew with skepticism and envy. But now the crew have a second chance to prove their worth as they approach a Vulcan space station that is emitting anomalous readings near the New Vulcan colony.
James T. Kirk

When avenging Romulan marauder Nero and his ship from the year 2387 emerged via a black-hole vortex, Kirk’s father George, aboard the U.S.S. Kelvin as its first officer, gave his life in a suicide run so as to give cover to his ship’s fleeing escape shuttles. His death was enough to split off an all-new altered timeline: One of the shuttles contained his wife Winona, who was going into labor amid the battle and delivered their son James Tiberius—now destined to grow up without his father’s influence a troubled child.
In and around his native Riverside, Iowa, young Kirk frequently got into trouble with local authorities and was often at odds with his stepfather. His aptitude tests, however, revealed hidden talents, and brought him to the attention of Capt. Christopher Pike, stationed at nearby Riverside Shipyards for the Earth-bound phase of construction on this timeline’s more massive Enterprise. When they met for the first time, Pike suggested that Kirk enter Starfleet Academy, following his father’s heroic profile—even though Kirk, now 22, was already the age of most typical cadet graduates. Much to his own surprise, Kirk swallowed part of his ego, took Pike’s challenge and graduated in 2258, finishing his course of study in just three years.
However, during the Academy’s Kobayashi Maru scenario, intended as a test of a cadet’s reaction to a “no-win” situation, Kirk altered the training program to beat it—because, like his martyred famous father, young Kirk said he didn’t believe in “no-win scenarios.” The disciplinary hearing that followed was Kirk’s first introduction to Spock, the scenario’s programmer. But the hearing was interrupted by the appearance of Nero’s Narada once again. Despite being under disciplinary review, Kirk managed to get aboard the new Enterprise thanks to Leonard McCoy’s faked medical emergency, leaving Kirk and Spock to butt heads repeatedly in Pike’s absence after the captain was taken hostage. Spock even had Kirk ejected from the ship after the two broke into a brawl, leaving him at Delta Vega’s lonely, ice-locked Starfleet base. Kirk’s shocking, life-changing encounter there with the elder Spock, led him to see Spock in a new light.
Once reunited, Kirk and Spock took the improbable fight to Nero and prevailed, ending the Narada’s reign of terror. By decree of Starfleet Order 28455 soon after, Kirk won a permanent field commission as captain of the Enterprise, despite his young age of 25.
Spock

Spock of Vulcan was already three years old at the time Romulan marauder Nero was thrown into the past and created an alternate reality, later causing the destruction of Spock’s homeworld. Like the elder Spock, this Spock is a cultural hybrid, the son of the human Amanda Grayson and the Vulcan Sarek. Spock spent much of his early life feeling like an outsider. Although he was an excellent student, Spock was bullied by other Vulcans in his classes, who resented him because of his mixed blood.
Even so, Spock’s school record was flawless and made him eligible for admission to the Vulcan Science Academy. But after realizing the latent racial bias against humans among the Vulcan Council who reviewed applications to the Academy, Spock declined admission and attended Starfleet Academy instead, eventually becoming one of Starfleet’s most distinguished graduates. Spock programmed the Kobayashi Maru “no-win scenario” simulation for four years—and only James Kirk ever beat the test, which he accomplished by secretly reprogramming it.
Despite his short resume, the brilliant Lieutenant Spock was tapped at age 28 by Captain Christopher Pike as his first officer when Pike took command of the newly commissioned U.S.S. Enterprise. The rushed launching came in crisis response to another temporal appearance of Nero and his attack on Vulcan. Spock, who met Kirk in adversity over the simulator disciplinary hearing—actually had Kirk arrested and banished to the icy Delta Vega outpost for later pickup by Starfleet.
Shaken by the death of his mother, his planet, and indeed most of his species, Spock finally realized his emotional shock thanks to Kirk’s prodding, and cited mental health reasons for going off active duty as the absent Pike’s Acting Captain. But Spock is no stranger to acknowledging his emotions. He has carried on a romance with the human Nyota Uhura, also assigned to the Enterprise. Their relationship is hardly a secret, but the couple limit their displays of affection when surrounded by fellow crew members.
After helping subdue Nero, Spock is further affected by a bizarre yet reassuring visit from his time-travelled, much older doppelganger from the alternate universe, and he agrees to trust Kirk and remain serving with him.
Dr. Leonard “Bones” McCoy

In the alternate timeline caused by Nero and the Narada incursion, McCoy enlisted in Starfleet around the same time as Kirk; he showed up on the shuttle for new recruits in 2255, the same day Kirk did. A bit older than the other cadets, McCoy was already a doctor and also a bit of a techno-hypochondriac. He claimed to suffer from “aviophobia”—the fear of dying in something that flies. McCoy is the reason for Nero’s eventual defeat and the saving of Earth from his orbital mining drill—the young doctor, newly graduated from Starfleet Academy and assigned to Pike’s Enterprise in 2258, was quick-witted and daring enough to create a medical ruse to get Kirk aboard despite his academic probation.
Spock, in command during Pike’s absence, likewise named McCoy as Enterprise Chief Medical Officer after CMO Dr. Puri was killed on Deck 6 amid the damage from the Narada’s very first torpedo hit. McCoy almost immediately began running a respectful “feud” with Spock—colored in part by Kirk’s initial conflict with the Vulcan over Kirk’s unauthorized alteration of the Kobayashi Maru training simulator.
McCoy claimed to have signed up for Starfleet because his ex-wife “took the whole damn planet in the divorce.” All he has left are his “bones”—which, Kirk decides, is the perfect nickname for him.
Montgomery “Scotty” Scott

Montgomery “Scotty” Scott matured into a brilliant young engineer by 2258—so much so that he’d brazenly debated a Starfleet instructor on relativistic physics and how it pertained to subspace travel. The professor saw transporter beaming as limited to 100 miles. Scott theorized instead a limit of adjacent planets—but his unauthorized experiment to test it led to the loss of Admiral Archer’s prized beagle.
Scott was “rewarded” for that act by being stationed at a small automated Starfleet outpost on ice-planet Delta Vega with only fellow engineer Keenser. Upon the unscheduled arrival of young James T. Kirk and the elder Spock, the elderly Vulcan informed Scotty that he will one day discover the theory of transwarp beaming—and showed him how to do it so that Kirk can get back to the Enterprise and the Nero crisis.
Once aboard the Enterprise, having joined Kirk in that historic first at-warp beam-in, Scott was appointed to fill the vacancy left by Chief Engineer Olson’s death. Within hours he also accomplished another first—a beam-in of two disparate targets onto the same transporter pad—and saved the ship from the black hole devouring the Narada by ejecting and detonating the Enterprise’s Warp Core to create a titanic counter-push.
Nyota Uhura

Nyota Uhura is an expert in xenolinguistics, the study of alien languages, morphology, phonology, and syntax. As one of Spock’s top students from Starfleet Academy, Uhura is gifted with exceptional aural sensitivity and, per Spock, possesses “an unparalleled ability to identify sonic anomalies in subspace transmission tests.” But that’s just the public Uhura. In private, she spends a lot of close personal time with Spock.
Hikaru Sulu

Lieutenant Hikaru Sulu is the acting helmsman for the newly commissioned starship Enterprise. Reportedly an excellent pilot, Sulu was awarded the position at the last minute, replacing the assigned Helmsman McKenna after McKenna contracted a case of lungworm. After an embarrassing start, Sulu quickly settled into the new helm and proved instrumental during the Nero crisis. Sulu said he was trained in advanced hand-to-hand combat, but later informed Kirk that his training was actually in fencing.
Pavel Chekov

Ensign Pavel Chekov is the navigator for the Enterprise and the youngest crew member, having graduated from Starfleet Academy at an early age. He knows so much about the operations of the ship (including the ship’s transporters) that Captain Pike initially referred to him as a “Russian whiz kid.” Chekov actively monitors the ship’s sensors and is also tuned in to incoming transmissions.
Federation Weapons
Throughout your adventure you’ll encounter a variety of Starfleet and Federation weapons. Each weapon has a primary and secondary fire function to offer greater versatility for confronting a variety of situations. Unlike the Gorn weapons, some of the Federation weapons have non-lethal stun functionality perfect for temporarily paralyzing enemies to make them vulnerable to takedown melee attacks. While non-lethal tactics are preferred, the Federation arsenal also offers plenty of lethal options as well.
Captain’s Phaser
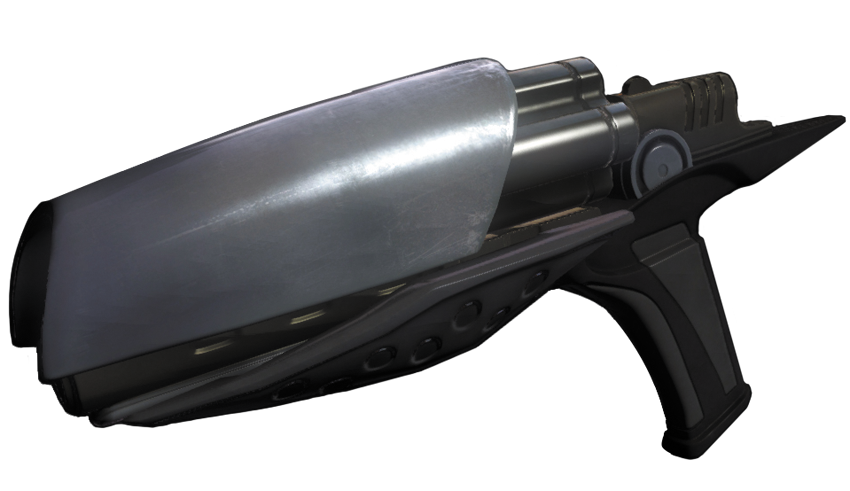
First Available: Helios-1
Primary Fire: Semi-auto kill shot
Secondary Fire: Stun shot
Scotty’s Analysis
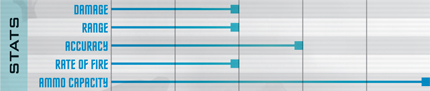
Ooh, fancy. This is a one-of-a-kind phaser created specifically for one Captain James Tiberius Kirk by his loyal Chief Engineer, who would be me. I took a standard-issue Starfleet phaser and basically made it better in every way: improved accuracy, faster reload, less recoil, quicker phase shift between stun and kill mode. I gave it all sorts of nifty projectile enhancements and added a bio-signature lock that ensures that only the Captain can use it. I’m still waiting on my special commendation.
Field Notes
Always carried by Captain Kirk, this modified Starfleet phaser’s kill and stun settings give it lethal and non-lethal capabilities, which is ideal when confronting infected Federation personnel. Always keep it equipped when operating in areas where infected personnel are present—if you want to earn non-lethal commendations, the weapon’s stun setting is critical. The weapon is best deployed at close range, where it is most accurate, particularly if you carefully aim at your target. But go easy on the trigger and keep an eye on the weapon gauge in the bottom right corner of the HUD. Although the phaser doesn’t consume ammo, it can overheat when fired rapidly. Once overheated, it takes a few seconds for the weapon to cool down before it can be fired again. But if you fire the weapon at a slow, steady pace, you can avoid these cooldown sequences.
Vulcan Repeater
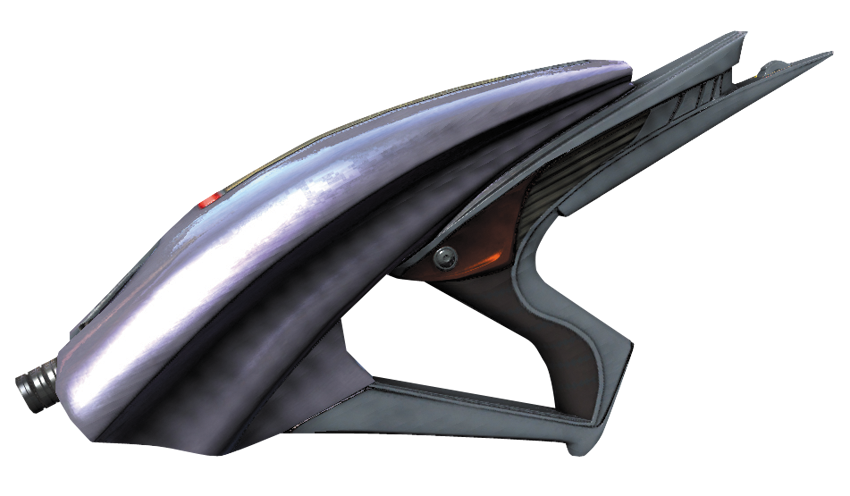
First Available: Helios-1
Primary Fire: Two-round burst kill shots
Secondary Fire: Stun shot
Scotty’s Analysis
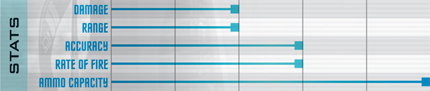
The quintessential Vulcan weapon. Efficient, no bells and whistles, optimized for non-lethal takedowns, but as deadly as can be when the situation calls for it. Much like Commander Spock, come to think of it.
Field Notes
Despite its unique name and appearance, Spock’s Vulcan Repeater performs similarly to the Captain’s phaser, complete with kill and stun settings. The major difference is its kill setting. Instead of firing one shot per trigger pull, this weapon fires two-round bursts. This makes it very effective when taking down enemies, but it also has a greater tendency overheat, particularly when fired rapidly. So always keep an eye on the weapon gauge and lay off the trigger before the weapon overheats to prevent a lengthy and inconvenient cooldown phase. But the Vulcan Repeater is best deployed as a stun weapon, perfect for temporarily stunning enemies prior to performing a melee takedown.
Starfleet Type III Rifle
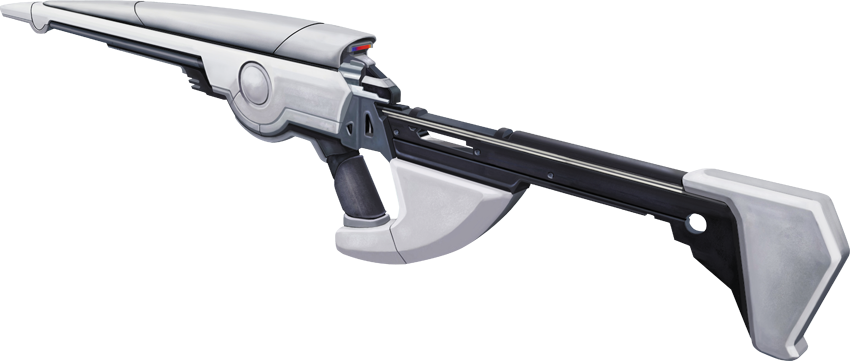
First Available: New Vulcan
Primary Fire: High-powered single kill shot
Secondary Fire: Triple-kill shot
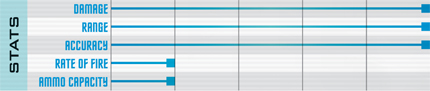
Scotty’s Analysis
No touching this one without advanced combat training. It takes the DNA of the standard phaser and gives it an evolutionary bump. Not for friendly non-lethal encounters. This one means business.
Field Notes
This is essentially Starfleet’s version of a sniper rifle capable of killing most enemies with a single shot. Aiming the weapon brings up a highly magnified scope view that is ideal for targeting enemies at long range. However, engaging targets at close range can be problematic, particularly when confronting fast-moving enemies—rely on the white dot reticle in the center of the HUD to aim at enemies nearby instead of acquiring targets through the scope. The weapon can hold only five rounds of ammo before it must be reloaded, and there’s a significant delay between each shot. The secondary fire function fires a three-round burst that helps guarantee a hit due to its tight spread pattern. Given the weapon’s slow rate of fire and limited ammo capacity, the Starfleet Type III Rifle is best reserved for long range engagements—switch to your phaser when engaging enemies at close range.
Vulcan Pulse Cannon
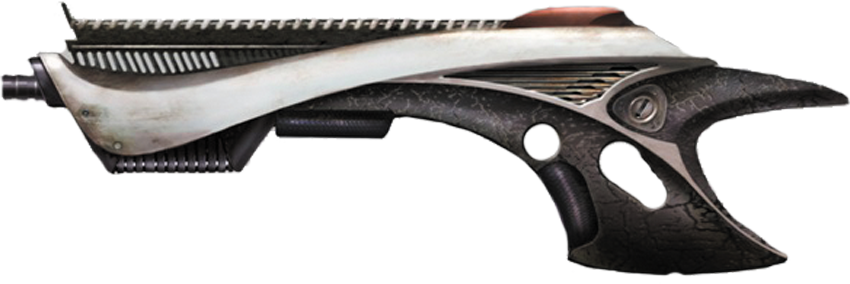
First Available: New Vulcan
Primary Fire: Full-auto fire pulses
Secondary Fire: Wide-range knockdown stun burst
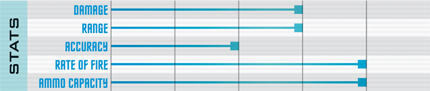
Scotty’s Analysis
Unlike the Vulcan Repeater, this Cannon’s got a bit more edge to it. It was developed by Vulcan engineers after the destruction of their homeworld by Nero, and it shows. Less emphasis on quiet resolution, more focus on getting the job done as quickly as possible regardless of what stands in the way.
Field Notes
The Vulcan Pulse Cannon performs like a fully automatic assault rifle, so it is the perfect choice for engaging large numbers of hostile units. The primary fire function unleashes a torrent of automatic pulses for as long as you hold down the trigger. However, the weapon exhibits significant recoil when fired, so fire in short bursts to maintain a hint of accuracy. The secondary fire function launches a stun burst that’s capable of stunning tight groups of enemies. This is ideal when confronting infected Federation personnel—stun a group then rush in and perform melee takedowns before they can recover. Outside of the phasers, the Vulcan Pulse Cannon is the only weapon with a non-lethal secondary function, so it is an excellent choice when operating in areas with a mix of Gorn and infected Federation enemies.
Starfleet Phaser Rifle
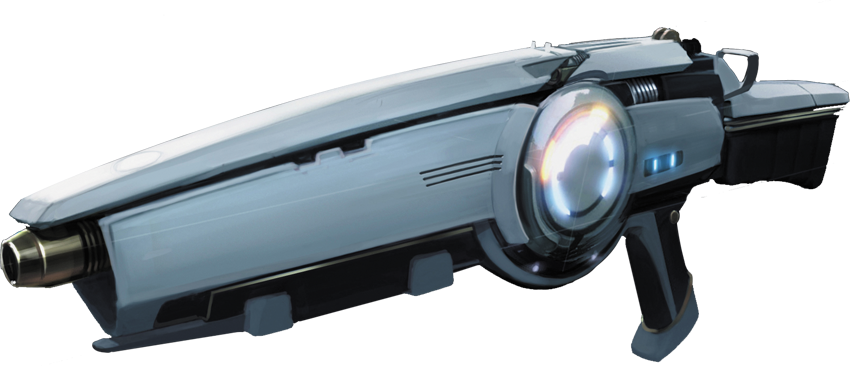
First Available: Frontier Starbase
Primary Fire: 3-round burst fire
Secondary Fire: Deflector shield
Scotty’s Analysis
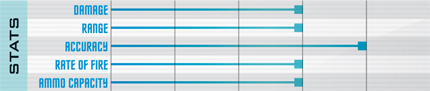
Standard-issue Starfleet rifle. The big brother of the phaser, equipped with a dilithium-enhanced deflector shield. Higher magazine capacity and longer range than the phaser pistol, but not quite as stealthy. When you use one, they’ll know you’re coming.
Field Notes
The Starfleet Phaser Rifle is a well balanced weapon that offers decent damage output and accuracy. Unlike the Vulcan Pulse Cannon, this weapon fires a three-round burst, which helps maintain accuracy with each pull of the trigger. The weapon’s secondary fire function deploys a deflector shield in front of the operator that blocks incoming fire when no cover is available—but you must be facing the threat, as the shield does not protect your flanks. While the deflector shield is deployed, it eats up ammo at a steady rate, so keep an eye on the ammo gauge in the bottom right corner of the HUD. Furthermore, the weapon cannot be fired when the shield is active. So when confronting enemies at close range, deploy the shield and wait for them to stop firing or reload before returning fire.
Engineer Transport Tool (ETT)
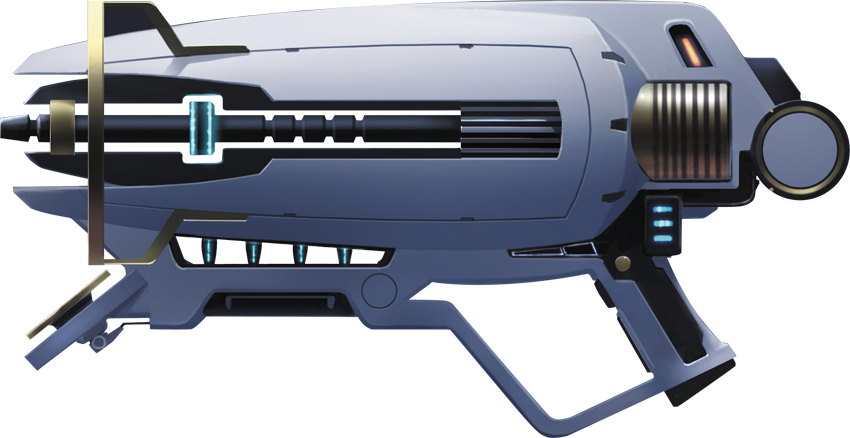
First Available: Frontier Starbase
Primary Fire: Transport
Secondary Fire: Tag for transport
Scotty’s Analysis
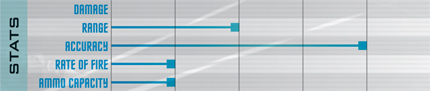
I’m very proud of this one. Think of it as a transporter for your pocket. You can send small objects short distances just like beaming them from a transporter pad. I’ve not finished tests on organic material yet, so be careful. Still, quite a breakthrough. And thus the name Scott joins Newton and Einstein in the pantheon.
Field Notes
Technically, the ETT isn’t a weapon at all. Instead, it’s a handheld device used to transport cargo and personnel over short distances. Start by tagging a suitable target for transport by using the secondary fire function. Next, aim at a designated transporter pad and use the primary fire function to beam the tagged object over to the pad. The ETT has very limited range; you must be within a few meters of a transporter pad to initiate the transport. In a pinch, the ETT can be used to transport enemies to other locations, but they will incur no damage during the process. Still, this can be a clever way to beam infected Federation personnel out of your way.
Stun Grenade

First Available: New Vulcan
Scotty’s Analysis
Good for taking care of groups of unfriendly natives when you don’t have time to stun them one by one.
Field Notes
This hand-thrown grenade emits a wide stun blast upon contact with any solid surface; it temporarily stuns all enemies within its large blast radius. This is handy for stunning enemies who are hiding behind cover and preventing you from getting a clear shot with your phaser. It is also the preferred weapon when confronting large groups of infected Federation personnel—toss the grenade at a group, then rush in to perform takedowns before they all recover. It is also effective in lethal engagements to stun multiple Gorn enemies—while they’re stunned, maneuver to flank or simply gun them down with the weapon of your choice. Stun grenades are often found in crates in Federation facilities.
The Gorn
The Gorn are a mysterious reptilian race from a distant galaxy, far beyond explored Federation space. By harnessing desired genetic traits from their conquered foes, the Gorn have customized their species to excel in combat through extensive genetic engineering. Gorn society is highly militaristic with a strict hierarchy that optimizes efficiency during offensive operations. Furthermore, each Gorn soldier is genetically designed to perform a specific task. Having conquered many planets in their own galaxy and enslaving their inhabitants, the Gorn now set their sights on Federation territory after emerging from a rip in space time.
Common Gorn Enemies
Gorn Initiate
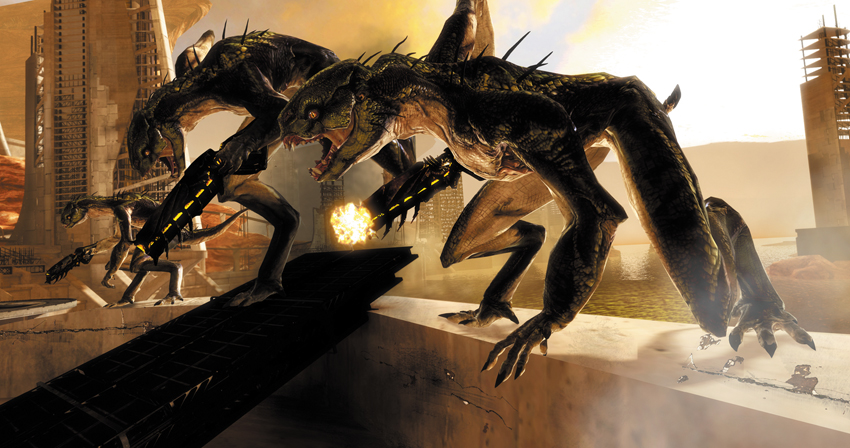
First Encounter: New Vulcan
Weapon: Ravager, Plasma Grenade

The Gorn Initiate is the weakest of all Gorn soldier types but is extremely loyal and willing to do anything for the greater good of the Gorn race. He has low health but moves quickly, which makes him a tough target to hit as he moves between cover.
Counter Tactics
Despite their foot soldier status within the Gorn hierarchy, Gorn Initiates aren’t dumb. When attacked, they seek cover, which often makes them difficult to hit during firefights. For best results, wait until they peek out of cover before taking a shot. Gorn Initiates are also vulnerable when moving from one piece of cover to the next. Just be patient, and don’t underestimate their effectiveness, particularly when facing multiple Gorn Initiates.
Gorn Warrior
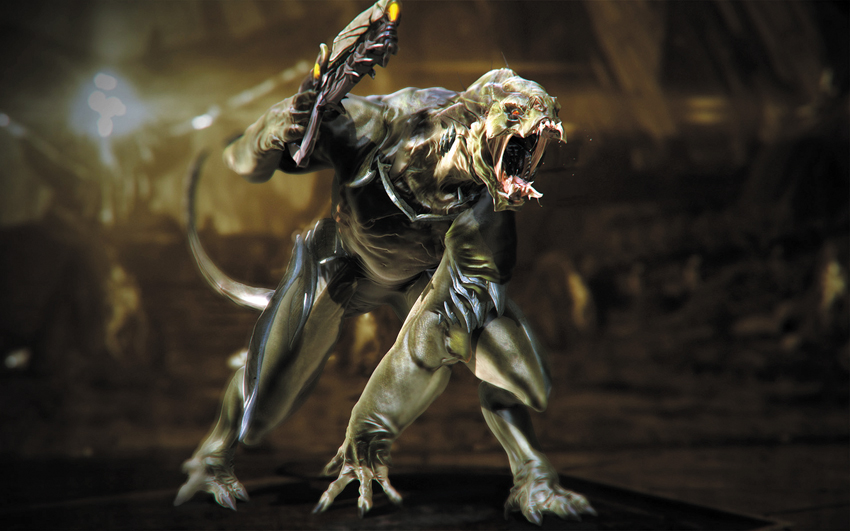
First Encounter: Frontier Starbase
Weapon: Pillager, Arc Driver, Plasma Grenade

The Gorn Warrior is the next evolution step above the Gorn Initiate, but still closely resembles a wild beast when in combat. Equipped with basic armor, the genetically enhanced Warrior is intelligent enough to operate weaponry such as the Pillager and the Arc Driver.
Counter Tactics
In combat, Gorn Warriors perform much like the Gorn Initiates. However, instead of hunkering down behind cover and attacking from a distance, Gorn Warriors are more likely to take the fight to close range, where their Pillager and Arc Driver weapons are most effective. But like the Gorn Initiate, these enemies don’t carelessly charge into incoming fire. They methodically advance from one piece of cover to the next, working their way closer to their enemy—watch out for flanking maneuvers.
Gorn Enforcer
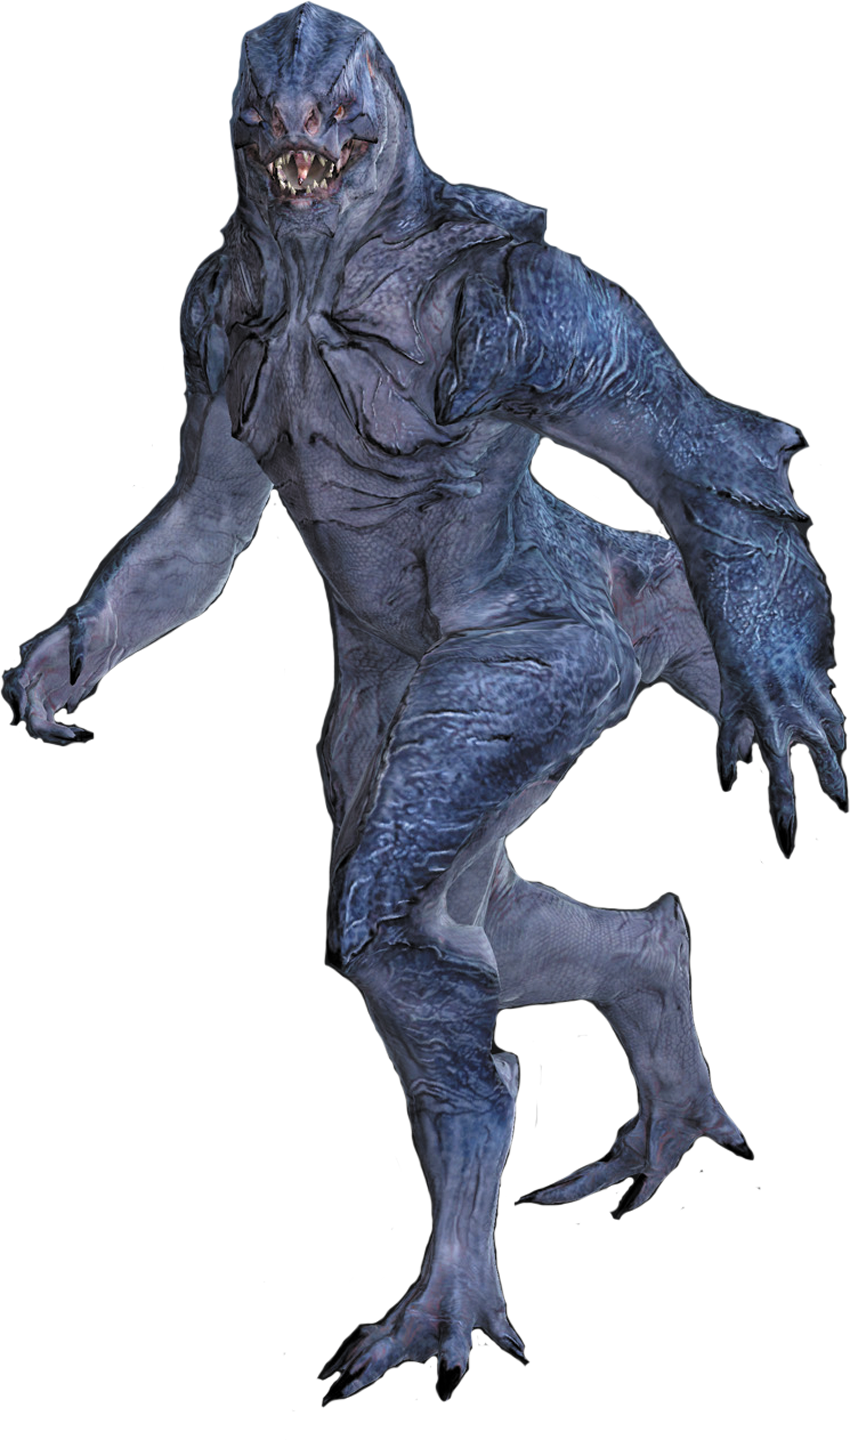
First Encounter: Frontier Starbase
Weapon: Marauder

The Gorn Enforcer is much slower than the other soldiers, but has more health. The Enforcer’s attacks inflict heavy damage. When attacking, the Enforcers throws smoke grenades out in front of his position to cover his movements as he tries to get in close to players for maximum damage with his Gorn version of a shotgun, the Marauder. The Enforcer is relentless and able to flush its enemies out of cover no matter where they hide. The Enforcer is more evolved than the Initiate and Warrior, and spends more time standing upright on his hind legs. He still has a tendency to slouch while moving, but he’s upright when unaware of enemies and his attacks are made from an upright stance.
Counter Tactics
When possible, avoid direct confrontations with Gorn Enforcers. Instead, look for ways to sneak past them or take them out without being detected. A phaser’s stun setting has very little effect on this enemy, stunning him for only a second or two. But you can still perform a takedown on these blue beasts by sneaking up behind them. When engaged in a firefight against a Gorn Enforcer, always stay behind cover and keep your distance. The Gorn Enforcer rushes forward, through their smoke screen, and charges directly at the enemy while firing their Marauder—Gorn Enforcers never seek cover. Retreat as necessary to stay away from the Marauder’s shotgun-like blasts and launched grenades. For best results, focus all fire on Gorn Enforcers and kill them before they get too close for comfort.
Gorn Rusher
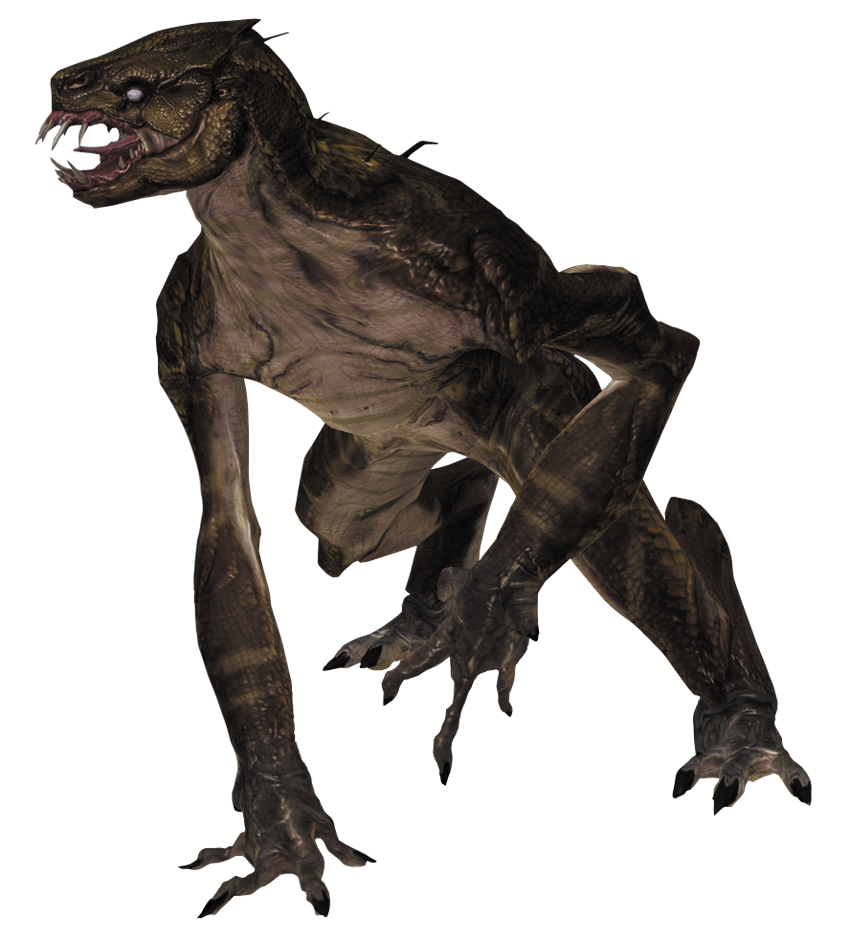
First Encounter: Frontier Starbase
Weapon: None

The Gorn Rusher is the least evolved of the Gorn. They don’t use weapons and move on all fours, which means they are very fast and agile. Rushers charge directly at enemies, leap into the air, and drag them to the ground to bite and claw them to death. Gorn Rushers are weak and can’t withstand much damage before being killed.
Counter Tactics
The Gorn Rusher is one of the most terrifying Gorn enemies. This is ravenous predator is extremely fast and capable of pouncing onto its prey and pinning them to the ground. If you’re pinned by a Rusher, ask for assistance from your partner while rapidly pressing the “Resist” button shown on-screen. Despite their speed and ferocious nature, Gorn Rushers are relatively easy to kill, assuming you can hit them. The Gorn Marauder is well suited for dealing with these enemies, given its close-quarters effectiveness and damage output.
Gorn Tech
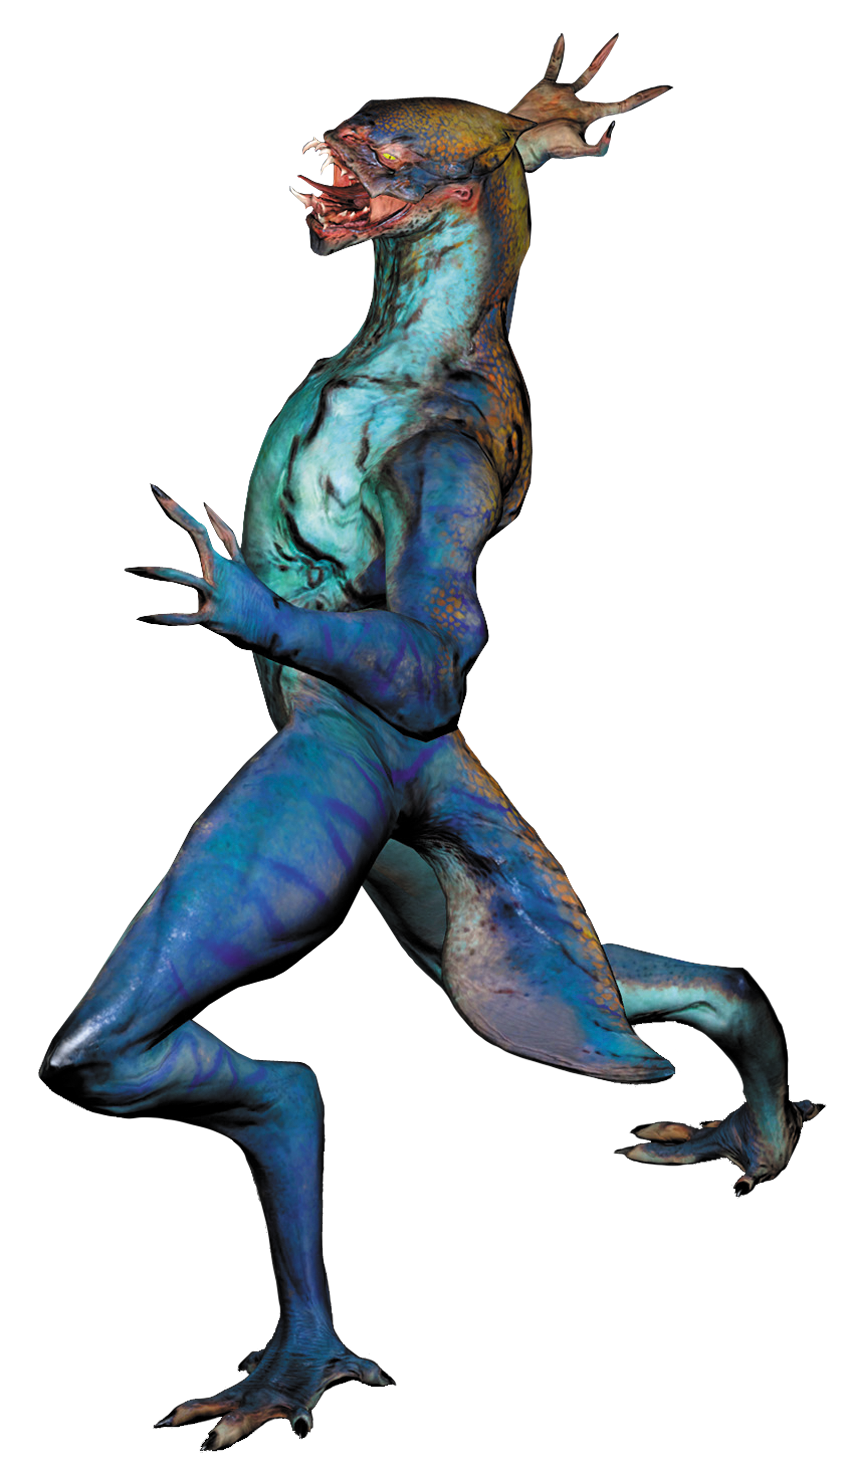
First Encounter: Frontier Starbase
Weapon: Railer

The Gorn Tech has the unique ability to teleport short distances during battle while also deploying an Attack Drone to aid in the fight. The Tech carries a lethal weapon, the Gorn Railer, that can shoot through cover.
Counter Tactics
Unlike many of their counterparts, Gorn Techs are not frontline troops. Instead, they’re often found conducting work near consoles deep within Gorn-controlled territory. However, don’t underestimate these enemies during combat. If you’ve been detected, the Gorn Tech will immediately conjure at least one Attack Drone to assist in hunting you down. Their Railer is a high-powered energy weapon capable of penetrating cover, which means you are vulnerable wherever you’re hiding. While Gorn Techs usually don’t seek cover themselves, they’re capable of teleporting to new locations, often to flank you. For best results, stun them to prevent them from teleporting or attacking, then either perform a takedown or shoot them with your weapon of choice while they’re stunned. Better yet, sneak up behind them and perform a takedown before they even detect you.
Gorn Observer
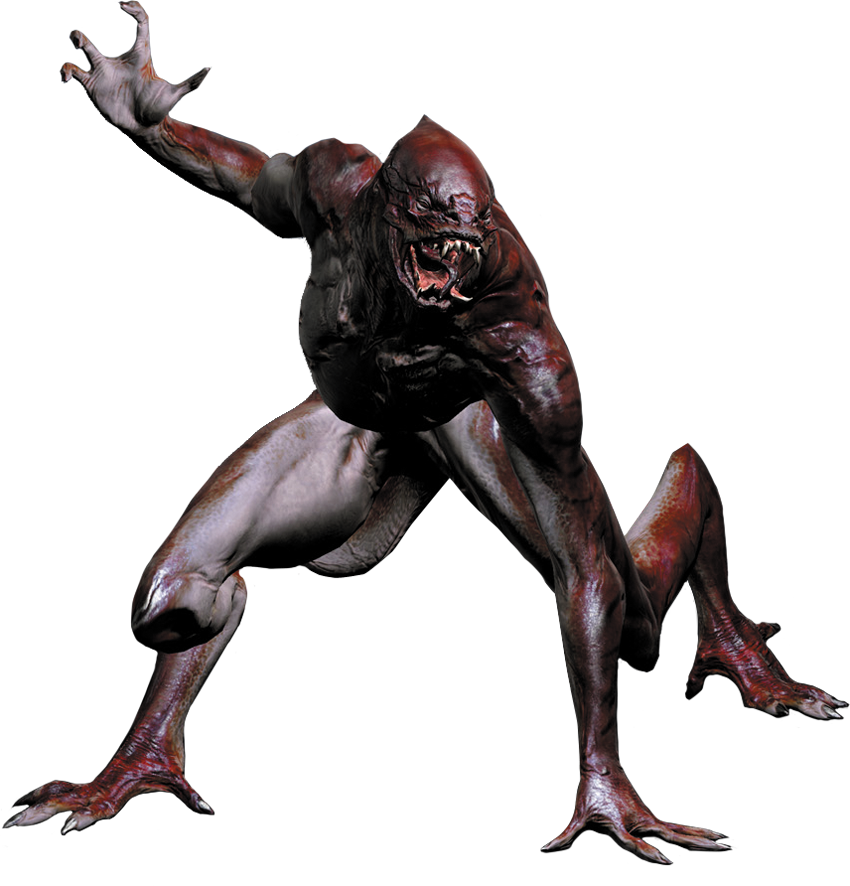
First Encounter: Frontier Starbase
Weapon: Ravager

The Gorn Observer is a weak enemy that is easily killed, but she isn’t the real threat here. If the Observer detects an enemy, she will call in Gorn reinforcements who transport into the encounter to fight for her. She may be weak, but she’s still a very lethal threat.
Counter Tactics
Gorn Observers are identifiable by their red and white markings—take extra caution when encountering these enemies. If you’re detected, the Observer will immediately request reinforcements, causing up to four Gorn Initiates or Warriors to instantly teleport into the area and make your bad situation even worse. In combat, the Gorn Observer performs much like the Gorn Initiate, attacking with a Ravager from behind cover. But the real threat comes from the reinforcements that may have teleported into the area to establish flanking positions. Therefore it’s best to stay out of sight, slipping past Gorn Observers entirely, or eliminating them without raising an alert—stun them with your phaser, then take them down before they can recover.
Gorn Scout
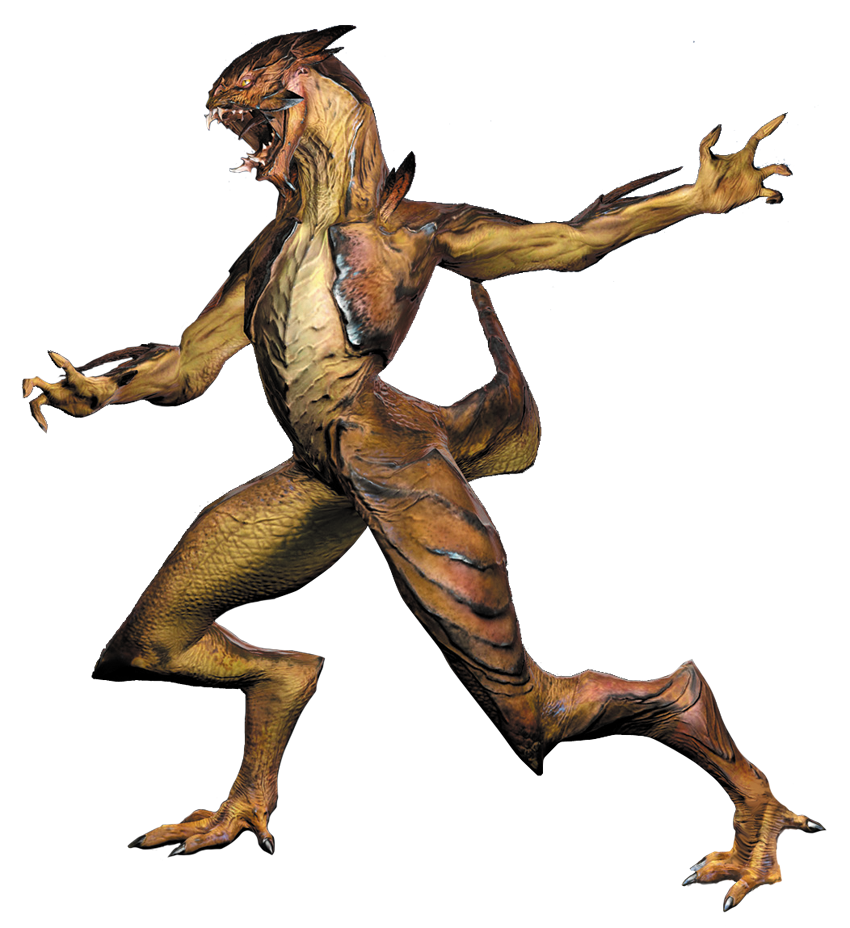
First Encounter: Gorn Planet
Weapon: Striker

Scouts are the long-range specialist; their Strikers do massive damage when a round connects with its target. Scouts do not take cover, but have two unique abilities that are key to their success as the silent killers of the Gorn army: Scouts can walk on walls and can camouflage themselves so they blend in with their background.
Counter Tactics
These chameleonlike creatures are invisible to the naked eye; you must use your tricorder to detect them. Once detected with the tricorder, Gorn Scouts remain visible for a few seconds before blending back into the surrounding terrain. Armed with a sniper rifle-type of weapon called the Striker, the Gorn Scout is the perfect sentry and assassin that excels in long-range combat. These enemies are always found clinging to the sides of cliffs and scurrying about on vertical faces to set up their next shot. Therefore, always stay behind cover when encountering these threats. The Starfleet Type III Rifle or the Scout’s own Striker are the best options for taking out these enemies. Wait for them to stop moving, then use the weapon’s magnified aim view before taking a shot. All it takes is one hit from either of these weapons to kill a Gorn Scout. But you’re exposed to incoming fire while peeking out of cover to aim. So track their movements and set up your shot before taking aim—don’t try to find targets through the zoomed-in view.
Gorpion
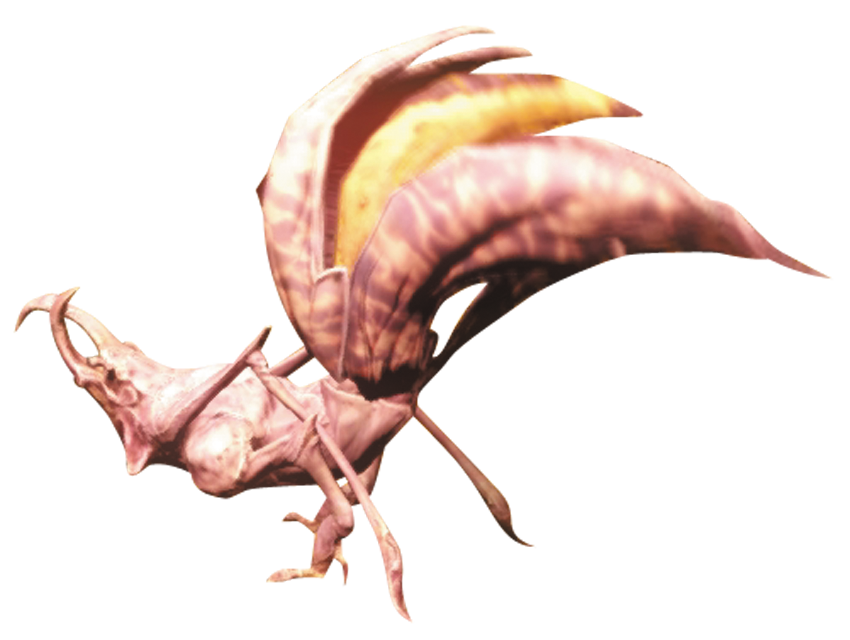
First Encounter: Gorn Planet
Weapon: Proximity-Triggered Explosive

These are small, fast, weak quadrupeds that run toward their enemies and damage them on impact with an explosion. They can run along walls or ceilings, and usually emerge from mound nests that they guard with their lives.
Counter Tactics
The Gorpion is an insect-like creature found exclusively on the Gorn Planet. These fiercely territorial creatures charge directly at their enemies and explode. All it takes is one hit from any weapon to detonate these enemies. However, their quick speed and tendency to attack in swarms makes these creatures very dangerous—detonating one Gorpion within a group can set off a chain reaction, causing nearby Gorpions to explode like a string of firecrackers. To stem nonstop attacks by Gorpions, locate their nest and destroy it. Gorpion nests can be found on cave floors, walls, and ceilings, and each nest produces an endless supply of Gorpions. Destroying these nests is the only way to stop Gorpion attacks once and for all.
Gorn Dog
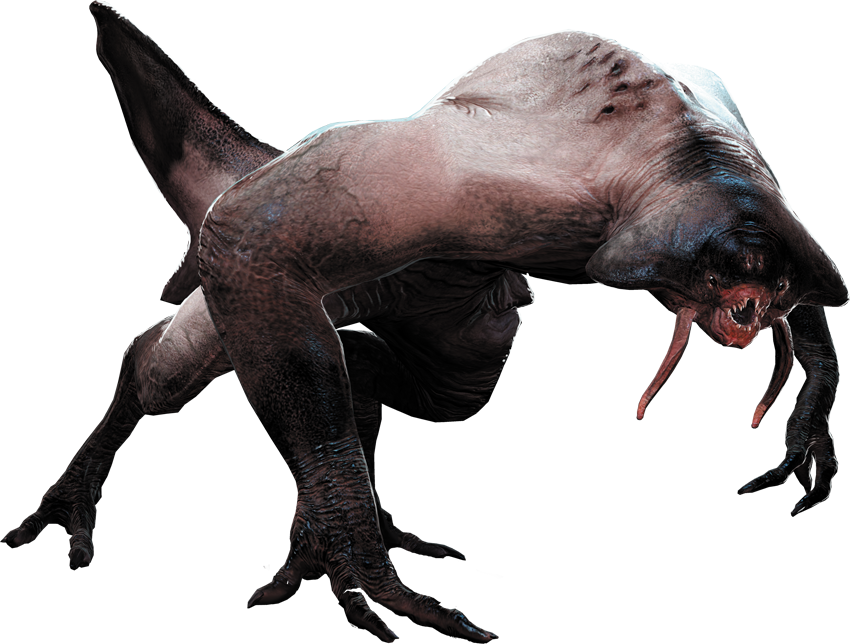
First Encounter: Gorn Planet
Weapon: Quills

The Gorn Dog is the angry “pit bull” of the Gorn. It has a leaping charge attack, and quills that it uses to fire at its enemy.
Counter Tactics
The Gorn Dog is a species native to the Gorn Planet, but it has been genetically engineered to make it more aggressive. Like Gorn Rushers, it’s best to engage these enemies at long range before they can get close enough to attack—the Starfleet Type III Rifle or Striker are ideal for taking down these creatures long before you’ve been detected. But if you’ve been detected, Gorn Dogs charge at you in small packs. While they primarily rely on a charging attack to inflict damage, these enemies can also perform a range attack by firing quills at short range. To avoid falling victim to either attack, keep moving and shooting until all Gorn Dogs have been eliminated.
Gorn Guardian
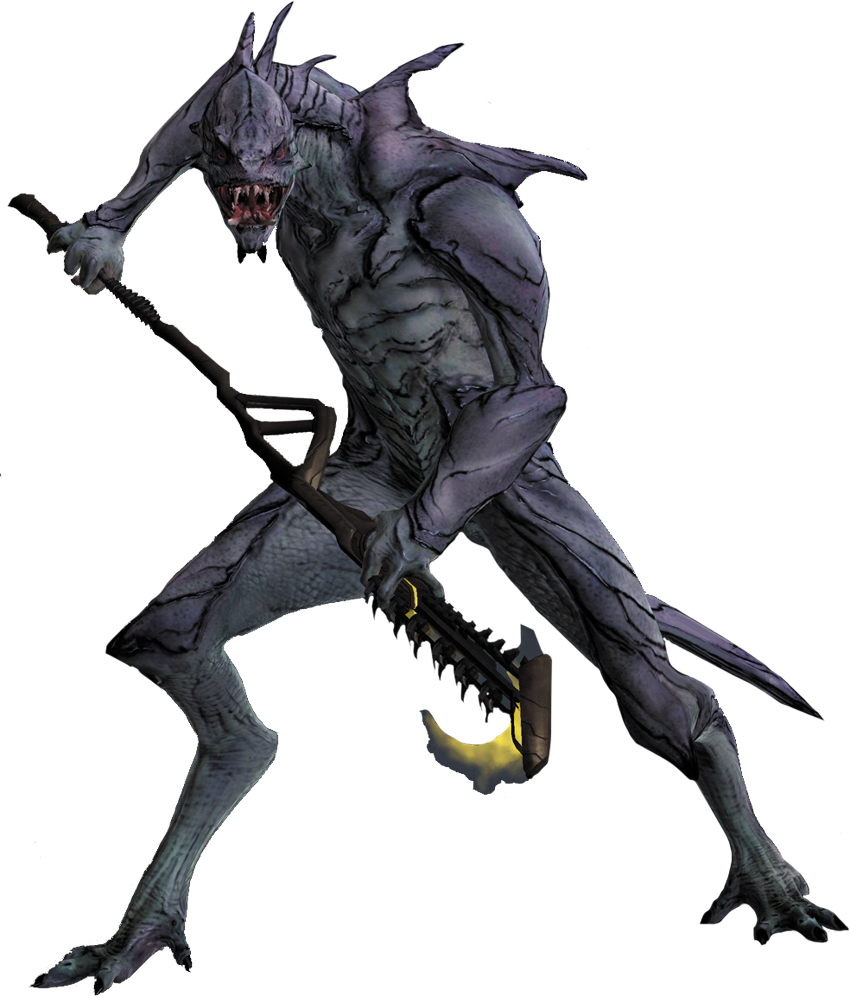
First Encounter: Gorn Planet
Weapon: Energy Axe

The Gorn Guardian is considered the “royal guard” of the Gorn and is essentially a melee-based enemy that carries a large energy axe to deal medium damage with a swiping attack. He is equivalent to the Warrior in health, but also has the ability to generate a shield from his energy axe. The Guardian is more evolved than the Initiate and Warrior; he spends more time standing upright on his hind legs. He still has a tendency to slouch down while moving, but he’s upright when unaware of enemies and his attacks are made from an upright stance.
Counter Tactics
The Gorn Guardian is similar in size and behavior to the Gorn Enforcer, and he relentlessly charges forward while attacking. The enemy’s energy axe is equipped with a directional shield that prevents the Gorn Guardian from taking frontal damage. However, the shield does not protect his back. So while the Gorn Guardian pursues you, your partner can shoot him in the back. The Guardian also lowers his shield immediately following a swiping attack with his axe, which leaves him vulnerable for a few seconds. But it’s best to avoid a confrontation with these enemies altogether. Like the Gorn Enforcer, your phaser’s stun setting has little effect on the Guardian. However, it will stun him for a couple of seconds. So if you must confront one of these enemies, shoot him in the back with your phaser’s stun setting, then immediately rush up behind him and perform a takedown. If you simply try to sneak up behind him, he will turn around and attack before you’re within melee range—so you must stun him first.
Drones
Attack Drone
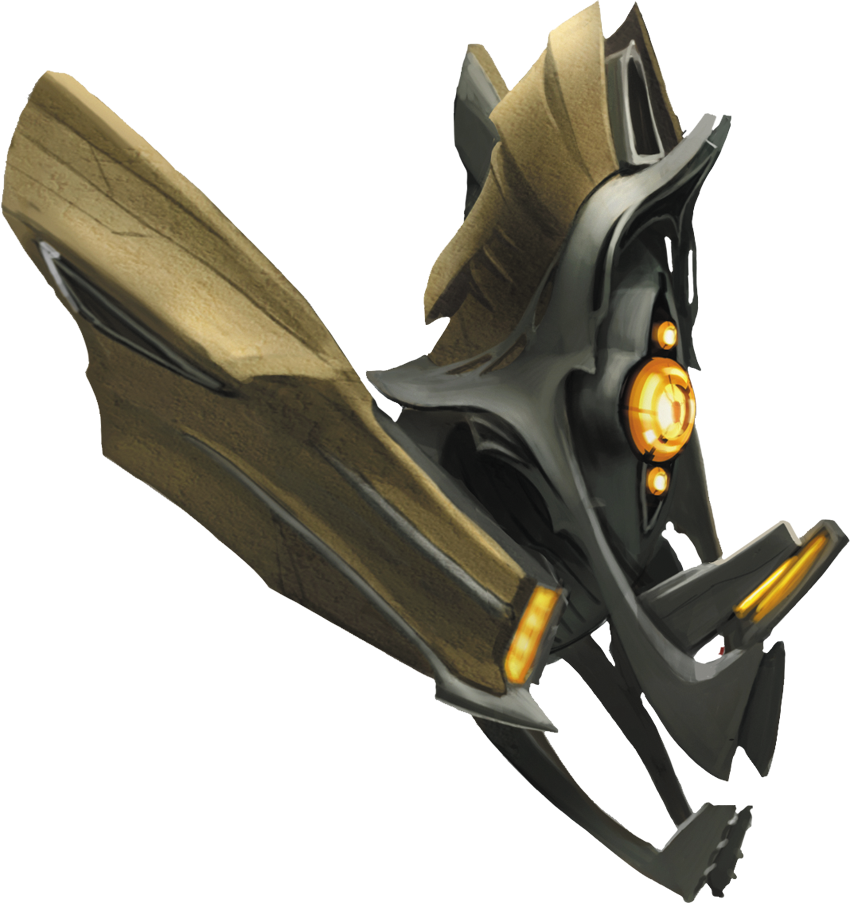
First Encounter: Frontier Starbase
Weapon: Integrated Beam Weapon

The Attack Drone has a medium-range beam weapon that increases in damage the longer it targets an enemy. Attack Drones are often deployed by Gorn Techs, using their Railer.
Counter Tactics
Attack Drones are conjured by the Gorn Techs’ Railer weapon. However, these drones are also deployed independently, and serve as sentries in sensitive locations. Attack Drones can fly at various altitudes, so they can easily detect enemies on the ground. When a target is detected, the drone commences its attack and fires a concentrated energy beam—stay behind cover to avoid contact with this yellow beam. Instead of destroying Attack Drones, stun them with your phaser, then hack them with your tricorder. A hacked Attack Drone will then fight for you, following you and attacking your enemies. They usually don’t last long in a fire fight, but serve as a force multiplier—at the very least, a hacked Attack Drone draws fire away from you and your partner.
Exploding Drone
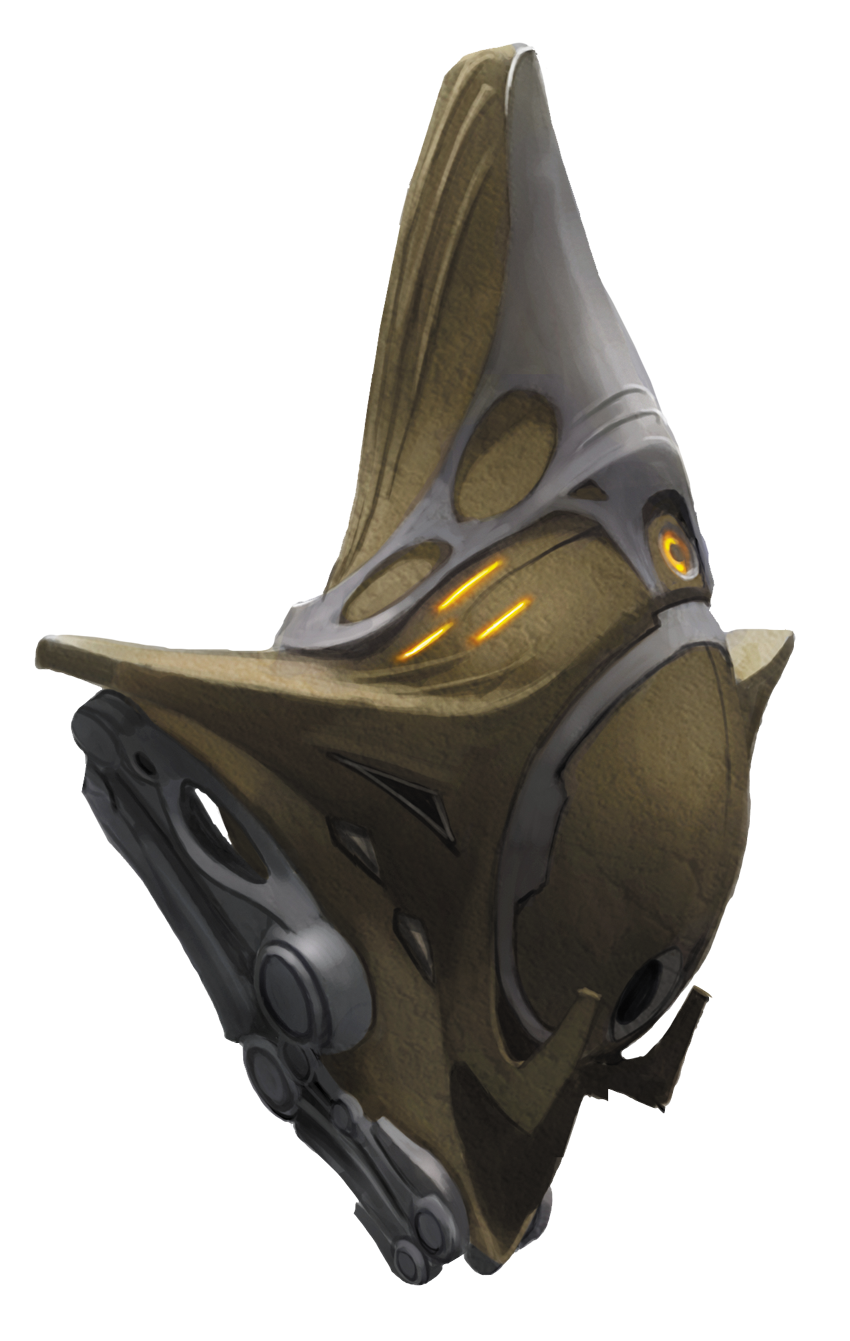
First Encounter: Volatile Cargo
Weapon: Proximity-Triggered Explosive

This red, glowing drone automatically tracks and pursues enemies, then detonates at close range, inflicting heavy damage over a wide blast radius.
Counter Tactics
Exploding Drones operate similarly to their Attack Drone counterparts. But instead of being armed with a beam weapon, Exploding Drones are packed with a high-explosive compound that is detonated when in close proximity of a hostile target. Therefore, avoid close contact with these drones. Destroy them before they get too close. Don’t stand your ground as an Exploding Drone approaches you—dive out of the way before it explodes in your face. Alternately, you can stun and hack these drones, making them turn on their Gorn creators—a hacked Exploding Drone will fly toward the nearest enemy and detonate.
Defense Drone
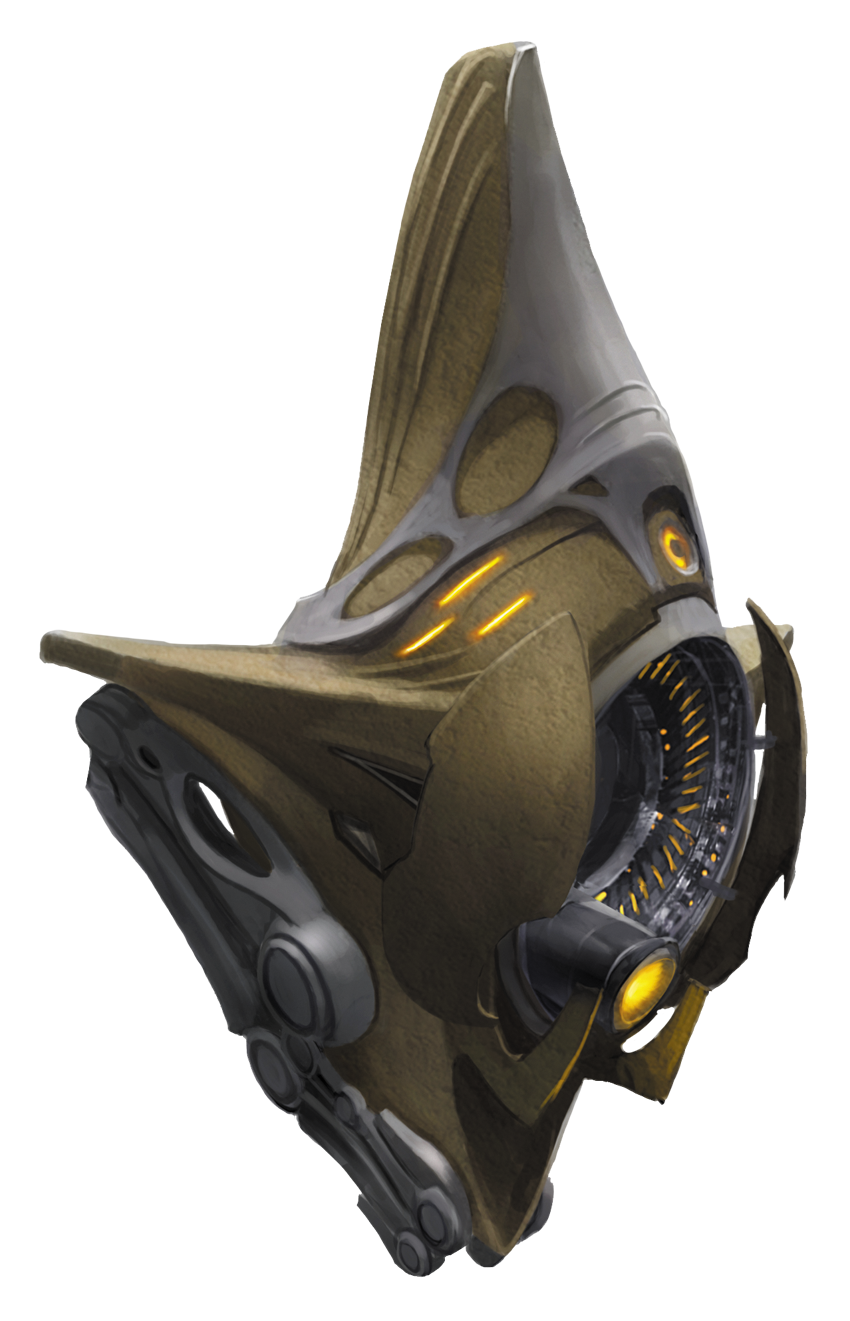
First Encounter: Gorn Planet
Weapon: None

The Defense Drone deploys near an enemy and proceeds to charge up shields around it. Once full, the Defense Drone moves on to find another enemy to shield. While not a direct threat, Defense Drones can make an easy encounter extremely difficult, as they make each enemy much harder to kill.
Counter Tactics
These blue-colored drones look similar to Attack Drones but are not equipped with a weapon. But just because they can’t shoot back, don’t take these drones lightly. Their ability to charge your enemy’s shields during a firefight makes them extremely dangerous. Furthermore, if they detect you, they will raise an alert. For best results, stun Defense Drones with your phaser, then hack them with your tricorder. The Defense Drone will then follow you, constantly charging your shields as well as those of your partner. Having a Defense Drone on your side can make all the difference in a chaotic firefight.
Infection Drone
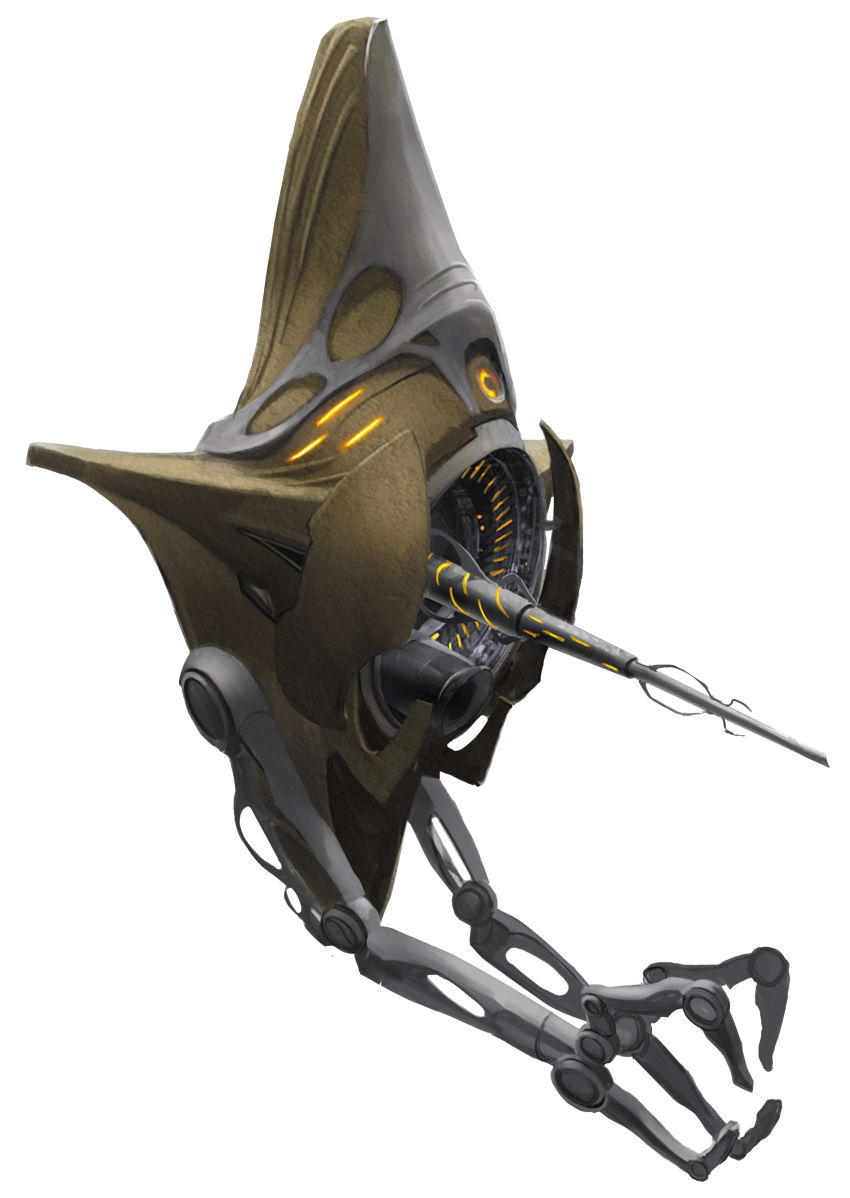
First Encounter: Frontier Starbase
Weapon: Venom-filled Syringe

Truly the most terrifying drone type, the Infection Drone can be used to turn humanoids into mindless killing machines. Throughout your adventure you will encounter Vulcans, humans and others than have become infected due to this drone’s venom.
Counter Tactics
The Infection Drone is seen only in cinematics and never confronted directly. So you don’t need to worry about taking out these drones.
Infected Enemies
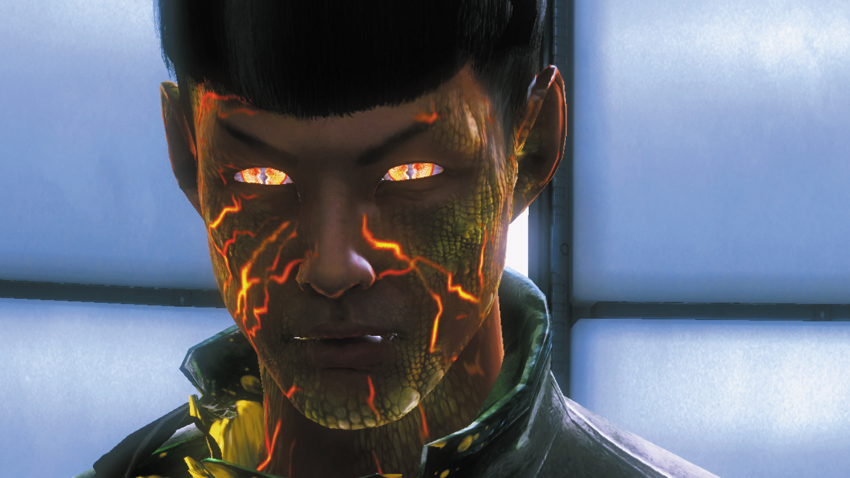
First Encounter: New Vulcan
Weapon: Mixed Melee and Ranged Weapons

Gorn Security
Gorn Turret
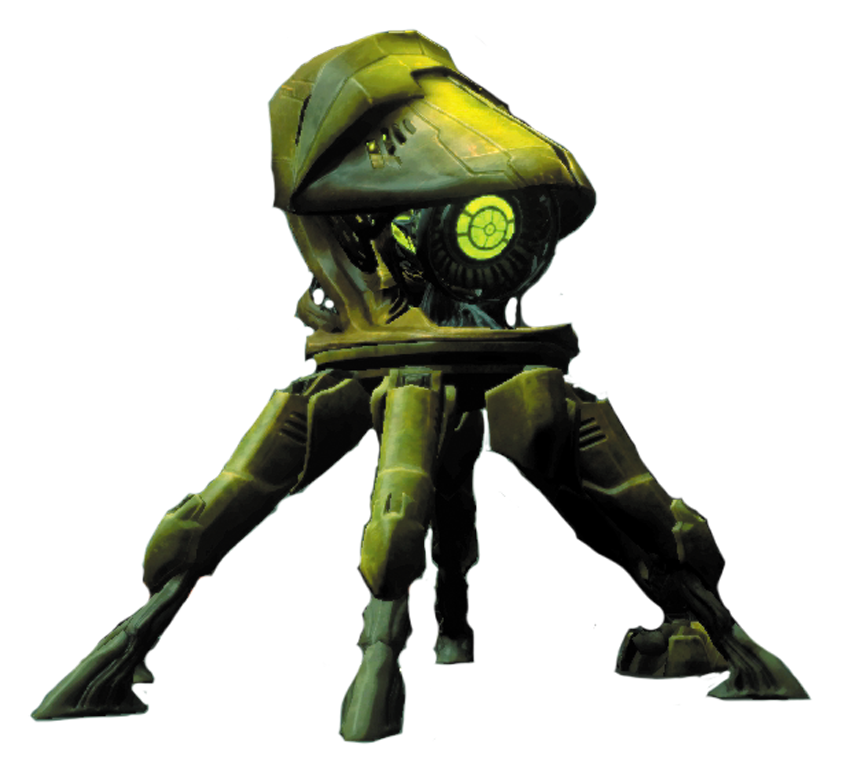
First Encounter: Frontier Starbase
Weapon: Automatic Energy-based Weapon

The Gorn often deploy these stationary automated turrets at critical choke points to preventing enemies from accessing sensitive areas. When in scan mode, these turrets emit three green beams, indicating the direction they’re facing as they pan. If an enemy crosses within its field of view, the turret opens fire, relentlessly tracking and shooting at its target.
Counter Tactics
Turrets are best avoided when possible—you don’t want to get in a firefight with these things. Turrets are extremely durable, capable of withstanding heavy punishment from the most powerful weapons available. While turrets can be destroyed, you put yourself and your partner at great risk when attempting to take out these lethal sentries. But all turrets can be bypassed by hacking their control station, which causes the turrets to engage Gorn targets instead. Using your tricorder, locate a turret’s control station by following a wire from the turret to the station—control stations are often positioned behind the turret to prevent enemies from tampering with them.
Mine
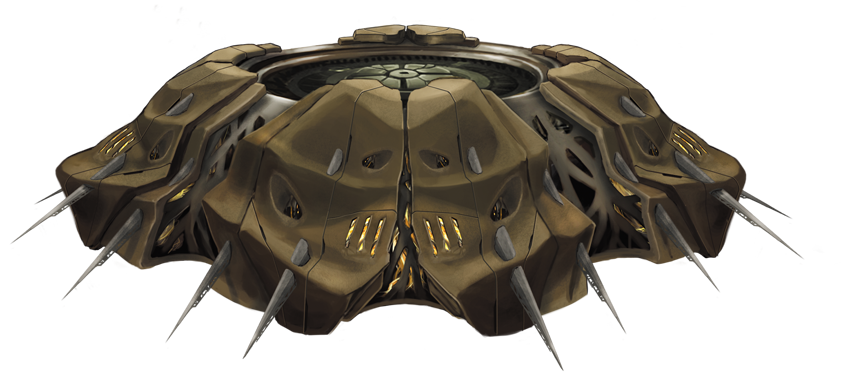
First Encounter: Frontier Starbase
Weapon: Proximity-Triggered Explosive

Like turrets, mines are often placed in highly sensitive locations defended by the Gorn to prevent unwanted intrusions. Mines are often placed on the ground, but can also be attached to walls and ceilings. Detonation of mines is proximity-based. As you approach a mine, it emits a beeping sound shortly before it explodes.
Counter Tactics
Mines can be hacked to explode when Gorn enemies approach—bypass their programming using your tricorder. Alternately, they can be destroyed by simply shooting them. Once you’ve bypassed a mine, use the tricorder’s sound decoy upgrade to lure enemies toward it. This is a great way to dispatch enemies without provoking an attack. Furthermore, an exploding mine will not cause an alert, making this tactic ideal when you are attempting to earn a stealth-based commendation.
Security Camera
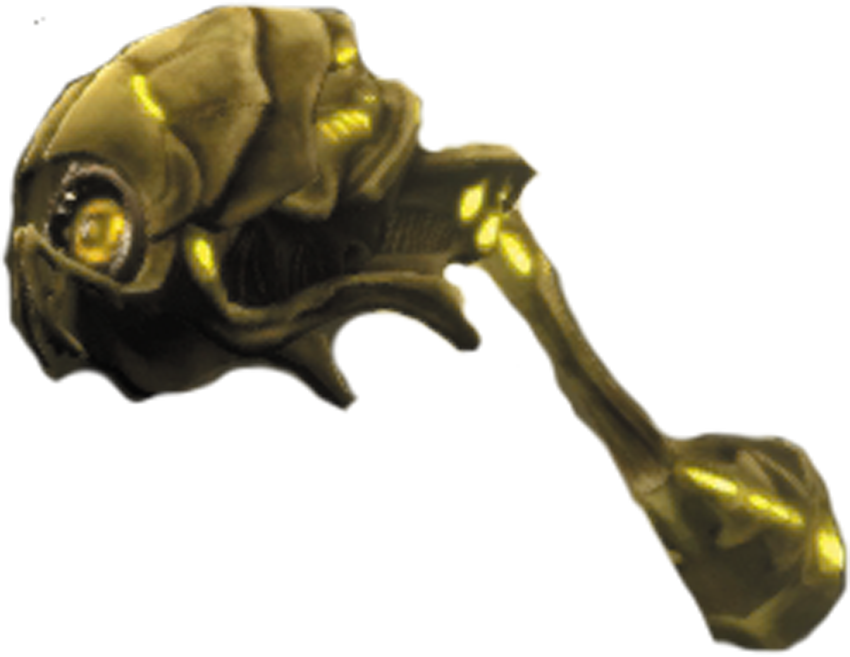
First Encounter: Gorn Planet
Weapon: None

The Gorn rely on security cameras to keep a watchful eye on sensitive areas. These devices are usually attached to walls and above doorways. Security cameras perform continuous lateral pans while emitting a green spotlight on the ground—if you step into the green light, you will be detected and the alarm will sound and reinforcements will arrive.
Counter Tactics
All security cameras are attached to a small wall-mounted console that can be hacked to disable the device. This is the preferred method for dealing with these cameras. You can also circumvent them by simply avoiding the green light they emit by carefully timing your movements or utilizing cover to avoid detection.
Advanced Gorn Enemies
Gorn Brute
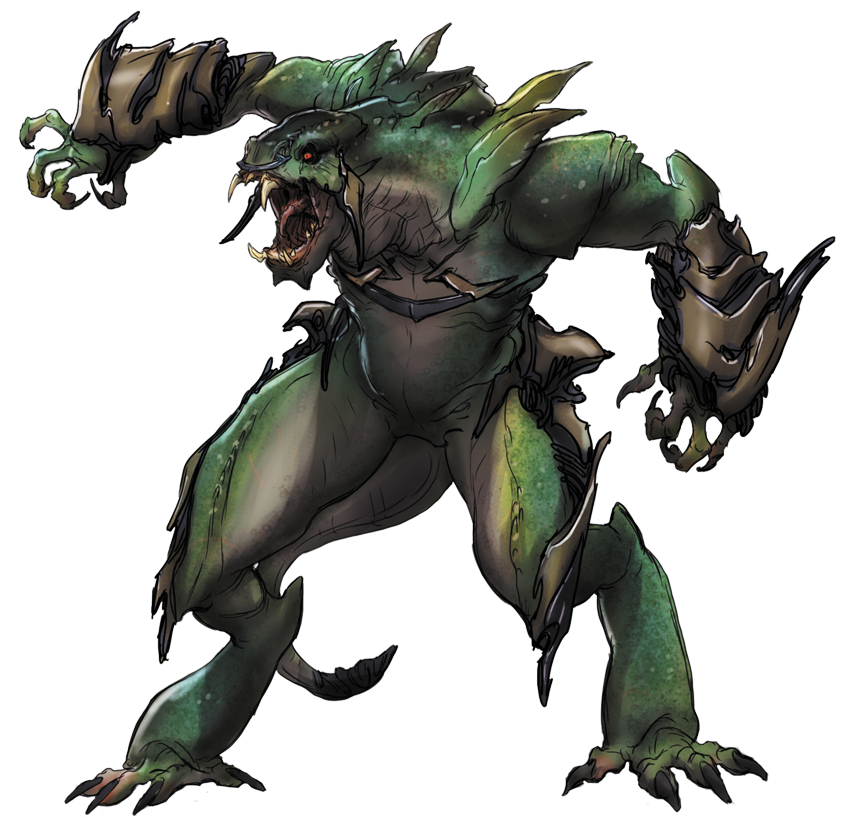
First Encounter: New Vulcan
Weapon: Energy Cells (thrown)

The Brute is one of the fiercest, most dangerous Gorn in close quarters. Big and heavily armored, they aren’t evolved enough to use weapons, relying instead on their claws and using charging attacks to devastate their enemies. Brutes charge through cover, destroying it and sending anyone behind that cover flying backward. The Brute has a large amount of health and is most heavily armored in the front.
Counter Tactics
Like with all melee-based enemies, don’t bother seeking cover when confronting a Gorn Brute. It’s better to stay mobile so you can dive out of the way when this enemy charges. On occasion, the Gorn Brute stops his charging attacks and retrieves energy cells from nearby containers. Shoot the energy cells while the Gorn Brute is still holding them to cause them to explode in his face and inflict heavy damage. If you’re not fast enough, the Gorn Brute will hurl the energy cell in your direction, forcing you to evade the object and its large blast radius. When you’re not shooting energy cells out of his hands, keep shooting the Gorn Brute with your weapon of choice to slowly deplete his health.
Gorn Lieutenant
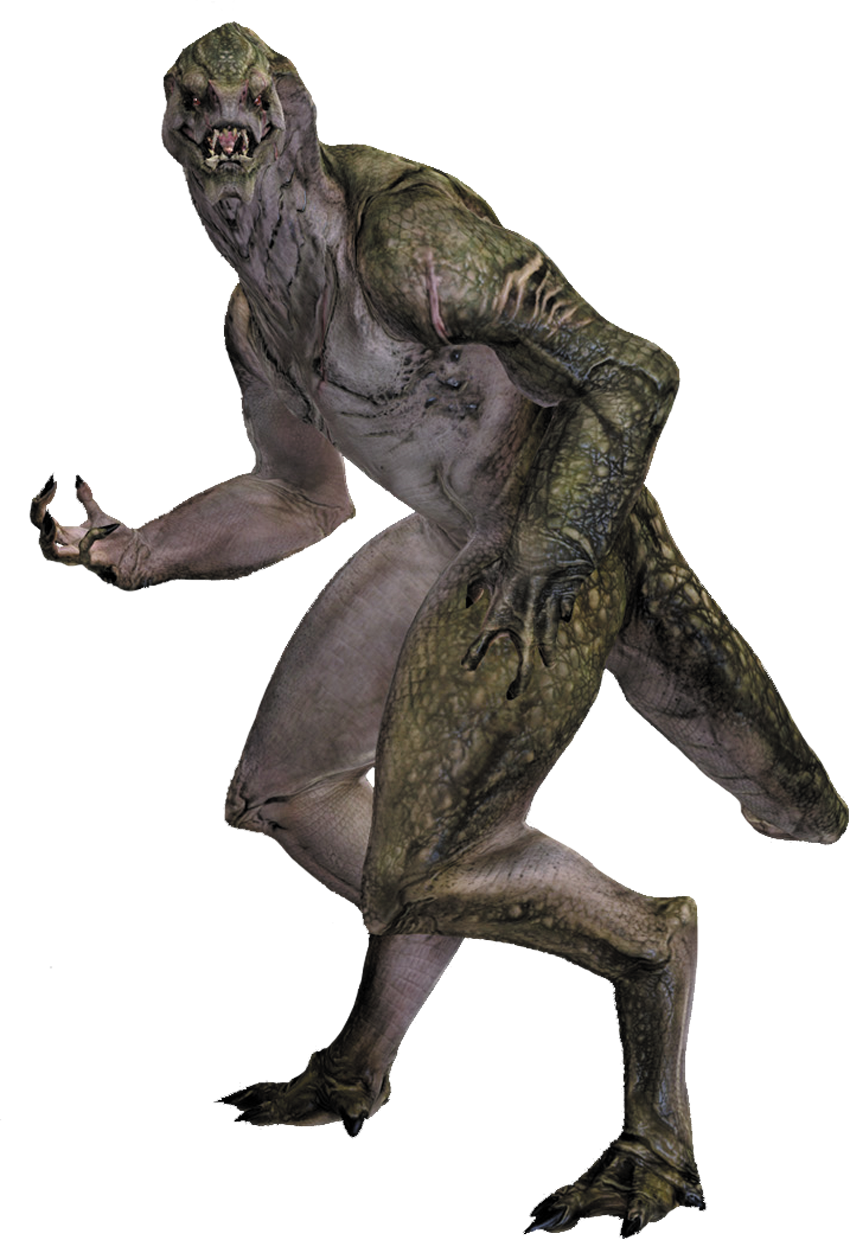
First Encounter: New Vulcan
Weapon: Pillager

The Gorn Lieutenant is one of the main antagonists in the game. He is first encountered on New Vulcan and is the Gorn that steals the Helios Device. Second in command of this particular Gorn Armada, the Lieutenant leads squads of Initiates and Warriors and takes orders directly from the Gorn Commander. The Lieutenant’s weapon of choice is the Pillager, but his real danger is his ability to cloak.
Counter Tactics
Before you can even attack the Gorn Lieutenant, you must deactivate his cloaking device—otherwise he’s invisible and cannot be hit. Once Scotty has upgraded your tricorder, it can be used to temporarily disable the Gorn Lieutenant’s cloaking device. Alternatively, activating the Enterprise’s fire suppression system can temporarily reveal this enemy. Once visible, the Gorn Lieutenant takes damage like any other enemy. But stay behind cover while attacking to avoid getting hit by incoming fire from his Pillager. As the Gorn Lieutenant disappears, disable his cloaking device again and resume your attack.
Gorn Champion
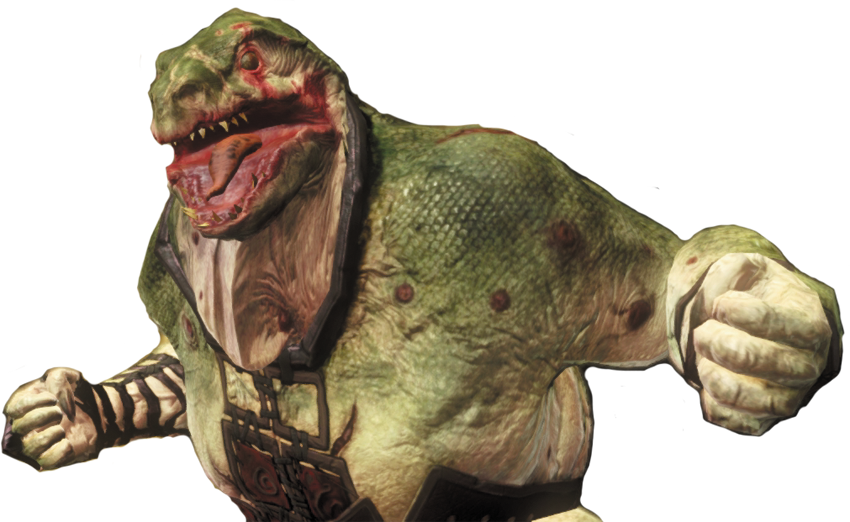
First Encounter: Gorn Planet
Weapon: Boulders (thrown)

An 8-foot mutated Gorn, the Gorn Champion is an homage to the Gorn featured in “The Arena” episode from The Original Series. In the episode, Kirk faced this enemy in a one-on-one duel. The Champion makes his only appearance in a boss battle that takes place in the Trials on the Gorn Planet. The Champion is bigger and burlier than the average Gorn due to his rare birth defects. This enemy largely performs charge and melee attacks, but can also hurl large rocks great distances.
Counter Tactics
During the single encounter with the Gorn Champion, he performs much like the Gorn Brute. His attacks primarily consist of charges, and you must dive out of the way to avoid being trampled. He also throws large boulders at you, giving you more objects to evade. The Gorn Champion is resistant to all standard weapon attacks. It’s not until Kirk and Spock modify their weapons to fire Plasma Grenades that the Gorn Champion begins taking damage. Hammer the Gorn Champion relentlessly with Plasma Grenades until his health is fully depleted.
Gorn Sentinel
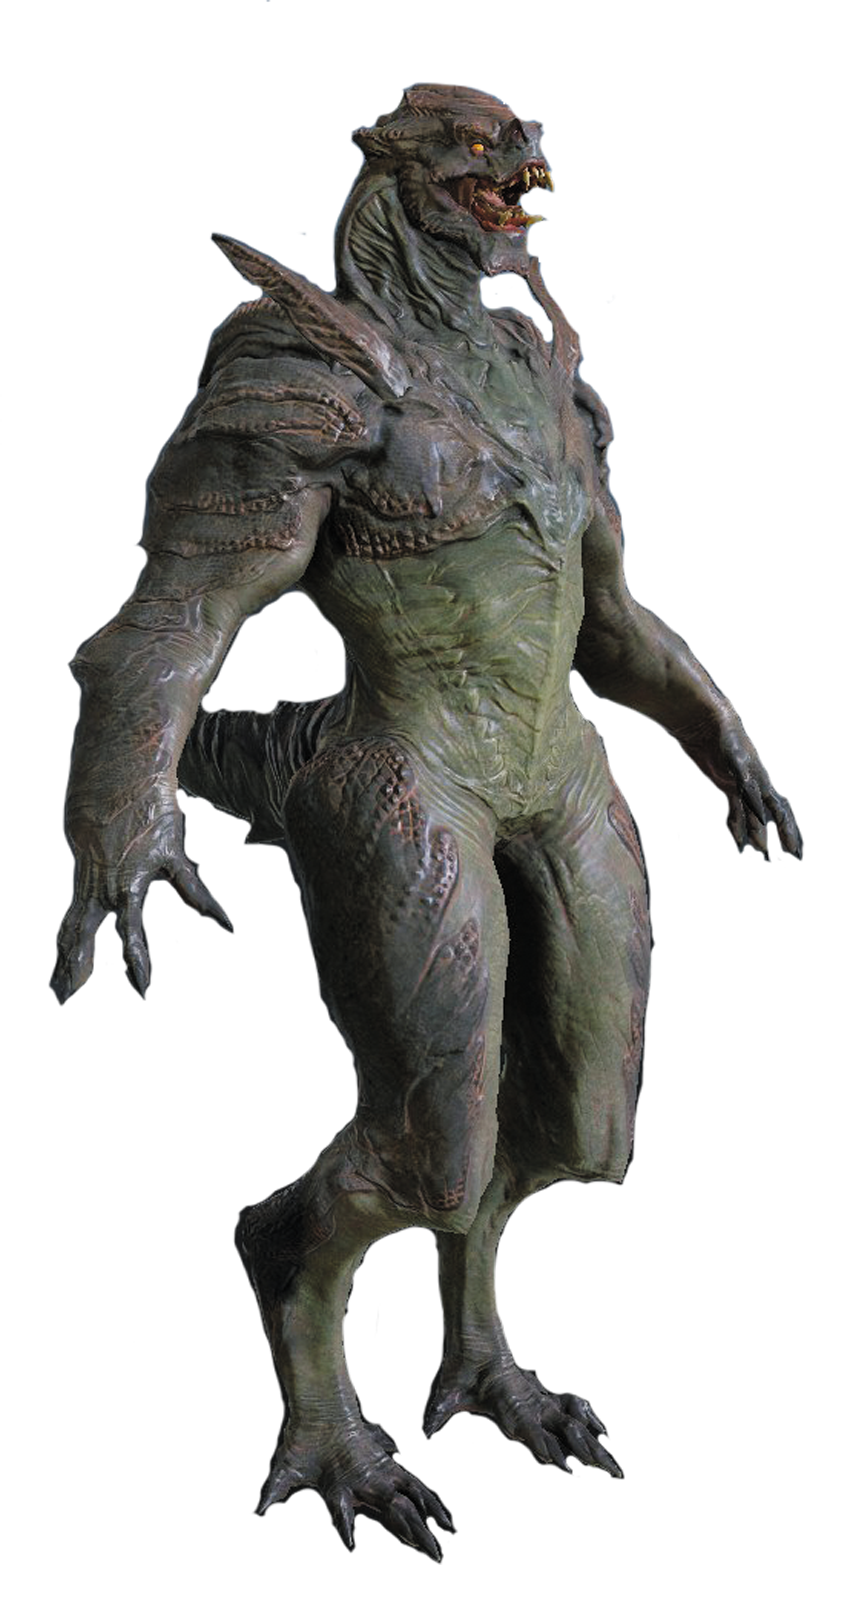
First Encounter: Gorn Mothership
Weapon: Arc Driver

The Sentinel is one of the largest Gorn in the race. He uses the Arc Driver as his main weapon. An arc of electricity will jump between targets if close enough, making the Gorn Sentinel devastating to groups of enemies.
Counter Tactics
As long as you’re well armed, the Gorn Sentinel isn’t as tough as he looks. But it’s important to keep your distance and stay behind cover to avoid attacks by the enemy’s Arc Driver. Explosive weapons are most effective against the Gorn Sentinel. While hiding behind cover, toss Plasma Grenades directly at the enemy, so that they attach to his body. Or simply hit him a few times with the Arc Driver’s secondary fire function and launch rocket-like explosives at him. After he sustains only a few direct hits from Plasma Grenades or the Arc Driver’s secondary fire function, nothing will be left of the Gorn Sentinel.
Gorn Commander
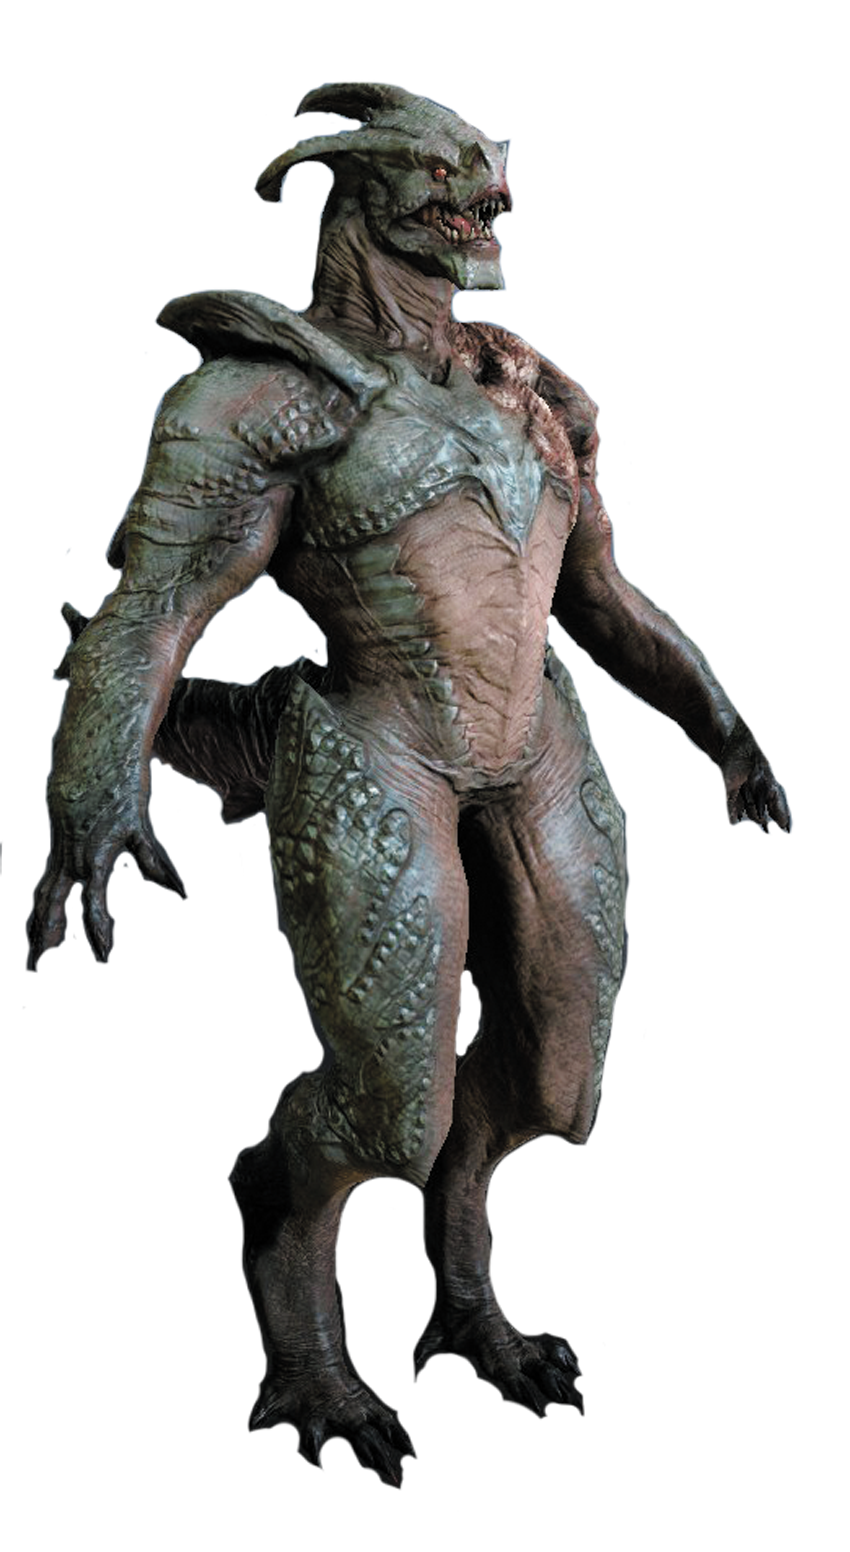
First Encounter: Frontier Starbase
Weapon: Arc Driver

The Gorn Commander is the leader of the Gorn Armada encountered during the adventure. While the Gorn Commander makes appearances in cinematics throughout the campaign, Kirk and Spock don’t confront him until they reach the Gorn Mothership. Armed with an Arc Driver and protected by thick reptilian skin, the Gorn Commander is a formidable opponent that requires skill, persistence, and teamwork to defeat.
Counter Tactics
In the final boss fight aboard the Gorn Mothership, make sure you enter the battle armed with an Arc Driver of your own. The Arc Driver is the most effective weapon against this enemy, as it slowly depletes the Commander’s health over time. But don’t attack too aggressively—be ready to avoid the Commander’s attacks. The Commander’s Arc Driver has a slightly different secondary fire function—launching multiple explosive grenade-like munitions. To avoid getting hit by these grenades, rush forward, toward the Gorn Commander to escape their large blast radius. The Commander constantly teleports throughout the room, similar to Gorn Techs, to gain an advantageous position. So instead of seeking cover, stay on the move, attacking, evading, and replenishing ammo for your Arc Driver from nearby Energy Stations.
Gorn Weapons
Gorn soldiers are issued a variety weapons created with organic and technological components—Scotty theorizes that the weapons appear to be grown rather than manufactured. While these bizarre alien weapons differ in appearance and function, they’re all designed to inflict as much damage as possible. Although created for the Gorn, these weapons can be operated by humans and Vulcans. Though Scotty is uncertain what the long-term effects of operating them may be, given biological nature of the weapons.
Ravager
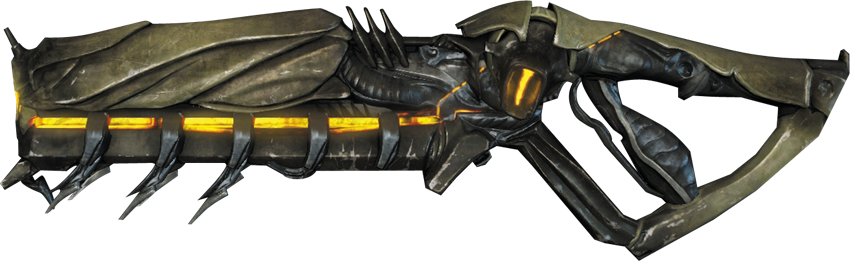
First Available: New Vulcan
Primary Fire: Fully-automatic plasma shots
Secondary Fire: Knockdown stun
Scotty’s Analysis
A nasty projectile weapon used by what I’m calling the “Initiate” class of Gorn soldiers. The knockdown secondary fire should be effective against a wider range of enemies than phasers normally are.
Field Notes
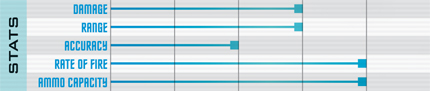
The Ravager is the most common Gorn weapon, carried by Gorn Initiates and Gorn Observers. Given its widespread availability, you should be familiar with its operation. The Ravager functions much like the Vulcan Pulse Cannon, firing plasma shots at a high rate through its primary fire function. Like its Vulcan counterpart, the Ravager exhibits significant recoil when firing automatically. The secondary fire function emits a non-lethal knockdown stun that is capable of knocking an enemy off their feet. With its mix of lethal and non-lethal fire options, the Ravager is a good choice to use when confronting a mix of infected enemies as well as the Gorn.
Marauder
First Available: Frontier Starbase
Primary Fire: Semi-automatic spread fire shot
Secondary Fire: Knockdown grenade
Scotty’s Analysis
A particularly brutal weapon intended for close-range mayhem, not unlike the shotgun used in Earth’s history.
Field Notes
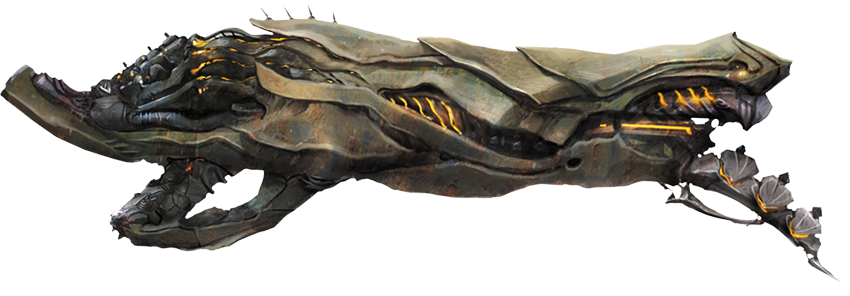
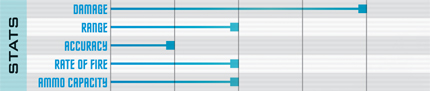
Carried exclusively by the Gorn Enforcer, the Marauder is a devastating close-quarter shotgun-like weapon designed for frontal assaults. The weapon inflicts extreme damage at close range, but due to its spread pattern is less effective (and less accurate) at ranges beyond 10 meters. This makes it best for engaging enemies like the Gorn Rusher, Gorpions, Gorn Dogs, and Enforcers that prefer to attack at close range. The secondary fire function is a grenade launcher that fires a knockdown grenade. This grenade inflicts only moderate damage, but is capable of knocking multiple enemies off their feet, and gives you a chance to move in to close range for the kill. While the Marauder is a fearsome close-quarter weapon, its limited ammo capacity and long reload times make it somewhat cumbersome to operate during intense firefights.
Railer
First Available: Frontier Starbase
Primary Fire: High-powered charge shot
Secondary Fire: Drone transport beacon
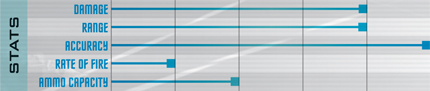
Scotty’s Analysis
A high-powered charge weapon that can penetrate thin walls and hit multiple targets at once. This is evidence that the Gorn are not simple brutes, but possess a technological aptitude that allows them to develop weapons that rival Starfleet’s in their sophistication.
Field Notes
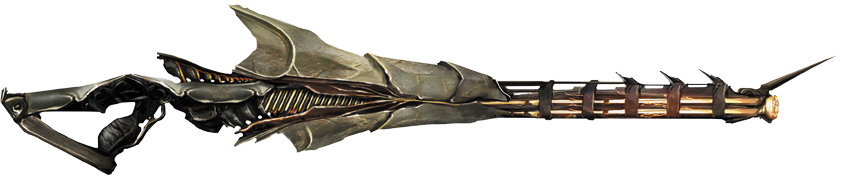
The Railer is the preferred weapon of Gorn Techs—do your best to dispatch these enemies without being detected because the Railer is a truly viscous, precision weapon capable of penetrating cover. When firing this weapon, hold down the trigger to build a charge while aiming at your target. Once a charge is built, release the trigger to fire. The weapon fires a thin, but intense energy beam—pinpoint accuracy is required to hit your target. The beam can pass through cover as well as multiple enemies, making it possible to score multiple kills with one shot. However, while charging a shot, you’re exposed to incoming fire. To help draw fire away from you, use the weapon’s secondary fire function to conjure an Attack Drone to fight alongside you. The Attack Drone will automatically engage enemies in the area, helping to distract enemies while you charge a shot. Admittedly, the Railer has a steep learning curve, but once you get the hang of it, it’s a very formidable weapon.
Pillager
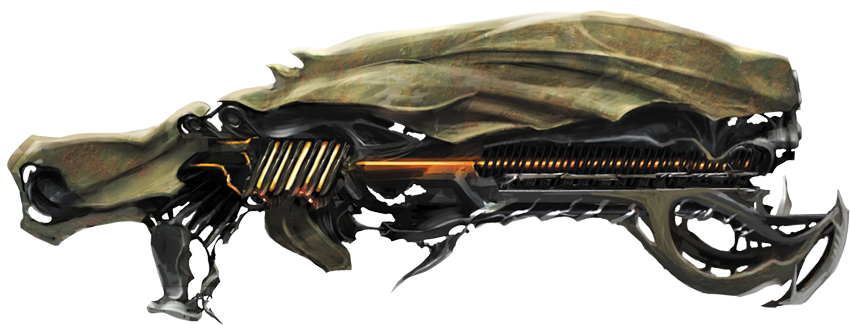
First Available: Frontier Starbase
Primary Fire: Fully-automatic projectiles
Secondary Fire: Spread shot
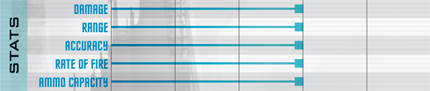
Scotty’s Analysis
A ballistic weapon stolen from an enslaved race and used by various Gorn Warrior classes. I shudder to think what they would do if they get their hands on Starfleet weapons. So let’s ensure that they don’t.
Field Notes
Carried by the Gorn Warrior and Gorn Lieutenant, the Pillager performs like a mix between the Ravager and Marauder, combining the full-auto characteristics of an assault rifle with the close-quarter power of a shotgun. As a result, this is one of the most versatile weapons available and ideal for engagements at any range. The primary fire function operates the assault rifle portion, firing a steady stream of projectiles fed from a 50-round magazine. Meanwhile, the secondary fire function operates the shotgun-like feature—each pull of the trigger here consumes five rounds of ammo, but the close-quarter damage output is well worth it. The Pillager isn’t as common as the Ravager, but it’s worth seeking out, particularly if you intend to fight your way through enemy-controlled areas as opposed to sneaking through.
Striker
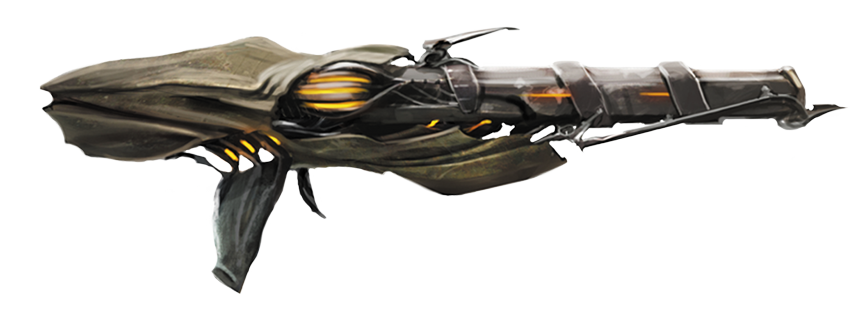
First Available: Gorn Planet
Primary Fire: Single-shot, high-velocity, high-damage projectile
Secondary Fire: Knockdown shot
Scotty’s Analysis
The Gorn equivalent of a sniper rifle. As much as the Gorn seem to prefer dispatching their enemies at close range, this weapon is evidence that they’ll use whatever means necessary to eliminate opposition.
Field Notes
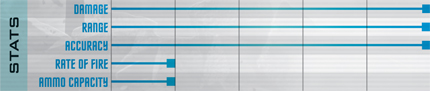
The Striker is a high-powered sniper rifle-type weapon carried exclusively by the Gorn Scout. The weapon functions similarly to the Starfleet Type III Rifle, complete with a magnified zoom that is accessible when aiming. The weapon holds only four rounds of ammo per magazine, so it requires frequent reloads during large-scale engagements. But each shot consumes only one round, whether firing the primary kill or secondary knockdown functions. The secondary knockdown shot is a non-lethal option; it simply knocks the targeted enemy off their feet. This is useful when engaging fast-moving enemies—hit them with a knockdown shot, then follow up with a kill shot before they can get back on their feet. Due to the weapon’s low rate of fire and limited ammo capacity, this is purely a long-range weapon—look for a different weapon if you’re taking the fight to intermediate or close range.
Arc Driver
First Available: Gorn Planet
Primary Fire: Focused beam of energy
Secondary Fire: Missile
Scotty’s Analysis
A ranged energy weapon of considerable destructive power. If you see one coming, looking for cover should become your priority. I can almost respect the ingenuity that went into this one. Almost.
Field Notes
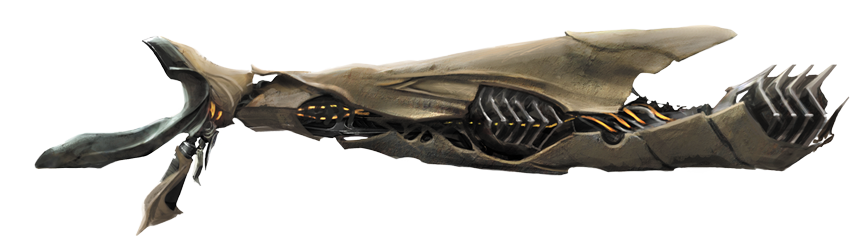
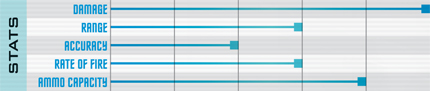
The Arc Driver is the most destructive weapon in the Gorn arsenal and is deployed by Gorn Warriors, Gorn Sentinels, as well as the Gorn Commander himself. When the primary fire function is activated, the weapon emits a powerful yellow beam of energy. Keep holding down the trigger to continue firing the beam—think of this weapon like an energy-based flamethrower. While the arc of energy inflicts damage to your target, the arc can also jump to nearby enemies. This makes the weapon very effective against groups. Even more devastating is the weapon’s secondary fire function, which launches a high-explosive missile with a very large blast radius—almost all enemies caught in the missile’s blast radius are vaporized. But each missile fired consumes one full 300-round magazine of ammo, which requires frequent and lengthy reload sequences. While the Arc Driver has enormous damage output, it’s far from a precision weapon. It’s best deployed at close to intermediate range against enemies that are exposed. This makes it most suitable for boss fights, such as when you’re fighting the Gorn Commander.
Plasma Grenade
First Available: Frontier Starbase
Scotty’s Analysis
Standard grenade used by the Gorn for maximum carnage. It has the ability to stick to any surface, including you, so be ready to peel it off and throw it back. Preferably in the direction it came from.
Field Notes
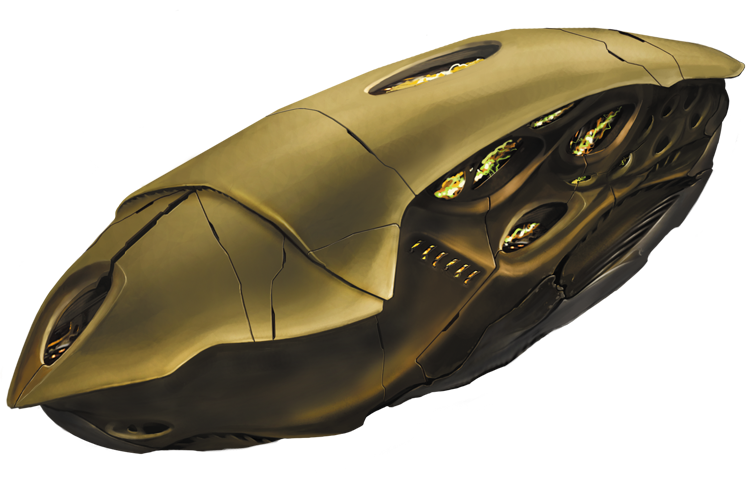
While the Plasma Grenade is thrown the same way as Stun Grenade, all similarities end there. Designed by the Gorn to inflict maximum damage, the Stun Grenade is extremely lethal. The weapon utilizes a time-delay fuse and detonates a few seconds after it is thrown. Upon making contact, the grenade sticks to the surface of any object, including enemies, before eventually exploding. So instead of throwing these grenades near an enemy, try to throw them directly at an enemy to ensure maximum damage—this is very effective when engaging large-scale advanced enemies like the Gorn Brute or the Gorn Sentinel. Plasma Grenades are quite plentiful in Gorn-controlled installations. Look for them within Gorn crates or near the bodies of fallen foes. You can carry a maximum of two Plasma Grenades.