
Tom Clancy's Splinter Cell: Conviction Guide Essentials The Essentials
Training - Introduction
Training
Sam Fisher is a splinter cell, a lone wolf operator who was authorized to exercise the so-called fifth freedom. As a splinter cell, he was off the books and in the shadows, where he could be disavowed if he was ever caught by the enemy.
But with Fisher's training and tactical skills, Third Echelon has not yet had to deny his existence. Fisher's game is to keep his existence a secret until the last possible second, stepping out of the darkness to strike and then retreat before anybody knows he was there.
You need this same training if you are to help Fisher complete his most dangerous, and most personal, assignment yet. From a converted museum in Malta to a daring mission in Washington DC, Fisher must outsmart and outmaneuver not only a band of mercenary thugs with military training, but also agents that he himself helped train.
Success will require knowledge of every trick in the book, from giving a glimpse of Fisher's movement to the enemy to establish a possible Last Known Position (LKP) to being an expert at EMP grenade usage.
The Essentials
Your specialty is stealth. Third Echelon agents are trained to be ghosts, undetectable to the average eye. But sometimes a situation gets out of control and the only way out is shooting everybody is sight while running as fast as possible in an effort to seek a shadow.
Once in that shadow, you can disappear again. Learning the balance between direct engagement and stealth is the key to victory in this assignment.
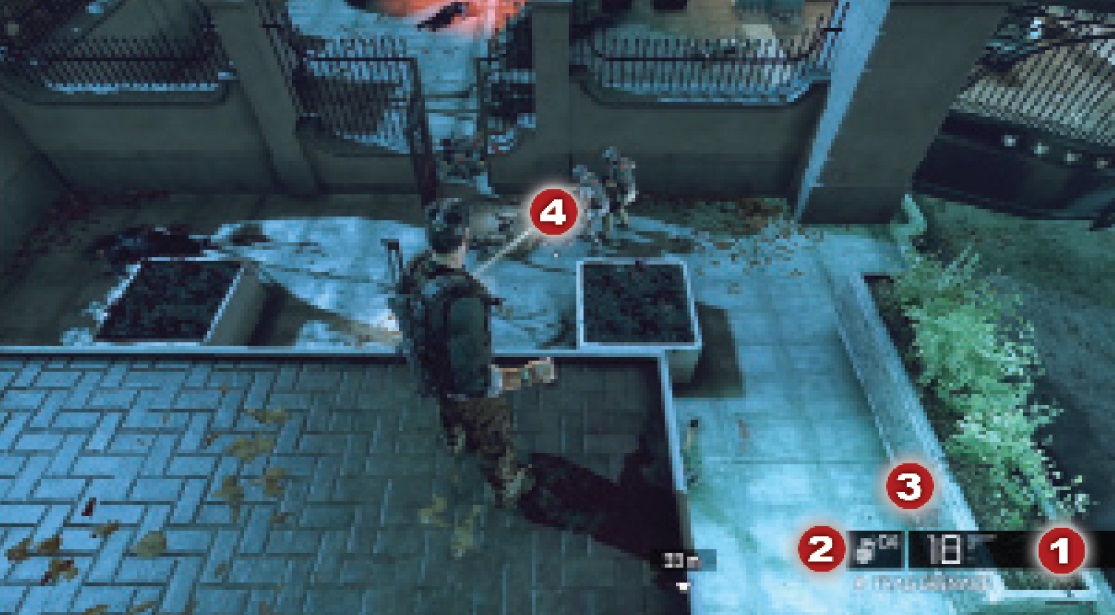
But before going into detail about different tactics, you must understand the essentials of being a Third Echelon agent. When you are in a mission, you have a minimal Head's Up Display (HUD) that only shows your vitals.
Instead of worrying about meters and gauges, survey the scene to uncover the smartest routes through trouble areas and spot opportunities for dealing death to your enemies. Here is the main game screen:
1. Current weapon: This is your currently selected weapon. You can carry only two weapons - one sidearm and one alternate weapon, such as a submachine gun or assault rifle.
Your sidearm has unlimited ammunition, but your secondary weapon does not. Monitor current ammo stocks next to the secondary weapon's icon.
2. Current gear: This is your active gear, such as frag grenades, remote mines, or portable EMP device. The number of available uses (when relevant) flanks the gear icon.
3. Marks for execution: You can mark as many targets as there are chevrons here. When you have an execution ready (explained later in this chapter), and targets marked that are within line of sight and within the precision range of your weapon, these chevrons turn red and the button prompt for unleashing the execution turns red.
4. Target cursor: This is where you are currently aiming your weapon.
When you are injured by a fall or a gunshot wound, the screen starts to turn red. The redder it turns, the more trouble you are in. And if it starts pulsing, then you better find cover as soon as possible to recover. Wait in the shadows or out of sight until the red dissipates, indicating that you are back to full health.

New objectives are painted on the side of buildings and objects to help direct you to the next point. You can also call up the objective at any time after that by pressing the Back button.