
Little Big Planet: Karting Guide Essentials Create Mode
Creating a Challenge
Ever feel like your sack person is driving in circles? Long to blow off some steam by blowing up the Hoard without worrying what place you’re in? Well, it’s time to stop thinking and start creating. So come on, stop waiting for the action to come to you…make your own!
Battle Royale…with Cheese
The food service industry is a cutthroat place and even the most noble delivery sack person has to bump up against the competition every now and then. Freelance delivery drivers sure do have it rough! The management’s latest brilliant idea: Make the drivers fight for each delivery!
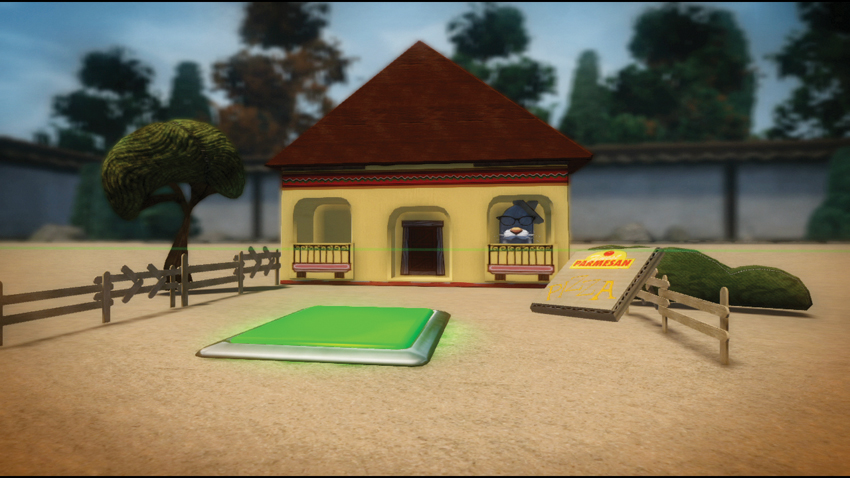
This Challenge Arena boasts a number of tasty features. There’s one hungry house ordering all the pizzas, and every driver wants to get there. But there’s only one pizza at a time and everyone wants the big tip.
All drivers start out with an unlimited Paintinator weaponator so they can only stun each other and try to steal the pizza box. But even when they get to the house, they have to ring the doorbell and deactivate the security to finish the delivery. It gets even tougher for the person holding the pizza—their kart gets super-sized, making them a bigger target for the competition.
A Beautiful Beginning
Popit Cursor Controls
| Logic | Sensors | World Tweakers | Kart Tweakers |
|---|---|---|---|
| Microchip | Reset Sensor | Score Giver | Powerup Loadout |
| Weapon Loadout |
The first step to creating this challenge begins, as with many things, in your Popit. It’s easy enough to get started by opening your Popit and selecting Track & Arena Edit. From the two options, select Create Arena since this isn’t a race. Choose the square shape, and voila! A ready-made boundary is conveniently dropped in the middle of your level along with a Scoreboard and an array of spawn points for your go-kart gladiators.


Because the unique gameplay of this challenge requires all drivers to have Grabinators and Paintinators from the start, it’s necessary to add some gadgets to the Spawn Points.

There’s a fair bit of logic being used, so a Microchip is a necessity. Attach one to the nearest spawn point. Its circuit board is parallel to the ground, making placing gadgets on it a bit difficult. Select the circuit board and click
 to flip it down using the left stick to a normal position before getting to work.
The beauty of the Microchip is that its circuit board can be as large or as small as you need it to be to fit your Logic without affecting the size of the actual objects in your level. After flipping it down and securing its new orientation, press
 to raise it up and the directional buttons to expand it to a comfortably large size.
Gearing Up for Delivery
The pies your would-be-delivery karter’s are delivering are hot to the touch and dangerous for any civvies not equipped with the proper gear. All our drivers’ karts need some professional-grade hand wear to touch these deliverables. To make sure your sack person doesn’t get their mitts burned, they need some high-end hand protection: the Grabinator!

To ensure that every driver starts with the Grabinator, get the Powerup Loadout tweaker from the Tools Bag on the Gadgets page under the Kart Tweaker section. Slap it on, open its tweak menu, and cycle through the options under Powerup Loadout Type until arriving at the Grabinator. Now any kart that resets using the spawn point starts with a Grabinator.

The remaining gear to outfit drivers with is a non-lethal but still potent weaponator: the Paintinator. Having every driver start with one ensures all are on equal footing. The fact that it only stuns ensures that pizzas change hands quickly in a flurry of paint during this challenge.
Open the Tools Bag to the Gadgets page to find the Weapons Loadout tweaker in the Kart Tweakers section. Place it on the circuit board and tweak it to choose the Paintinator as the Weapon.
Punishing Trespassers
The ravenous customer ordering all the pizzas is a very private person. It’s therefore not a big surprise to find a high-voltage security system surrounding the house. Trespassing is a serious offense in the Craftverse, and a driver who does it needs to be punished beyond having to reset.
The handy Reset Sensor, located in the Tools Bag on the Gadgets page under the Sensors section, can keep track of any such incidents. Place one on the circuit board and tweak it to set its Reset Type to Hazard. This ensures that the punishment for resetting is only dealt to those that get shocked by the security system.

Every successful delivery will be worth 1500 points, so you will want to deduct twice that to make sure everyone thinks twice before crossing the property line. To deduct the points, place a Score Giver world tweaker on the circuit board. It’s found in the Tools Bag under the Gadgets page in the World Tweakers section. Tweak it and set its Score to -3000. Connect the Reset Sensor to the Score Giver so that, now, any driver that gets themselves zapped by the security system will pay a high price.
Monitoring the Madness
Before getting too much further, you should change gears and think about how drivers can keep track of what’s going on. To help them deal with everything, it’s time to modify the HUD so the critical information they need is available at a glance. The easiest way is to put some Custom HUD Widgets on the screen to show them.
Open up the Tools Bag and scroll all the way to the HUD Widgets page. There are two widgets from the Custom section you need to place. Plop a Dial and a Meter as seen below. They will report the time until the next pizza and the total percentage of pizzas delivered.
After placing the widgets, use the HUD Cursor to highlight each and press
 to view its tweak menu. Change the Shared setting to Each Player Has Their Own. This sets your level up for multiple human players to each have their own set of these widgets on their screen instead of having to share.
These elements are purely cosmetic for now and require the use of HUD Tweakers to control what they display. But to that, first you must set up the rest of the level.

Delivery Destination
Tools of the Trade
| Logic | Sensors | World Tweakers | Kart Tweakers |
|---|---|---|---|
| Microchip | Pressure Sensor | Danger Tweaker | Score Giver |
| Timer | Tag Sensor | ||
| Transmitter |

Shocking Security

It’s time to move on to the home equipped with the high-voltage security system. It’s designed to zap to smithereens any burglar or wayward door-to-door salesman.
To put this hazard together, you must first assemble the basic property on which the house sits. Open your Popit’s Goodies Bag and select Asphalt from the Basic Materials section of the Materials page.
Choose Asphalt in the shape of a square, rotate it flat, and reduce its thickness to its thinnest by pressing
 while clicking and holding
 . Paint this shape to a suitably large size for the property where you intend the deliveries to go. Attach a Danger Tweaker and tweak its Lethal Type to be Electricity. Switch to Live Mode to see that the property is electrified.


To enable drivers to avoid being shocked, hook up a doorbell to the property in the form of a Pressure Sensor. Place one on one of the non-electrified ends of the property and rotate it, if needed, so its output points in the right direction.

To add some urgency to each delivery, you want the security system to only turn off for a brief span of time. Accomplish this by placing a Timer near the Danger Tweaker. Connect the Pressure Sensor output to the Timer’s input and the Timer’s output to the Danger Tweaker’s input. Also, connect the Timer’s output to its Reset input.


While the Timer’s default Target Time of 4.0 seconds should be fine, a few things need to be adjusted in its tweak menu. Set the Input Action to Count Down as this timer is less focused on elapsed time and more on time left. Additionally, enable Invert Output so that the Danger Tweaker is normally active until the Timer is triggered and shuts off after the four-second delay.
Wrap up the security system by placing a Sound gadget. Connect the Pressure Sensor’s output to the Sound’s input so the drivers can hear the doorbell ringing.


Home Sweet Home
Now to build the house itself. From the Goodies Bag’s Materials page, select Wood—Beige. Using the square shape, create a solid wood building that fits on the property you created.

Every pizza will be transmitting its presence using a Tag gadget. To detect when a pizza has arrived at the house, place a Tag Sensor smack dab in the middle. It’s found in the Tools Bag on the Gadgets page under Sensors.
Tweak the Tag Sensor so its Shape is a Cube and increase the Max Range until it’s roughly the same width as the house. Be sure it doesn’t extend beyond the property’s edge.

A few things need to happen when a pizza is delivered, so place a Microchip on the house next to the Tag Sensor. For starters, the driver needs to get paid in points. Place a Score Giver on the circuit board and tweak it so the Score awarded is 1500 (as previously noted).

Once the current pizza is delivered, another one needs to be prepared back at the stove. To signal the stove to bake up a new pizza, you want to use the powerful Transmitter. After finding it in the Tools Bag on the Gadgets page under the Simple Logic section, place it on the circuit board. Open its tweak menu and set its Transmitter Type to Red.

Finally, place a Sound on the circuit board to give the driver an audio cue that the delivery was successful. Then, connect the Tag Sensor’s out put to all three of the circuit board’s resident’s inputs.

Build a Box Workshop
Tools of the Trade
| Logic | Sensors | Object Tweakers |
|---|---|---|
| Transmitter | Tag | Physics Tweaker |
| Receiver | Grab Sensor | Destroyer |
By the time the pies are ready for delivery, they’ve already been cooked and boxed. Making the box is easy, but the key is making it the proper size.
Reopen your Popit to access the Goodies Bag. From the available Materials, select Basic Cardboard. For a pizza box, you want a simple Square shape. However, it starts out sideways and needs some rotating. Decrease its thickness and then rotate it until it lies flat to start. Use the
 /
/
 directional buttons to scale it so that it’s not too much larger than your sack person.
Before moving on, remember to open the box’s tweak menu and change its Behavior to Dynamic so it can get taken around the level.

Getting a Grip

In their current state, the drivers can’t actually grab the pizzas yet. To make the boxes grabable, you need another gadget: the Physics Tweaker. This nifty gadget lets you manipulate the properties of the object it is attached to in a variety of ways. Place a Microchip on the pizza box and rotate its circuit board to a comfortable position.
Again, navigate to the Gadgets page in the Tools Bag and scroll down to the Object Tweakers section to find the Physics Tweaker. Select it and place it on the pizza box’s Microchip. Then, open its tweak menu and toggle Grabability on under the Special Properties section. Now your Grabinator-equipped drivers can wrap their knitted hands onto these boxes with ease.
Determining Delivery

It’s time to set up the soulmate for the Tag Sensor on the house. Tags are used to transmit a signal over a short distance of your choice that can be picked up in your level by a Tag Sensor. It’s a great way to make your object’s presence known. Place a Tag on the circuit board after finding it in the Tools Bag on the Gadgets page under the Sensors section.
Losing the Leftovers
Upon a successful delivery, there’s no more use for this pizza box. To have it disappear from the level, you need the Destroyer object tweaker. You can also repurpose the red Transmitter Type signal you placed on the house to signal a fresh pizza to also signal the current pizza be destroyed.
Place the Receiver and set its Transmitter Type to Red in the tweak menu. Place a Destroyer right next to it and connect the Receiver’s output to the Destroyer’s input. This ensures past-delivered pizzas don’t just stack up.


Designated Driver

To detect which driver is currently grabbing the pizza, go to the Tools Bag’s Gadgets page to fetch a Grab Sensor from the Sensors section. Place it on the circuit board and place a Transmitter next to it. Tweak the Transmitter’s Transmitter Type to Green (so it doesn’t interfere with the Red one you already set up). Connect the two gadgets together. Where is this signal going? Well, that’s coming up later…
Capture the Moment
Basic cardboard makes for an awfully bland pizza box. Spruce it up by putting the finishing touches with stickers. To save all your hard work and have this pizza box readily accessible in your Popit, you need to capture it with the Capture Object tool, located in your Popit’s Tools Bag on the Tools page.
Select the Capture Tool and then hover its cursor over a pizza box. Press and hold
 while moving the cursor over the object until you see a purple outline around it indicating it has been selected.

Release
and then tap it once more to capture the object you have defined. You can now find this pizza box stored in your Popit’s Goodies Bag. To find it, move several pages to the right until you arrive at My Objects. Your pizza box is preserved here just as you remember it.

However, your pizza box is automatically given the unhelpful name of “Some Kind of Object.” To fix this, highlight the box in your Popit and then press
to tweak the description. Select RENAME and input whatever you want to describe the custom pizza box.
Spawn Point Wrap Up
Tools of the Trade
| Logic | Kart Tweakers |
|---|---|
| Receiver | Kart Scale Tweaker |
| Battle Brain |
The Bigger They Are

It’s time to return to the spawn point to finish up with its Microchip. Remember that Green Transmitter from the pizza box? Well, it’s time to place a matching Receiver for it. Stick one on to the circuit board and don’t forget to tweak its Transmitter Type to Green.

To make things a little tougher for whichever driver has the pizza, you can use the Kart Scale Tweaker to super-size them. It’s tough enough to make a delivery with everyone else splattering paint everywhere. It’s even harder when your kart is four times the normal size!
Place a Kart Scale Tweaker next to the Receiver and connect the latter’s output to the former’s input. Then tweak the Kart Scale Tweaker so the Scale is 4.0. Go back to the Receiver’s tweak menu and enable the Only From Owner setting. This prevents the kart scaling effect from happening to any driver other than the one holding the box.
Hoard Hooligans

The Hoard’s thieving ways is probably because they can’t get a job—not even as a delivery driver. But that doesn’t stop them from making this challenge more challenging. The Battle Brain kart tweaker instructs AI opponents to try and steal the pizza from your sack person, even if they have no intention of delivering or even eating it.
Find the Battle Brain in the Tools Bag on the Gadgets page under the Kart Tweakers section. Place it on the circuit board and open its tweak menu. Set its Behavior to Grab Item and Requires Tag to Blue. The Blue Tag is the default color and the color of the pizza box.
Now, AI drivers are compelled to swipe the box from your sack person and will happily pelt whichever kart has it with paint.
Making Many

The spawn point is now perfect. The only problem is that there’s only one. Rather than repeat the process by placing a fresh Microchip on the remaining spawn points and starting over, there’s a simpler way.
Instead, highlight the spawn point and press
to select it and the Microchip on it before opening its tweak menu. It’s only upon selection that you can access the Clone tool. It’s right there under Actions.
Move the left stick around and press
wherever you please to place another identical Spawn Point/Microchip combo. Just stick with two for now so the Logic is easier to test.
Baking Up a Storm
Tools of the Trade
| Object | Emitters | Logic | World Tweakers |
|---|---|---|---|
| Stove Top | Emitter | Receiver | HUD Tweaker |
| Timer | Game Ender | ||
| Counter | |||
| Threshold |
You have the deliveries and the destinations, but to get them out the door you need to prep the oven. Wood-fired ovens are too old-fashioned for the Craftverse. Go to the Popit’s Goodies Bag, fetch the Stove Top under the Bits and Bobs section, and place it in the level.

Never Emit Defeat!
Now it’s time to wire up the oven! The first step is to place the gadgets that will produce your pizzas on demand: the Emitter. The Emitter is handy for summoning the object of your choice when triggered.
Open the Popit’s Tools Bag to the Gadgets page to find the Emitter located—unsurprisingly—under Emitters. Place it on the Stove Top.

Open up the Emitter’s tweak menu to begin adjusting its default settings for a world-class pizza pie. In the Choose Object section, take note of the dashed circle. Highlight it and press
to open a new menu listing your Collected Objects. Press
 to change pages to My Objects. Highlight your custom pizza box object and press
to select it. Position it and press
again to assign it to the Emitter.
to change pages to My Objects. Highlight your custom pizza box object and press
to select it. Position it and press
again to assign it to the Emitter.

For extra style, scroll down to Visuals in the last section of each Emitter’s tweak menu where you can set Create Effect to Expand. Now the pizza box appears to grow into its full size as it appears. Neat!
Timing is Everything
By default, Emitters that aren’t connected to an output emit whatever object you specify over and over again. That’s a lot of pizzas! To prevent this, we need to hook up an output to the Emitter’s input, adding a new option to its tweak menu: Input Action. This option adjusts how the Emitter reacts when an output triggers it.
Place a Microchip near the Emitter on the Stove Top. You should remember the Red Transmitter you’ve been using so much. Once again, you need a Receiver with a Red Transmitter Type, so place it on the circuit board. This signal needs to be sent to the Emitter to trigger the next pizza.

But first, to prevent the last successful delivery driver from having a disadvantage in getting back to the stove for the next pizza, add in a time delay before each fresh pizza appears. Do this by placing a Timer on the circuit board and connect the Receiver’s output to its input. Tweak it so that the Target Time is a healthy 15 seconds.
Take the Timer’s output and connect that to both its Reset and the Emitter’s input. Back to Input Action: Now that the Emitter is connected to an output, you can open its tweak menu and change Input Action to Emit Once. This ensures that the Emitter doesn’t continuously pop out pizzas when it receives a positive signal.

So that drivers know how long until the next pizza shows up, you want to show the Timer’s countdown on every player’s screen. You already placed the Dial Custom HUD Widget, so now it’s time to actually give it the vital information.
Pick out the HUD Tweaker from the Tools Bag on the Gadgets page under the World Tweakers section. Place it next to the Timer and connect an output from the Timer to the tweaker’s input. Open the HUD Tweaker’s tweak menu and set the HUD Type to Dial. Then press
under HUD Widget to bring up a list to choose which Dial to associate with the tweaker. Your options are limited to just the Dial you already placed.

Taking It To The Limit
You’re very close to finishing this challenge. Place a Counter from the Tools Bag’s Gadget page’s Advanced Logic section on the circuit board. Open its tweak menu to change the Target Count to 20 pizzas. This total number is how many pizzas are available for delivery within the time limit.

So that the drivers can monitor how many pizzas have been delivered, place a HUD Tweaker and connect the Counter to it. Tweak the HUD Tweaker so its HUD Type is Meter and HUD Widget is Meter.

But, in addition, the round needs to end once a total of 20 pizzas have been delivered. The aptly named Game Ender world tweaker does just that. Find it in the Tools Bag under the Gadgets page in the World Tweakers section. Connect the Counter’s output to its Input and now your challenge has an end.

To make things more exciting near the end, you can have the music change when only a few pizzas are left to deliver. The Threshold logic is useful for monitoring when a number—whether counted or timed—reaches a certain range. In this case, you want it to happen when only five pizzas are left for delivery.

Place the Threshold on the circuit board and connect the Counter’s output to its input. Then place a Music gadget next to it and connect the Threshold’s output to the Music’s input.

Five pizzas remaining means 15 out of 20 pizzas have been delivered. 15 divided by 20 gives us our Threshold percentage: 75%. Open the Threshold’s tweak menu and set the Minimum to 75%. Once 15 pizzas have been delivered, it triggers the Music gadget so every player can tell it’s close to the end.
And There You Have It!
At last, your challenge level is complete. Take it for a spin and have a go at customizing and tweaking the scenario to your heart’s content. Add in more delivery destinations, each one using a different color Tag/Tag sensor combo. Use a Randomizer and multiple Emitters to force drivers to scramble for the next nearest pizza. The possibilities in the Craftverse are endless!
