
Little Big Planet: Karting Guide Essentials Create Mode
Basics
Expand the Craftverse!
While many have debated the origin of the universe, there’s no need for intricate theorems or thoughts on complicated explosions to explain how the Craftverse came to be. Simply put, Creator Curators created the delightfully quirky lands and worlds seen before you. And all it takes to join the ranks of these creative geniuses and expand the known Craftverse is an idea and a controller.
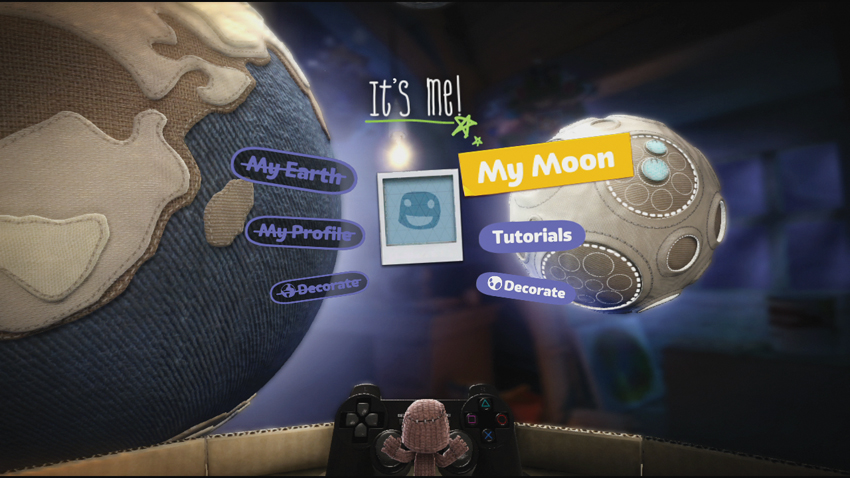
To get started, select Me from the Popit computer. This moves your pod closer to two very important Creator Curator objects, your very own Moon and Earth! Just about everything you need to craft your personal levels.
My Moon
Right now, your moon is a barren rock, but with enough ingenuity, you can colonize it with fantastic new lands and experiences. See all those empty spots dotted across the moon’s surface? Those are vacant spaces just waiting to be filled with your ideas. Pick out an empty level in any of the moon craters, and press
 to select it. Before being whisked away to your new level, pick a theme based on any of the planets in the Story Mode, or choose no theme at all.

Tutorials
Confused about something, but would like a moving picture explanation? Need to hear the Narrator’s reassuring voice? Well you’re in luck, because the Tutorials have that covered. Select any of these helpful video walkthroughs for all of the tools for budding Creator Curators.


My Earth
After crafting the perfect level, don’t let that wonderful creation sit alone on your moon. Publish that level to put it on your Earth and share it with the Community. When you have a level you’re ready to share, highlight it and press
 . From the Level Details screen, select Publish.
My Profile
Select this option to see what your sack person’s been up to in the community. Here you can view your sack person’s activities, achievements, and any comments made about your level creations.
Decorate
Select DECORATE under either My Moon, or My Earth to add a personal touch to your globes. Doll up your worlds by changing its material, or applying some stickers, decorations, or pictures to the surface. Now you have an object in the Craftverse you can call your own!
Taking Flight
Now that your sack person is inside your freshly conjured level, notice that your woven buddy floats precariously about. Well, Creator Curators don’t have to worry about gravity’s troublesome pull affecting those creative juices (unless they want to—more on that later). The ability to hover allows you to view and work on your creations from most of the perceivable angles. Imagine if Michelangelo had that option...think of the back pain he could have been spared!

Hover Mode Controls
| Button | Action |
|---|---|
Directional button

|
Toggle Hover Mode/Test Drive |
Directional button

|
Toggle Live Mode |
| Left Stick | Move your Sack person |
|
Right Stick
/
|
Zoom camera |
Right Stick
 /
/

|
Rotate camera |
 + Right Stick
|
Tilt camera |
|
|
Confirm selection |
or

|
Open Popit |

|
Descend |

|
Ascend |
Popit
Once your hovering sack thing has had its fill zipping about empty space, it’s time to fill this purgatorial place with various knicks and knacks. To accomplish this, press
to open the Popit. Notice that this Popit, while similar to the Pod Popit, adds several create tools. Each create tool can help you craft whatever strikes your fancy.
Popit Cursor
Smack dab in the center of your Popit options is the multitalented Popit Cursor. The stringy, and pointy backbone of the create toolset, the Popit Cursor can select or grab just about anything in the level. Use the left stick to move the cursor around the level. To grab an object, move the cursor onto it. When the object is highlighted, press
to select it.
Once an object is selected, you can move it around the level with the left stick, and rotate/scale it with the directional buttons. Press
to place the object down, or press
 to delete it. Press
 to be able to rotate the object in three dimensions using a combination of the
left stick and directional buttons.
to be able to rotate the object in three dimensions using a combination of the
left stick and directional buttons.

Popit Cursor Controls
| Button | Action |
|---|---|
|
Directional button
|
Toggle single/group select |
|
Directional button
|
Toggle Live Mode |
|
+ Right Stick
|
Tilt camera |
|
|
Select Item |
|
|
Open Tweak Menu (when object is highlighted) |
|
|
Popit |
|
|
Delete or detach highlighted object |

|
Undo action |

|
Redo action |
|
|
Switch to 3D Rotate |
|
+
|
Switch to overhead view (when handling certain items or tools) |
Stickers and Decorations
As any student’s sticker-adorned binder attests, decorated objects always look better. And what better place to apply all those Stickers and Decorations your sack person has collected than in your brand new level?
Select Stickers & Decorations from the Popit and scroll through the stylish stickers or awesome decorations pages. Press
to select a sticker or decoration, and move it around the level until you find a spot to place it. You can also press
to flip the sticker or decoration.
If you find that your sticker or decoration isn’t lined up quite right, fret not, for a handy tool can remedy that mistake. Open the Popit and select the Sticker & Decoration Edit Tool from the Functions page of the Tools Bag. The tool lets you grab an already-placed sticker or decoration. Now you can move, replace, flip, or delete the item like before.

Material World
What? There’s nothing in your level to grab? Well, then you should start putting stuff into the space. There are all sorts of objects that can be placed in your new level, but let’s start off by crafting your very own object, a simple box.
Taking Shape
To create an object, you first have to select the material. Open the Popit, select the Goodies Bag, and browse the Materials page. Most objects in the Craftverse are made from the very textures listed here. Scroll down and leaf through the various materials and press
to pick one. With the material selected, you are asked to choose a shape. Notice there are all sorts of different shapes to play around with, but for now select the Square shape to create your box.
With the material and shape selected, you can adjust your new object several ways. Like stickers and decorations, you can rotate and scale the object with the directional buttons, but there are more ways to make that perfect box for you. Click and hold
and then press
to increase the box’s thickness, lengthening the box into a rectangle. To flatten that box like a pancake, hold
and press
to make it thinner. Once the box is at a size and shape to your liking, press
to stamp the material down. Voila! Congratulations on creating your first object. Looks like six sides of perfection!

A box is a nice shape starting out, but you are free to create any unique shape to fit your level. Hold
and move the left stick to paint the material onto the two dimensional grid to create custom objects, like a box-shaped arch. Alternatively, press and hold
to erase the object. Don’t forget you can press
to switch to the 3D rotate tweak, allowing you to rotate the material on several axes.
Tweaking into a Whole New Era
Your box exists, but the tinkering doesn’t have to stop there. While holding onto any almost any object, gadget, etc., press
to open up the Tweak Menu. These options allow you to adjust your object with even greater detail. Listed are some basic tweak options, but keep in mind that most gadgets, tools, and other objects have even more specific tweak options. These special tweaks are discussed in the sections ahead.

Basic Tweak Menu
| Type | Tweak | Effect |
|---|---|---|
| Actions | Snap to Ground | Places the object on the terrain's surface. |
| Actions | Edit Shape | Opens the material cursor to edit the shape. |
| Actions | Clone | Make an exact duplicate of the object. |
| Actions | Make Unique | Toggle the object as unique, or not. |
| Actions | 3D Rotate | Lets you rotate the axis of an object. |
| Actions | Reset Rotation | Resets object to original orientation. |
| Behavior | Dynamic | Determines if the object is affected by elements in the level such as gravity or other objects. Toggle On or Off. |
| Color | Color | Select a color box to change the color. |
| Color | Brightness | Adjust the brightness from 1% to 100% |
| Visuals | Gadget Visible | Adjust whether or not the gadget is visible in the level. |
More Material Goods
Here are a couple of tools and options to further adjust your materials. To access the tools, open the Popit, and select these options from the Functions page in the Tools Bag.
Creating a Track
That’s a very pretty box, but that’s just the tip of the iceberg. Now that you have a grasp of basic object handling and crafting, it is time to build a track. Open the Popit, select Track & Arena Edit, and choose Create Track to get started on a shiny new racecourse.
Path to Success
Before laying down some track, every race has to start from somewhere, so place a start line down for…well, starters. Use the left stick to move the start line around the level. Once you have found a suitable spot, press
to put the start line down.
With the start line down, it’s time to pave the road. And what better way to paint a path than with a nifty paint roller. Drive the paint roller through the level, leaving behind a new road in its wake. Press and hold
to move the roller forward. And unless you like a long straightaway, use the left stick to steer the roller left or right and put some curves on the course. Create a wrong turn? No worries. Press and hold
to rollback your path.
More Killer Track Tips
Flat roads are good for setting suns and road trips, but why not throw some hills and dips into the mix? Move the right stick up or down to adjust the track’s elevation, sending the course into the stratosphere or diving it well below sea level. Glance at the Terrain Follow indicator on the right side of the screen to view the track’s current elevation. You can toggle the indicator’s presence by pressing
. Press
to reset the elevation and level out the road.

To finish paving the road, connect the road back to the start line to complete the circuit. If you are in a rush to complete the circuit, press and hold
to put the roller on autopilot, which automatically finds the shortest path back to the start line.
Edit Track Tools
Although the circuit is complete, the track edit doesn’t have to stop at the finish line. There are plenty of tools to help fine-tune your racecourse. Select Track & Arena Edit from the Popit and browse through the tools under Edit Track. Play around with them to add more personality to your track.
Branches
Most drivers jump at the opportunity to explore their surroundings. They want to break off the pack and discover hidden pathways and routes to stay ahead. The Branches and Breadcrumbs tools give you the freedom to break up the main road with forks and branches, letting you create some awesome shortcuts and alternate paths.

Select the Branches tool to stick a fork in the road. Once the tool is selected, the cursor changes into to a small flagpole. Move the pole where you want the branch to begin and press
to place the branch point. A green flag indicates the point highlighted is ok to place, while a red flag means it is not.
With the start point down, find another spot on the main track to place the end point. The tool generates the road between both points, creating your branch on the spot.
Branch Tool Controls
| Button | Action |
|---|---|
| Right stick | Move branch point |
|
|
Place branch point |
|
Directional button
/
|
Change edge |
|
Directional button
|
Toggle Live Mode |
Breadcrumbs
Branches and alternate paths are nice, but what if you want drivers to take a detour off the road through an unbeaten path. That’s where the Breadcrumbs tool comes in. With it you can draw a path off the main road where the racers can drive safely, without worry about Off Track popping nonsense that resets their karts.
Select the tool to change the cursor to a breadcrumb sign. Locate the start of your alternate off road path, and press
to start laying it down. Use the right stick to draw the path you want and press
to end it.

Breadcrumb Edit Controls
| Button | Action |
|---|---|
|
|
Switch to Breadcrumb selector |
|
|
Select Breadcrumb sign |
|
Left stick
/
|
Cycle between existing signs |
|
Directional buttons
/
|
Adjust width of sign |
|
Directional buttons
/
|
Shift sign left or right |
Horizontal/Vertical Shift
Sure, that paint roller paves a fine road, but sometimes you want to edit the finer points of the road to your liking. Select the Horizontal or Vertical Shift tool to create some tricky chicanes or add bumpy hills and slopes. Four blue zone lines appear over the track. Use the left stick and highlight the segment of track you want to shift. Press
to select a segment of the road. You can also hold
and move the left stick to highlight multiple segments.
With a section of the track selected, you are ready to shift the track. The yellow lines indicate which areas of the track are to be shifted. Use the directional buttons to change which lines in the road are shifted and move the edit zone up or down the road. Use the left stick to shift the road. When you are satisfied with your change, press
to confirm it.

Add/Remove Control Points
Whenever you want to change a part of the track, Control Points are essential. Control Points allow you to manipulate and modify areas of the track. Once you have laid down a track, Control Points are automatically added throughout the course. Select this tool to add or remove Control Points. Move the left stick to move up or down the track. Press
to add control points or press
to delete them.
Re-Roll
Creator Curators not happy with how their track turned out, fret not, for the ultimate do over, the Re-Roll tool is here. The path drawing mulligan lets you repave any section of the track with that awesome paint roller. After you select the tool use the left stick to choose where you want the repave. Press
to set the new path’s start and end. After you have a section selected, drive the roller and repave the road to your liking from the start point to the end.
Track Materials
The track’s shape and direction are just right, but what about its appearance? To change the road, bridge, or fence material, select Track & Arena Edit from the Popit, and go to the Mod Track page. Once you select a new material, a large paintbrush appears over the track. Press and hold
while using the left stick to paint the material over the track. Press
to erase the material.
Lord of the Land
That track is full of fun twists and turns, but everything else around it seems pretty bare. To spruce up the geography, use the Terrain Edit tools to mold the landscape in and around your track. Open the Popit and select Terrain Edit to access the tools.
Channeling your inner sculptor, select a mold from the Terrain Deform and Terrain Sculpt sections. Each tool uses a circular virtual brush to paint the landscape. Terrain Deform alters existing terrain, while Terrain Sculpt molds creates new terrain. Use the brush around the level to surround your track with large hills, tall mountains, deep canyons, or rivers.
Terrain Deform Controls
| Button | Action |
|---|---|
| Left stick | Move paintbrush cursor |
|
|
Apply terrain mold |
|
|
Invert terrain mold direction |
|
Directional button
/
|
Scale the paintbrush radius |
|
Directional button
/
|
Rotate terrain mold |
Terrain Sculpt Controls
| Button | Action |
|---|---|
| Left stick | Move paintbrush cursor |
|
|
Apply terrain mold |
|
|
Raise terrain mold |
|
|
Lower terrain mold |
|
+ Directional button
/
|
Scale the paintbrush radius |
Terrain Cleanup
From the Terrain Edit tools, select Terrain Cleanup to edit any already sculpted landscapes. Press and hold
and use the left stick to draw a dotted line around the terrain you want to remove. Release
and press
to delete the selected terrain.

Terrain Material
Turn those boring peaks to purple mountain majesties with some cool materials. From the Terrain Edit list, move down to the Terrain Material section and select a material. Choose a shape for the paintbrush and use the left stick to move the brush. Press
to apply the texture to the landscape.

Basic Pickups and Powerups
Now that the track and environment are up and ready to go, add some pickups and powerups to the course to keep those drivers on their toes. Select the Tools Bag from the Popit and scroll to the Gameplay Kits page to put down some helpful pickups, deadly weaponators, or those ever-so-shiny prize bubbles.
Spawn Point
Those round objects with an arrow thingy attached to it are called spawn points. At the start of a race, sack things, sack bots, and Hoard drivers pop out from these tiny portals. Once you lay down a track, eight of these bad boys are automatically added to the starting line of your course. The spawn point also acts as the location for all any player or kart modifications (covered in the Advanced Tutorials). You can attach a number of gadgets, from Tweakers to Logic to drastically change the driver’s characteristics, but more on that later in the guide.

Spawn Point Tweak Menu
| Type | Tweak | Effect |
|---|---|---|
| Actions | Player Type | Switch the type of driver that spawns here. Toggle between Any, Players Only, Player or Sackbot, or Hoard Only. |
| Actions | Team | Assign the spawning player to a specific team or set it to any team. |
| Actions | Human Priority (when Player Type is set to Players Only) | Set to any player or to a specific player number. |
| Actions | Label | Add a memorable description. |
Prize Bubbles
A spinning sphere full of goodies that can cause even the most stable driver to risk sack life and limb, prize bubbles reward drivers with fantastic gifts. Put them anywhere on the course and watch drivers frantically try to reach the prize. To reward drivers for popping your prize bubble, open the prize bubble’s tweak menu and select Prize to add a custom object to it.


Prize Bubble Tweak Menu
| Type | Tweak | Effect |
|---|---|---|
| Prize | Prize | Assign a prize to be awarded to players who pop the prize bubble. |
Score Bubbles
The smaller cousin to the prize bubble, score bubbles help pad a driver’s score. Use the little point bubbles to lead players through the course, and line them up so they can score some long multiplier chains.
Checkpoints
Checkpoints can be used in a race for a variety of reasons. Use them to lead drivers through specific locations on the track, gain more points, add a special objective, etc. There are three different checkpoints: rainbow arch, green arch, and pair of checkered flags. From far away, your drivers see a giant arrow that points down to their locations. Play around with them to see all the possibilities.

Checkpoint Tweak Menu
| Type | Tweak | Effect |
|---|---|---|
| Behavior | Respawn | Adjust whether the checkpoint reappears after a driver passes through it. |
| Behavior | Lives | Change the amount of lives given to a driver. Toggle between 0 and 99. |
| Score | Score amount | Adjust the number of points awarded to drivers passing through. Toggle between 0 and 10000. |
| Score | Score type | Change which players passing through the checkpoint get the points. Toggle between First Only or All. |
| Score | Final checkpoint | Set this checkpoint to be the last one. Toggle On or Off. |
| Visuals | Visuals | Toggle the smoke effect that appears in the middle of the checkpoint (Checkpoint 3 only). |
Weaponators
Just when a racer thinks it’s down and out, a weaponator comes around the next bend to shift the race in their favor. Spread these deadly devices around your course to arm the drivers with a means to attack and defend.
There are two types of weaponators that can be placed on the course. Random Weaponators are the standard weapon pickup, equipping a driver with a random weaponator when they drive over it. Specific Weaponators allow you to assign any particular weapon to the powerup. To assign a Weaponator to the Specific Weaponator powerup, open its tweak menu and select Weapon. Scroll through the weaponators and choose the particular weaponator for that powerup.
Specific Weaponator Tweak Menu
| Type | Tweak | Effect |
|---|---|---|
| Choose Weapon | Weapon | Choose the weaponator to be acquired. |
Random Weaponator Tweak Menu
| Type | Tweak | Effect |
|---|---|---|
| Choose Weapon | Weapon | Assign up to 16 different weaponators. |
| Choose Weapon | Frequency | Adjust the frequency of each weaponator for the Random Weaponator. |
Jet Pack
Sometimes a driver needs a little boost. Give them a little push by placing a couple of Jet Packs onto your track. Place them in front of hills or ramps to create some nice jumps.

Powerup Remover
Powerups equip a number of gadgets to help drivers through a race, but at times can also wreak havoc to the general balance of the level. Any driver that runs into the Powerup Remover is stripped of any Weaponators, Grabinators, or other powerups. Place a row of them on the course to put drivers on an even playing field.

Scoreboard
At the end of a race, all drivers gather around the scoreboard to see their triumphs, failures, and to see what kinds of goodies they may have earned. Handling all the complicated arithmetic, the scoreboard tallies each player’s total points and awards standings to the top three. Most important of all, the Scoreboard can hand out prizes to the top three places, to any driver who has looted the level of all prize bubbles, and to driver’s who have starred the level. To add any of these special prizes, open the scoreboard tweak menu and select Prize from any of the special prize sections. You can add up to three of your custom objects to these special reward prizes.

Other Scoreboard Tweak Menu
| Type | Tweak | Effect |
|---|---|---|
| Actions | Skip Celebration | Toggle the celebration animations On or Off. |
| Actions | Level Name Display Duration | Set the number of seconds that the level name appears on the scoreboard. |
| Actions | Play Startline camera | Toggle the opening startline camera On or Off. |

Sounds and Music
Your level’s environment is a visual masterpiece, and all the sensors, logic, and other mechanisms are set and working, but something is odd. Could it be that deafening silence in the background? Tie all those elements together with some well-placed sound effects and add a killer theme to drive it all home. Go to the Sounds or Music page in the Tools Bag and browse through the collected sound sets or music tracks. Once you select an audio object, place it somewhere in the level, and then tweak it until your eardrums are happy with it.

Sound Tweak Menu
| Type | Tweak | Effect |
|---|---|---|
| Actions | Choose Sound | Choose a sound from the gadget’s selection. |
| Actions | Input Action | When connected to an output, choose what effect it has on the sound. Toogle between On/Off, Toggle, Modify Sound, Modify Volume, or Trigger. |
| Trigger | Trigger Mode | Determine what causes the sound to activate. Toggle between Player Proximity, On Impact, On Destruction, or On Creation. |
| Audio | Volume | Adjust the volume level from 1% to 100%. |
| Audio | Modify | Change the sound effect’s pitch from -12 to 12. |
| Audio | Position | Change whether the sound is heard in throughout the level (2D) or only when a player is near it (3D). |
| Audio | Attenuation | Adjust sound’s radius from 0.1 to 500 (3D position only). |
| Audio | Focus | Adjust the level of focus of the sound from 0.0% to 100%. |
| Audio | Player Only | Toggle whether audio is heard by the player only, or all. |
| Audio | Focus Music | When Focus is set to more than 0, apply the focus setting to music as well. |
Sound Tweak Menu
| Type | Tweak | Effect |
|---|---|---|
| Actions | Choose Sound | Choose a sound from the gadget’s selection. |
| Actions | Input Action | When connected to an output, choose what effect it has on the sound. Toogle between On/Off, Toggle, Modify Sound, Modify Volume, or Trigger. |
| Trigger | Trigger Mode | Determine what causes the sound to activate. Toggle between Player Proximity, On Impact, On Destruction, or On Creation. |
| Audio | Volume | Adjust the volume level from 1% to 100%. |
| Audio | Modify | Change the sound effect’s pitch from -12 to 12. |
| Audio | Position | Change whether the sound is heard in throughout the level (2D) or only when a player is near it (3D). |
| Audio | Attenuation | Adjust sound’s radius from 0.1 to 500 (3D position only). |
| Audio | Focus | Adjust the level of focus of the sound from 0.0% to 100%. |
| Audio | Player Only | Toggle whether audio is heard by the player only, or all. |
| Audio | Focus Music | When Focus is set to more than 0, apply the focus setting to music as well. |

Music Tweak Menu
| Type | Tweak | Effect |
|---|---|---|
| Volume | Volume | Adjust music volume level from 1% to 100% |
| Start Point | Start Point | Adjust where in the track the song begins its playback. |
| Start Point | Play on Race Start | Toggle On/Off whether music plays at the beginning of the race. |
| Start Point | Only Activate Once | Toggle On/Off whether the music can be activated more than one time. |
| Trigger | Shape | Change the trigger range shape to either a square or sphere. |
| Trigger | Max Range | Adjust the overall range of the activation radius from 1.0 to 500. |
Global Settings
The level tweaker to end all level tweakers, the Global Settings options in the Popit is filled with adjustments for everything from environmental conditions to gameplay settings. Scroll through all the tweaks in the Global Controls, Gameplay Settings, Audio, Lighting, and Background pages to adjust every detail of your level.
Global Controls
| Type | Tweak | Effect |
|---|---|---|
| Level Settings | Water Level |
Press the directional buttons
/
to raise or lower the water level.
|
| Reset | Clear All | Removes everything in the level. |
| Reset | Clear Objects | Removes all objects in the level. |
| Reset | Clear Terrain | Flattens all terrain in the level. |
| Reset | Clear Track/Arena | Clears the track or arena in the level. |
| Kart | Change Kart | Changes the player’s kart in the Play Mode. |
Gameplay Settings
| Type | Tweak | Effect |
|---|---|---|
| General | Min Human Players | Set the minimum number of players required to play the level. Toggle between 1 and 8. |
| General | AI Players | Determines if AI is present in the level. Toggle between AI Enabled, AI Enabled: NON-SCORING, or AI Not Enabled. NON-SCORING means they cannot place in the winning top three. |
| General | AI Difficulty | Adjust the AI’s level from Easy, Medium, Hard, or Expert. |
| General | Friendly Fire | Toggle damage from teammates On or Off. |
| General | Auto-Reset Enabled | Determines how aggressively the game forcibly resets karts. Toggle between Off, Normal, or Extreme. |
| General | Level Type | Toggle the level type between Versus or Cooperative. |
| General | Teams | Toggle teams On or Off. |
| General | 321 Boost | Toggle the ability to boost from the start line On or Off |
| Game Enders | Time Limit | Adjust how many minutes count down to the endgame. Toggle between 1 and 999, or set to Infinite. |
| Game Enders | Hit Limit | Adjust how many total hits required to end the game. Toggle between 1 and 9999, or set to Infinite. |
| Game Enders | Score Limit | Adjust the total points required to end the game. Toggle between 10 and 999999 or set to Infinite. |
| Game Enders | Number of Laps | Adjust the amount of laps required to complete the race. Toggle between 1 and 99. |
| Scoring | Level Results Type | Determines how the rankings are assigned. Toggle between having them based on Score Limit, Time Limit, or Hits Limit. |
| Scoring | Scoreboard Type | Change scoreboard display to show Time or Score. |
| Scoring | Bonus Score 1 | Set the points earned for first place. Toggle between 0 and 9999. |
| Scoring | Bonus Score 2 | Set the points earned for second place. Toggle between 0 and 9999. |
| Scoring | Bonus Score 3 | Set the points earned for third place. Toggle between 0 and 9999. |
| Scoring | Countdown Score | Determines if there is a score counter on-screen that counts down during the level and awards the current value when the game ends. Toggle between 1 and 1000000000. |
| Scoring | Cinematic Disabled | Toggles cinematic scene On or Off. |
| Scoring | Drift Scores | Toggles whether or not players are awarded points for drifting On or Off. |
| Scoring | Chase Camera Distance | Set how far the camera is from the driver. Toggle between 0% and Default (100%). |
| Scoring | Is Split Screen Enabled | Toggle split screen mode On or Off. |
| Scoring | Spin Scores | Toggles whether or not players are awarded points for spinning On or Off. |
| Scoring | Airtime Score | Toggles whether or not players are awarded points for airtime On or Off. |
| Scoring | Draft Scores | Toggles whether or not players are awarded points for drafting On or Off. |
| Scoring | Weapon Hit Scores | Toggles whether or not players are awarded points for weapon hits On or Off. |
Audio
| Type | Tweak | Effect |
|---|---|---|
| Volume | SFX Volume | Adjust sound effect volume level. Toggle between 0% and 100%. |
| Volume | Background Volume | Adjust background volume level. Toggle between 0% and 100%. |
| Volume | Music Volume | Adjust music volume level. Toggle between 0% and 100%. |
| Volume | Dialogue Volume | Adjust dialogue volume level. Toggle between 0% and 100%. |
| Volume | Kart Volume | Adjust kart volume level. Toggle between 0% and 100%. |
| Volume | Gameplay Volume | Adjust gameplay volume level. Toggle between 0% and 100%. |
| Volume | Collision Volume | Adjust collision volume level. Toggle between 0% and 100%. |
| Reverb | Reverb Settings | Add a Padded Cell, Bathroom, Room, Hallway, Sewer Pipe, Cave, Concert Hall, Hangar, Forest, or Underwater reverb to the audio. |
| Reverb | SFX Reverb Send | Adjust the degree of reverb applied to sound effects. |
| Reverb | Music Reverb Send | Adjust the degree of reverb applied to the music. |
| Reverb | Dialogue Reverb Send | Adjust the degree of reverb applied to the dialogue. |
| Filter | SFX Filter Amount | Adjust how much sound effects are filtered. Toggle between 0% and 100%. |
| Filter | Music Filter Amount | Adjust the music’s filter level. Toggle between 0% and 100%. |
| Filter | Dialogue Filter Amount | Adjust how much dialogue is filtered. Toggle between 0% and 100%. |
| Filter | Kart Filter Amount | Adjust how the kart’s sound effects are filtered. Toggle between 0% and 100%. |
| Filter | Disable Automatic Gameplay Mixing | Toggle whether or not the game automatically adjusts the audio mix while you play. |
Lighting
| Type | Tweak | Effect |
|---|---|---|
| Sun | Sun Color Red | Adjust the sun’s red color level. Toggle between 0% and 100%. |
| Sun | Sun Color Green | Adjust the sun’s green color level. Toggle between 0% and 100%. |
| Sun | Sun Color Blue | Adjust the sun’s blue color level. Toggle between 0% and 100%. |
| Sun | Sun Strength | Adjust the sun’s brightness. Toggle between 0% and 100%. |
| Sun | Sun Altitude | Change the distance of the sun from your level. Toggle between 0% and 100%. |
| Sun | Sun AziMuth | Change the angle of the sun. Toggle between 0% and 100%. |
| Ambient | Ambient Color Red | Adjust the sun’s red color level. Toggle between 0% and 100%. |
| Ambient | Ambient Color Green | Adjust the sun’s green color level. Toggle between 0% and 100%. |
| Ambient | Ambient Color Blue | Adjust the sun’s blue color level. Toggle between 0% and 100%. |
| Fog | Fog Color Red | Adjust the fog’s red color level. Toggle between 0% and 100%. |
| Fog | Fog Color Green | Adjust the fog’s green color level. Toggle between 0% and 100%. |
| Fog | Fog Color Blue | Adjust the fog’s blue color level. Toggle between 0% and 100%. |
| Fog | Fog Start Distance | Determines how far away fog begins to appear in the level. Toggle between 0.0 and 2000. |
| Fog | Fog Distance | Determines how far away from the player fog appears. Toggle between 1.0 and 10000. |
| Fog | Fogginess | Adjust the fog’s thickness. Toggle between 0% and 100%. |
Background Knowledge
You can change the theme you selected when you first created the level by scrolling over to the Background page in the Global Settings tool. Browse through the themes and select one to change the skyline’s appearance. You can also select from three different pano styles that alter how the background appears on the horizon.

Finishing Touches
There are even more settings in the Pause Menu to help you personalize a level or change certain settings in the Create mode. Take a gander at these options to help you tie a bow around your track.
First Hand Experience
The track is paved, the terrain is up and there are plenty of pickups and powerups dotted over the course. Everything may be in place, but is the experience up to snuff? Test it out before you send it to the masses.
Press START to enter the Pause Menu and select Change to Play Mode. Unlike the Test Drive Mode, Play Mode simulates the entire level experience, complete with all the AI opponents, and your gadgets and logic running at full speed. Run through the track and see whether it’s ready for the community!

A Track by Any Other Name Burns the Rubber
Everyday more and more new lands pop up in the Craftverse. How will the community find your gem among the endless lands? With a clever, but informative description of course! Select Edit Level Details in the Pause Menu to add a short description about your level. You can also add some labels that can help players find your level while searching for keywords.

Save
Before you can publish your track, all that hard work should be saved into your Moon for safekeeping. Simply select Save from the Pause Menu at any time to save the level.


Creating an Arena
Sometimes driving in circles, no matter how well designed, can get a wee bit tedious. It’s times like these that all you really want to do is see some explosions! Arenas are precisely the type of event drivers with itchy trigger fingers live to compete in.
Shape Your Vision
Making an arena of your own is a straightforward affair. After picking an empty level on your Moon and choosing a theme, simply open Track & Arena Edit from your Popit. There are only two options under the Create header. Naturally, choose Create Arena to bring up a prompt to choose the shape for the arena.
Voila! The boundaries of your arena are drawn in the shape of your choosing, indicated by the green border. In addition, eight spawn points are conveniently placed in the arena to save you time.


Of course, you can’t be expected to make every arena a circle or a square or a triangle. Luckily, adjusting your starting arena shape only requires a simple trip back to the Track & Arena Edit in your Popit.
Now that you’ve defined the level as an arena, a new option appears under Track & Arena Edit: Edit Arena. This section contains a familiar collection of shapes. These let you add and remove from the arena’s border with ease.
Arena Respawn Points
While initial spawn points for competitors are automatically placed, there is a different variety of spawn point that’s worth familiarizing yourself with: Arena Respawn Points. They can be found in the Tools Bag on the Gameplay Kits page under the Level Kit section.
Arena Respawn Points only come into play after a round has begun and all players have entered the arena. That way you can place them in out of the way locations without worrying about stranding any players in the middle of nowhere at the start of the round. Arena Respawn Points prevent players from always respawning in the same starting areas as the round goes on.
Arena Respawn Points are also useful for when you can also specify which type of player or which team can respawn at a given point. This keeps different types of players or teams separated when they respawn in team-based games where opponents should respawn at different ends of the level.

Arena Respawn Point Tweak Menu
| Tweak | Description |
|---|---|
| Player Type | Determines which players can respawn at this point. Choose between Any, Players Only, Player or Sackbot, or Hoard Only. |
| Team | Determines which team can use this Spawn Point. Choose from Team 1-8 or Any Team. |
| Label | Enter a descriptive label here. |
Final Touches
Aside from placing weaponators in the manner previously discussed, your arena is ready to go—albeit rather barren. You can fix that in a jiffy by placing whatever objects, decorations, and stickers you please as well as manipulating the topography with the Terrain Edit option in the Popit.

At this point, surely your ambitions have grown and require more tools to fulfill your vision of karting bliss. It’s time to get a little airborne…
Spicing Things Up, Up, and Away
Bounce & Launch Pads
Just because your kart rolls around on four wheels doesn’t mean it has to stay on the ground all the time. Placing Bounce Pads and Launch Pads adds a whole other vertical dimension to your levels.
Open your Popit and press
twice to switch to the Gameplay Kits page. The Bounce Pad, Launch Pad, Launch Pad—Wide, and Launch Ramp are all located under the Level Kits section.
When a kart drives over a Bounce Pad, the kart gets a vertical boost while their direction and speed remain otherwise unaffected. Pretty simple.

Bounce Pad Tweak Menu
| Tweak | Description |
|---|---|
| Height | Adjust how high karts bounce. Toggle between 1 and 100 |
Unlike Bounce Pads, however, Launch Pads and Launch Ramps cause karts that touch them to fly along a pre-determined arc through the air. This ensures that every driver that uses one lands in exactly the same place.
The only exception to this is if Air Control is enabled under the pad or ramp’s tweak menu. If so, the driver can maneuver their kart side to side, but no matter what, the distance they travel remains unchanged.

Launch Pad — Wide/Launch Ramp Tweak Menu
| Tweak | Description |
|---|---|
| Launch Distance | Determines how far launched karts travel. Toggle between 40 and 400. |
| Max Height | Determines the maximum height of the arc traveled by the launched kart. Toggle between 10 and 100. |
| Air Control | Enabling this setting allows karts to adjust their side-to-side motion while mid-air. |
Grappling
Pads and ramps make it easy for drivers to catch some air with little effort on their part. If you feel like making them work a little, there’s a far more interactive way at your disposal: grappling!
To grapple, a driver needs two things: a Grapple Sponge to latch onto and a Grapple Hook powerup to grapple with. Open the Popit to the Tools Bag’s Gameplay Kits page where you can find the Grapple Sponge under the Level Kit section. Place that Grapple Sponge above the road, or as is more often the case, a lack of it. Nothing adds excitement like swinging above a gaping pit of dooom!


Placing a Grapple Hook is a simple process that’s identical to positioning Weaponators. After all, you can find them both in the Tools Bag on the Gameplay Kits page under the Powerups section. Drop it wherever you feel on the course, but remember it’s got to be before the Grapple Sponge to be of any use.
As soon as any driver picks one up, they can grapple to any Grapple Sponge in range with a press of
. And don’t worry about supplies: they’re perpetually available like Jet Packs (and unlike Weaponators).

Grapple Sponge Tweak Menu
| Tweak | Description |
|---|---|
| Height | Determines the length of the connection tethering a kart’s Grapple Hook to the Grapple Sponge. Toggle between 1 and 50. |
| Distance | Determines the distance the kart swings from when it grapples to the sponge to when it automatically releases. Toggle between 10 and 100. |
| Speed | Determines the speed of the kart’s swing. Toggle between 20 and 70. |
Swinging isn’t the only use for the Grapple Hook. Your sack person can use it to sink its hooks into any object you please, provided it has the Grapplizer Object Tweaker attached.
“What’s an Object Tweaker?” you’re no doubt wondering. Well, Object Tweakers modify the properties of whatever they are attached to in strange and wondrous ways. You can find them all in the Tools Bag on the Gadgets page under the Object Tweakers section.

In this instance, the Grapplizer takes an ordinary object and lets any driver with a Grapple Hook latch onto it and drag it behind them as they please. However, keep in mind that the object must first have its Dynamic setting turned on.

Grapplizer Sponge Tweak Menu
| Tweak | Description |
|---|---|
| Grapple Length | Determines the length of the connection tethering a kart’s Grapple Hook to the object. Toggle between 1 and 35. |

GOOOAAALLSSS!
It’s just as important in the Craftverse to set goals as it is everywhere else. Goals are great for offering drivers an alternative way to score points besides blowing up other karts. Not everything has to be about explosions.
There are three varieties of Goals you can place, and all are found in the Tools Bag on the Gameplay Kits page under the Level Kit section. Simply plop them down wherever you wish and drivers won’t be able to resist their allure.
Goal Tweak Menu
| Tweak | Description |
|---|---|
| Kart Respawn | Toggles whether or not the Goal acts as a Respawn Point. |
| Score | Determines the amount of points, if any, the first kart to reach the goal receives. Toggle between 0 and 10000. |
| Visuals (Goal 3 Only) | Toggle whether or not a sparking plume of smoke is emitted from the goal’s center. You can also choose the smoke’s color. |

Tweak the Goal to adjust the amount of points awarded for being the first kart to reach it. Increasing the value of Goals and placing them in out of the way corners of your level gives drivers an incentive to really explore your creations.
Custom Craftwork
With so many tasty ingredients at your disposal, it’s easy to get carried away poring through Popit’s collection. But just imagine the satisfaction of adding a creation of your very own to that inventory.
You can easily save objects you have created for posterity and future use with the Capture Object tool. It’s right there on the first page of the Tools Bag under Functions. Move the cursor over the object you wish to save and press
to take a snapshot of it.
If it’s actually a group of objects you’re trying to capture, hold
while moving the left stick across each one until you see a purple outline around them all indicating they have been selected. Then release
, and then tap it once more to capture the object you have defined.

You can now find your object stored in your Popit’s Goodies Bag. To find it, press
to navigate two pages to the right until you arrive at My Objects. Your new, custom object is preserved here just as you remember it.
However, new custom objects are automatically given the unhelpful name of “Some Kind of Object.” To fix this, highlight the object in your Popit and then press
to tweak the description. Select RENAME and type in something memorable you can recognize at a glance.


A Custom Companion in Create
To accompany your sack person through the many nooks and crannies of Create, try your hand at making your own custom object that you can experiment while exploring the assorted gadgets at your disposal.
Open your Popit’s Goodies Bag and choose the Ice material. This time, instead of a Square, choose the Arch shape. Scale it down so it’s not too much larger than your sack person, then plop it right there in front of you. Say hello to Archie!

Feel free to give Archie some personality by decorating him with stickers. Before capturing him to your Popit, there’s one more very important step. Switch to the Popit Cursor and open Archie’s tweak menu. Be sure to toggle the Dynamic property on. This ensures Archie doesn’t just float where you stick him initially and that he’s affected by gravity just as the average kart is.
When you’re satisfied, use the Capture Object tool and save him away in your Popit to be summoned at a moment’s notice. Don’t forget to rename him the Popit to prevent any difficulty in finding him later.
Grab and Go
Student drivers are taught to always keep both hands on the steering wheel, but that’s only because they aren’t allowed to have Grabinators during their driving test. With the Grabinator powerup, Craftverse drivers can pick up grabable objects with ease while still keeping one knitted hand on the wheel.
You can place a Grabinator powerup on the track just as easily as a Weaponator. After all, they’re both located in the Tools Bag on the Gameplay Kits page under the Powerups section. Stick one on the ground in front of Archie.
However, you’re not ready to grab hold of Archie yet; objects are not naturally grabable. In order to make them ripe for the picking with the Grabinator, you need to use an Object Tweaker: Physics Material. You can find it in the Tools Bag on the Gadgets page under the Object Tweakers section.

As you recall from the Grapplizer, Object Tweakers modify the properties of whatever they are attached to. The Physics Material tweaker gives you many options for determining how your object interacts with the karts and world around it. It can only be used on Dynamic objects.
To make our good friend Archie grabable so your sack person can tote him around, place a Physics Material tweaker onto it. Tweak the Physics Material gadget and toggle the Grabability property on so it displays a check mark.
Go for a Test Drive and steer your sack person toward the Grabinator. With the powerup acquired, all it takes is a press of
to get your sack person’s mitts on Archie. What a gripping development!

Physics Material Tweak Menu
| Tweak | Description |
|---|---|
| Mass | Determines how dense your object is by affecting its mass. Toggle between 0.2 and 4.0. |
| Bounciness | Determines how much the object bounces back when it impacts something else. Toggle between 0 and 1.0. |
| Friction | Determines how much resistance the object meets when moving across or against another surface. Toggle between 0 and 3.0. |
| Gravity Scale | Determines how quickly the object falls to the ground. Negative values reverse gravity and cause the object to “fall” upward. Toggle between -5.0 and 5.0. |
| Linear Dampening | Determines how much the object’s linear momentum slowed. Toggle between 0 and 1.0. |
| Angular Dampening | Determines how much the objects angular momentum slowed. Toggle between 0 and 1.0. |
| Slip | Determines how much karts slip when driving upon this object. Toggle between 0 and 1.0. |
| Drag | Determines how much karts are slowed when driving upon this object. Toggle between 0 and 1.0. |
| Rumble | Determines the degree of controller rumble feedback felt while driving upon object. Toggle between 0 and 1.0. |
Let’s Get Dangerous
What’s life without a hint of danger to make victory all the sweeter? Sometimes a track calls for objects that are too hot to handle.
Consider a cube. Boring. Six sides. But imagine—what if—that cube were to be made of crackling electricity? Or scorching hot embers? Well, now, that’s quite a bit more exciting. That’s where the Danger Tweaker comes in. You can find it in the Tools Bag on the Gadgets page under Object Tweakers.

To demonstrate the awesome alchemy possible with the Danger Tweaker, place one on your good friend Archie. Tweak the Danger Tweaker’s Lethal Type to Electricty and see what happens.

Oh ho! As you can see, doing so gives Archie a shocking change in appearance. Using the Danger Tweaker is a great way to add hazards to keep drivers in your level on their toes.
Tweak Archie and set the Lethal Type back to Fire. Go ahead and use the Capture Tool to save this new version of Archie. Rename him in your Popit to Danger Archie, stuntarch extraordinaire!
Danger Tweaker Tweak Menu
| Tweak | Description |
|---|---|
| Lethal Type | Set which deadly property the attached object acquires. Choose from Fire, Electricity, Plasma, Poisonous Gas, or No Visuals. |
| Effect Scale | Adjust how intense the lighting effects emanating from the object are. Toggle between 0.2 and 3.0. |
Pathfinder
Imagine a row of Danger Archies in the road. Terrifying, indeed. Of course, your sack person knows not to drive around the flaming fellow. However, AI drivers on the road aren’t so quick on the uptake. Not knowing any better, they drive head-on into dangerous hazards. But with the Pathfinder object tweaker applied, you can set the object to drivable, an obstacle, or something to be ignored.


Pathfinder Tweak Menu
| Type | Tweak | Description |
|---|---|---|
| Navigation | Type | Determines how AI drivers treat the object. Toggle between Drivable, Ignore, Obstacle, or Drivable Obstacle. |
| Navigation | Include Rigid Connections | Determines if the effect is extended to Materials glued or connected to the object. Toggle On or Off. |
Weapon Target
While the Pathfinder is good at keeping things away from objects, the Weapon Target object tweaker works in quite the opposite manner. A straightforward gadget, it makes whatever object you attach it to the target of any seeking-type weaponator that’s fired. Consider it the universal ‘Kick Me’ sign of the Craftverse.
Technology Marches Onwards!
You’ve learned about danger, grabbing, swinging, soaring, goals, and more. You’re probably feeling pretty darn clever but don’t think that’s all there is to Create Mode. In fact, you’re just getting started.
There’s two more Object Tweakers you should know about, but before you can really put them through their paces, it’s important to learn about Sensors. Sally forth to the Intermediate Tutorials!
