The Best Drop Spots for Apex Legends’ Broken Moon
Why waste time dying on the edges of the map when you can die at the center of the map

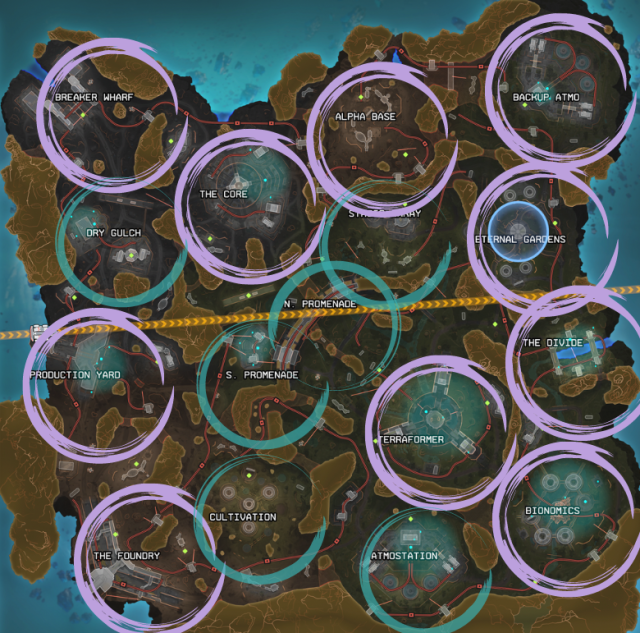
Broken Moon, Apex Legends’ newest map and the home of the latest hero, Catalyst, provides a wide variety of drop zones. Broken Moon is smaller than Storm Point and larger than World’s Edge, but the inclusion of ziprails makes the size more manageable.
Still, because of its size, where you drop can become all important, or you’ll end up trudging through dead zones. Here are the best drop spots for Apex Legends’ newest map, Broken Moon.

S-Tier Drop Zones in Apex Legends: Broken Moon
The Foundry –
The Foundry says high-tier loot and means it. This point of interest is on the edge of the map but, unlike other purple edge zones, has good ziprails that can connect you to The Promenade, which is likely going to be part of the next few rings. It’s possible there will be other squads in the area, but there’s enough loot to ensure everyone gets a gun and plenty of areas to take cover and work around in.
The Core –
The core itself is an extremely open area, which means you’ll be open to a lot of crossfire. It’s also a popular drop, so it’s better to loot from the abundant crates that surround The Core. But the loot tends to be good, and it’s fairly central. This drop point best benefits highly aggressive and skilled players, as you’re likely to steamroll less coordinated teams. It’s also central, which keeps the momentum high.
A-Tier Drop Zones in Apex Legends: Broken Moon
The Promenade –
The Promenade is labeled as mid-tier loot, but there’s just as much high-tier loot here as others with the designation. It’s a fairly long corridor, with ziprails on either side, and a long corridor at its center. But despite that, there are plenty of places to find cover. You have great sightlines from the side, and you’re fairly central.
Production Yard –
The outer area doesn’t provide much, but within can be a fairly diverse tier of loot. It’s best to enter through the side before funneling in towards the center, assuming there are other squads, towards The Promenade.
Stasis Array –
Despite stating that it offers mid-tier loot, there is enough loot here to kit out an entire fireteam, at least for their first fight. It’s also center to the map, meaning you’ll be able to ensure you have a gun before you chase the sounds of your first firefight. And because it tends to offer mid-tier loot and is a little smaller than some of the other areas, it’s not often picked as a drop point, meaning you’ll likely only have to share it with one to two other teams. There’s also plenty of cover available, and ziprails. A personal favorite.
Eternal Garden –
One of the most beautiful points of interest on Broken Moon, but there’s also fairly decent loot and a few separate buildings that squads can split off to loot from. Issues arise with the long sightlines and lack of cover between these buildings. If you manage to claim the center building, with Broken Moon’s only jump tower, it’s a fantastic area.
B-Tier Drop Zones in Apex Legends: Broken Moon
Bionomics –
Bionomics is gorgeous, but with a handful of buildings with a lot of open space, it’ll become a haven for snipers. The loot is fine, but you can likely do better at the Foundry.
Cultivation –
Cultivation is flat and open, with a few buildings and loot boxes, but nothing particularly special. It’s likely a place you’ll wind up as the rings close, but definitely shouldn’t be your first choice to drop. Respawn point.
Terraformer –
It’s likely that if you’ve played with randoms you’ve dropped here. Terraformer is fairly central, and it offers the promise of purple-tier loot. However, being made with several branching corridors, it can be a deathtrap if more than two teams drop, which is likely, and there’s a significant chance you’ll struggle to find a gun. But if you are one of the first to drop, you’ll likely get fairly decent loot and might even get the chance to steamroll the less fortunate squads.
C-Tier Drop Zones in Apex Legends: Broken Moon
Alpha Base –
While this segment of the map feels the most like a lunar colony, it’s a place to skip. The loot here is rather meager, and it lies in a valley with long sightlines all around, opening you up to snipers coming from three different locations. Its only positives are its ziprails, which connect it to Stasis Array.
Backup ATMO –
Backup ATMO makes the promise of high-tier loot with very little to back it up. You might be able to scrounge up purple shields if you have a Loba, but the location’s sprawl and far distance from the center of the map means that it will be a struggle to get equipped otherwise before you’re running from the first ring. The ziprails it offers will only take you to other edge locations, so it’s better if you just run straight to Stasis Array. But by the time you get there, the loot will probably have been picked.
Dry Gulch –
While it offers mid-tier loot versus Breaker Wharf’s high-tier loot, it’s slightly closer to the center. That, however, doesn’t make up for how poor the loot is. Ziprails will take you to the Production Yard, which is a superior point of interest.
D-Tier Drop Zones in Apex Legends: Broken Moon
Atmostation –
Atmostation would do fantastic as a control map but, as a drop point, it flounders. It’s mid-tier loot designation is accurate, and it suffers from the same faults as Dry Gulch. The loot isn’t fantastic, and it’s likely far from the next ring, forcing you to ride the rails through deadzones to where you want to go, exposing you to people set up in better locations like Terraformer.
Breaker Wharf –
Breaker Wharf is far out of the way and the loot that it offers isn’t worth the difficulty you’ll face trying to get to the center of the map, should the rings not play out in your favor. You’ll find comparable loot in Dry Gulch.
