
Servant of the Lake Day 3 Walkthrough – All Achievements and Puzzles
The end of a banger adventure in the Rusty Lake universe.

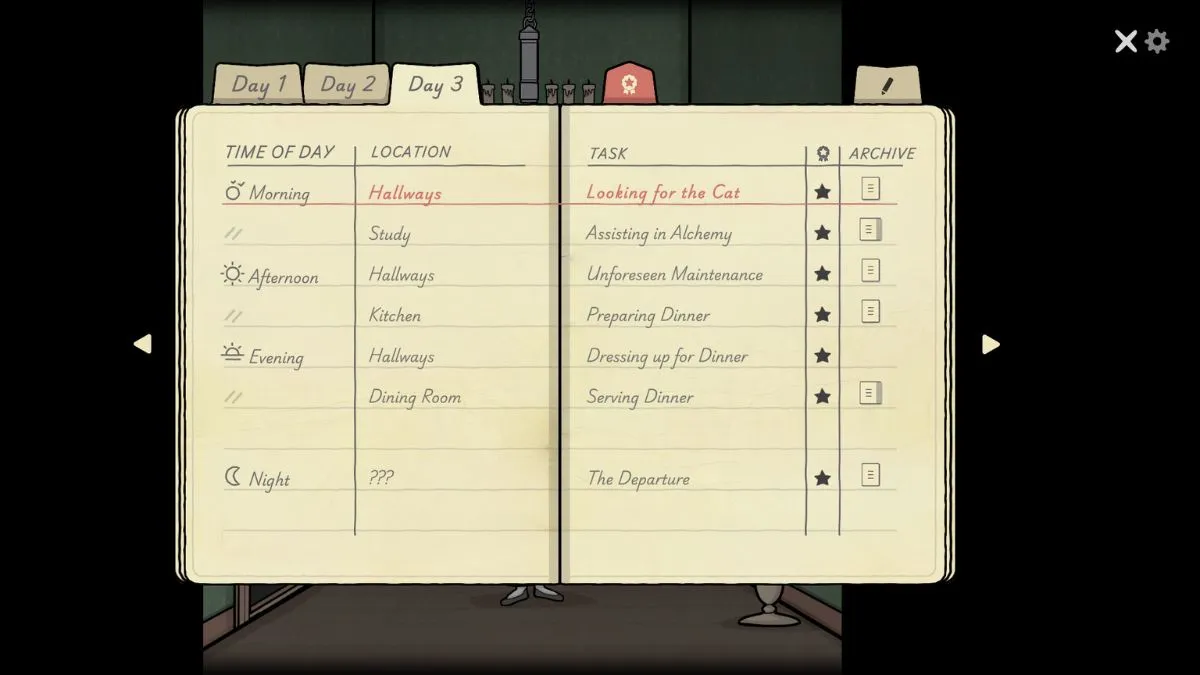
Well done on making it Day 3 in Servant of the Lake. It’s a fun game with a great story, and I’m glad you’re spending some time on it. Here follows the full guide to Day 3, including all the achievements and puzzles.
Let’s get stuck in.
Table of Contents
- Looking for the Cat
- Assisting in Alchemy
- Unforseen Maintenance
- Preparing Dinner
- Dressing up for Dinner
- Serving Dinner
- The Departure
Looking for the Cat
At the start of Day 3, Kate will meet you outside the servant’s room. Speak with her. Once she tells you about the missing cat, back out and go straight into the foyer. William will call you from upstairs. Click on the door that’s ajar up there.
He will ask you for the book, then the hammer. Give him the hammer when he asks for it, then head down the stairs again and go to your right. Look at the statue and grab the pebble off its head, then back up and take the hallway to the left.
Open the window and look out, then throw the pebble at the tree stump behind which the cat is hiding. Click on the cat again and it’ll flee. Go all the way back to the foyer to find the cat hiding under the chair.
Chase it off again, then go right once more to find the cat hiding behind the statue. After you chase it off, head back to the foyer to find the lower door ajar. Click on it to witness William’s madness. After this scene, you’ll find the cat hiding in the stove. Open the door and chase it off once more.
Kate will be in the room with you again, the cat on her lap. Speak to them.
First, click on the cat’s head until it jumps off. Achievement done. Then speak to Kate. She’ll mention a note on the table. Back out again and go back to the room with the statue (foyer, and then to the right). Go to the painting and click on the items in the same order they were mentioned in the note.
Hat, rifle, bear eyes, crow. This ends this section, and we head into Aldous’s lab.
Assisting in Alchemy
This section is probably the most difficult in the entire game. At least it was for me. If I could’ve looked up a guide, I would have, so I don’t blame you for being here for this one. So, let’s tackle this toughie.
Talk to Aldous first, then go all the way to the right and click on the crate on the ground, grab the bottles, and back out. Click on the puzzle box next. The sideways T with the dots is left, and the trolley-looking thing is right. Click the buttons in the order displayed and grab the matches.
It’s left, left, right, right, left, right, in case you’re stuck. With this, we can input our first symbols on the board. But since I already know them all, here’s the full board with all symbols in the right places.
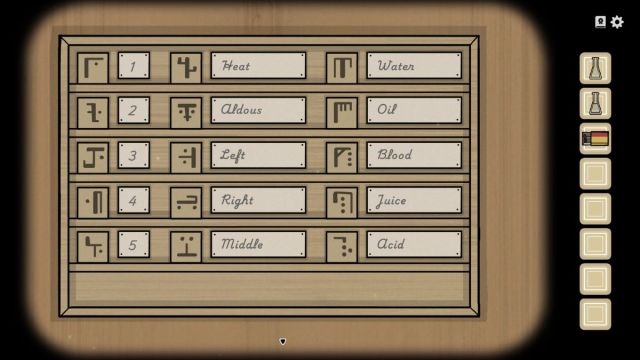
Since we already know all the symbols now, let’s run from left to right again, shall we? Click on the parrot, and feed it five drops of water. After it chirps, click on it, and it’ll lay an egg. Grab the egg and then click on the cabinet behind the parrot, below the alchemy board. Click on the combination lock and insert the code according to the board. So, 2451.
Open the cabinet and grab the flasks. Back out and then click on the table beside Aldous with the book, candle, and empty jar. Light the candle with the matches, and you’ll see the symbol for heat. Might as well drop the egg into the empty jar so long, too. Back out, and then go into the backroom with the odd-looking machine silhouette.
Here we have a formula, and if we consult the board, it reads as follows.
Two, left + three, middle = oil.
Four, right + one, left = acid.
Be careful here. Rusty Lake have been amazing at squashing bugs super quick (seen the amount of updates we got already?), but I ran into one here where if you make acid first, the machine stops working and you can’t make the oil.
It’s probably fixed, but make the oil first, anyway. Hit the left plunger twice and the middle plunger three times, then place a flask down to catch the oil and activate the machine. Grab your oil and place down another flask for the acid, which is four pumps on the right plunger, and then one on the left.
Now go to Aldous and pour him a refreshing drop of acid into the glass he’s holding. Grab the meat from his mouth, back out, and go to the juicer below the alchemy board.
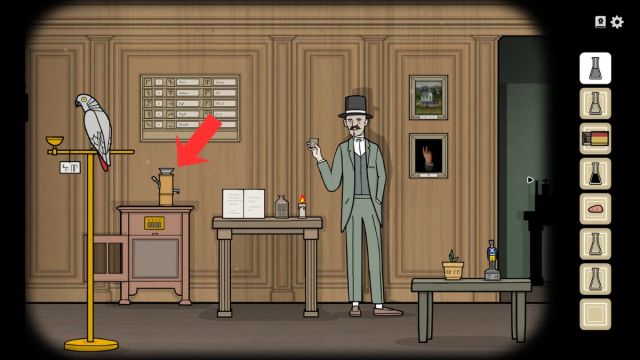
Place down an empty bottle, throw the meat you got into the juicer, and pump the lever four times. Take your newly acquired meat juice and go to the plant on the table in the middle of the room. Add four drops of water and one drop of blood, then grab the fruit and head back to the juicer.
Juice the fruit, then go back to the book. Add the following, in this order, to the jar with the egg in. One drop of juice, one drop of acid, one drop of oil, and three drops of blood.
Grab the elixir, then go back to the parrot. Feed it some of the elixir to get your achievement for this section. Talk to the parrot once after feeding it the elixir, then go to Aldous.
Give him some of the elixir, listen to his dialogue, and move on to the next section.
Unforseen Maintenance
As you start, the house is in a bit of a mess. But we can grab your achievement right away. Head into the servant’s room and click on the cat hiding under the table, then click on the table leg to reveal and read another note from Kate’s brother.
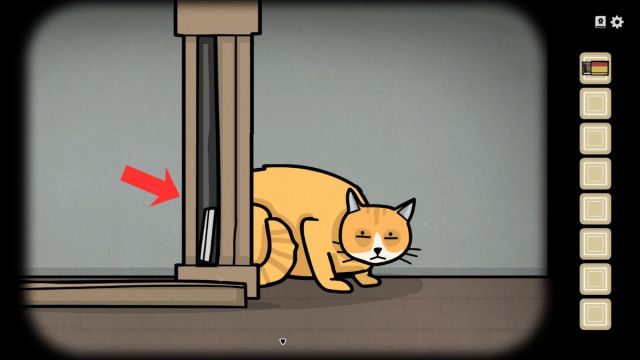
It may be that you first need to finish the game to find this note, so if it doesn’t work for you, definitely check back after you finish the game.
Now click on the cat to get some more sticky substance from it. Grab the statue head off the stove, then grab the chair leg off the table in the previous room. Repair the portraits with the sticky substance as you go, since Kate will ask you to do this later anyway.
In the foyer, you’ll find Kate crying under the stairs. Speak to her. When she’s done, grab the piece of chair off the chair in the foyer, repair the painting (William’s will be fine), then go right. In this room, again, repair the painting, and then use the sticky substance to repair the statue. Go left down the hallway, pick up the balcony piece, then look out the window.
William will be there, yelling and brandishing his hammer. Go back to the foyer, repair the balcony, then go to the servant’s room and speak with Kate. Do as she says and repair the chair, replace the stove door, then speak to her again, and she’ll say it’s time to go to the kitchen to prepare the dinner.
Head back to the foyer, take a right, then go through the now-open door, and that’s all for this chapter.
Preparing Dinner
As always, it’s best to knock out the achievement first, so let’s get that done. You’ll need to speak to Kate first, and get the knife from her. The go to the cake to the left of Kate, and use the knife to kill the fly that’s buzzing around.
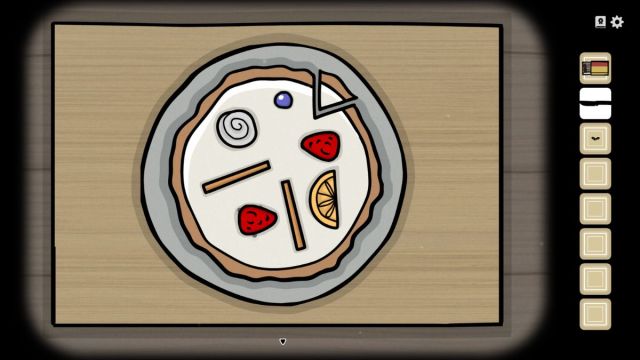
Pick up the fly, which is tied to the achievement, then decorate the cake so there are no open holes. If you have any trouble with this, here’s the solution:
Grab the cake slice and head back. Pick up the wood on the floor, then go to the oven. Place the wood in the lower door and light it with the matches, then back out. Next, go to the wall cabinet and grab the tomato, then click on the jars.
This is another simple puzzle. Your goal is to shuffle the bottles around until they all contain only one color liquid. Take your time, and you should get it in a jiffy.
Now go to the cutting board that’s on the table and chop the onion, shrimp, and tomato using the knife. Head over to the pot on the stove. Add the oil, onion rings, shrimp parts, tomato wedges, the fly, and the mushroom to the pot.
Go to the oven, open the door, and place the potato wedges in. Close the door and back out, talk to Kate, and then check on the potatoes. They should be done. If not, just wait a little.
Speak to Kate again and ring the bell in her hand, then back out. Aldous will appear in the kitchen. Speak to him, and hand him the plate of potatoes. Feed him the normal potato first, and then, depending on the mutation he gets, feed him the potato with the same mutation.
So, if his eye goes all funky, feed him a potato with a circle over the eye. Same with the ear, neck, and so forth. Feed him the cake, grab the spoon he offers you, and go get some soup.
He’ll offer you a sip. You have no choice but to take it.
Now you’ll have a pretty gnarly trip. All you need to do here is listen to the voice speaking with you, and then click on the silhouette the voice belongs to. I’m pretty sure the order is random here, but mine was Aldous, then William with the missing hat. Click the items in the order he mentions them. He’ll talk about his missing book, keep clicking on him.
A giant fly buzzes by, granting you your achievement. Speak to Alexandra. Undo her buttons to see the eye, then talk to the coachman, who will tell you it’s too late. Finally, I had only one silhouette to click on.
It mentions that the blood moon is rising, so click and drag the moon upwards. Then speak to the baby basket, remove the lid, and click the baby again to progress. Next is Aldous again, who was to the right for me.
Finally, speak to Kate, then to the man lying down. Turns out to be Aldous, and the first thing he says as you regain consciousness? “That was a strong soup.”
That actually made me laugh out loud the first time. Anyway, that’s it for this section. Weird.
Dressing up for Dinner
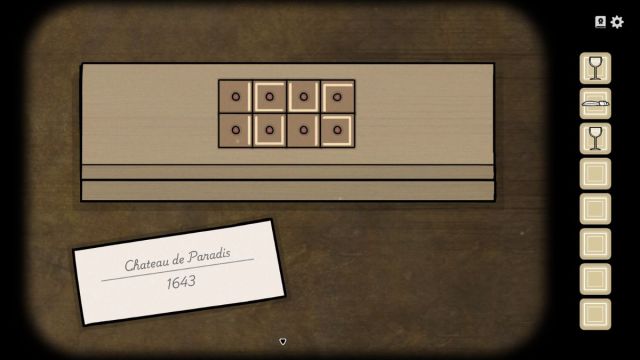
Here, let’s start by grabbing the glass on the table. Go through to the foyer, grab the tie off the chair, then go down to the cellar under the rug. Grab the glass off the shelf, then click on the box on the floor. It’s another wine puzzle.
Another simple solution, though admittedly trickier than the first one. If you have any trouble, copy the image below, then file the top-right tile once to unlock the box.
Go back to Kate and give her the bottle and the glasses. Go back to the foyer and you’ll see that the upstairs is now open. Head up, click on the portrait of the house, then start clicking lights. Three of these windows light up the portraits downstairs, so I had to go back and check which items were where.
In the end, it should look like this, with the three marked windows being the ones that light up the portraits.
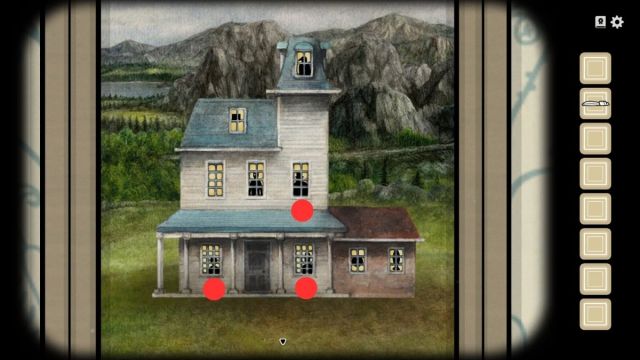
In the screenshot, William is in the middle-right window. If you want the achievement, swap him with the fish, then go to his portrait and grab the Special Fish Pin off it. Grab the pearl necklace from the box on the table while you’re at it.
Now head to each portrait when they’re correctly lit up with the rightful owners, and touch them to reveal a symbol. William, the gold-necked wine bottle, should be on the lower right triangle. Aldous, the silver-necked wine bottle, should be on the spiral, and Alexandra, the bronze-necked wine bottle, should be on the S.
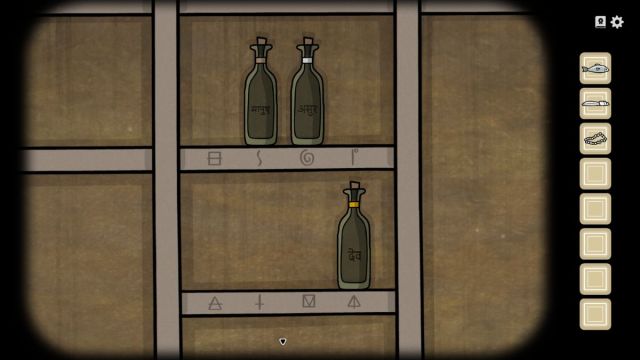
Back out and grab the sacred water and cloth from the golden box in the cellar. Now head back to the foyer and go upstairs, then to the door on the left. William will ask you to fetch him something from the staircase. Use this opportunity to put the special fish pin on him and secure your achievement. Might as well put on his tie, too, then go grab the item from the stairs.
It’s easy, just click on the stairs and click the middle one once zoomed in. Grab the revolver and return it to William.
Back out to the foyer, then go down the hallway straight ahead and look in the crate. Here you’ll find a ribbon. Go back upstairs again and take a right this time. Alexandra will ask you to prepare her baby. Grab the baby, put it in the basket, and then use the sacred cloth and sacred water on him.
Go back to Alexandra and give her the ribbon and the pearl necklace.
Head back to the foyer and then go to Aldous’ room. He’ll be standing outside it. Talk to him to get instructions on retrieving his rifle. Head back to the foyer, take the door on the right, and grab the butterfly tie off the statue.
After this, check the painting, and tap on the hat twice, once on the crow, and once on the rifle. Grab the rifle and take it and the tie back to Aldous.
After handing him his gear, go back to the foyer, take a right, a left, and go through the now-open door to start the penultimate chapter of this fantastic game.
Serving Dinner
Let’s get that achievement out of the way first, shall we? Tap on the rope on the top left of the screen repeatedly until Aldous asks you what you are doing. Easy one, eh?
Now talk to Aldous and fill his glass with the red wine. After his speech, scroll left and grab the appetizers from Kate. Click on the table and fill all the glasses with red wine, then place the appetizers in the center of the table.
The first solution is simple. Give the onion ring and the broccoli to Aldous (left), give the bread and the rabbit ear to Alexandra (top), and give the fish head and the bacon to William (right). It’s pretty funny to see William chomping down on a fish head, but then he’s eaten worse, hasn’t he?
William will sing a song now. When he sings, you’ve got to drop all the notes in the air into the wine glass. Straight notes will fall straight down, and angled notes will drop at the angle they’re leaning. Use this to get all the notes into the wine glass.
It can be a bit tricky, but you’ll get the hang of it fast. When he pukes up the worse thing he ate (I literally just mentioned that), lift it out of the glass and drop it.
Get the main dish from Kate, and place the dish in the center of the table, as before. For this puzzle, place a broccoli and a potato on the left plate, two drumsticks and a carrot on the top plate, and all the remaining items on the right plate.
The harp sequence is next, and it’s tricky. All I can tell you is take your time and count the strings. If it’s not randomized, here’s the order in which I had to play the strings (from the left).
- 1, 1, 1.
- 3, 2, 1.
- 1, 5, 1, 3.
- 5, 4, 3, 1, 2.
Time for dessert. Grab the dessert from Kate and place it on the table again. This one’s simple. Put the two yellow pieces of cheese on the left plate, the Chocolate Custard (is that a donut?) on the top plate, and everything else on the right plate.
Aldous will make a speech now, and a standoff ensues. Grab the knife on the floor to the right, and cut the rope holding up the chandelier. Chaos erupts, and this also ends this section. Time for the last scene.
The Departure
Things erupted, but we can still save the day. Talk to William first, and once he tells you to give the man a drink, remove the glass from his shoulder.
Click on the floor where the water’s dropping form the ceiling, and catch a drop with the glass, then talk to Aldous. Get the fork from his shoulder, take the cloth he offers you, then back out and go back to William. Use the cloth to treat his wounds, and use the fork to pull out a piece of meat.
Next, give the meat to the cat, click on the cat, and then back out once it’s left and then grab the hairpin from the cat. Now click on Aldous’s leg. Click and drag to move the pant leg up, then use the hairpin on the wounds to remove all the items. Your final achievement, well done.
Click on the door now, and insert the hairpin into the lock. Angle it so that the bolts begin to rattle. They’ll pop off eventually, then move on to the next one. Slide the lock mechanism back and head through the door.
Go straight all the way, shift the wood slab out of the way, and keep going. You’ll find some flint on the floor in one of the rooms, grab it and move to the next room, where you’ll find a torch. Use the flint to light the torch.
Take note of the lines on the statue’s head in this room, then go right, then into the room on the right. Grab the plank, back out, then go through the room on the left. Use the plank to bridge the gap here, and keep going straight. Another statue head – remember the number.
Keep going until you reach the room with the statues. The numbers, in case you forgot, are as follows. The bird, eight, the cube head, five, and the woman, three. These are the times you need to enter into the statues.
So, set the time on the right statue to five’o’clock, the far-left statue to three’o’clock, and the last statue to eight’o’clock.
That’s it. And if you played the Cube Escape series, that ending will hit especially hard. Enjoy it. We’re all done here.
If you missed any achievements, skim through the relevant sections of our Day 1 and Day 2 walkthoughs, and you’ll get them all.


