
Servant of the Lake Day 2 Walkthrough – All Achievements and Puzzles
Not quite as long as Day 1.


Welcome back to Day 2 of your journey as a servant at the Vanderboom estate. We’ve had to use cat vomit to fix broken teacups, douse flaming tongues, and deal with creepy masked figures.
And now it’s time to tackle Day 2. Are you ready? Then let’s get stuck in.
If you have completed Day 2 and want to jump straight into Day 3, check out our full guide to all achievements.
Table of Contents
- Preparing Coffee
- Waking up William
- Cleaning the Floors
- Going Hunting
- Doing the Washing
- Helping with Bathing
- Night Time Duties
- Inspecting the Cellar
Preparing Coffee
Starting Day 2, you’ll be faced with the other servant. Hear what she has to say, then go straight to the next room. Go to the upstairs room and click on the painting of the house. Click the unlit windows to turn on all the lights, then back out and look at each other painting in the house.
Aldous points to the right, Alexandra up, and William to the left. Going back to the house, we can match their silhouettes to the numbers they’re pointing to. So, in my case, William would be 5, Aldous 1, and Alexandra 3.
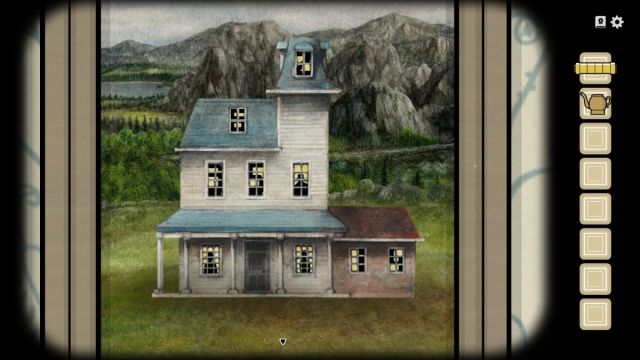
Head back to the first room and enter the room on your left, then click the box on the table. My code here worked out to 315 (not sure if it’s random). Grab the coffee beans from inside the box and then head to the stove. Place the coffee beans on the stove until they roast, then pick them up again.
Head back to the upstairs room with the house portrait, and use the grinder on the table to turn the coffee beans into ground coffee. Head back to the stove and place the powder in the pot, then grab the pot.
Head back to the foyer, and you’ll notice the lower door is cracked open. Click on it, and you’ll meet Aldous. Pour his coffee for him, and you’ll get the achievement for this section if you roasted the coffee beans on the stove.
Head back up the stairs to find our fellow servant with some, uh… ketchup falling from the ceiling. Speak to the servant again, then enter the door to your left to end this section.
Waking up William
Let’s start this one from left to right again. Let’s scroll to the left and open the closet (click and drag). Grab the hat and check the time on the pocket watch (it should read nine’o’clock). Head back and grab the spoon off the table.
Click on the clock next and set the time to nine, same as on the pocket watch. Open the door to find a puzzle box. There’s a portrait on the wall with the solution, but if you’re in a hurry, here it is:
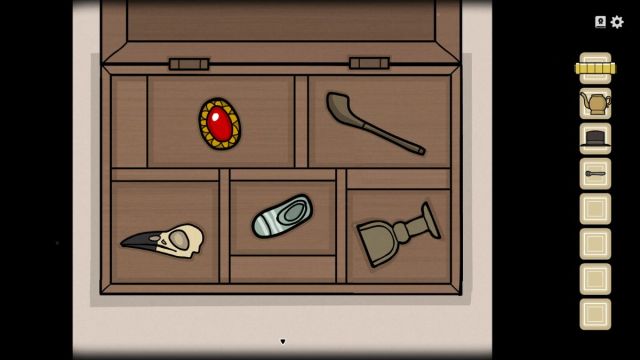
The chalice will begin to wiggle, so grab it and back out. Now… we need to do something I’d rather not. Click on William, click on his mouth, and use the chalice to scoop up his saliva.
Told you, I’d rather not have. Yuck.
Scroll to the right and click on the white patch on the floor, then pick up the seed. Back out and click on the plant pot on the table next. Plant the seed, and use the saliva we scooped up to grow the plant, then click it and collect the bird seed.
Feed the birdseed to the parrot and grab the feather he drops. Now go back to William and use the feather to tickle his face. After a few tickles on the nose and… nipples, you should get your achievement for this section. Now back out and go to William’s feet.
Tickle his big toe with the feather, and pay attention to the number of times it moves. Count down that many toes and tickle the next toe. It will point out the direction and number of spaces to move to next, and so on. Complete all the tickles, and once William pulls his foot away, back out and pick up the key on the ground.
Use it on the box on the table, and grab the knob and the eyedrops within. Use the knob on the window, open the window, then scoop some rain with the chalice. Head back to the plant and give it the water. It’ll drop more birdseed.
Feed the birdseed to the parrot, grab the egg, and go back to William. Open his eyes, put the eye drops in, and then open his mouth and pour coffee in. Click him again to wake him up, then click on him again.
He’ll ask for his hat, then his egg. Break the egg for him using the spoon, and then he’ll have his “breakfast.”
Place the scroll on the table when he asks, then click on it to solve a rather easy barrel puzzle. You just need to align the fish so that it points to the right. Next, guide William’s finger to each drawing in the order that it appears in the written piece to the left.
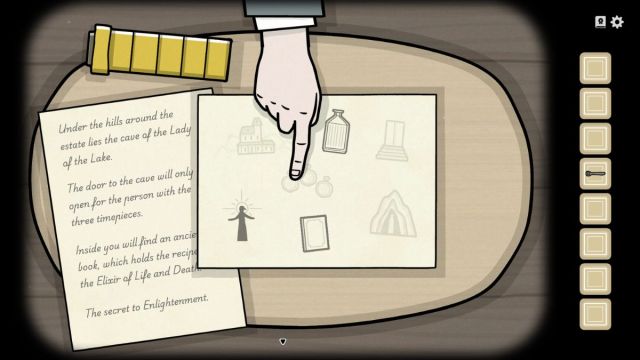
Talk to William again, and he’ll make you an offer, and that ends this section.
Cleaning the Floors
As you start this section, head through and go to the upstairs room to talk to the other servant. Open the bag on the table and grab the scrubbing brush. Also check out the note. Heavy stuff. Now we know why Kate’s got that thousand-yard stare, potentially?
This section is simple. Grab the brush and clean the “ketchup” off the floor. The first one, in the same room as Kate, has numbered spots, so clean them in order, from small to large. The next one is in the room to the right, past Kate. Here, each spot points towards the next spot that should be cleaned.
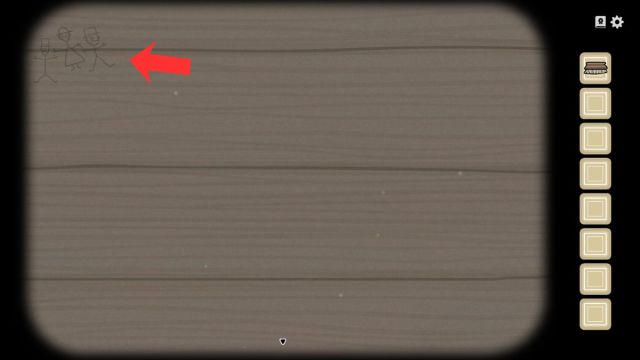
Very easy, so let’s head back to the starting room and go left to find the final ketchup spill. But here’s also where we’ll get our achievement. Click on the spot on the floor, then scrub all the spots away. These need to be done in similar pairs. Don’t release the brush, and then scrub the three drawn figures in the top-left corner of the screen.
That should get you your achievement.
Head back to where Kate was last, and then take the door on the right again. You’ll find Kate huddled on the floor and baby noises coming from the bathroom. Talk to Kate first, then click on the bathroom door, then the keyhole to peek through, if you dare.
Back out, and Aldous will call you. Open the balcony doors, climb down the ladder, and this will end this chapter.
Going Hunting
Talk to Aldous a couple times, take the rifle from him, then shoot all the animals. The key to the achievement here is to not miss a single shot. The first animal I suggest going for is the bird flying in the sky. It’s the hardest to hit, so if you miss, you can restart now and save some time.
You’ll need to load a round into the rifle with each shot. Next is the pheasant, in a tree to the right of your starting position. It’s hard to miss. Then there’s the boar, which is hiding behind a tree straight ahead.
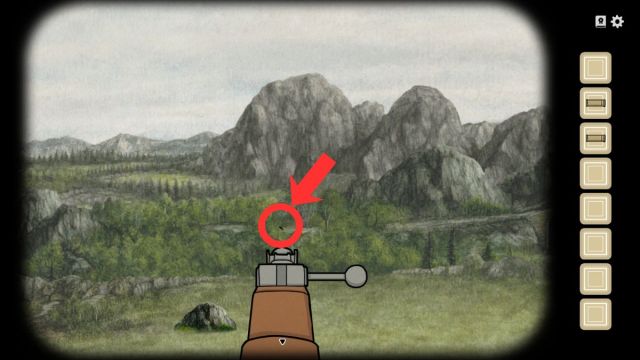
Shoot the boar once to bring it out from cover, and again to drop it. Then back out and collect your next four rounds from the stump. Go back to the stump and shoot at the rock visible in the above image. It’s straight ahead of you and slightly to the left.
The rabbit will come out from behind it. Drop it. It’s the 1700’s.
Aim further left, and you’ll see William planning on taking a swim beside the riverbank. Shoot him to scare him into the water, then shoot him again. Back up again and grab the next four rounds, then go back in. You’ll find the deer further up from the riverbank where you shot at William.
Head back out and read the note that falls on the floor. Remember the order of the senses here, sight, smell, touch, taste, and hearing.
Talk to Aldous, and he will ask you to get him the butcher knife. Next, click on the table with the meat. The point here is to arrange the tongue, claw, snout, and ear to the numbers they respond to. The numbers I got (and they have stayed consistent) are one, two, six, seven (don’t even think about it), and nine.
Ordering these to the note, we get the code 91276. Go to the shed to the right and enter this code on the padlock to open it. Go inside and grab the cloth on the floor and the butcher knife from the… stuffed animal head.
Go back to Aldous and hand him the butcher knife, then click on him so he slices the meat until he gets ketchup in his eyes. Use this opportunity to click on his pouch, open it, and steal his timepiece.
After this, use the cloth to clean his eyes, back out, and this will end this section.
Doing the Washing
Grab the sock off the table, and head into the room on the left. Grab the dirty clothes from the table, then from the pile on the floor. Pick up the baby and head out, go straight, up the stairs, then talk to Kate and hand her the baby to stop that ear-splitting noise.
Take the diaper, back out, then click on the door to the left to talk to William. Take his sock and go back to the servant’s room. Throw all the dirty laundry into the tub on the stove, then take the tub and head back to the upstairs room. Take a right to the balcony. Now, do yourself a favor and peek through the bathroom keyhole again. That should get you the achievement for this section.
Right, now back out and open the balcony doors, then click on the laundry line near the top of the door. Click the tub, then the line, to hang the clothes, and then order them according to their stripes. Shirt first, then the undies, then the diaper, then the pants, socks, and then the towel last.
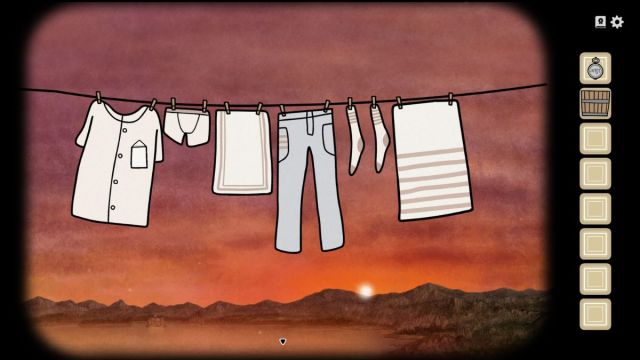
Click on the shirt’s pocket, which should be vibrating, to get a key. Use the key to unlock the bathroom and end this section.
Helping with Bathing
Use the tub in your inventory to fill the bath, then head back and scroll to the right. You’ll find a table with a cookie and a puzzle box. Grab the cookie, and tackle the puzzle box. The trick is to start with the middle ones and only do the edges last. It’s not too difficult, but if you’re having trouble, here’s a video.
Grab the soap and add it to the bath, then back out and click on the tiles above the bath. This is another simple puzzle — all you need to do is click the tiles in groups of four that are related to each other. For example, the four people (three adults and a baby) are all clicked together, the four plants, the four animals, the four furniture items, the four accessories (gun, briefcase, potion, hat), and the four senses (hearing, sight, smell, touch).
Once you complete the puzzle, a tile will crack open to reveal some scissors. Grab them and go to Alexandra. Click on the wound on her neck, and use the scissors to cut open the stitches. Grab the maggot, back out, and remove Alexandra’s hat and hairpin, then back out.
Go to the hole under the table and place the cookie on the ground. Click on the rat so it leaves the hole, then use the hairpin on it, then use the maggot on it.
Grab the bone comb and go back to Alexandra, use the comb on her hair, undo her buttons, then go to the window to the left. Click on all the panes to clean them, and you should get your achievement there.
Next, go to Alexandra in the bath. Click on her, and some bubbles will pop up, starting a mini-game. Simply look at which direction the bubbles will go, and click on the one that will cause all the bubbles to pop.
For example, in the last and hardest part of this task, look for any bubbles that might block the path of others. The last bubble, indicated by not having a direction, has another bubble between it and the bubble meant to pop it, so we’ll get that bubble out of the way to complete the game.
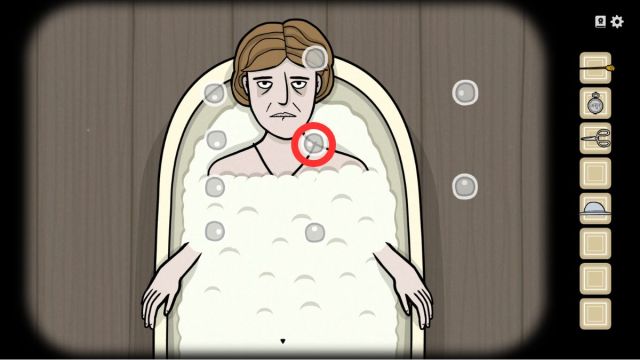
A hand will emerge from the bath, use the scissors to stab it until it leaves, then cut the necklace from Alexandra’s neck (again with the scissors), and take the necklace. Head to the coat rack at the far left end of the room, hang the hat, and then grab the note from both the hat and the dress.
Now you can head to the table to try to decipher the code. The trick is to use the X’s on 2 of the letters to cancel out numbers on the other letter. The remaining three letters give us the code.
I end up with 281, which should be the same every time. Use the code to open the briefcase on the floor, remove the box, use the necklace to open the box, and grab the timepiece. You’re all done here.
Night Time Duties
First, head left and speak to William in the servant’s room. With all three of the timepieces, head back out and stop at each portrait painting you pass. Use the corresponding timepiece to touch its likeness on the painting, and you’ll get a symbol on each painting. Remember these symbols.
Once you’ve seen all three paintings, go upstairs, turn right, and go onto the balcony. Here you’ll find some… leftovers. Throw them over the balcony by dragging and dropping them to get your achievement.
Go back down to the foyer and click on the rug, which should have an upturned corner. Open the cellar and go inside, inspect the wine bottles, and place each one on the symbol you saw on the painting, according to the writing on the watch.
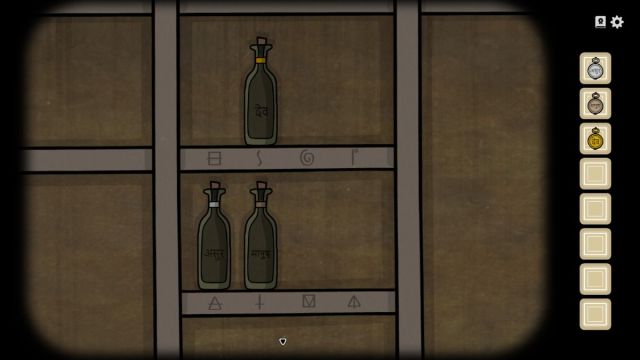
Back out, go through the open barrel, and into the next and final section of Day 2.
Inspecting the Cellar
Here, you’ll need to choose three items from the shelves before you can move on. Let’s get you your achievement first, shall we? Grab the hammer and the magnet, and whatever else you want, you only need those two for now. Head through the door and go left, then click on the small hole in the wall next to the dirt pile.
Use the magnet on the hole to get the key, then lure out a mouse, then use the hammer to end it. There’s your achievement. Head back to the first room, then click on the silhouette of the statue and touch the statue to go back to the shelf room.
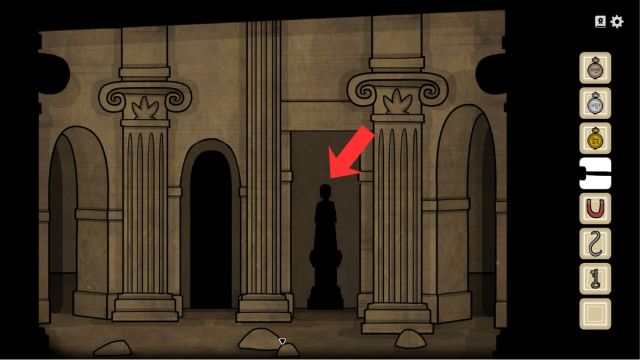
Now, grab the magnet, the spade, and the matches. Go through the door, ignore the spooky dude, and go left again. Fish out the key with the magnet, dig open the dirt pile with the spade, and use the key on the chest. Grab the torch and back up one.
Click on the torch holder, place the torch in, and use the matches to light it, then back up and go into that room. Go straight all the way, and touch the statue at the end to go back to the shelf room once more. Remember the times on these statues.
Now grab the corkscrew, the matches, and the empty bottle, and go through the door again. Go straight this time, through the door to the left on the statue. Punch a hole in the barrel with the corkscrew, then scoop up some oil with the bottle. Finally, use the matches to light the leaking oil on fire, and wait for the barrel to explode. Head through your brand-new door.
Pour the bottle of oil into the crack in the rock, toss in a match, and then keep going straight. Touch this statue to go back to the shelf room once again.
Now grab the hook, the weight, and the statue. Go through the door and take a right. Place the hook on the ring in front of you, add the weight, and go through the door. Use the sledgehammer on the bottom of the pillar to bash it down and create a bridge. Head straight until you’re in the room with the three statues. Place a timepiece around each one’s neck, and set the time to what displayed on the other statues. Here’s an image of the times:
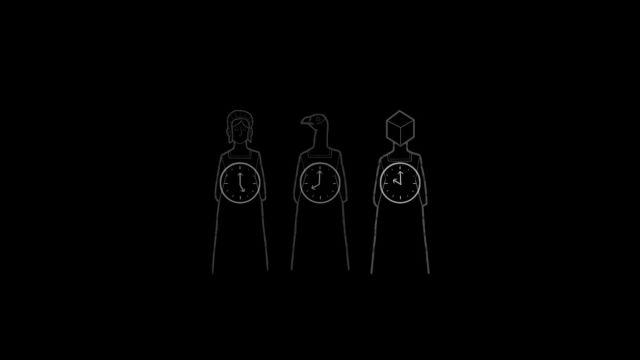
Just in case you can’t see it, the cube-head is ten’o’clock, the bird is eight’o’clock, and the woman is five’o’clock. It doesn’t matter which timepiece you place on which statue.
The door will open once you get it right. Head through and grab the book, then talk to the creepy crow fellow. And, of course, it’s Aldous. You will have no choice but to hand it to him and end the day.
If you’re ready to move on, check out our full Servant of the Lake Day 3 walkthrough, complete with all the achievements and puzzles.


