
ZombiU Guide Essentials Contracts
Appendices
COLLECTIBLES, UNLOCKABLES, AND SECRETS
This section of the guide is devoted to checklists. During your journey, you’ll want to know what you’re unlocking, where important items are located, and where everything is. The following Appendices furnish you with all these pertinent details.
Appendix I // Campaign Maps
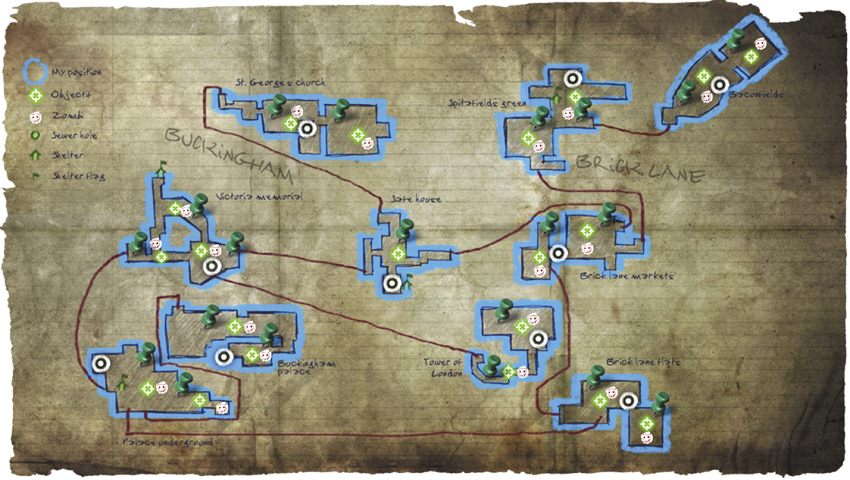
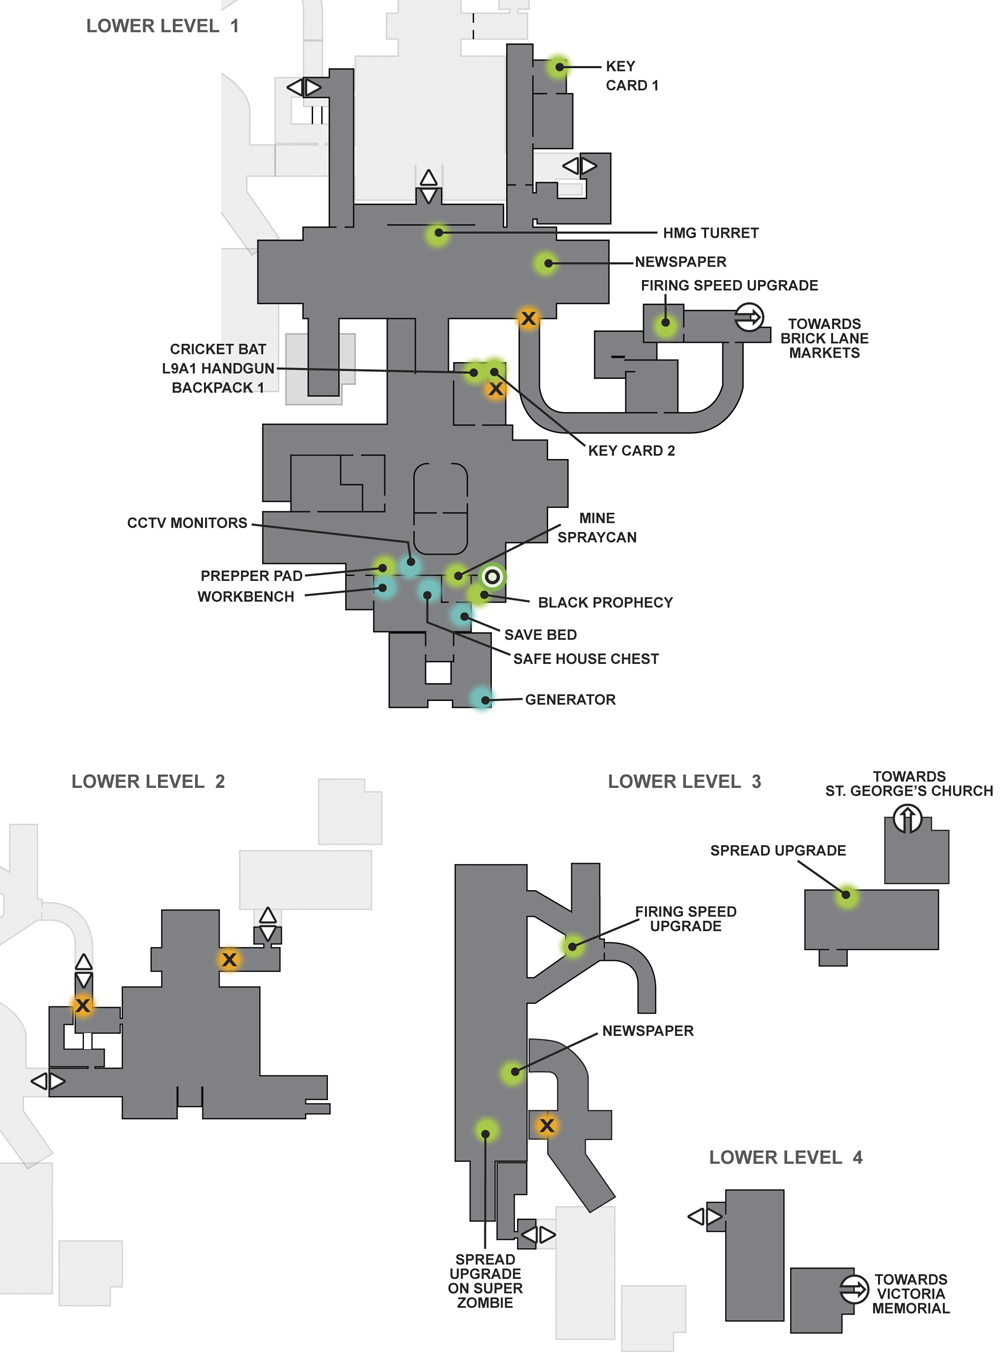
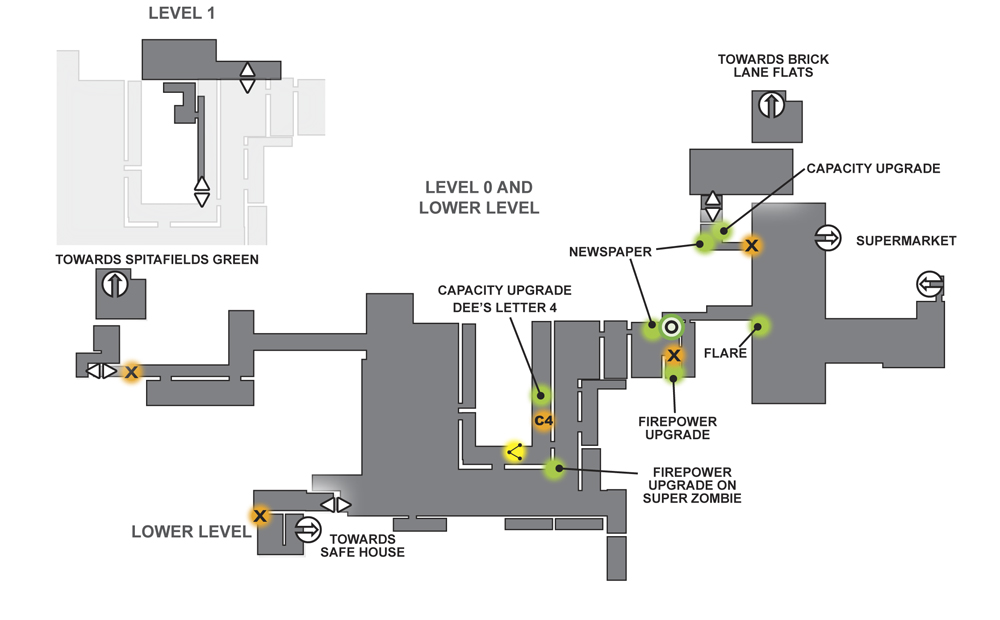
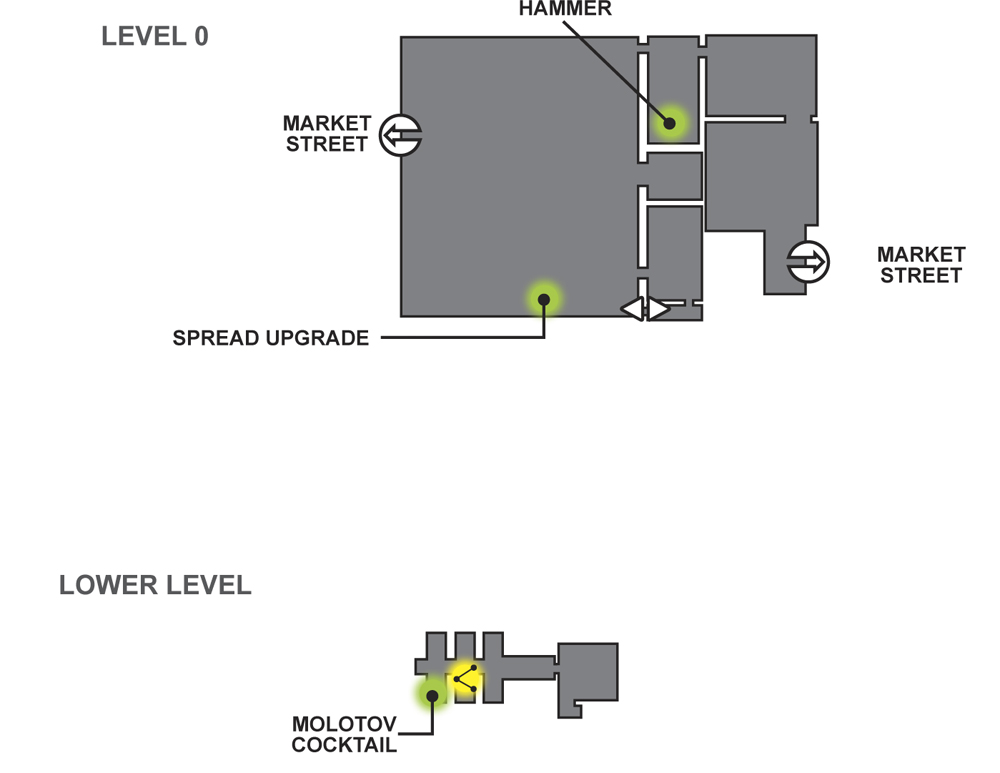
While exploring London and revisiting particular locations, it’s helpful to have all labeled maps in one place, flagged with every important item and object. Remember that some you must revisit a location in order to find certain items.
00 // Overview // London
01 // Location // Safe House
02A // Location // Brick Lane Markets (Hanbury Green and Market Street)
02B // Location // Brick Lane Markets (Supermarket)
03A // Location // Victoria Memorial (Green Park)
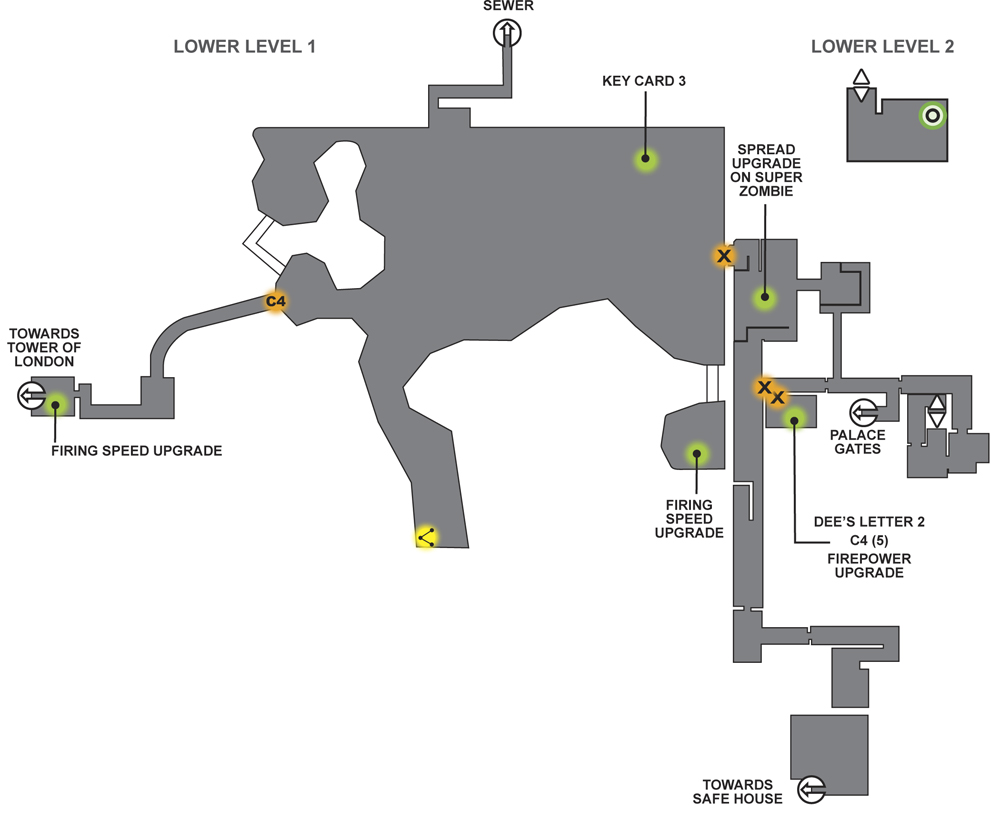
03B // Location // Victoria Memorial (Palace Gates)
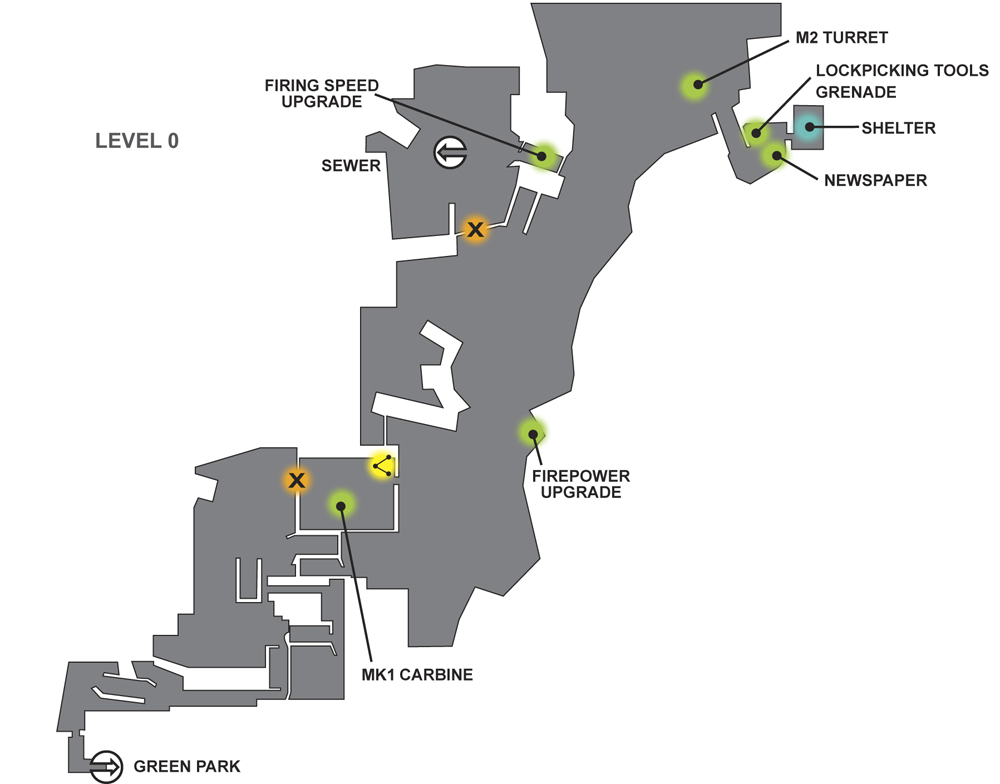
03C // Location // Victoria Memorial (Sewer)
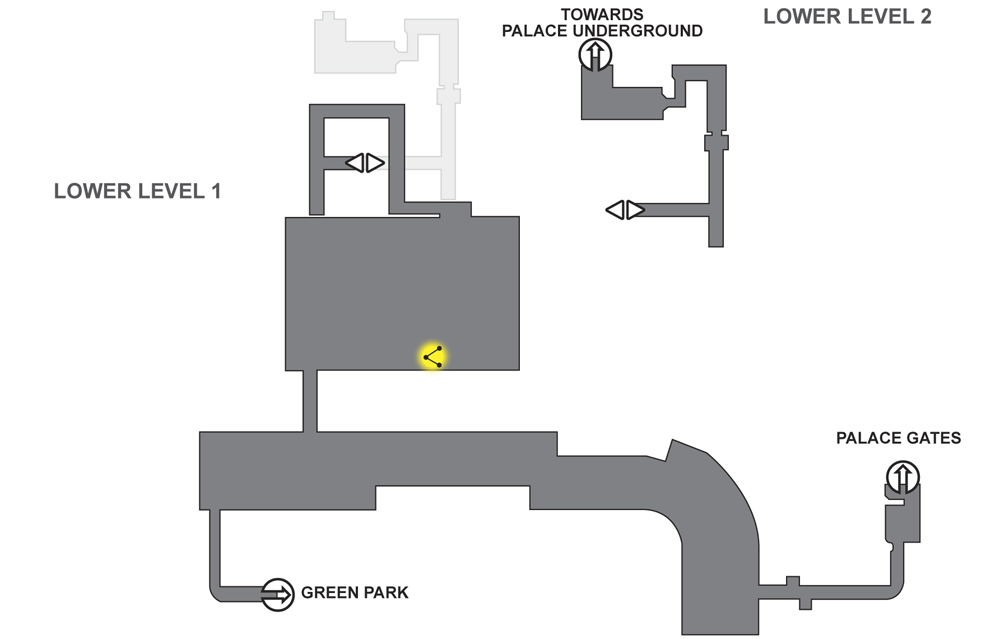
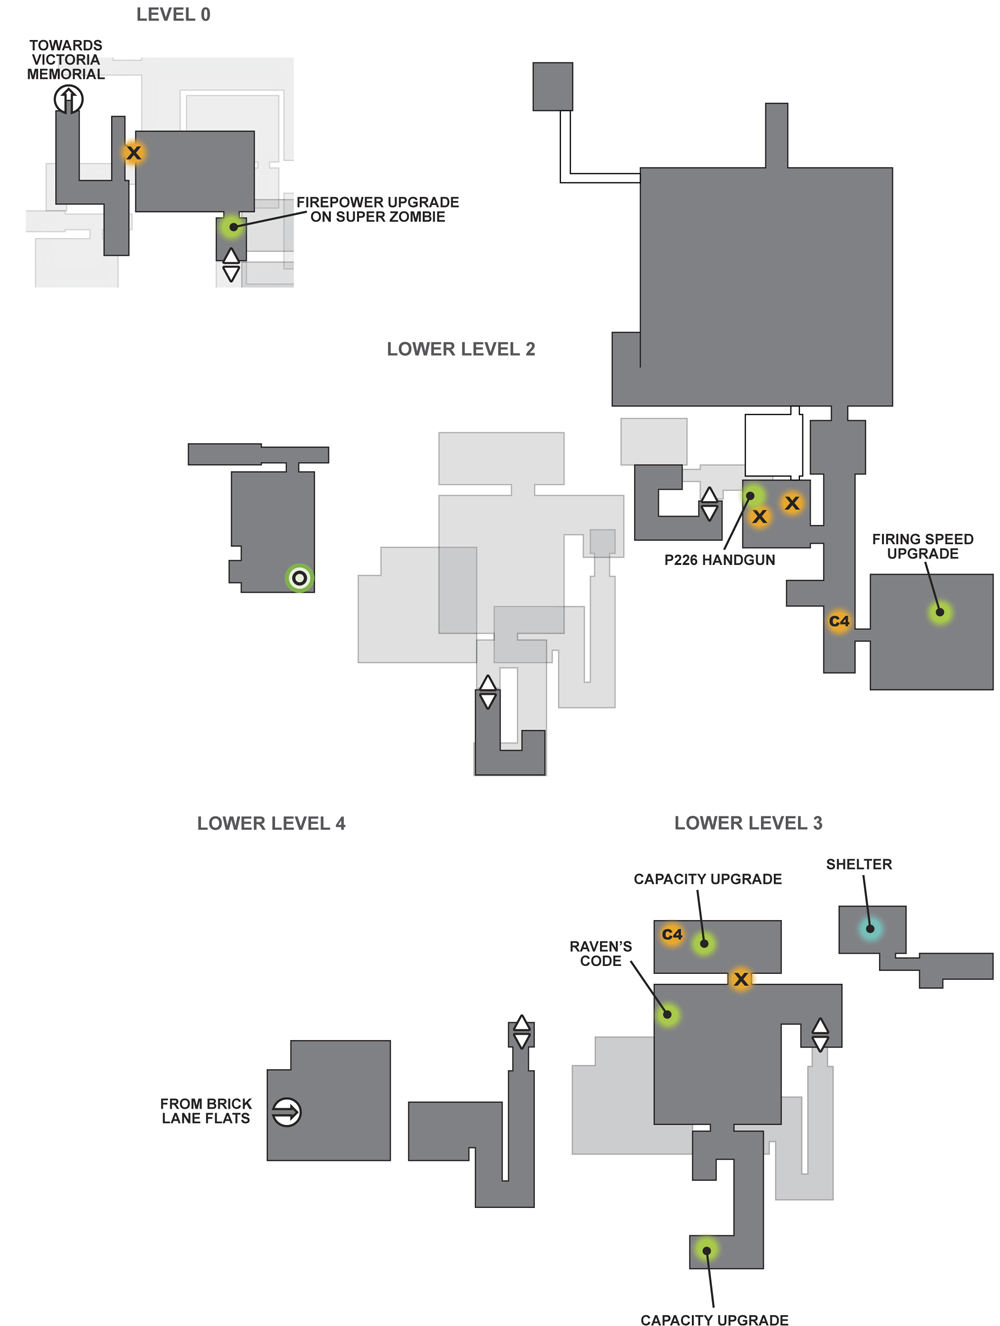
04B // Location // Palace Underground (Queen’s Quarter)
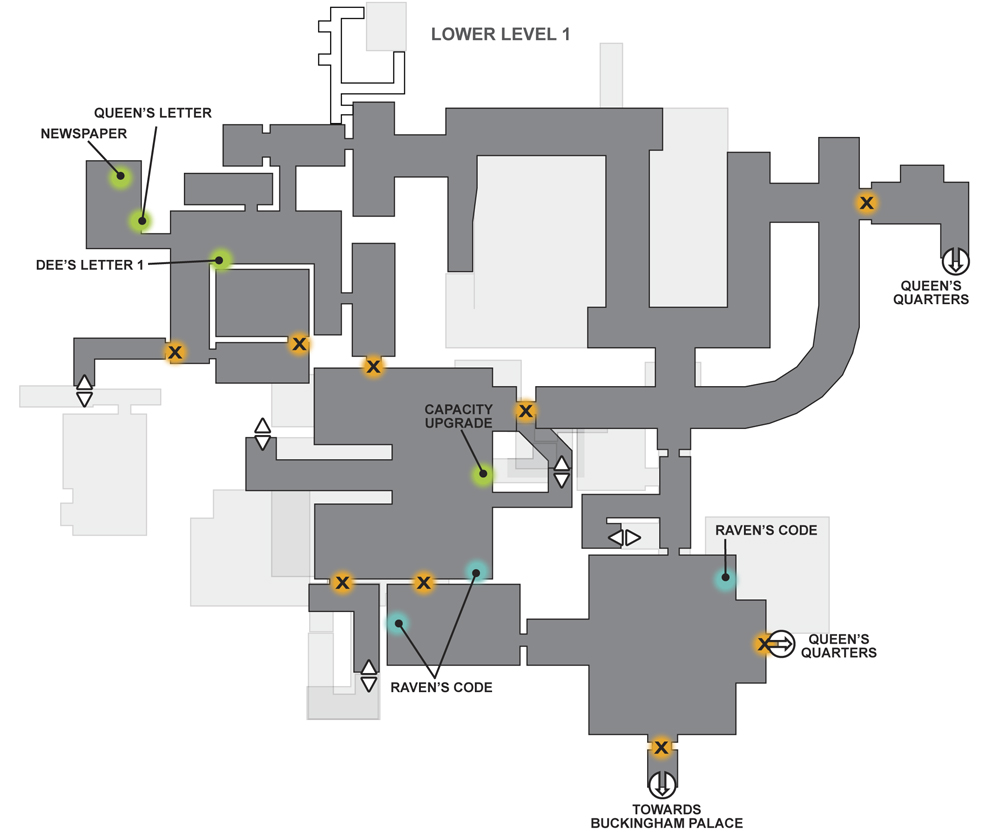
05A // Location // Buckingham Palace (Interior)
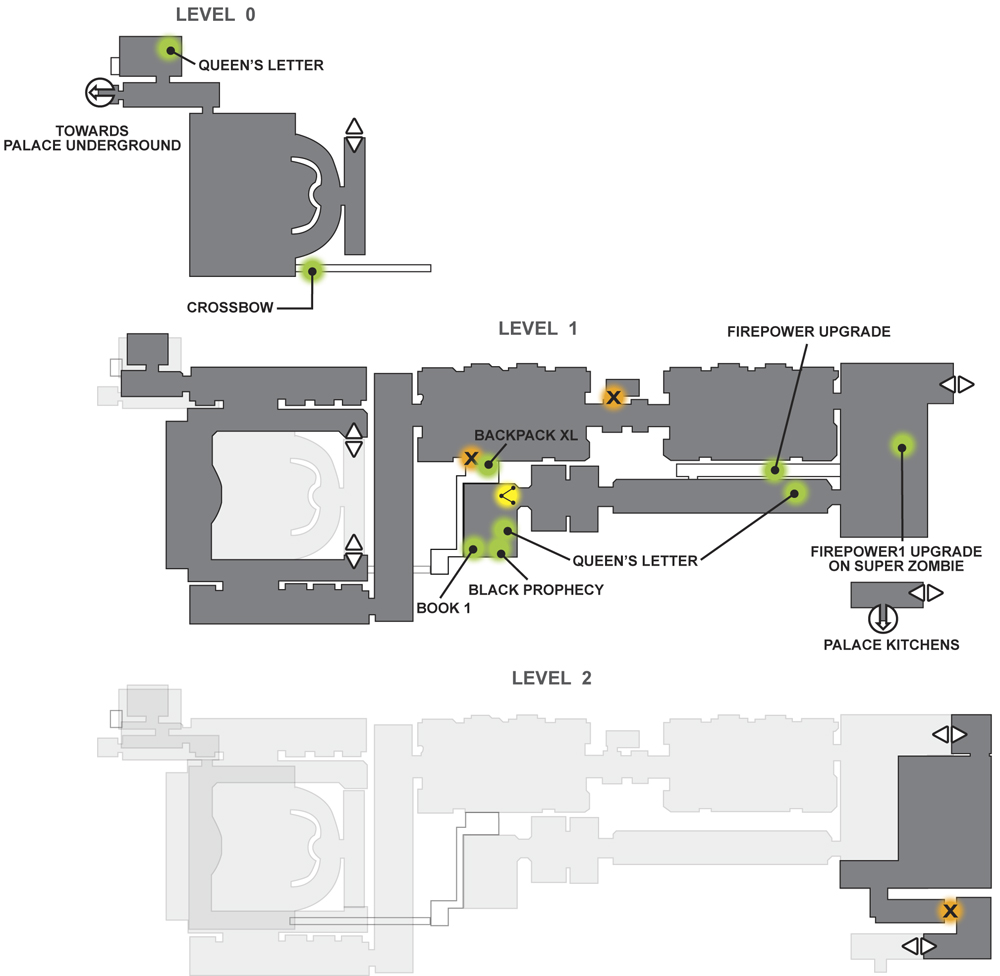
05B // Location // Buckingham Palace (Kitchens)
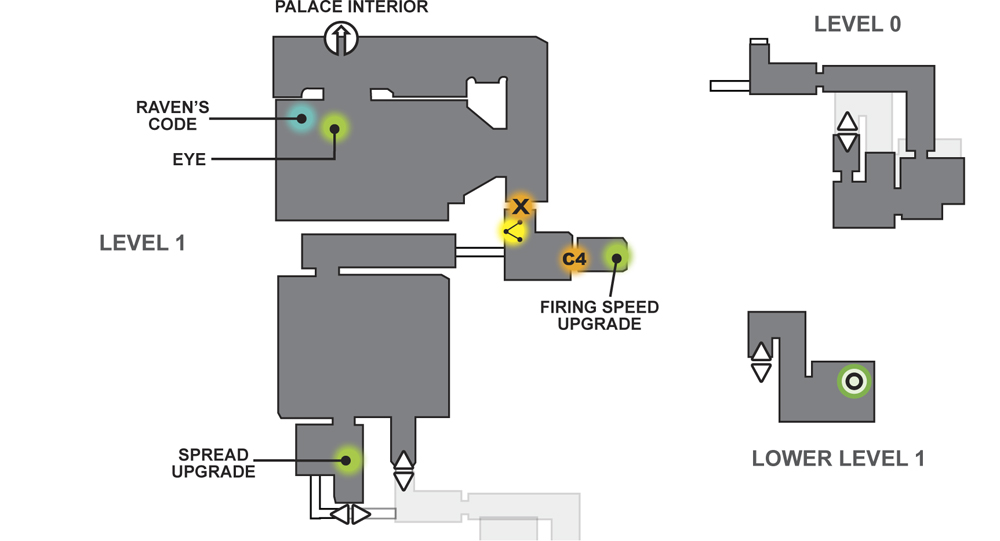
06A // Location // Brick Lane Flats (Old Brick Warehouses)
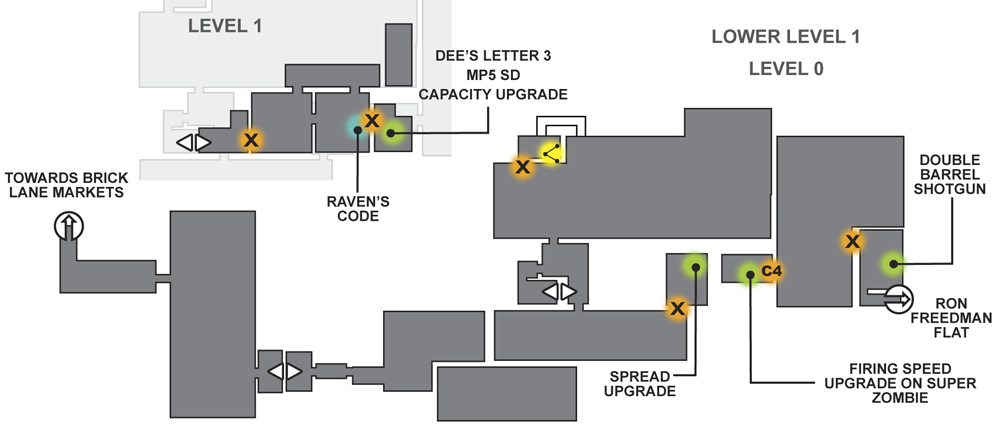
06B // Location // Brick Lane Flats (Ron Freedman’s Flat)
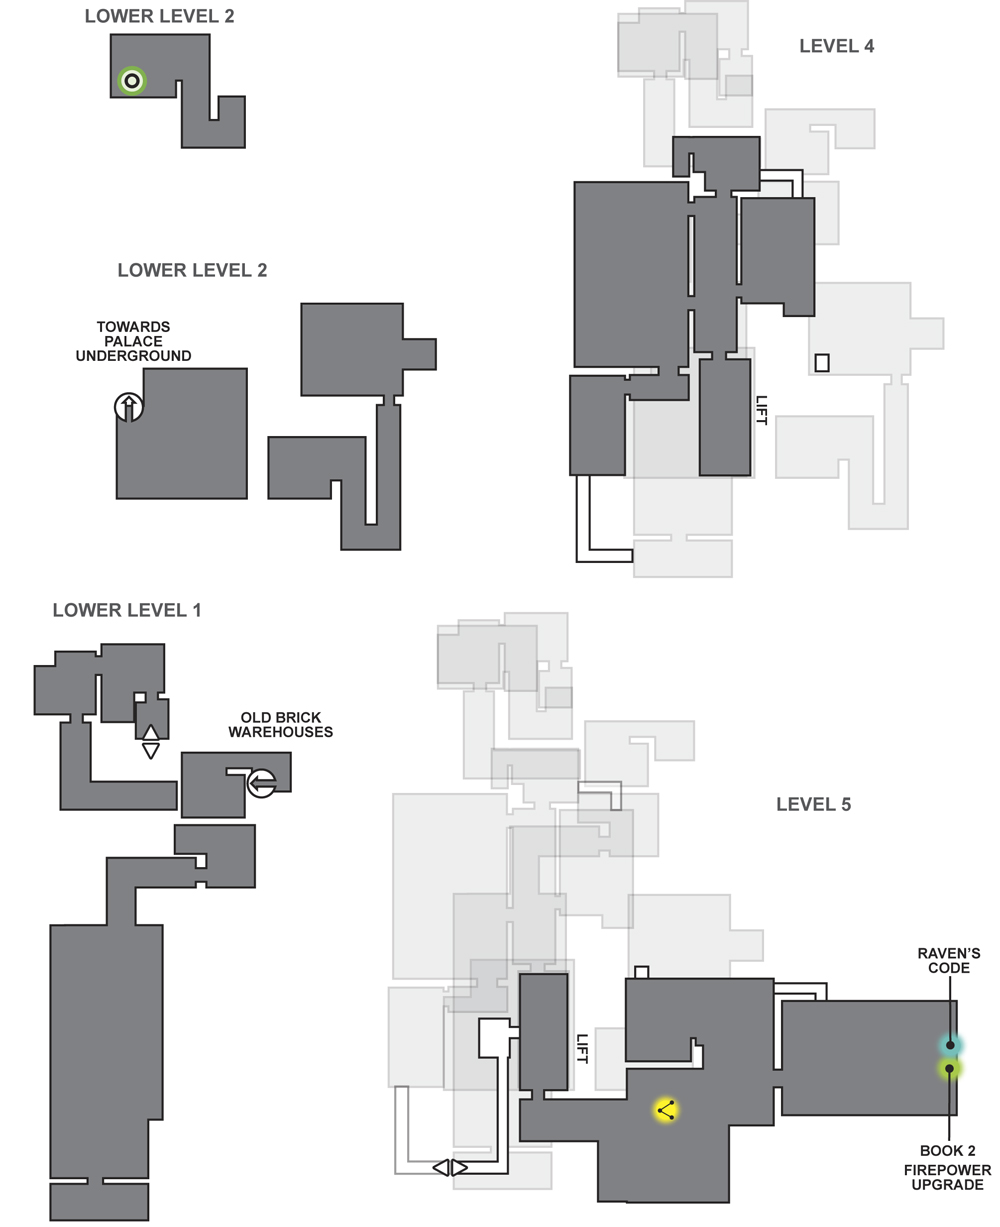
07A // Location // Tower of London (Tower Pier)
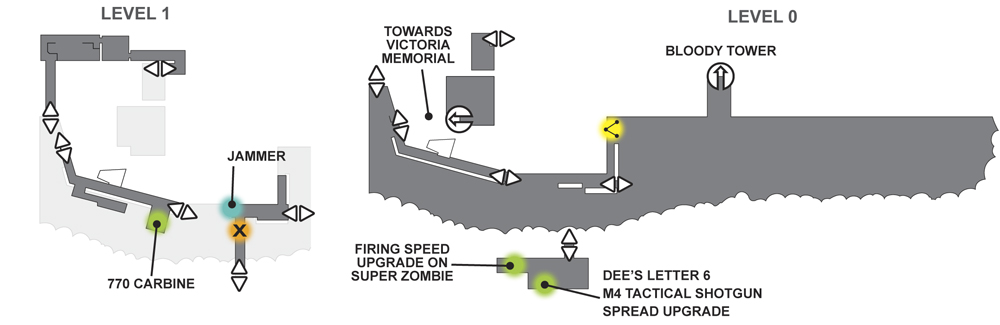
07B // Location // Tower of London (Bloody Tower)
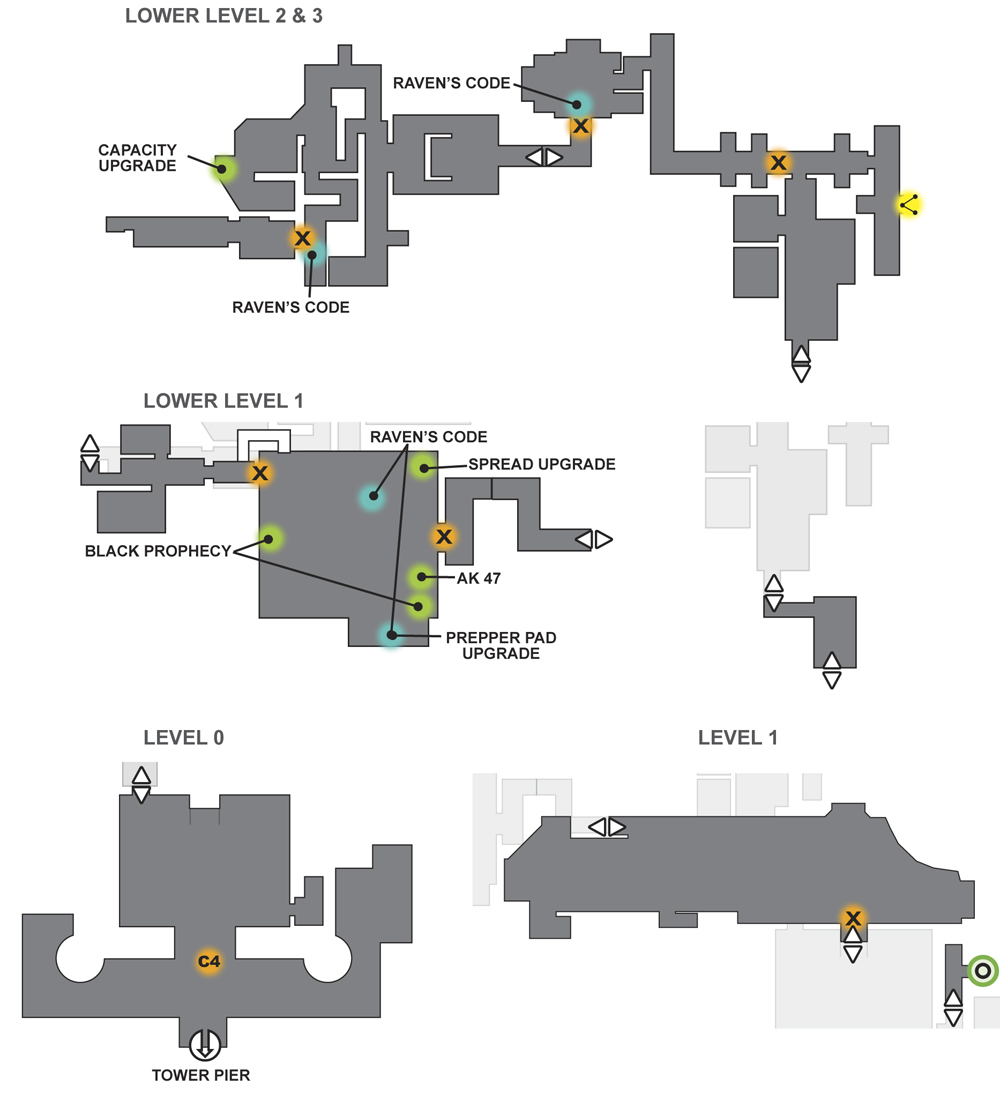
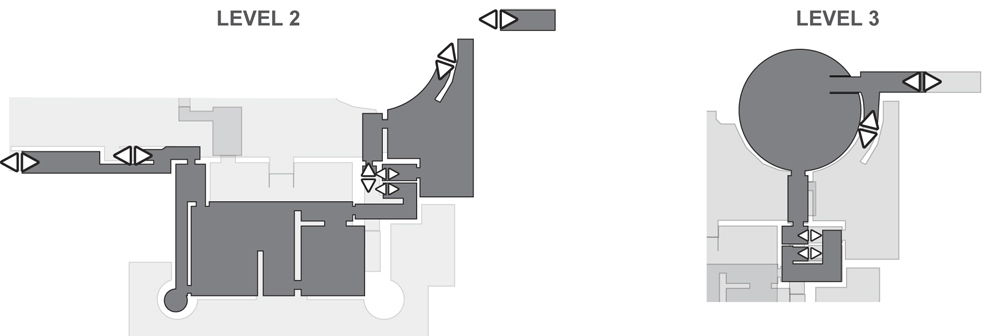
08A // Location // Spitalfields Green (Quaker Park)
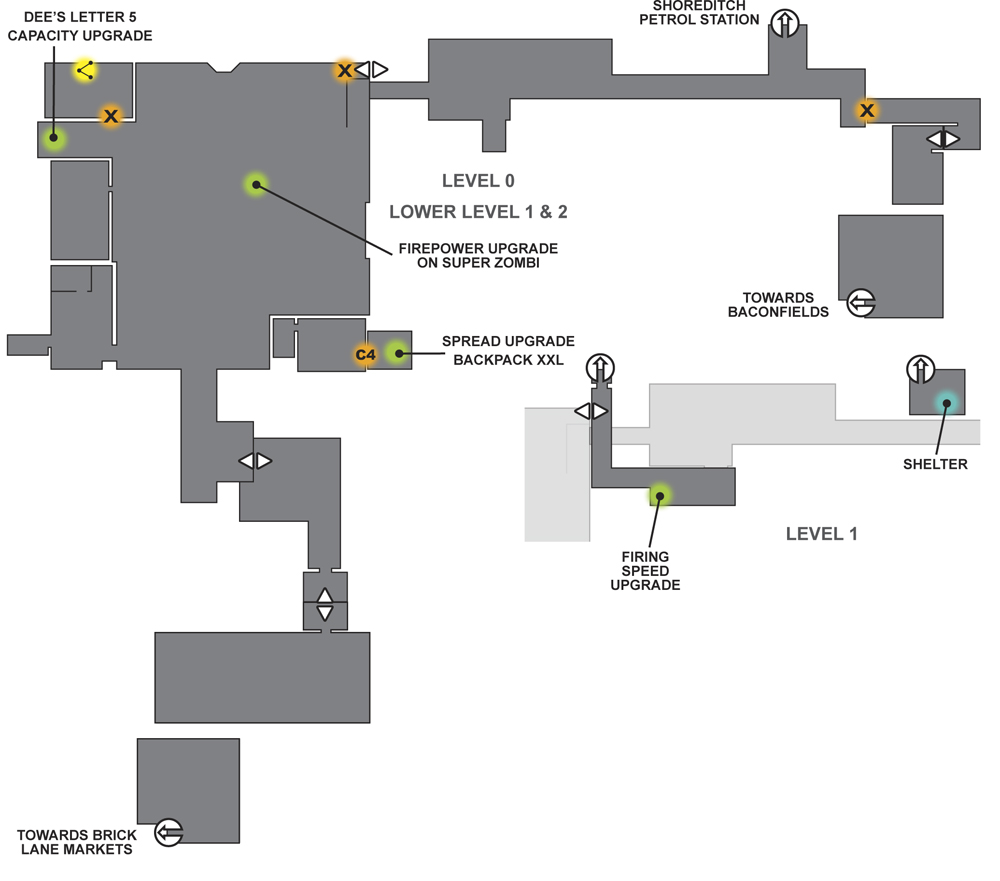
08B // Location // Spitalfields Green (Shoreditch Petrol Station)
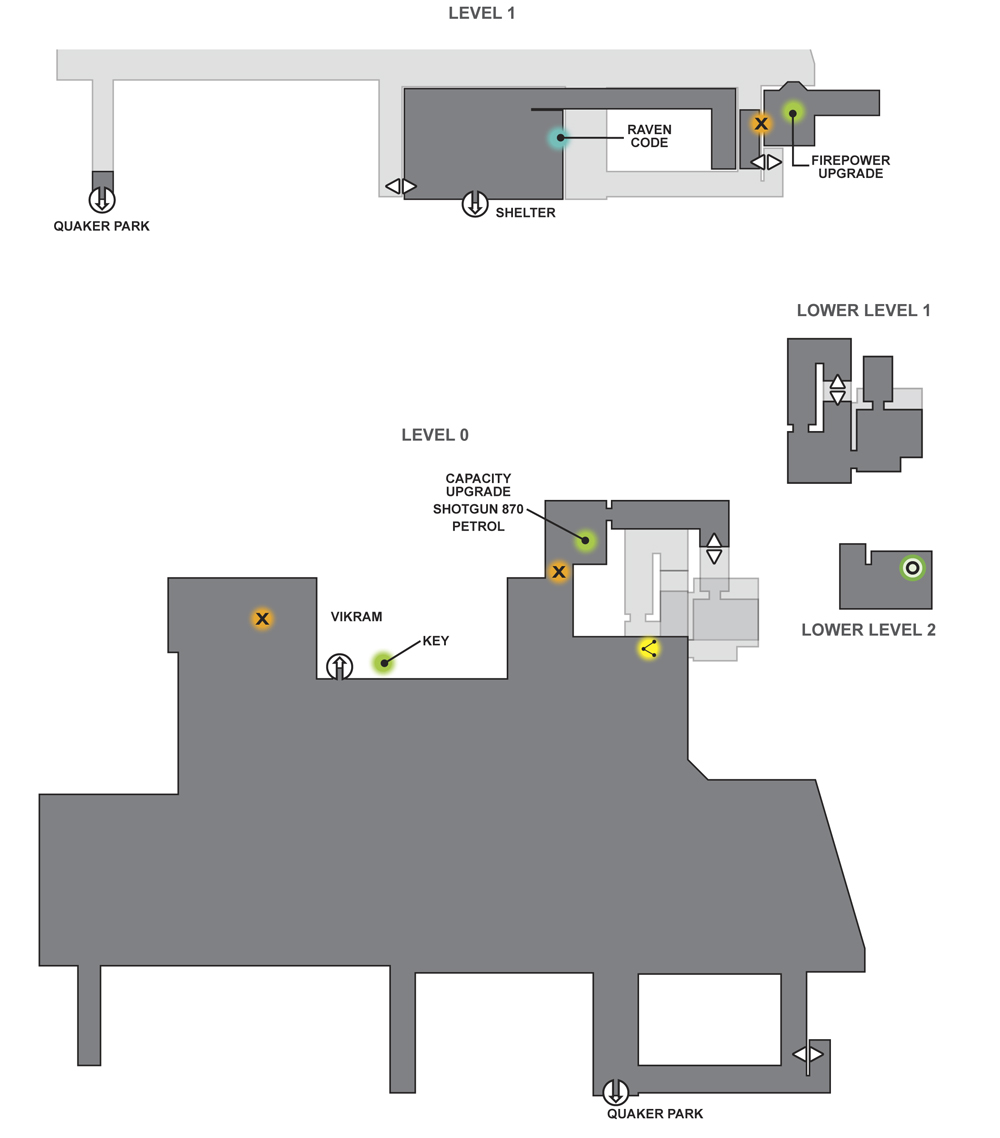
09A // Location // Baconfields (Darwin Yard)
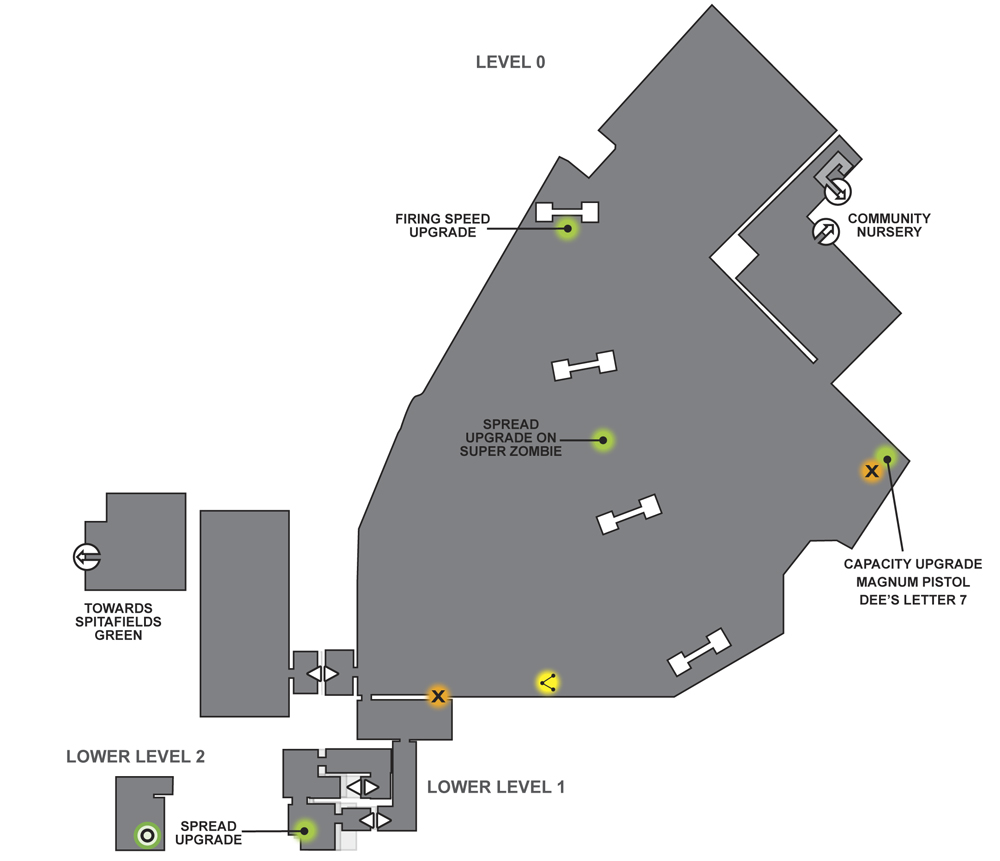
09B // Location // Baconfields (Brick Lane Community Nursery)
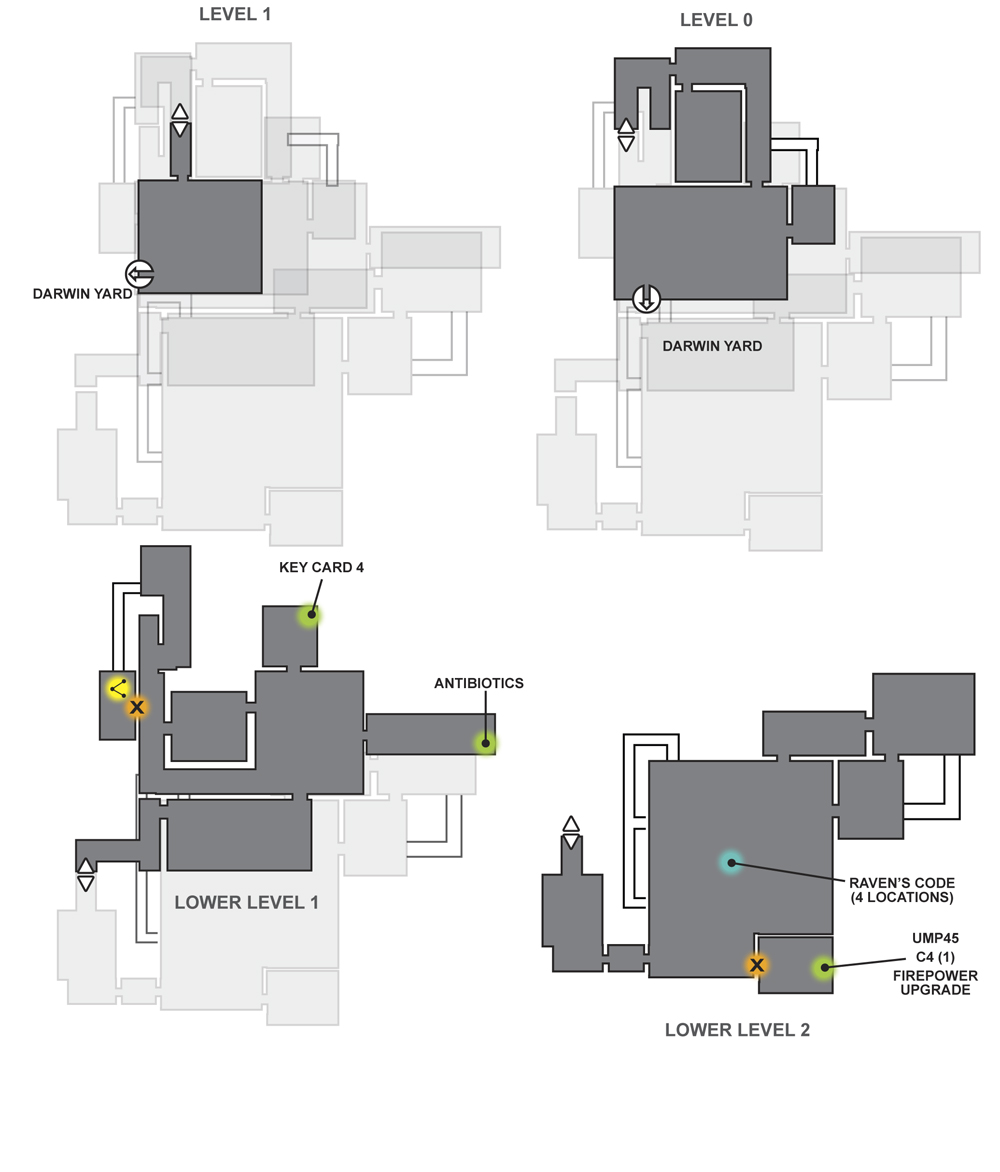
10A // Location // St. George’s Church (Catacombs)
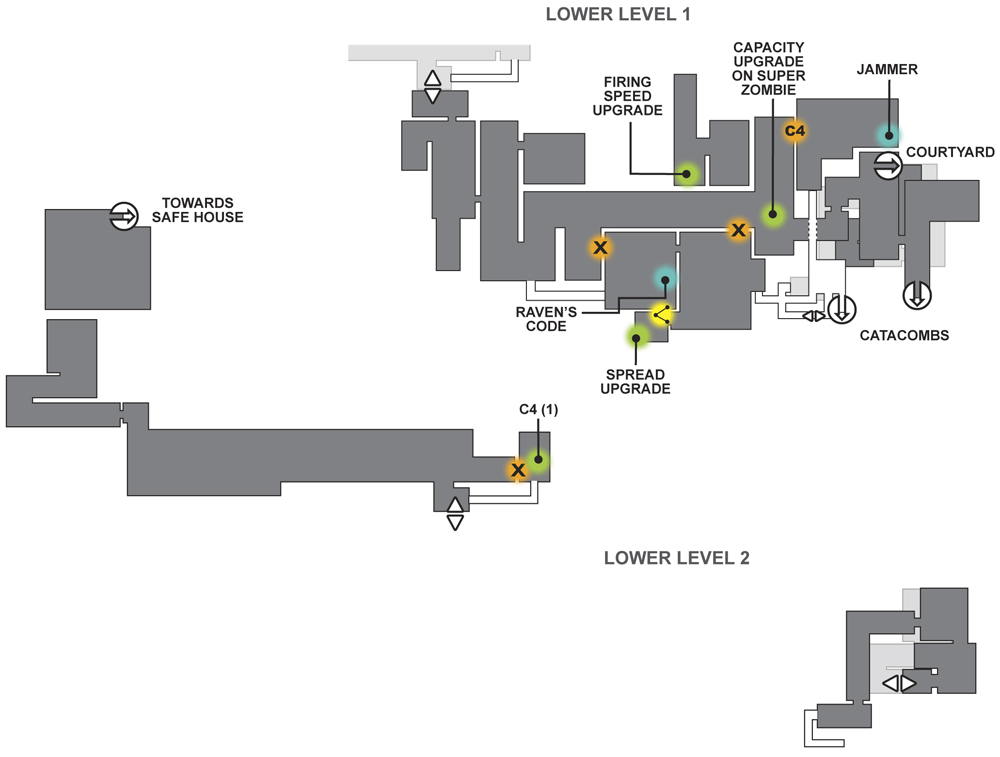
10B // Location // St. George’s Church (Crypt)
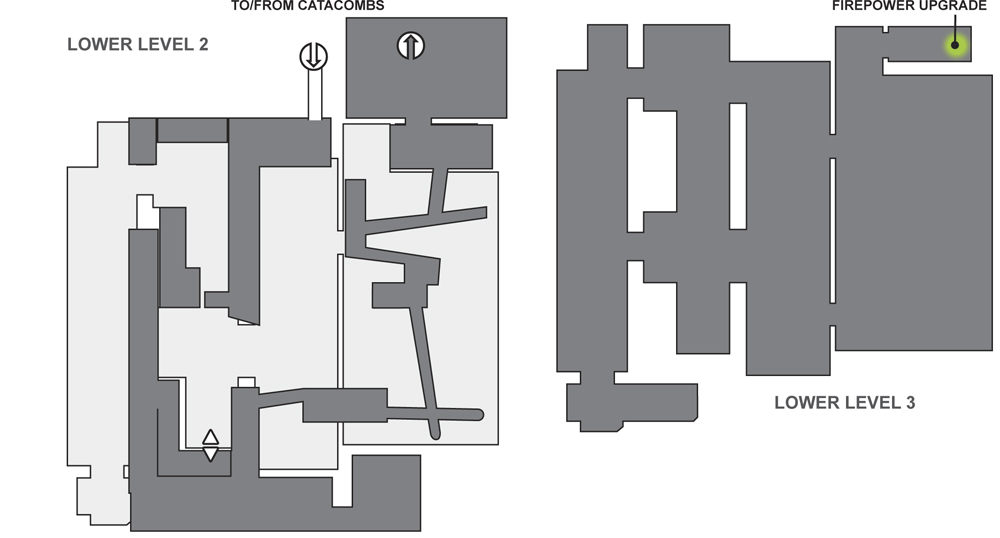
10C // Location // St. George’s Church (Arena Courtyard)
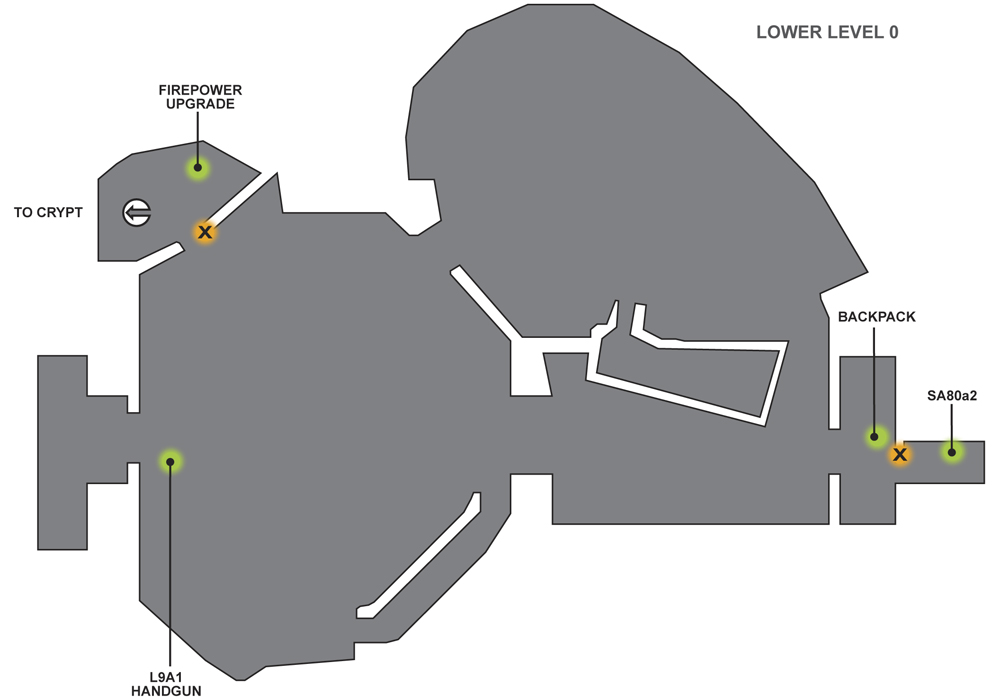
Appendix II // Manholes
There are a total of 10 manholes to uncover, one for every location in London. Here’s where they all are:
01 // Location // Safe House
Floor –1: Through the chain-link gate, close to the save bed, within the main Safe House resting area.
02 // Location // Brick Lane Markets
Floor 0: In the building between Hanbury Green and Market Street, accessed via the alley from Hanbury Green.
03 // Location // Victoria Memorial
Floor –2: At the bottom of the stairwell, off the side tunnel near the dry sewer tunnel, close to the exit to the palace gates.
04 // Location // Palace Underground
Floor –2: Down the stairs, in a concrete chamber linked to the doctor’s laboratory.
05 // Location // Buckingham Palace
Floor –1: At the bottom of the stairwell, connected to the Palace Kitchens.
06 // Location // Brick Lane Flats
Floor –2: Down the stairs connecting the second warehouse (Shotgun office) to Ron Freedman’s flats.
07 // Location // Tower of London
Floor 1: Accessed via a side door from the initial courtyard of the Bloody Tower.
08 // Location // Spitalfields Green
Floor –2: At the bottom of a stairwell accessed via the locked gate where the petrol is kept, next to the petrol station.
09 // Location // Baconfields
Floor –2: At the bottom of a stairwell leading from Darwin Yard (the small room with the remote lock).
10 // Location // St. George’s Church
Floor –3: At the bottom of a stairwell and narrow storage area, accessed via the catacombs ductwork.
Appendix III // CCTV Junction Boxes
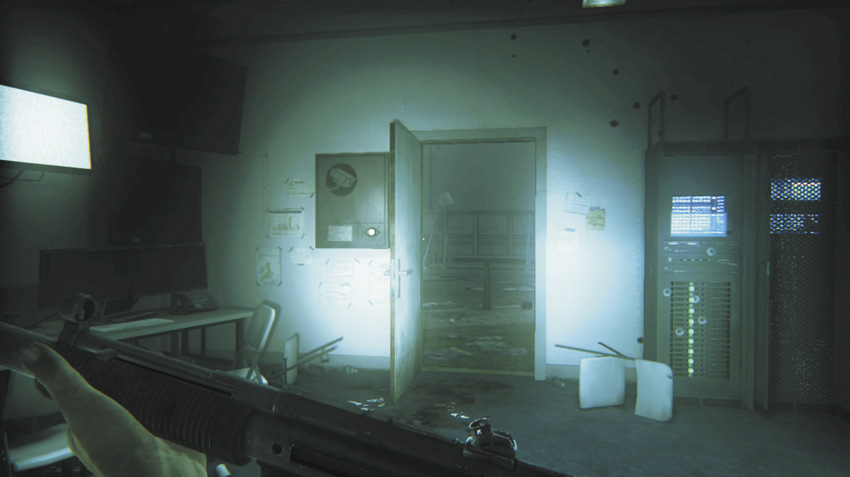
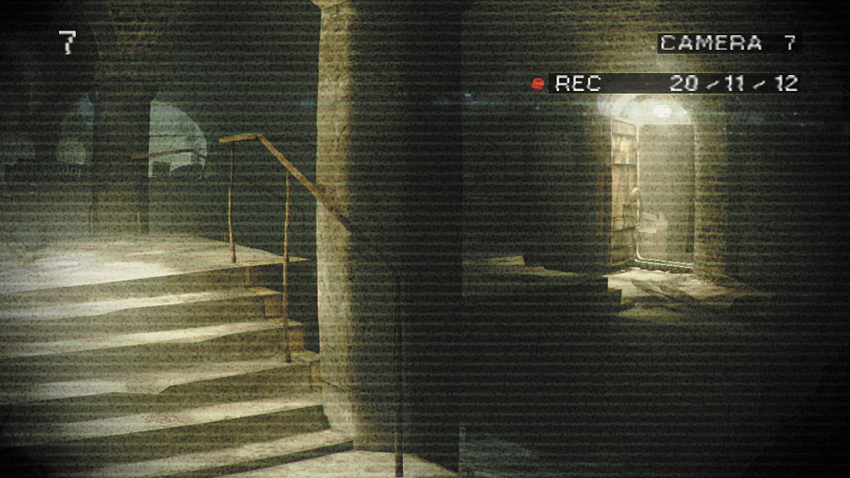
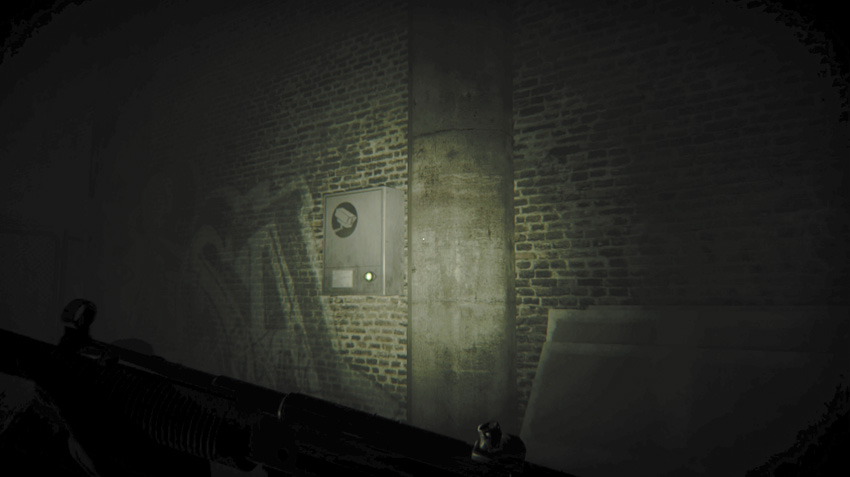
There are a total of 16 CCTV Junction Boxes dotted around the capital in many locations. The first of the images below show the camera picture that appears on your CCTV Monitors in the Safe House when you access the feeds. The second of the images below shows exactly where each box is. There are no CCTV Junction Boxes in the Safe House area (the Prepper already has this covered), or the Palace Bunker and Queen’s Quarter (Doctor Knight provides mapping for your Pad here) or at St. George’s Church Crypt or Arena (the Catacombs Junction Box reveals the map for all locations here.
02A // Location // Brick Lane Markets (Hanbury Green and Market Street)
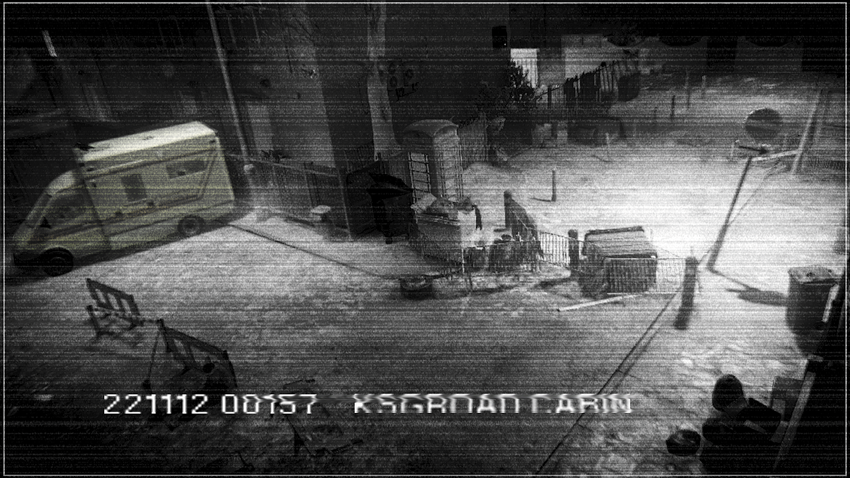
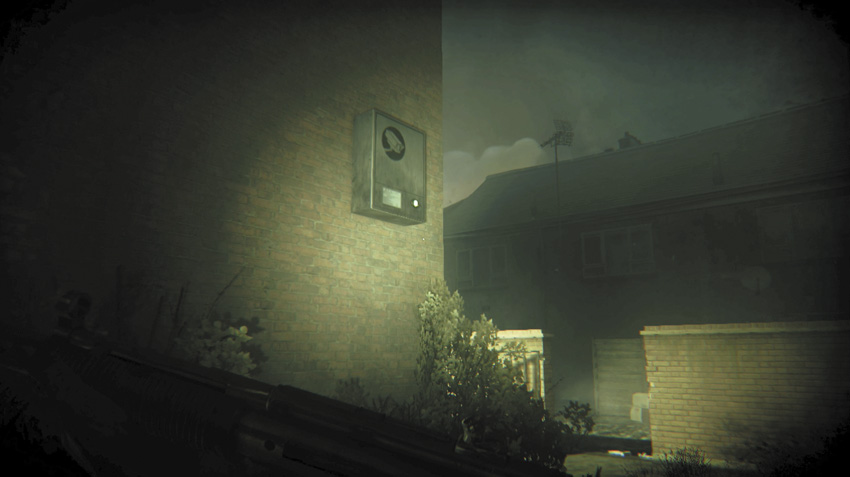
Floor 0: On the wall at the end of the tenement block, spotted near the telephone booth and partial barricade.
02B // Location // Brick Lane Markets (Supermarket)
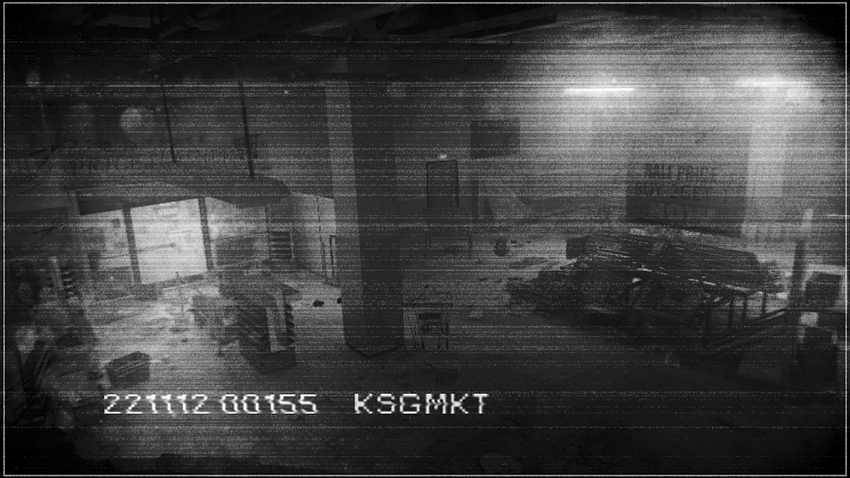
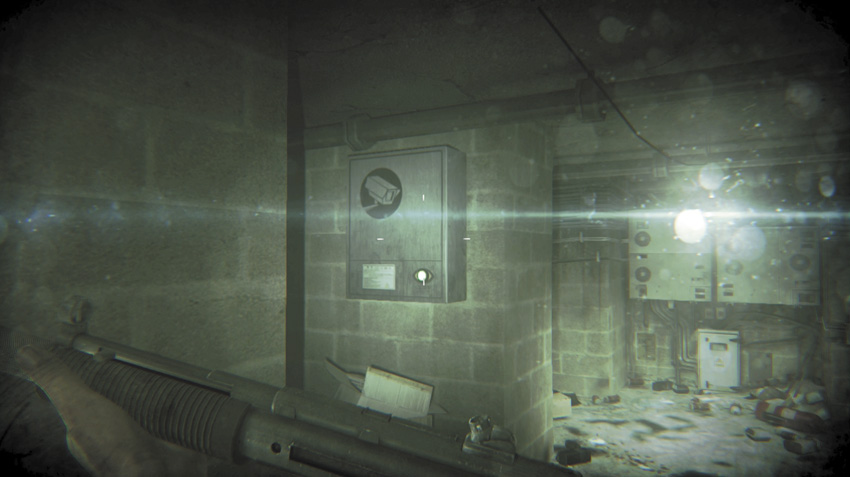
Floor 0: In the supermarket basement storage area, attached to one of the alcove walls.
03A // Location // Victoria Memorial (Green Park)
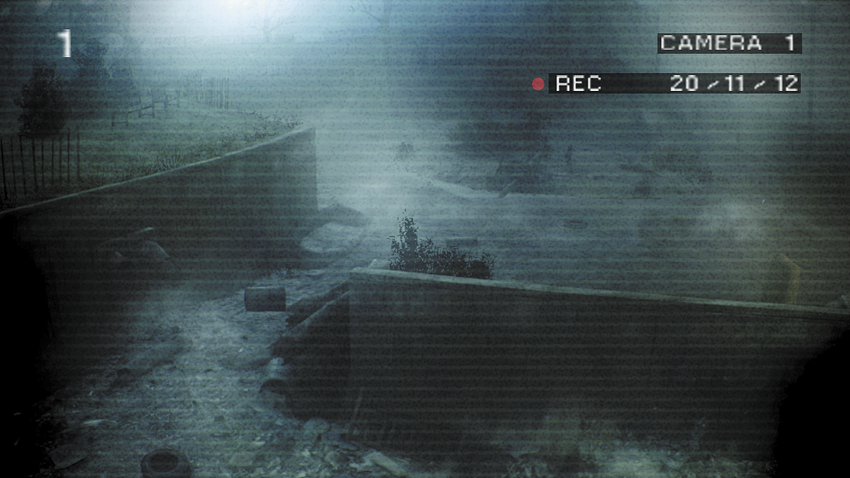
Floor –1: To the right of the impassable storm drain, in the drainage area outside, below the palace.
03B // Location // Victoria Memorial (Palace Gates)
Floor 0: To the left of the exit door, inside the mobile command and control room.
03C // Location // Victoria Memorial (Sewer)
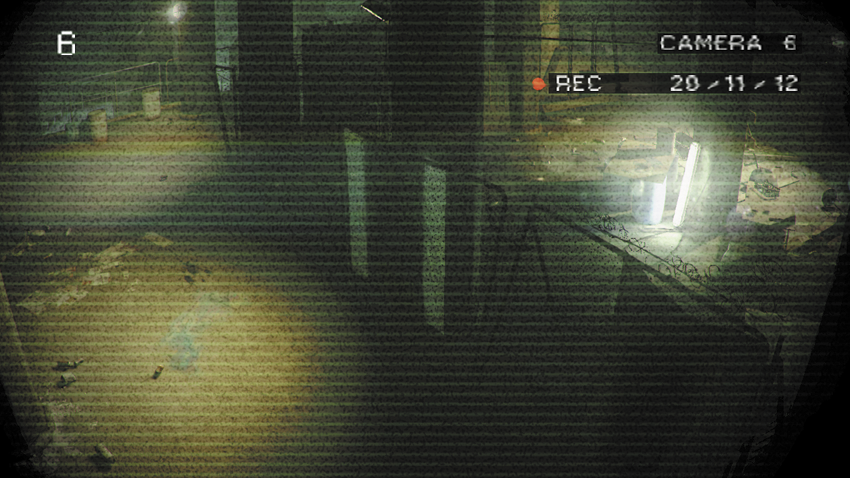
Floor –1: On the wall inside the chain-link fence camp, inside the large pump-house chamber.
05A // Location // Buckingham Palace (Interior)
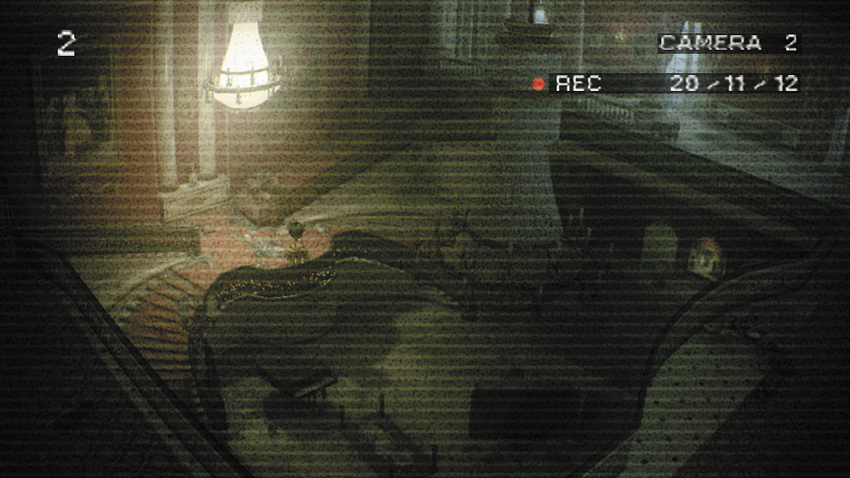
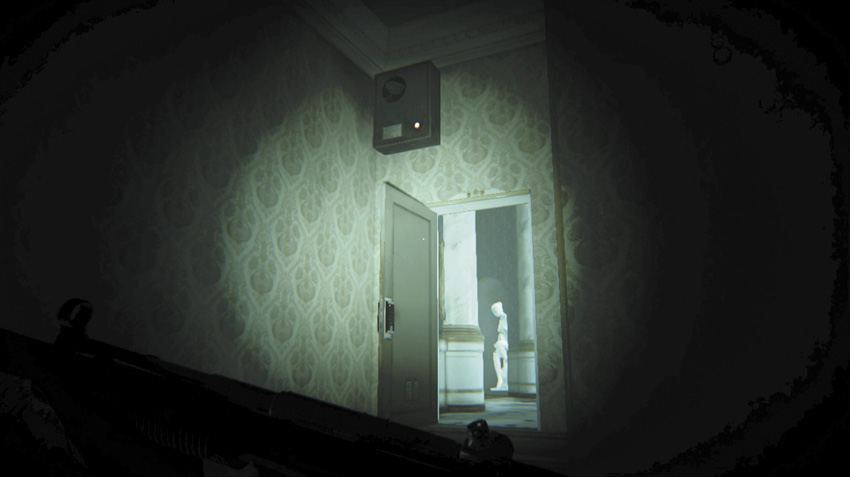
Floor 1: Above the entrance door to the formal office, with the green wallpaper.
05B // Location // Buckingham Palace (Kitchens)
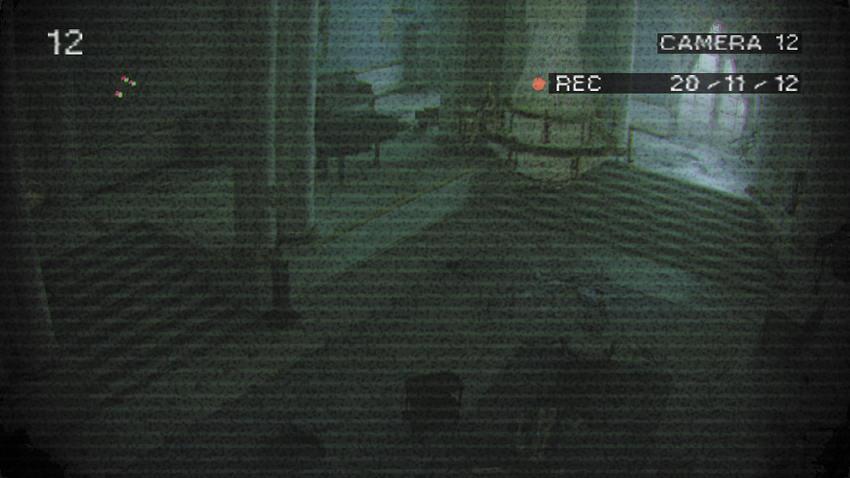
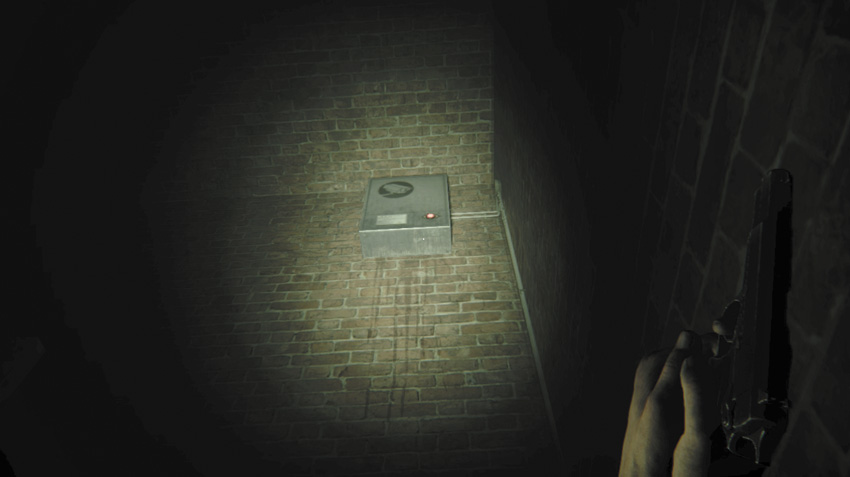
Floor 1: In the small keypad storage room, above the door, just before the duct into the kitchens.
06A // Location // Brick Lane Flats (Old Brick Warehouses)
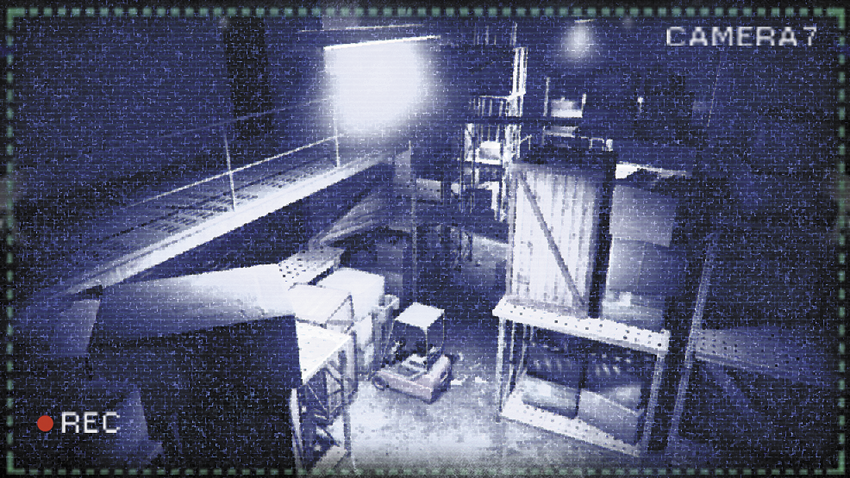
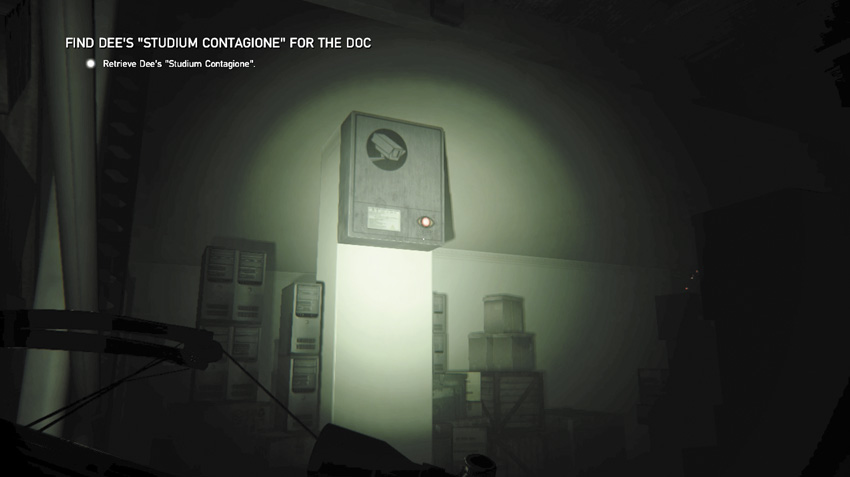
Floor 0: In the locked storage room accessed via the high duct in the first warehouse.
06B // Location // Brick Lane Flats (Ron Freedman’s Flat)
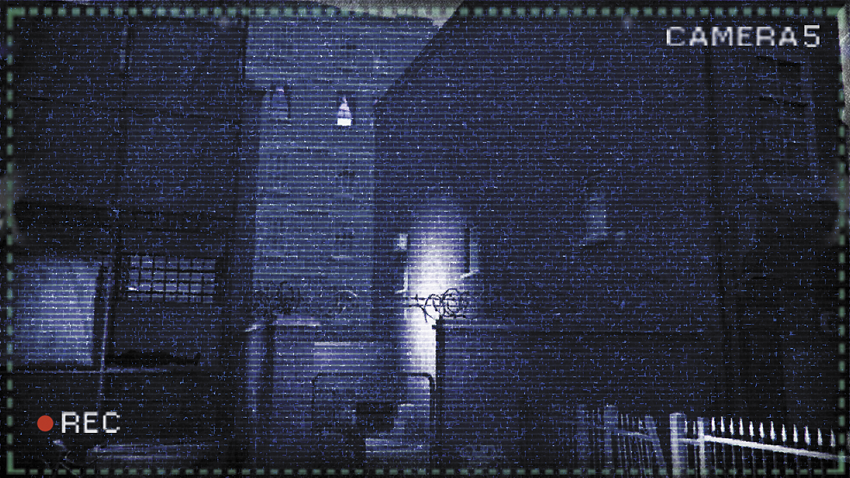
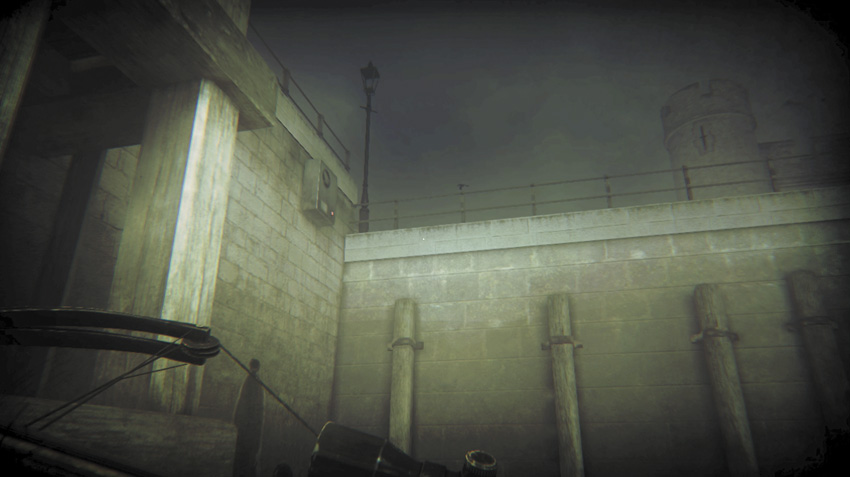
Floor 5: On the pillar inside the storage area of Ron Freedman’s flat.
07A // Location // Tower of London (Tower Pier)
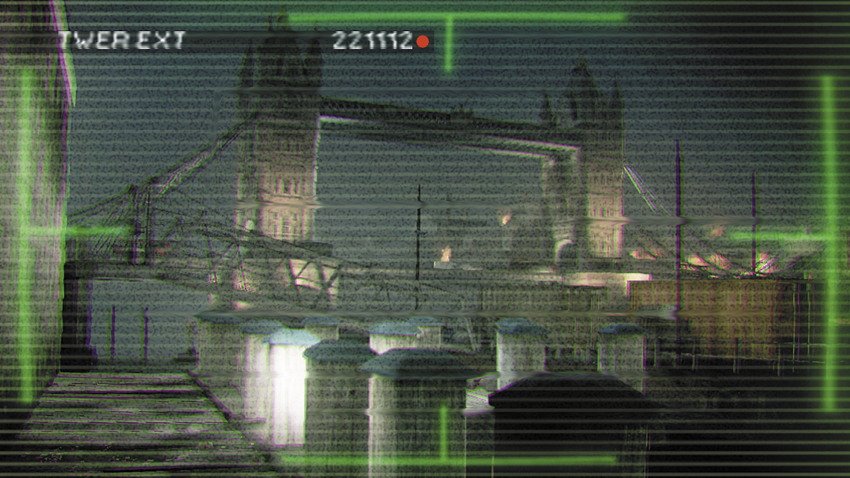
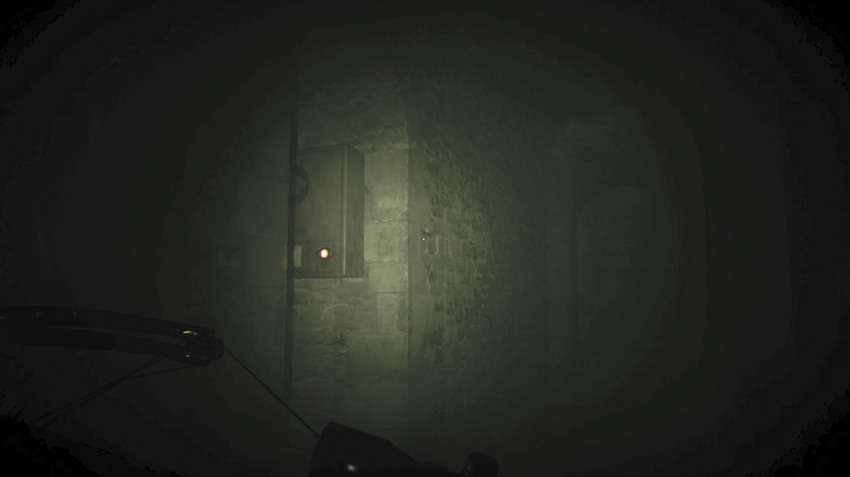
Floor 0: On the harbor wall, just around the corner from the second pier.
07B // Location // Tower of London (Bloody Tower)
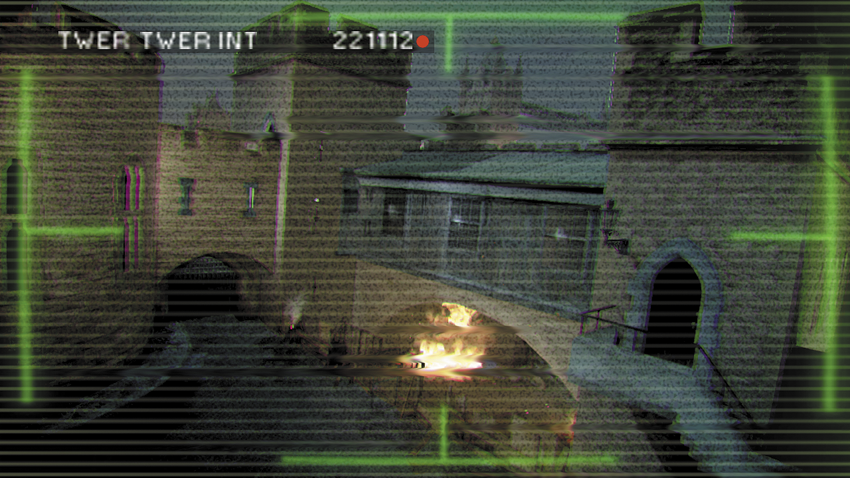
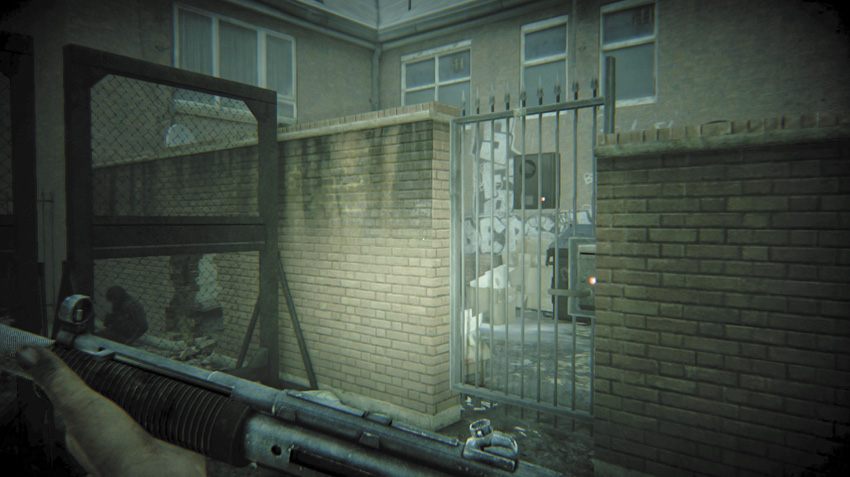
Floor –2: In a side alcove, inside the first dungeon chamber, prior to unlocking the gate.
08A // Location // Spitalfields Green (Quaker Park)
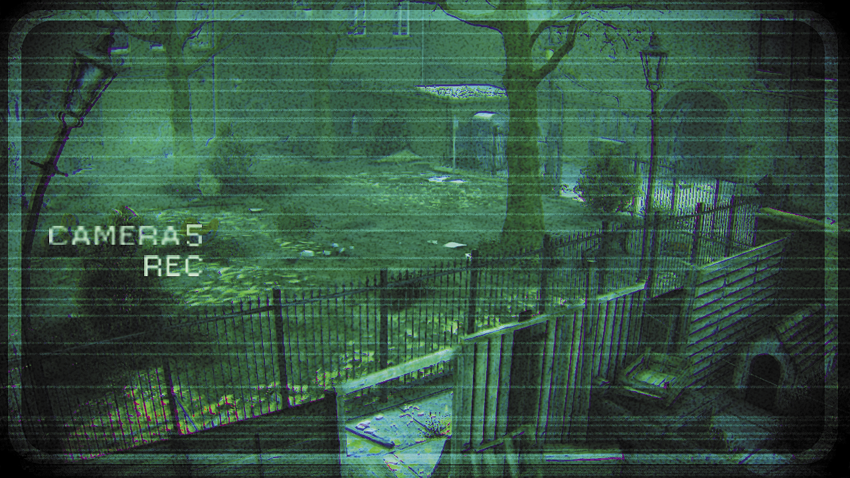
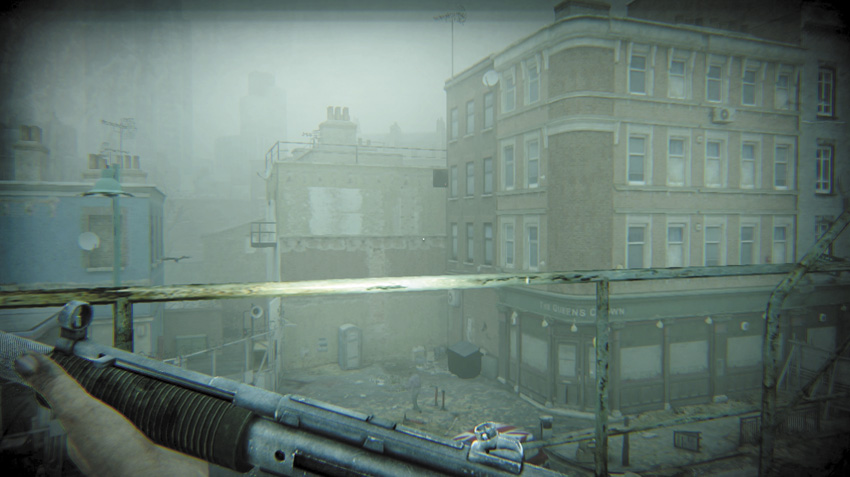
Floor 0: In the small, trash-strewn corner across from the park, near the jammer and behind a keycard gate.
08B // Location // Spitalfields Green (Shoreditch Petrol Station)
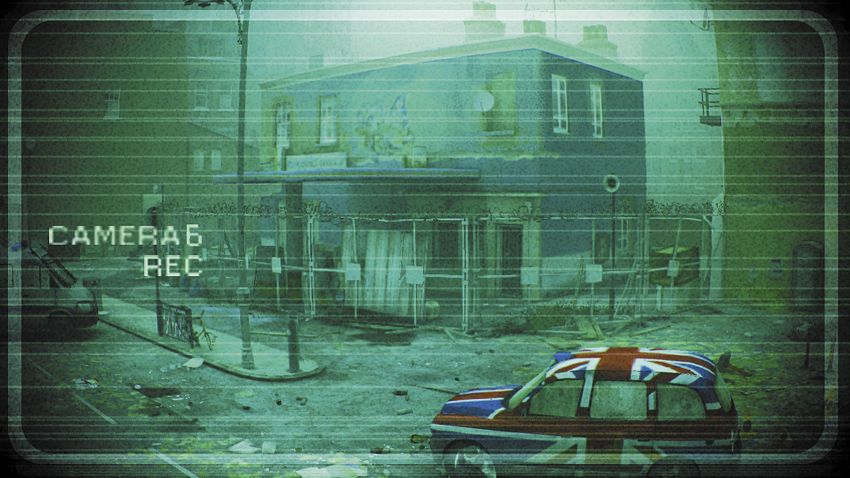
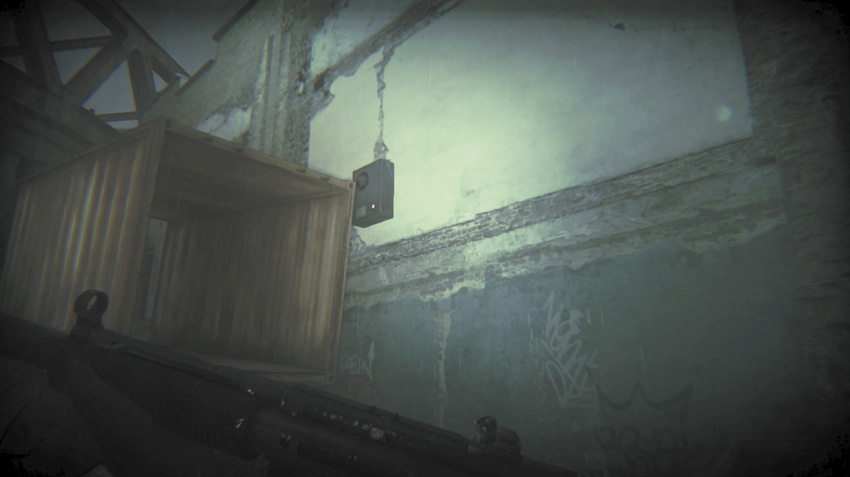
Floor 0: Riveted to the top right of a high wall, to the right of the garage, on the main Shoreditch road.
09A // Location // Baconfields (Darwin Yard)
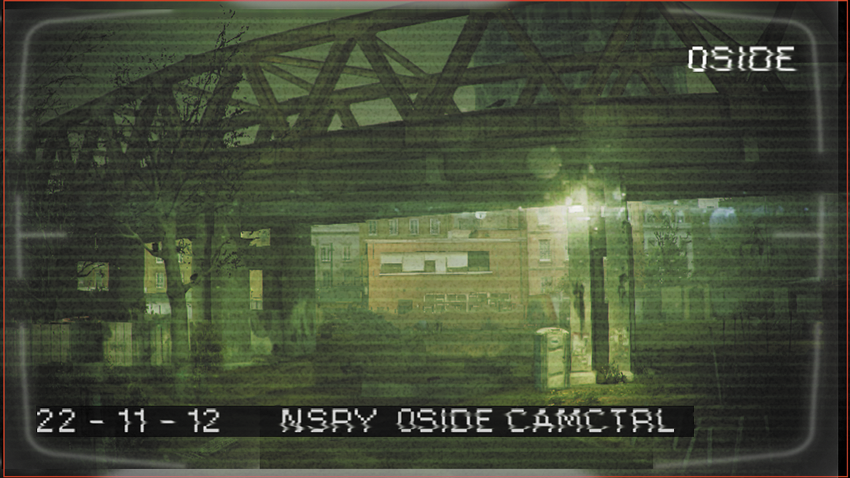
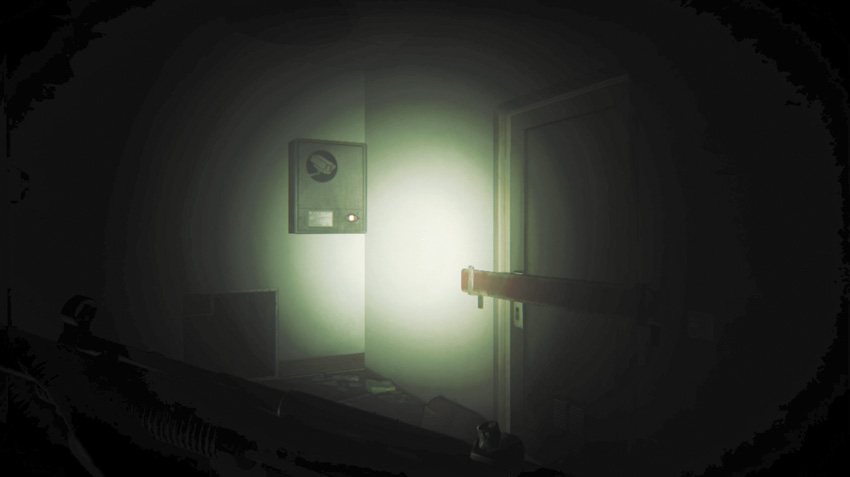
Floor 0: On the exterior wall, above the rusting containers, near the remotely locked door you wait by.
09B // Location // Baconfields (Brick Lane Community Nursery)
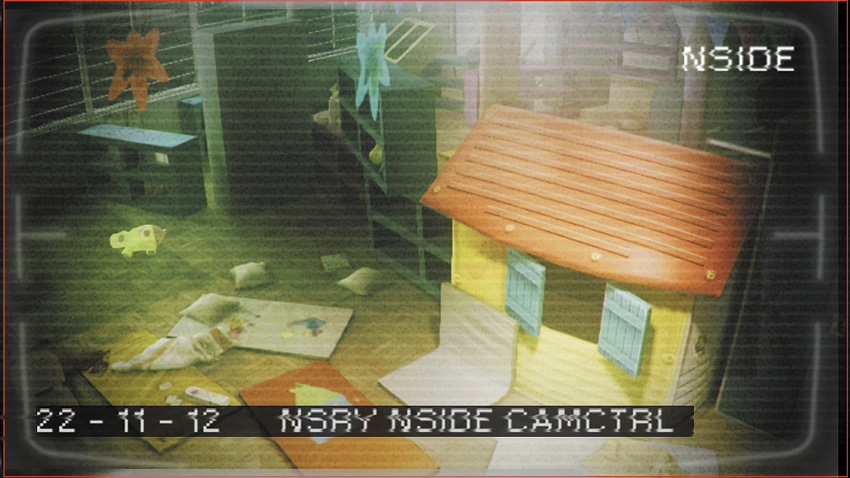
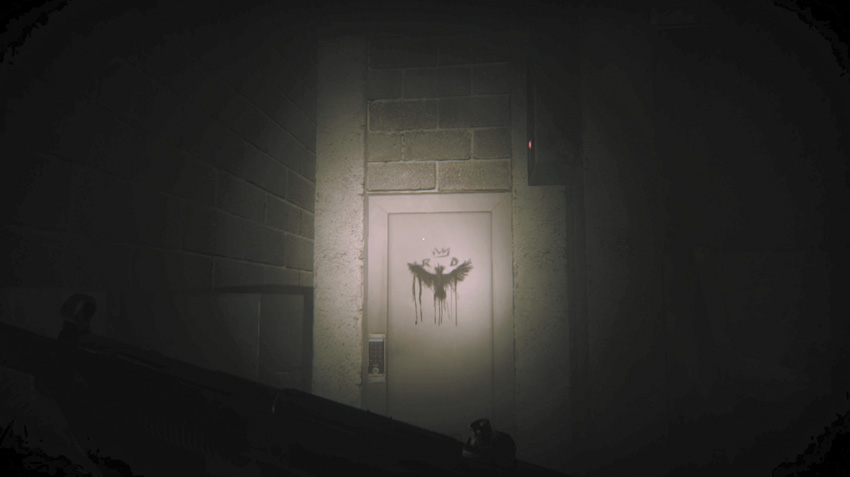
Floor -1: In a sealed side room accessed via the duct under the main stairwell.
10A // Location // St. George’s Church (Catacombs)
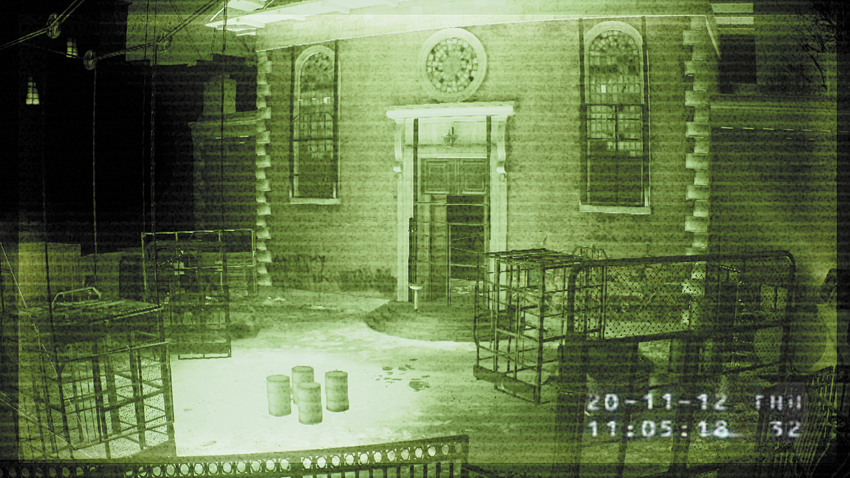
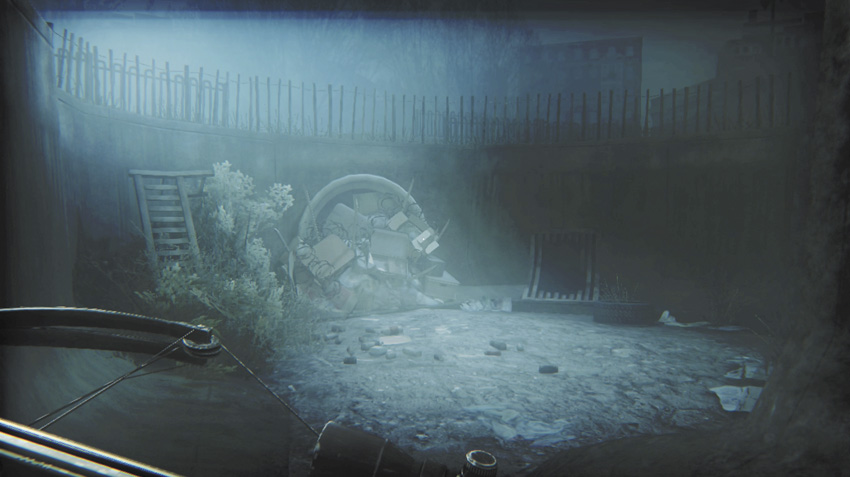
Floor –1: Inside the tiny keypad storage room near the armchair with the Infected, in the duct storage room.
Appendix IV // C4 Cracked Walls
You receive C4 for the first time at the end of Mission 09. Use this explosive to destroy piles of trash that cover a weakened and cracked wall, leading to a secret area with a helpful item or access to a new location. Here’s a list of all eight locations.
Location 1 // Victoria Memorial (Green Park)
- Description: Drainage ditch storm drain (to Tower of London)
- Optimal Time to Destroy: During Mission 10
- Reward: Access to Tower of London
Location 2 // Tower of London (Bloody Tower)
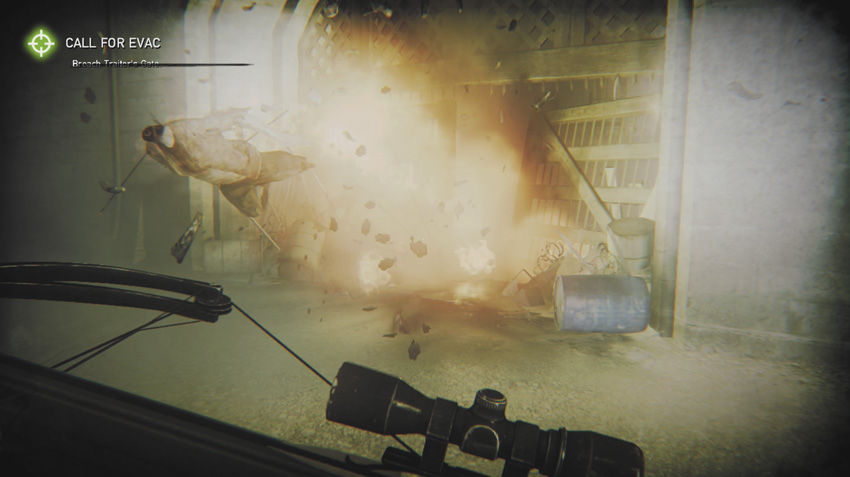
- Description: Entrance to the Bloody Tower
- Optimal Time to Destroy: During Mission 10
- Reward: Access to the Bloody Tower
Location 3 // Brick Lane Markets (Hanbury Green and Market Street)
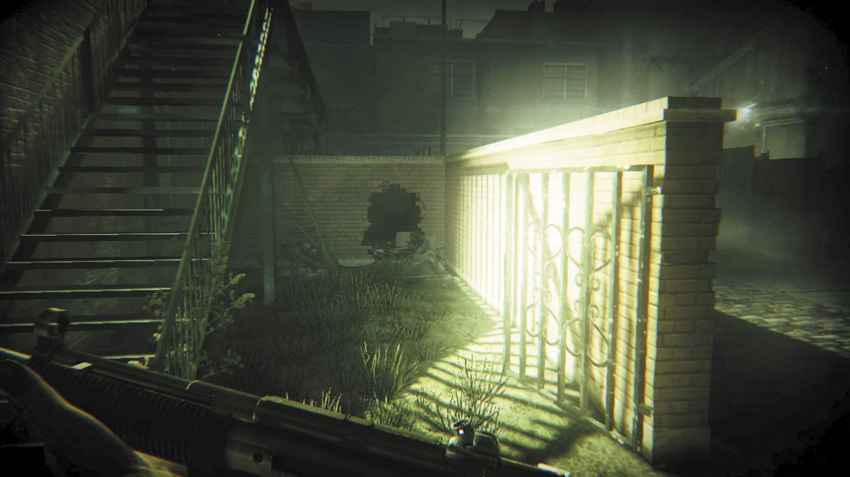
- Description: Back alley garden below tenement blocks
- Optimal Time to Destroy: During Mission 11A
- Reward: Dee’s Letter, Capacity Upgrade
Location 4 // Palace Underground (Royal Bunker)
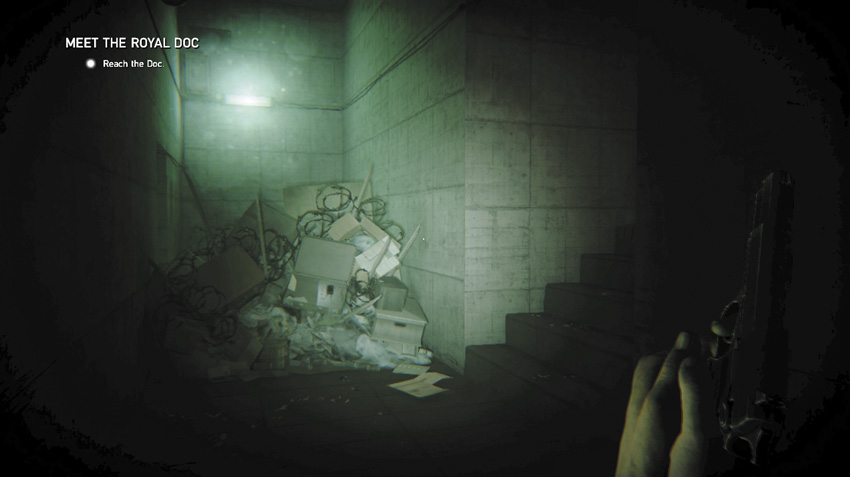
- Description: Lower floor, near toilets, in the main corridor
- Optimal Time to Destroy: After Mission 10
- Reward: Firing Speed Upgrade
Location 5 // Brick Lane Flats (Old Brick Warehouses)
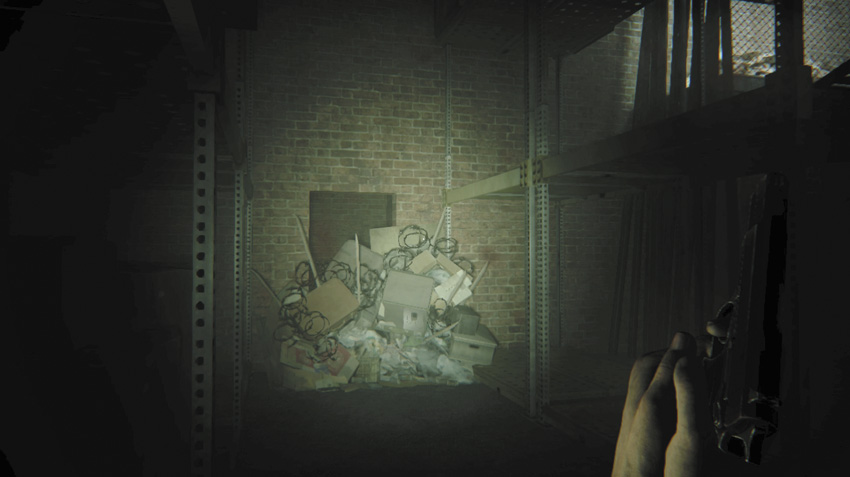
- Description: Floor of second warehouse, leading to toilet
- Optimal Time to Destroy: After Mission 10
- Reward: Enraged Zombie and Firing Speed Upgrade
Location 6 // Spitalfields Green (Quaker Park)
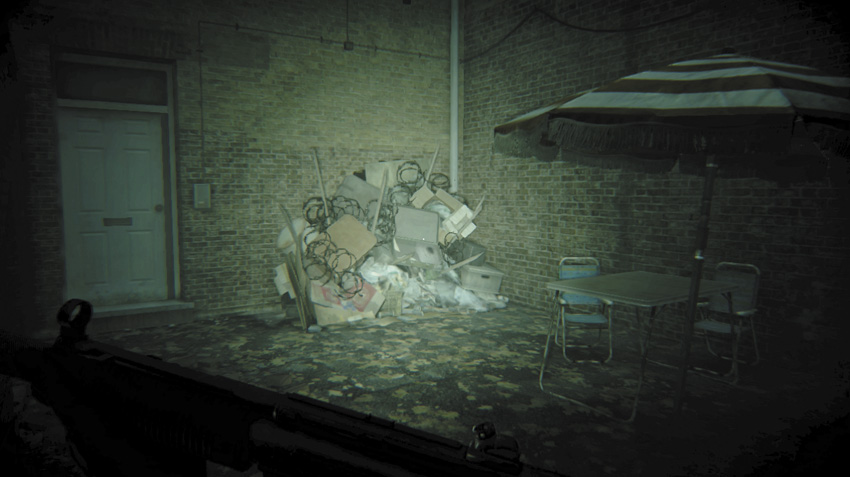
- Description: Through a hole in the wall, in the corner of the park
- Optimal Time to Destroy: During Mission 11A
- Reward: XXL Backpack, Spread Upgrade
Location 7 // St. George’s Church (Catacombs)
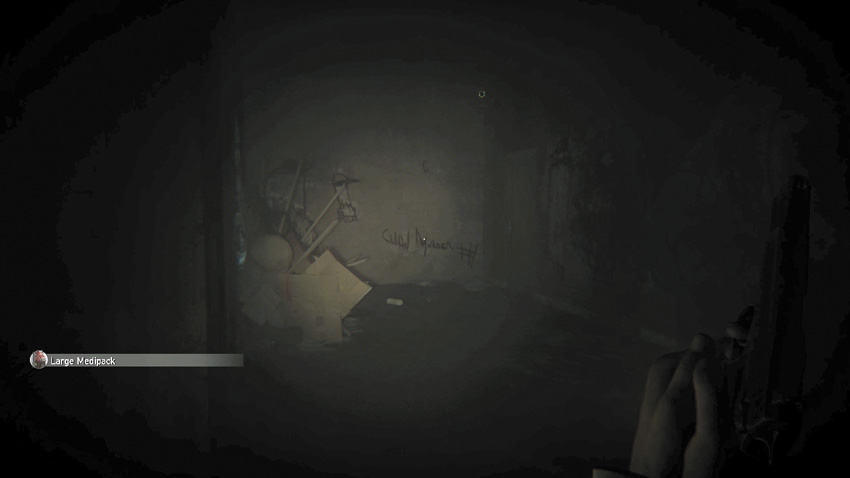
- Description: Across from ducts into the crypt, leads to bathroom
- Optimal Time to Destroy: During Mission 13
- Reward: Firing Speed Upgrade
Location 8 // Buckingham Palace (Kitchens)
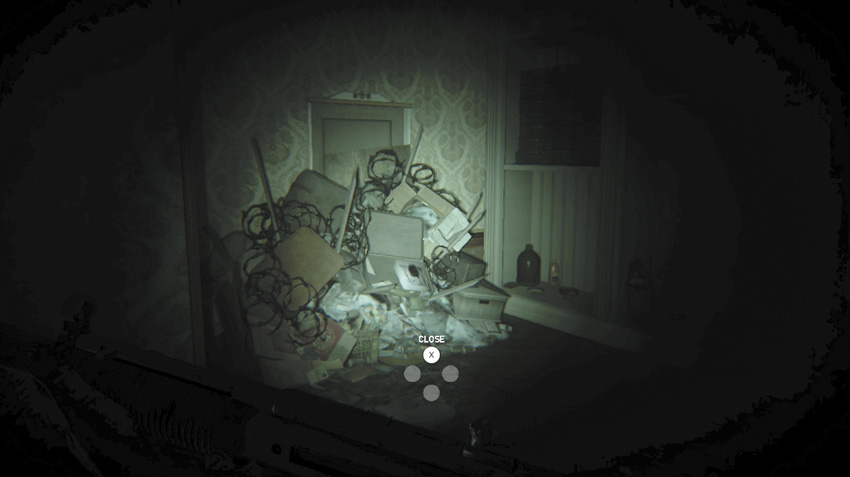
- Description: Behind keypad door, just before the duct to the kitchens
- Optimal Time to Destroy: During Mission 15
- Reward: Firing Speed Upgrade
Appendix V // Weapons and Gear
The following details where and when to locate the most important items and weapons. Only objects that are not randomly placed can be tracked.
Gear
Backpack (BOB)
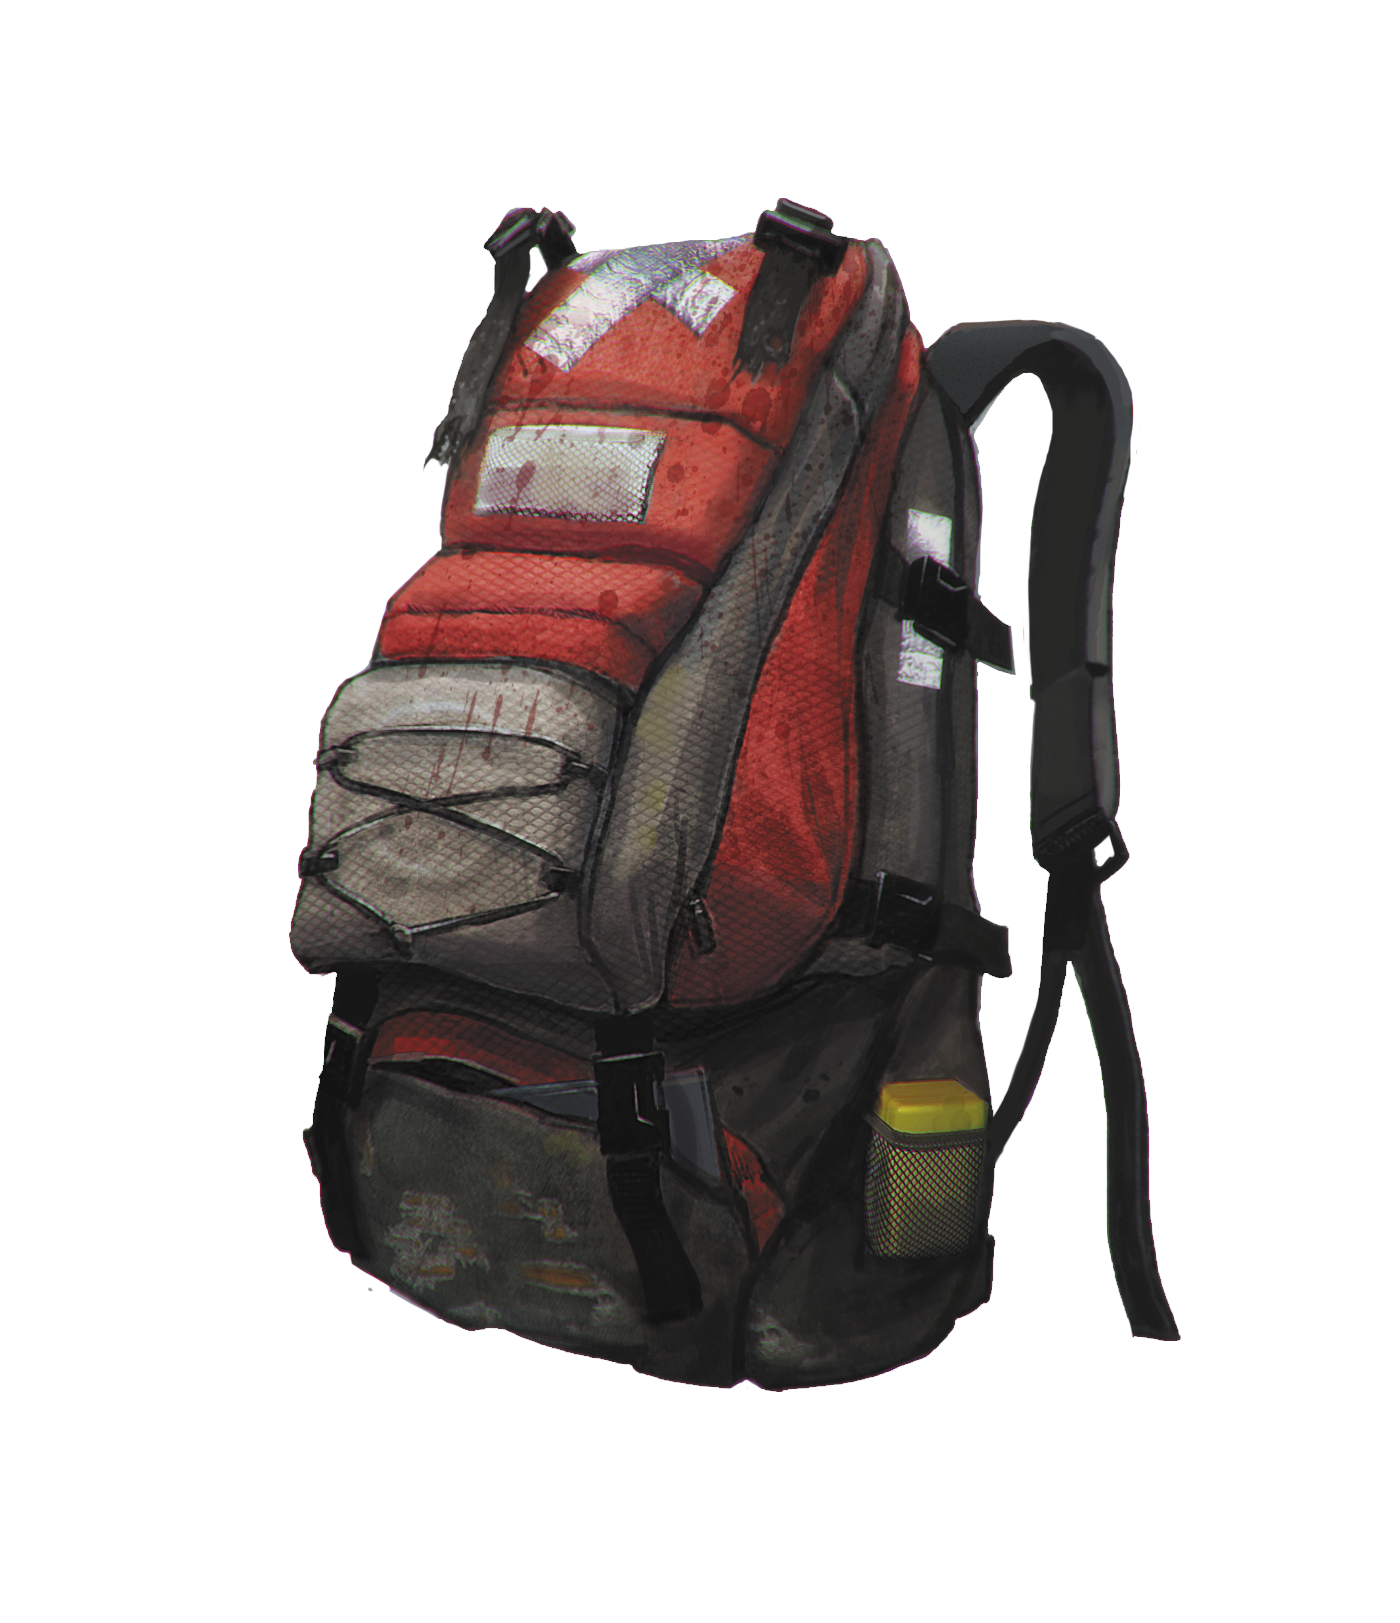
Where Found: Mission 01. Pried from the back of a recently deceased and newly infected Survivor, near the Safe House.
XL Backpack
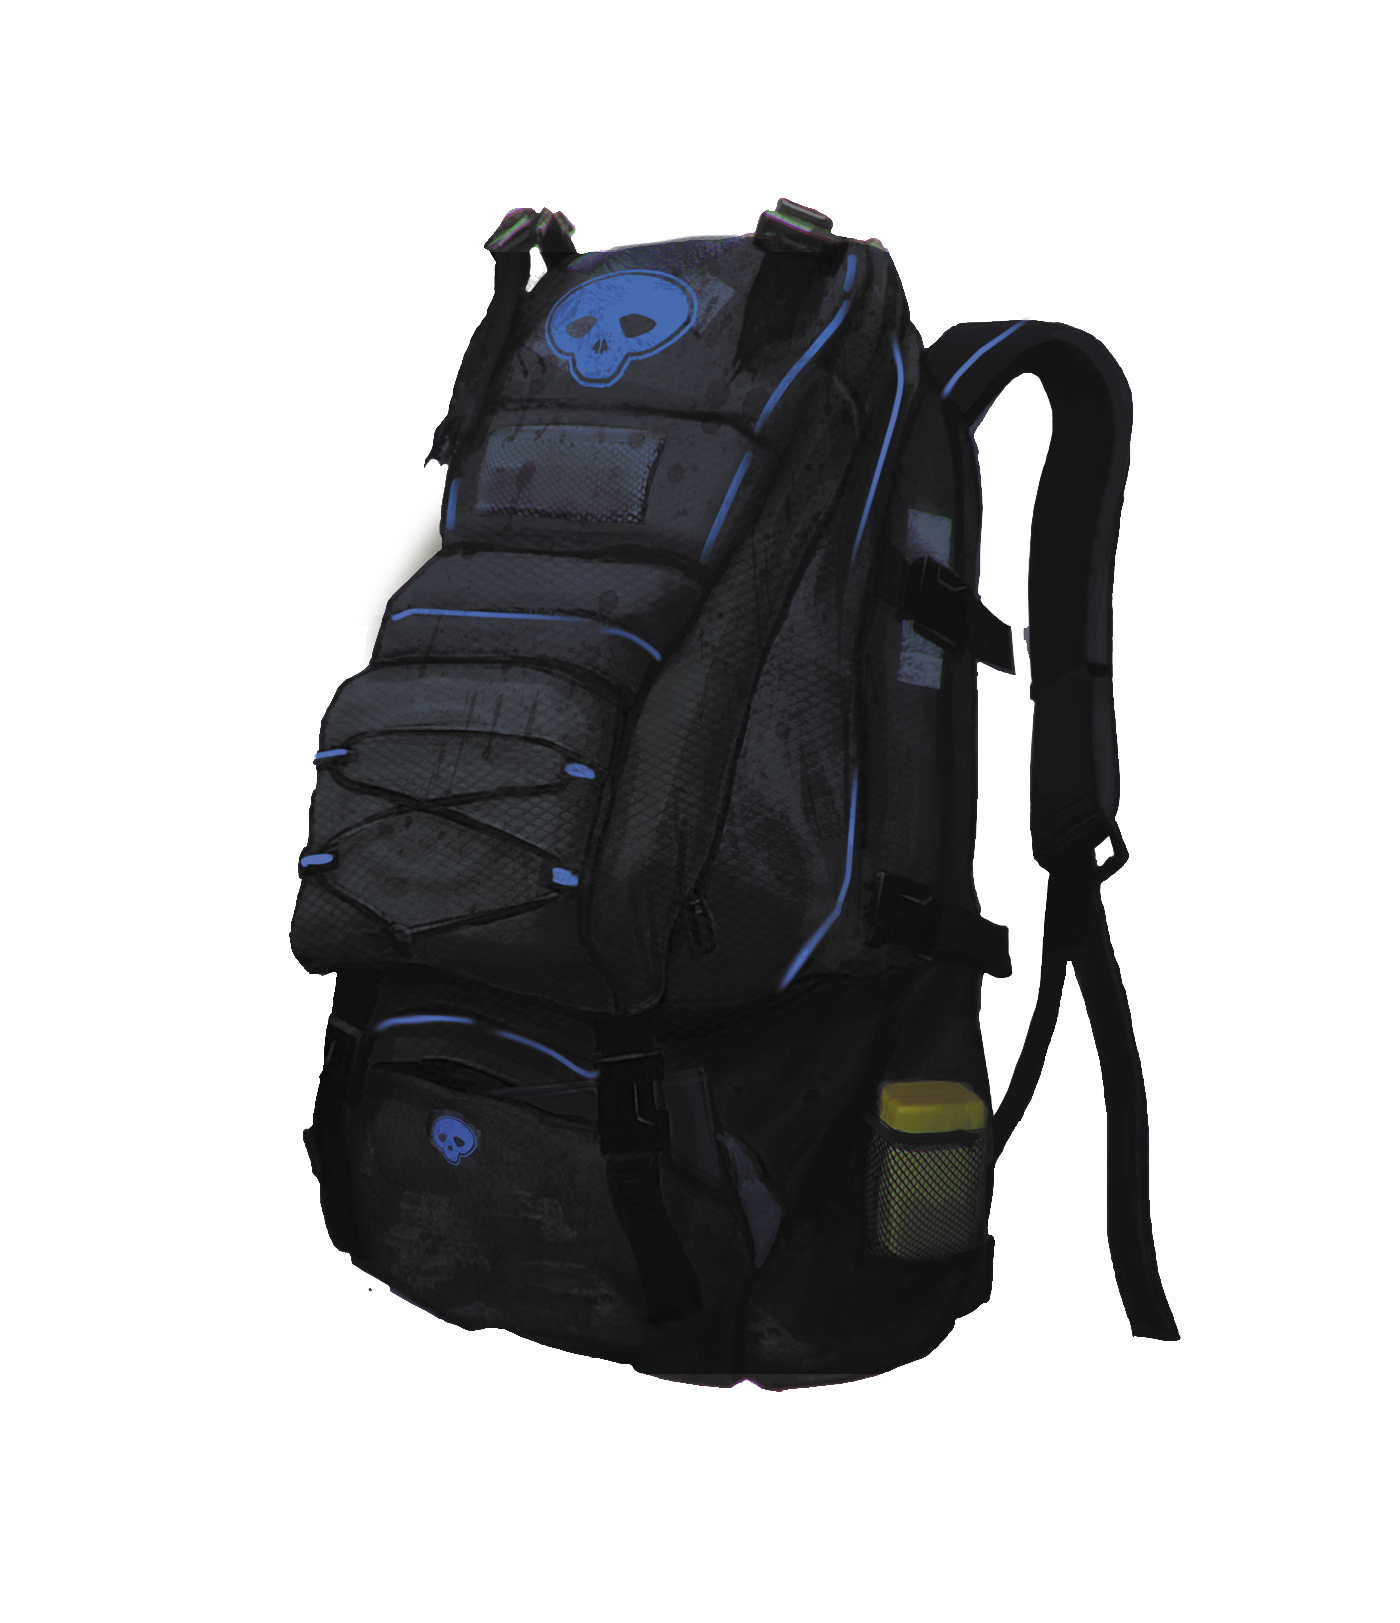
Where Found: Mission 06. Hidden in a long crawl space; found while exiting Buckingham Palace interior.
XXL Backpack

Where Found: Mission 11A. Spitalfields Green (Quaker Park), found in a dirt yard off the park, via a cracked wall needing C4 to uncover.
Flashlight

Where Found: Mission 00. On your person at the start of your adventure.
Hammer

Where Found: Mission 02. Found inside a metal cabinet within Brick Lane Supermarket.
Spraycan

Where Found: Safe House cabinet, close to manhole.
Lockpicking Tool
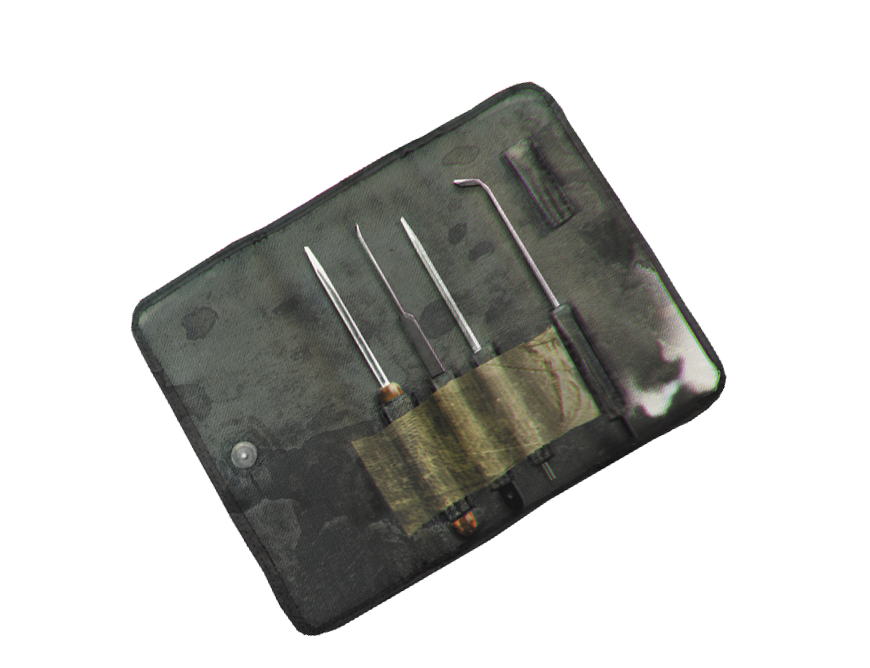
Where Found: Mission 04. Victoria Memorial, in the Metal Container, close to the Shelter, near the palace gates.
Prepper Pad

Where Found: Mission 01. Inside the Safe House, on the workbench.
Prepper Pad Upgrade 2
Where Found: Mission 06. Upgrade by Dr. Knight, in the Royal Bunker laboratory.
Prepper Pad Upgrade 3
Where Found: Mission 10. Upgrade in Raven’s Bunker, within the Tower of London.
Prepper Pad Upgrade 4
Where Found: Mission 11B. Upgrade at Vikram’s Petrol Station, on Shoreditch Road.
Virucide Shot
virucideempty.png
Where Found: Mission 06. Palace Bunker, inside Dr. Knight’s Laboratory (first occasion).
C4
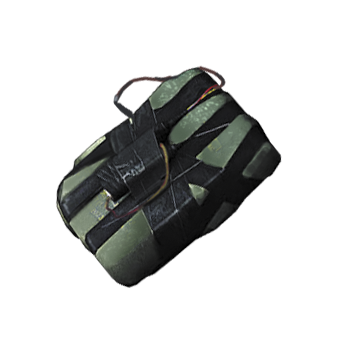
Where Found:
- Mission 09: Green Park area, inside the small armory in the side tunnel (x5).
- Mission 10: Palace Underground storage area, after checking the four paintings and entering the keypad code at the door (x1).
- Mission 12: Spitalfields Nursery: In the lower basement keypad storage room with the UMP45 and C4 (x1).
- Mission 13: St. George’s Church Catacombs: In the barred storage area at the far end of the initial sewer area (x1).
Weapon // Melee
Cricket Bat
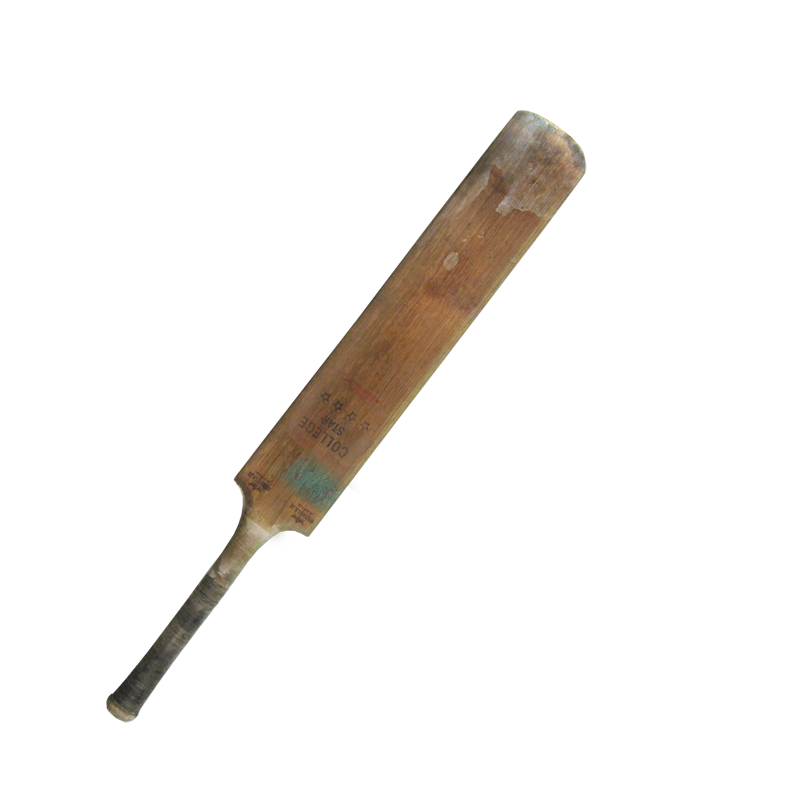
Where Found: Mission 01. Safe House area, travel shop by the Infected Survivor.
Weapon // Handguns
L9A1 Browning

Where Found:
- Mission 01: Safe House area, travel shop, in the BOB (backpack) of the Infected Survivor.
- Mission 14: St. George’s Church: Courtyard, on a small pedestal birdbath.
HK P226

Where Found: Mission 06. Palace Underground (Bunker), in the restrooms, in the last stall next to a corpse.
Magnum Pistol

Where Found: After Mission 11B. Baconfields, Darwin Yard. Hack the keycard lock of the shed once your Pad is updated.
Weapon // Shotguns
Double-Barrel Shotgun

Where Found: Mission 07. Brick Lane Flats, in the foreman’s office of the second warehouse.
Remington 870

Where Found: Mission 11B: Spitalfields Green (Shoreditch Road). By the petrol can, behind the keycard lock (must be scanned by your Pad), next to the petrol station.
Benelli M4 Tactical

Where Found: After Mission 11B. Tower of London (Pier 2), on the tug boat, via the hacked keycard gate (once your Pad is updated).
Weapon // Carbines
Lee Enfield No.4 MK1

Where Found: Mission 04. Victoria Memorial (Green Park Command and Control), inside the C&C building, on a table.
Remington 770
remington770.png
Where Found: Mission 10. Tower of London, on the first pier, by the corpse of the deceased Ravens member.
Weapon // Crossbow

Hunting Crossbow
Where Found: Mission 06. Buckingham Palace, in the secret interior crawl space passage, accessed via the rotating plinth off the grand entrance room.
Weapon // Submachine Guns
MP5 SD

Where Found: After Mission 10. Brick Lane Flats. First warehouse, in the upper office, behind the secret wall keypad (scan using upgraded Pad).
UMP45

Where Found: Mission 12. Nursery bottom basement, in a storage room accessed via a septagram puzzle and keypad door.
Weapon // Assault Rifles
AK-47

Where Found: Mission 10. Tower of London, inside the Raven’s secret chamber, after the dungeon exploration.
SA80a2

Where Found: Mission 14. Behind the rising metal wall, inside an ammo stash accessed with the lockpicking tools.
Weapon // Mounted
M2 Turret

Where Found:
- Mission 01: Safe House, upper Mezzanine balcony.*
- Mission 04: Victoria Memorial, by Buckingham palace gates.*
Appendix VI // Weapon Upgrades
The following list details the location of every available weapon upgrade. The information displayed below isn’t listed in the order you can obtain the items (as that’s covered in the walkthrough) but is presented on a map-by-map basis. Consult the map Appendix for more information.
01 // Location // Safe House

- Firing Speed Upgrade 1: In the small storage room close to the exit to Brick Lane Markets.
- Firing Speed Upgrade 2: Scan and hack the door in the lower mezzanine red storage to reach the hidden platform area; the upgrade is at the tunnel junction.

- Spread Upgrade 1: Carried by an Enraged Super Zombie on the tube train near the entrance to Victoria Memorial.
- Spread Upgrade 2: In the connecting tube station passage leading to St. George’s Church.
02A // Location // Brick Lane Markets (Hanbury Green and Market Street)

- Capacity Upgrade 1: In the small connecting yard behind the gate, leading to Brick Lane Flats.
- Capacity Upgrade 2: In the backyard, accessible by C4, with the Dee’s Letter.
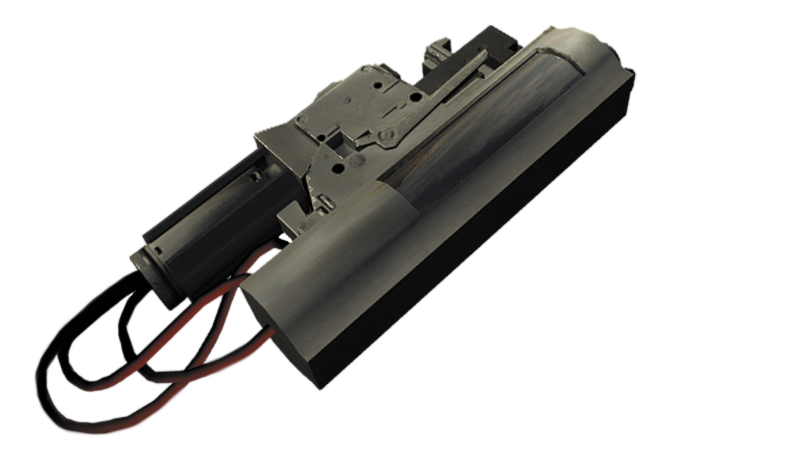
- Firepower Upgrade 1: In the locked concrete storage shed adjacent to the manhole.
- Firepower Upgrade 2: In the Hanbury Green Alley, carried by an Evolved Super Zombie.
02B // Location // Brick Lane Markets (Supermarket)
- Spread Upgrade 3: Behind the strewn shelving inside the supermarket.
03A // Location // Victoria Memorial (Green Park)
- Firepower Upgrade 3: In the Armory, accessed using the keycard during Mission 09.
- Spread Upgrade 4: Carried by the Evolved Super Zombie, in the knee-deep water in the main sewer corridor.
- Firing Speed Upgrade 3: In the small drainage chamber left of the drainage entrance gate.
- Firing Speed Upgrade 4: In the connecting chambers leading to the Tower of London.
03B // Location // Victoria Memorial (Palace Gates)
- Firepower Upgrade 4: In a container with ambushing Infected, just before the ambulances.
- Firing Speed Upgrade 5: Inside the container in the chain-link fence area you need to unlock (sewer entrance).
04A // Location // Palace Underground (Royal Bunker)
- Capacity Upgrade 3: In the hub chamber, opposite the entrance stairs.
- Capacity Upgrade 4: On a shelf, in an L-shaped storage area under some stairs.
- Capacity Upgrade 5: Inside a locked room with a Ravens symbol to decipher.
- Firepower Upgrade 5: Carried by the Enraged Super Zombie, as you exit during Mission 15.
- Firing Speed Upgrade 6: In the Omega barracks, behind a C4 trash pile.
04B // Location // Palace Underground (Queen’s Quarter)
- Spread Upgrade 5: Behind the open vault door.
05A // Location // Buckingham Palace (Interior)
- Firepower Upgrade 6: In the crawl space running between the fiery state room and long blue corridor.
- Firepower Upgrade 7: In the hallway and stairs area, carried by an Enraged Super Zombie.
05B // Location // Buckingham Palace (Kitchens)
- Spread Upgrade 6: Among the scattered trolleys in the kitchens pantry.
- Firing Speed Upgrade 7: In a tiny storage room accessed via blowing up the C4 blocking the entrance.
06A // Location // Brick Lane Flats (Old Brick Warehouses)
- Capacity Upgrade 6: Behind the Raven’s keypad door (with the Dee’s Letter and MP5 SD), top-floor office.
- Spread Upgrade 7: Behind the locked door in the small storage room off the warehouse entrance loading bay.
- Firing Speed Upgrade 8: Carried by an Enraged Super Zombie behind the C4 trash wall, second warehouse.
06B // Location // Brick Lane Flats (Ron Freedman’s Flat)
- Firepower Upgrade 8: In Ron Freedman’s office, inside the safe.
07A // Location // Tower of London (Tower Pier)
- Spread Upgrade 8: With the Dee’s Letter #6 and the M4 Tactical Shotgun, on the tugboat.
- upgradefiringspeed.png
- Firing Speed Upgrade 9: Carried by an Enraged Super Zombie on the tugboat.
07B // Location // Tower of London (Bloody Tower)
- Capacity Upgrade 7: In the water dungeon, on a small alcove.
- Spread Upgrade 9: Held by a suit of armor, in the corner of the Raven’s hidden chamber.
08A // Location // Spitalfields Green (Quaker Park)
- Capacity Upgrade 8: Behind the metal fencing, by the corpse with Dee’s Letter, across from the park.
- Firepower Upgrade 9: Carried by the Enraged Super Zombie, in the park.
- Spread Upgrade 10: With the XXL Backpack in the storage room behind the C4 wall, accessed via the hole in the brick wall in one corner of the park.
- Firing Speed Upgrade 10: On the upper balcony overlooking the alleyways, before jumping down.
08B // Location // Spitalfields Green (Shoreditch Petrol Station)
- Capacity Upgrade 9: With the 870 Shotgun and petrol can, behind the gate near the petrol station.
- Firepower Upgrade 10: In the hallway behind the black light coded keypad door up the ladder.
09A // Location // Baconfields (Darwin Yard)
- Capacity Upgrade 10: In the locked shed with the Magnum Pistol and Dee’s Letter #7.
- Spread Upgrade 11: In the connecting rooms close to the manhole.
- Spread Upgrade 12: Carried by an Enraged Super Zombie on the wasteland.
- Firing Speed Upgrade 11: Among the bushes below the massive motorway pillar, near the huts.
09B // Location // Baconfields (Brick Lane Community Nursery)
- Firepower Upgrade 11: In the lower basement keypad storage room with the UMP45 and C4.
10A // Location // St. George’s Church (Catacombs)
- Capacity Upgrade 11: Carried by an Enraged Super Zombie in the main corridor.
- Spread Upgrade 13: In the toilets behind the C4 trash pile.
- Firing Speed Upgrade 12: In the tiny keypad storage room near the CCTV Junction Box.
10B // Location // St. George’s Church (Crypt)
- Firepower Upgrade 12: In one corner of the waterlogged lower area.
10C // Location // St. George’s Church (Arena Courtyard)
- Firepower Upgrade 13: Behind the locked gate, near the exit ladder.
Appendix VII // Notepad Documents
The following is an unabridged list of every item you can add to your Notepad documents menu. We also present the information contained within each document.
Notepad Documents // Newspapers
Newspaper 1 // Safe House
Located near a corpse by the turnstiles, on the upper mezzanine concourse.
LORE: SCHOLARS WARN OF 400-YEAR-OLD “PROPHECY”
METROPOLITAN, Aug. 30, 2012
Historians claim a 17th-century prophecy predicts the end of the world, and politicians ignore it at their peril.
John Dee, an advisor to Queen Elizabeth I who spied for her in Europe and signed his coded letters “007,” was one of the most well-known scientists of the time. But Dee was also an alchemist and claimed to talk to angels.
“He used magical rituals to hold what he called ‘Enochian Conversations,’ and among other things, these angels told him how the world would end,” says Professor William Keatinge, a historian from Oxford University who has studied the so-called Black Prophecy for almost ten years.
Prof. Keatinge admits he was skeptical when he began the research but became convinced when he discovered Dee had already predicted the Great Plague, the Great Fire of London, the Battle of Waterloo, World War II, Britain’s loss of India, and even the Gulf War.
“John Dee is England’s very own Nostradamus,” he says. And Dee’s predictions for 2012 could spell something much worse....
[Article cuts off]
[CAPTION 1]: “John Dee predicted disaster for London.”
[CAPTION 2]: “Professor William Keatinge, a senior historian at Oxford University, says Dee was probably right.”
Newspaper 2 // Brick Lane Markets
On a low shelf, by the manhole cover, between the markets and supermarket area.
LORE: BRITAIN’S OWN NOSTRADAMUS PREDICTS “BLIGHT” FOR 2012
VOX, Jan. 18, 2012
A medieval history boffin says 2012 will be the END OF ENGLAND—and he doesn’t just mean this summer’s “Extortionate Games”!
According to Professor Keatinge from Oxford University, “Shakespearian Spymaster” John Dee—who already predicted the Great Fire of London, Napoleon, and World War II—wrote a “Black Prophecy” that predicts a modern-day plague sweeping out of London!
Dee calls it “the Blight” and says it will:
- Kill everything it meets.
- Destroy modern society.
- Be incurable.
- Destroy England.
But, incredibly, the queen refused to listen to the dotty professor....
[Article cuts off]
[CAPTION]: “Professor Keatinge, who tried to warn the government about John Dee’s dire predictions.”
Newspaper 3 // Safe House
On the tube station platform, near the stopped train.
“NO BLIGHT IN BLIGHTY” SAYS PM
VOX, Nov. 10, 2012
The prime minister today denied the government is making plans to deal with the “Blight” predicted to hit London in 2012—because he says it won’t happen.
The PM described John Dee’s Black Prophecy as “hogwash” and “utter rubbish.” And when VOX asked him about rumors that the queen herself believed the predictions, he ranted that “ordinary people shouldn’t believe everything they read in the news!”
After calming down, he said even if the prophecy is real, Britain will be safe because the plague will stay in Europe. “It’s like rabies”, he said. “We are a proud island nation, and any plague or disease is more likely to start in Europe than here. And it’ll have a jolly hard time crossing the Channel.” But experts say the sheer number of people traveling in and out of the country makes it impossible to screen everyone for disease....
[Article cuts off]
[CAPTION]: “PM says, ‘No need to worry.’”
Newspaper 4 // Victoria Memorial (Palace Gates)
Buckingham Palace Gates: In front of the Shelter, on the ground, near the lockpick container.
LORE: COULD LONDON OUTBREAK BE “BLIGHT”? “NO CALL FOR ALARM” SAYS PM
METROPOLITAN, Dec. 18, 2012
The PM has called for calm and insists there is “no cause for alarm” after police and medics admitted they were baffled by three deaths in Southeast London.
Some health analysts believe it could be the first signs of the “Blight” predicted to sweep the city in 2012 by 16th-century alchemist John Dee, often called “Britain’s very own Nostradamus.”
Fueling speculation are the deceased, who have not been named but are believed to have no connection besides geography.
A source close to the coroner said, “They were all in good health, from different walks of life, and even different ages. There’s just nothing to connect them, which leads us to believe it must be disease.”
The source refused to give details on the manner of death, saying only, “It’s not a nice way to go.”
At a Downing Street press conference yesterday, the prime minister said the disease was “treatable if detected early,” but also refused to go into detail....
[Article cuts off]
[CAPTION ]: “Police and medical experts at the house of an unnamed ‘Blight’ victim in Southeast London yesterday.”
Doctor’s Laboratory: In the small living room, near the doctor’s bedding.
LORE: FORMER ROYAL GUARD SHOT BY HIS OWN MEN
VOX, Nov. 11, 2002
Police have revealed that the mystery man shot last week in the Buckingham Palace gardens was a former soldier who used to work as a bodyguard to the queen.
The man, who can’t be named for legal reasons, is believed to be a former member of the so-called Omega Group—elite ex-Special Forces soldiers who are recruited to guard the Royal Family 24 hours a day.
“He was shot by men he used to work with,” said a police spokesman. “It’s very unfortunate, but this individual appears to be quite mentally unstable, which is why he was relieved of his duties several years ago in the first place.”
But an Army source denied this, saying, “He was let go because he turned out to be a conspiracy nutter, and he was trying to get the queen to listen to his half-baked rubbish. Omega’s better off without him.”
A spokesman for the queen refused to...
[Article cuts off]
[CAPTION]: “The moment when the palace intruder was shot by Royal Guards.”
In the refuse-filled dirt backyard behind the chain-link gate across from the supermarket.
LORE: EXCLUSIVE: “I DECODED THE BLACK PROPHECY”
VOX, June 3, 2012
A librarian from London says he’s cracked the Black Prophecy—a set of predictions by 16th-century magician John Dee that has the establishment worried.
VOX revealed the controversy surrounding the Prophecy in January, when we told you how it predicts a deadly plague that Dee predicted will bring London to its knees some time this year.
Now we can show you the man who decoded the Prophecy and realized he had to tell the world.
Ron Freedman, a senior librarian from East London, owns a collection of more than five hundred books on Dee, including more than 20 Dee wrote himself.
Ron discovered the Prophecy when he was a student at Oxford University and has been obsessed with it ever since. Luckily for him, his girlfriend Sondra, a leggy 35-year-old from South London, shares his obsession—in fact, it’s how they met.
But Ron’s first love will always be John Dee, and the predictions he...
[Article cuts off]
[CAPTION]: “Ron Freedman and his girlfriend Sondra Kelley, who are obsessed with John Dee’s predictions.”
Newspaper 7 // Brick Lane Flats
In the second upper office, inside Warehouse 1, on a box near a desk and Raven sign.
LORE: COULD THE BLIGHT AFFECT HOUSE PRICES?
METROPOLITAN, Dec. 19, 2012
House owners in areas affected by the “Blight” could see the value of their property plummet if the disease isn’t contained soon, warned experts yesterday.
The disease is currently sweeping across South London, and some medical experts fear it could cross the river into North London within days if a quarantine is not put in place.
But even owners unaffected by the Blight itself could still feel sick as property values plummet in those areas. Neal Dale, an estate agent with dozens of houses and flats in the area, said...
[Article cuts off]
[CAPTION]: “Could houses in ‘Blighted’ areas plummet in value?”
Notepad Documents // Queen’s Letters
Queen’s Letter 1 // Palace Underground (Royal Bunker)
Doctor’s Laboratory: In the small living room, inside a royal briefcase.
LORE: PREPPER’S FIRST ATTEMPT
[On Downing Street stationery]
FROM: The Office of the Prime Minister
TO: EIIR, Office of Buckingham Palace
June 5, 1999
Your Majesty,
You will be pleased to know that the OG officer in question has been disciplined and dismissed with immediate effect. The individual’s Armed Forces pension has been annulled, and he has been further urged to seek psychiatric aid.
I must apologize again for the poor performance of the Group’s screening process, for which I am ultimately responsible. I have asked the Royal Safety and Security Committee to examine the measures currently in place, which examine the background and mental state of those officers under review for transfer to the Group, and any recommendation for improvement the Committee makes will most assuredly be implemented forthwith.
Your safety and security, and that of your family, remains my highest priority.
I remain,
Your loyal servant
P.M.
[Indecipherable signature]
Queen’s Letter 2 // Palace Underground (Royal Bunker)
Small office by the elevator, inside a royal briefcase.
LORE: PREPPER’S SECOND ATTEMPT
[On Buckingham Palace stationery]
FROM: The Office of Eiir
TO: The Prime Minister, 10 Downing Street
November 14, 2002
Prime Minister,
After the events of last week, and the infiltration of our premises and offices by the former Omega Group officer who was previously dismissed in 1999, we have been reflecting on this matter at great length.
While we have no doubt the man is psychologically disturbed, and notwithstanding the failure of Omega security to anticipate and apprehend him at an earlier stage, it strikes us that a man so determined, even at risk to his own life, to “deliver a message” is unusual.
We are of course sadly familiar with those suffering delusions that compel them to approach our person in the manner of an intimate friend. There have been many in the past, many of which you will be aware of, some of which you have remained a subject of nondisclosure.
Nevertheless, such men (and they are always men) without fail have a nefarious purpose in mind. Some have believed us to be lovers; others have wished great harm upon our person and state. But we have never encountered one who merely wishes to warn us of impending disaster. Such delusions are normally directed to the instruments of our government, police, or security forces.
For this reason, we have decided to request further research into these “Dee prophecies,” to be undertaken by a number of our loyal subjects with knowledge in this area. We remain confident their research will bear no fruit, but we will nevertheless keep you, and your successors if necessary, appraised of our findings.
[Queen’s signature]
Queen’s Letter 3 // Buckingham Palace (Interior)
Blue Corridor: In a Royal briefcase, near a ransacked curio cabinet, on the floor.
Lore: QUEEN COMMISSIONS BUNKER
[On Buckingham Palace stationery]
FROM: The office of EIIR
TO: Office of the Sergeant Surgeon
May 1, 2003
Doctor,
After our discussions with yourself and our esteemed medical household, we have approved the decision to utilise a portion of the Buckingham Emergency Rooms for the purpose of research into the “Panacea.” Building work will begin immediately, and your insight and advice on its construction will be most valuable to us. Do not concern yourself with monetary constraints in this undertaking.
Following the unsettling revelations from our learned friends at Oxford, and the prediction by our Royal Astronomer that “a serious biological threat will emerge to claim at least one million lives by 2020,” we therefore ask that you direct your own research and work to this project with urgency. You must arrange your schedule as you see fit, on the understanding that this research, while most valuable to us, must not interfere with your normal duties to the Household.
May God guide your hand in this troubling hour.
[Queen’s signature]
Queen’s Letter 4 // Buckingham Palace (Interior)
Formal Office: In a Royal briefcase, at the foot of the ransacked main desk.
Lore: SCHOLAR TO THE QUEEN
[On University College, Oxford stationery]
FROM: The Office of Prof Keatinge, the Master and Fellows of the College of the Great Hall of the University of Oxford
TO: the office of EIIR
August 18, 2004
Your Majesty,
Following your request, and our previous conversations on the matter, I have undertaken a brief study of the so-called Black Prophecy of John Dee.
While fascinating in historical context, and undoubtedly powerful in its imagery and intellectual curiosity, I must conclude that the Prophecy, and its correlating interest in the “Panacea,” are little more than that.
Dee was a devout and intelligent man, but also a scholar of alchemy and hermeticism, as was common at the time. He therefore believed himself to be regularly visited by angels and demons, with whom he conversed.
The Black Prophecy is the result of one such conversation, as related in Dee’s volume In Enochum Colloquia. This book is quite rare, and many extant copies are suspected to be forgeries, but the Bodleian has held a copy since 1640, just 30 years after Dee’s death, and I am quite sure of its provenance.
Dee’s fascination with a panacea likely derives from his obsession with the Great Plague, as he encountered many cases during his European travels, and his own wife succumbed toward the end of Dee’s life. I would suggest this “vision” is a reaction to a man known as an expert physician when faced with such traumatic, and incurable, circumstances.
In modern times, bubonic plague is a known, quantifiable, and curable disease. By contrast, in the 16th century, the only “cure” was to burn the corpses so as to stem the disease’s spread (as, of course, occurred in the Great Fire of London).
In summary, while I admire and welcome Your Majesty’s interest and patronage in medical research and care for the nation, I must conclude that there is no cause for alarm with regard to the predicted “Blight,” nor indeed for undue optimism concerning the “Panacea.”
Humbly yours,
I remain
William Keatinge
[William Keatinge’s signature]
Queen’s Letter 5 // Palace Underground (Queen’s Quarters)
In the Queen’s Quarters, at the foot of the entrance stairs behind the two hunters.
LORE: DOCTOR TO QUEEN
[On Omega Group stationery]
FROM: The Office of the Sergeant Surgeon
TO: The Office of EIIR
February 2, 2005
Your Majesty,
You asked to be appraised of our research and progress to date. The news I have to give is both encouraging and frustrating.
My colleagues and I are encouraged by findings that, contrary to Prof. Keatinge’s assertions, our own research strongly indicates several outbreaks of “black death” in the Middle Ages and even during the Renaissance were in fact the Blight of which Dr Dee wrote.
Documents we have secured suggest the Catholic Church, and their “plague healers” known as Medici, were instrumental in concealing this fact from the world at large. I recognize this is a serious accusation, but the evidence is strong. Res ipsa loquitur.
The frustration stems from our lack of progress concerning the Panacea. Although much mention of the fabled cure can be found throughout history, and especially in the writings of Dee and other alchemists such as Francis Bacon, there is no indication of even partial success.
Dee and Bacon were friends and colleagues, and both men make mention of a “code” that supposedly explains and delivers the Panacea. But we have yet to ascertain what form this code takes, or even if it truly exists.
If I may suggest a course of action, it is perhaps worth reconsidering Your Majesty’s relationship with the group known as the “Ravens of Dee,” with whom I know you are familiar. I realize they are somewhat unorthodox and radical, but fanatics are also often vast pools of obscure knowledge. They possess much Dee material, some of it perhaps exclusively, and I feel confident that if anyone knows more about this subject, it is the Ravens.
I remain ...
[Indecipherable signature]
Queen’s Letter 6 // Palace Underground (Queen’s Quarters)
In a Royal briefcase, in the vault, across from the open vault door.
LORE: ROYAL PARDON
[On Buckingham Palace stationery]
FROM: The Office of EIIR
TO: Office of the Administrator, Kent Secure MTRU Hospital
John Wright
c/o Ward 7-H
MTRU
Maidstone
Kent ME14
October 7, 2009
Elizabeth the Second, by the grace of God of the United Kingdom of Great Britain and Northern Ireland and of our other realms and territories, Queen, Head of the Commonwealth, Defender of the Faith, to all to whom these presents shall come greeting.
John William Wright, at the Central Criminal Court on the 13th day of December 2002, was convicted of trespassing on Our Royal Grounds of Buckingham Palace in possession of illegal firearms and with malicious intent. He was sentenced to life internment in Kent Secure Mental Ward for veterans of Our Royal Armed Forces.
Now know ye that we in consideration of some circumstances humbly represented unto us are graciously pleased to extend our grace and mercy and to grant him our free pardon in respect of the said conviction, and we do hereby command all justice and others whom it may concern that they take due notice hereof, and for so doing this shall be a sufficient warrant.
Give at our court at St. James’s the 7th day of October 2009, in the year of our reign.
[Queen’s signature]
Notepad Documents // The Black Prophecy
A Postcard // Safe House
Located on the tile floor very close to the manhole.
Lore: POSTCARD
[Tourist postcard of modern London, with Dee magical symbols on the front and handwritten text scrawled on the back]
ARISE A NEW UTOPIA IN LONDINIUM
THOSE MEN WHO LIVE THROUGH THE CLEANSING FIRE
SHALL BE ITS MASTERS
FOR THE OTHERS HELL AND FIRE WILL BE THEIR SOUL’S REWARD
A Text // Buckingham Palace (Interior)
On the main ornate desk inside the office.
Lore: THE FIRST BLIGHT
[Michael Maier engraving of the Great Plague, but with some subtle clues to hint that it was in fact an outbreak of zombies, not bubonic plague]
A Letter // Tower of London (Hidden Raven’s Chamber)
Raven’s secret chamber, on one of the chests.
LORE: THE FIRST BLIGHT
[Page taken from unknown textbook.]
What is remarkable in Dee’s predictions are his accuracy and specificity. Less than 60 years after his death and his infamous final letter to Sir Francis Bacon, the Great Plague ravaged London, until the Great Fire of 1666 destroyed both city and outbreak.
Contemporary sources point to the uncanny similarities between the Plague and Dee’s own predictions of the “first Blight”—or rather its spread to England at that time, as Dee claimed to have encountered the Blight himself during his travels throughout the continent.
Those 60 years had seen Dee’s reputation, and that of his work, ridiculed and besmirched by a variety of men, including no less a figure than James I. But the Great Plague and Fire gave the reigning monarch, Charles II, pause to reconsider.
It was Charles who followed Dee’s advice and instated a law that its resident Ravens must never leave the Tower of London; it was Charles who created the “Ravens of Dee,” a secret society of scholars and noblemen. Rumor persists that the “Ravens” were even given permanent quarters underneath the Tower of London, in secret rooms on the dungeon level. Needless to say, these rooms have never been found.
Little is known about the Ravens of Dee, and less still documentary evidence remains; this is hardly surprising for a secret society, perhaps, but some rumors and legends about their work have remained steadfastly consistent over the ensuing centuries. The Ravens were to study what remained of Dee’s work; to scour the land for any additional surviving copies of his manuscripts; and to prepare England for Dee’s next great cataclysm, the “second Blight.”
A Tarot Card // Tower of London (Hidden Raven’s Chamber)
On one of the seats in the Hidden Raven’s chamber with the AK-47 and Pad Decipher Upgrade.
LORE: TAROT CARD
[Tarot card The Tower, drawn in traditional style, with black ravens flying out of the falling tower, up into the air.]
“Should the Ravens ever flee the Tower of London, the Tower itself will crumble and England’s glory shall fall to ruin...”
—John Dee, excerpt from a letter to Elizabeth I, written at Mortlake in July 1592
Appendix VIII // Dee’s Letters
There are a total of seven Dee’s Letters to find throughout London. Dr. Knight needs these to make the Panacea, as each letter contains a code (a single Enochian Symbol) written in ink visible only in black light. This is known as the Panacea Code, or the missing codon for the creation of the vaccine.
You begin collecting them when Mission 08 begins. You can collect them at any time, although the “Campaign” chapter has the optimal moments. They are found in the following locations:
Letter 1 // Palace Underground (Royal Bunker)
- Objective #: 1
- Location Description: In the pass-through box between you and the doctor. Given to you by the doctor at the end of Mission 07.
- Optimal Time to Locate: The conclusion of Mission 07.
- Items Needed: None.
LORE: DEE’s LETTER TO FRANCIS BACON
John Dee’s final letter to Francis Bacon before he died. It appears Dee tried to warn King James but was branded a witch for it! He urges Bacon to keep searching for the Panacea and to “safeguard our code”...
September 28, 1607
Dearest Francis,
With the death of our beloved Bess, I find I am fallen from grace at court, and I fear the dire warnings I have attempted to communicate will be ignored. Without Her Majesty’s patronage, my influence on the realm is lost.
I know you are in the Scot James’s favor, but he regards me as a heretic, branding me “sorcerer” and a practitioner of “black magic”! My home and archives at Mortlake have been pillaged and thousands of manuscripts lost. The knowledge of centuries, gone forever for no more reason than fear and ignorance.
There is no recourse for me; I am in ill health and hear Death’s approaching hooves grow louder with each passing day. But you, my friend, are still in favor, and your place at the College of Physicians is secured. I beg of you, continue our work and pursue the Panacea, for the sake of England.
Prepare its children for their darkest hour, which will surely come as the archangel foretold.
On the event of my death, I urge you to Mortlake and to safeguard our Code; only it can reveal the knowledge I have salvaged from this catastrophe.
[signed] John Dee
Letter 2 // Victoria Memorial (Sewer)
- Objective #: 3
- Location Description: The armory, inside the cell door in the side passage just down the steps from the Safe House door.
- Optimal Time to Locate: The conclusion of Mission 09.
- Items Needed: Waverley’s Keycard.
LORE: DEE’S NOTES ON THE BLIGHT IN EUROPE
What Dee saw in Europe during the Great Plague. He says there was a conspiracy to hide the truth by the plague doctors! But he also says he talks to angels, so maybe he was just paranoid and crazy...?
John Dee’s diary
April 3, 1590
Being finally accustomed once more to English weather and manners after our return, I resolve to set down my observations on the plague wreaking havoc in Europe. For that to which I have borne witness causes me great consternation.
The plague is like no other I have seen; the Physici Epidemeie and Papists alike may say it is no more than a resurgence of the Black Death, but with mine own eyes I saw things to drive a man of science to the brink of his understanding.
A man would ask, Why are those towns affected by this Blight (as I call it) swiftly quarantined and isolated? A man may further ask, Why do the Physici—the only men permitted to enter and the supposed physicians of compassionate healing—carry blades and poisons with them, concealed under their voluminous cloaks?
I know the answer, for I used my experienced guile to gain entry to one such town in southern France, but even I am afeared to commit my observations to words. The horrors of that place will remain in my vision beyond even death, I am sure, even as the disease stays with its victims beyond death!
Kelley and I consulted the archangel Uriel, the incandescent, on this matter. I will write our full conversation in time, but the most urgent entreaty was of the fabled Panacea, that elusive salve, which cures all ills, that has confounded hermeticists and magicians since the time of Plato.
And Uriel revealed to us why their search has been fruitless; for the Philosopher’s Stone, though necessary, is not enough. There is also a divine code of seven Enochian words that must be delivered to unlock the formulation. The search for this code, this holy epigram, must be our priority.
Letter 3 // Brick Lane Flats (Old Brick Warehouses)
- Objective #: 4
- Location Description: Inside the cubbyhole behind a Ravens keypad door.
- Optimal Time to Locate: The conclusion of Mission 10.
- Items Needed: Prepper Pad Decipher Upgrade.
LORE: OUTBREAK IN MANCHESTER
Dee lived in Manchester during an outbreak, and it sounds like his wife got infected, but Dee couldn’t cure her. He mentions the “Panacea epigram.” Does he mean the code...?
John Dee’s diary
December 15, 1603
What danger! What futile endeavor! What wasted hope!
Last night I collected scabs from the Blighted, and the streets of Manchester are never the safest place, but this excursion was like to make a man of advancing years faint.
Where the Blight took hold in this city, the infected roamed the streets freely, and with ravenous hunger. There was no respite here, no army of sword-wielding beaked Physici to tame the outbreak. Instead the council moved slowly and finally determined to burn the infection from the streets and homes of Manchester.
This they did last night, and so intent was I on collecting some few more infected scabs that I was almost caught in the conflagration. But I escaped, and returned home to my beloved Jane with no more wound than to my pride.
I have been crushing the scabs into a sniffing powder for the purpose of fighting the infection with its own pustulence. I met physicians in Germany experimenting with this method, and my beloved Jane has responded well to its administration since her own infection five days ago.
If only Francis and I had made better progress on the Panacea epigram! Three of the seven are known to us, but it is not enough, and my own time is surely fading fast.
I, who saved Elizabeth herself from the small pox! I, who have Michael’s divine entreaties to guide me! Even I remain confounded as to the nature of the Blight, and with the Scot James’s sycophants still calling for my head, I will never obtain the resources I require.
[signed] 007
Letter 4 // Brick Lane Markets (Hanbury Green And Market Street)
- Objective #: 5
- Location Description: Behind a C4 debris pile, in the back garden near the alleyway between tenement flats.
- Optimal Time to Locate: During Mission 11A.
- Items Needed: C4.
LORE: DEE’S WIFE JANE DIES OF BLIGHT
Dee talks about his wife’s death in a letter to Bacon. It sounds horrible...and a lot like the Blight we’re suffering now! He mentions the “Enochian code” and signs the letter “007”...
February 3, 1604
Dearest Francis,
It is with great sadness that I write to inform you of my wife Jane’s passing. How I wish I could say she went peacefully, in our bed, perhaps even as she slept. But as you know from my previous letters, such gentle peace was never going to be her destiny.
The crushed scabs were effective for a while, but time wore on, and as my supplies dwindled, the infection grew stronger. The veins blackened, the glands became swollen and pustulant. Her countenance became impossible to look upon, repulsive even to me, her husband, and I knew the end was near.
The straps were like bands of parchment when the infection took full hold. Her voice and mind lost, nought but a guttural screech escaped her throat as she clutched at me—at me!—with evil intent.
I have often mused upon the myth of the banshee and wondered what sound such a creature might make. After last night, I wonder no more.
I upheld my solemn promise to her. The end was swift.
My old friend, I will return to London soon. There is nothing left for me here, and my conflict with the Scot James seems insignificant in the face of this threat. I will seek you upon my arrival, and I beg of you to resume our search for the Enochian code that unlocks the Panacea. No quest has ever been of such vital importance.
[signed] 007
Letter 5 // Spitalfields Green (Quaker Park)
- Objective #: 6
- Location Description: Behind a large iron barricade, at the end of a series of backyards, in one corner of the park.
- Optimal Time to Locate: The conclusion of Mission 11B.
- Items Needed: Prepper Pad Keycard Hack.
LORE: REFLECTIONS ON 7
I think this is meant to be excerpts from things the angels told Dee. It’s all about how 7 is a holy number, with sacred meaning. It sounds totally mad, real crazy apocalyptic stuff...
COLLOQUIUM XLIII: A HOLY NUMBER, A WICKED NUMBER
(From varied conversations, 1585)
...7 is the number of all that is holy and divine in His nature. For, as He rested on the 7th day, so it is that in his 7th year the boy becomes a man, and his mind made open to God and the world. And are there not 7 musical notes, 7 colors in the rainbow, 7 orifices in the head of man, 7 planets in His glorious sky...
...In Revelation there be 7 churches, 7 seals, 7 angels, 7 plagues, 7 stars, 7 thunders, 7 spirits of God, and the lamb has 7 horns and 7 eyes, the dragon 7 heads and 7 crowns, and the beast has 7 heads that are the 7 hills of the Whore of Babylon...
...Therefore will the Enochian epigram also possess 7 pieces, as the Rosicrucians know well, and they are 7 orders to which the divine words will be whispered, but in their seeking, 7 times will you be thwarted; 7 times will you know defeat...
...The shew-stone will reveal these to you and more, as it reveals me unto you now; 7 times shall you gaze into it, and 7 fears shall you know...
...And with the 7 wisdoms of the Rose-Croix shall you see clearly the 7 manifestations of this wicked Blight; for the first is fever, hot and foul; the second is a fool’s peace, of the body and mind; and the third is a black humor tempting the soul...
Letter 6 // Tower of London (Tower Pier)
- Objective #: 7
- Location Description: On the deck of a tugboat, connected by drawbridge to the second pier, on the Thames.
- Optimal Time to Locate: The conclusion of Mission 11B.
- Items Needed: Prepper Pad Keycard Hack.
LORE: CONCERNING RESEARCH AND CURES
Dee says King James tried to stop his research and begs a doctor called “Robertus” to secretly join him. Dee truly believed angels were giving him the knowledge to make a cure! Could it be true...or was he just insane?
Dr. Robertus de Fluctibus, Fenchurch St.
London, February 26, 1606
Dear Robert,
I write to warn you to take the greatest care in your work and affairs and to conceal them where necessary from the jealous and spiteful minds of lesser men; for I speak on account of my own such experiences.
As you well know, upon Elizabeth’s death and the Scot James’s ascension, the mood and humor of England changed. The work of men such as myself, Kelley, and even Bacon, was condemned by our king as blasphemous and a kind of devilish sorcery.
I was in exile in Manchester at the time, oblivious to this change. I knew only what I had seen and what my Enochian conversations had proved, that we are all of us in great danger from the Blight. It was only through razing a quarter of the city to the ground that Manchester itself yet survives.
My beloved wife died of this same sickness, and I returned to London, little knowing the sadness it would bring. My home and library at Mortlake had been pillaged, and I was arrested upon presenting myself to the court!
It was only with the application of much persuasion, and assurances of a virtuous path to come, that I escaped the fires of the stake itself. A fate, alas, already suffered by too many of our fellows who pursue science and learning as you and I. Since those damned fools Catesby and Fawkes were uncovered, the king grows ever more cautious and aggressive.
It is clear to me now that the fabled Panacea is mankind’s only hope. The angels assured me, though it was no simple matter to draw it from them, that the formulation of this salve is not so difficult. It is the knowledge needed, the divine epigram known as “the Enochian code,” that is so hard to obtain.
Francis and I have endeavoured to do so for many years, with some measure of success, aided no doubt by my own extensive experience with ciphers, but many of these holy words yet elude us.
I urge you to join us in this quest to aid mankind in its hour of need, before it is too late, and with equal urgency, I entreat you to keep this matter concealed from those who would thwart us; “for they know not what they do,” as He spake in the Good Book.
[signed] 007
Letter 7 // Baconfields (Darwin Yard)
- Objective #: 8
- Location Description: Inside a small shed, close to the wasteland pond and digging equipment.
- Optimal Time to Locate: The conclusion of Mission 11B.
- Items Needed: Prepper Pad Keycard Hack.
LORE: THE FIRE
The last thing Dee ever wrote in his diary. He predicts the Great Plague and the Great Fire of London...and says the only way to stop the Blight is to burn London, just like back then!
John Dee’s diary
February 29, 1608
I feel Death’s hand upon my shoulder. The time is near. Yet continue I must, for a final revelation has been made.
First, upon this my deathbed, I must admit personal defeat. The Enochian code has eluded me; it has eluded Francis; and I do not know if Robert even looks for it.
The few pieces of code we have are incomplete. I hope and pray that our work is continued by some later generation, in a time when perhaps learned men are not cast out and branded witches—if such a time should ever dawn again in this bleak land—and such science is given the prominence it deserves.
The future is yours, now, O sons of our sons; may your knowledge be greater than men such as we could ever imagine, and you look back at this time with sad mirth that our quests were such trials.
The Panacea is waiting to be found, if only you can discover the code. I implore you to do this thing, before all is lost.
Finally, the revelation. I saw the Blight in London, spreading its foul black humor across our fair city, which is the heart of the world.
A broken warrior sits upon the throne, impotent to bring salvation.
Salvation eventually comes, as in Manchester, not from the Physici but from a cleansing fire that sweeps the city, heralded by London’s own black angels.
I have written of this vision before, as spake to me by the angel Michael; yet this was not the same, but in fact the vision of a time less than a lifetime hence. All must beware; all must prepare! The Blight is com—
[Letter ends; Dee died while writing it. NB 1608 was indeed a leap year, and Dee’s real date of death remains unknown. It seemed appropriate that such an extraordinary man should die on a rare day.]
Appendix IX // Lore of the Land
Recently uncovered from the Royal Bunker and Ron Freedman’s flats is a series of documents shedding some additional light on Dr. Knight’s work, the relationship between Sondra and John, and the unabridged Black Prophecy, presented here for your edification.
LORE: THE BLACK PROPHECY IN FULL
While living in exile in Manchester, John Dee compiled his work with Edward Kelley, and their conversations with angels, into a manuscript entitled “In Enochum Colloquia” (“The Enochian Conversations”).
The book was published in 1602, reputedly financed by Queen Elizabeth I herself. But Elizabeth died shortly after publication. Her successor, the puritan James I, decreed the Colloquia a blasphemy and ordered all copies to be burned. Only a few escaped this fate and remain to this day, but their authenticity is perpetually in doubt.
Excerpts from the Enochian Conversations, November 1585:
“In the year of our Lord two thousand and twelve, the alchemy of wealth from air will bring a second Blight upon mankind.”
“As the Revelation shows, when death overcomes life, so shall man walk eternally in purgatory, and those who long for the bosom of God shall not find it, as death itself flees from them to smother the world in gray damnation.”
“This fog of death will cloak the land, and those men who are not prepared will succumb to its foul clutches.”
“Harken not the beast with a thousand eyes, whose split tongue defiles and embraces your demise, as none shall escape its gaze.”
“Therefore prepare, for a small few shall be spared, and they will be the enlightened ones, the prepared ones, the ones who seek to possess the fabled Panacea.”
“For the others, hell and fire will be their soul’s reward.”
“Fathers will not know their sons; sons will damn their fathers.”
“The Tower shall fall when the Ravens flee.”
“And when the Tower crumbles, so, too, will England, as surely as night follows day.”
“If you would survive, bury yourself in the earth’s bosom, that she may protect you.”
“For God shows no mercy to those who heed not His words, and the man who has grown fat upon the backs of his fellows with insatiable greed will himself starve for life and turn at last to devour his own children.”
“Thus will the end come, and the world made unworthy in His eyes, so that He may begin anew. You will know when His Heralds sound seven bells, to reveal His glory.”
“And a cleansing fire of black angels will purify the world.”
“From these ashes shall arise a new utopia in Londinium, like unto Heaven on earth.”
“And those men who pass through the cleansing fire shall be its masters, blessed to serve Him and His Glory.”
“Thus spake Michael, most holy of all angels, in his many entreaties to me.”
The book was published in 1602, reputedly financed by Queen Elizabeth I herself. But Elizabeth died shortly after publication. Her successor, the puritan James I, decreed the Colloquia a blasphemy, and ordered all copies to be burned. Only a few escaped this fate and remain to this day, but their authenticity is perpetually in doubt.
LORE: LETTERS FROM SONDRA (1 of 2)
Oct. 28, 2002
Dear John,
I’m sorry, but I just don’t think we’re going to agree on this point of interpretation. You seem dead set on a “scorched earth” reading of the BP, whereas I (and Ron and many of the others) see it more as a warning that we need to help people, not stand by and watch as it happens.
I know you’re angry with me and Ron for arguing with you at the last meeting, but I hope you can see that we’re just advocating a “better safe than sorry” approach. It’s like global warming—if we’re wrong, well, at least we tried to make the world a better place, and no harm done. But if we’re right, and don’t act quickly, we’re putting the whole planet in danger. I wish you could see that.
We’re not trying to shut you out or shout you down, like you suggested. I know you said those things in the heat of the moment, but even if you didn’t mean them, they hurt. Your experience is invaluable to us; that’s why I was asked to recruit you in the first place.
But we’re not children, and we do understand your point of view. We just disagree.
The council has asked me to suggest you take some time off from the meetings, because they don’t feel you’re being productive right now.
I’m not going to do that, because I still love you and know how much being excluded from the council would frustrate you, but I agree this fatalist agenda isn’t productive.
I’m about to leave for Clermont-Ferrand, to see what I can dig up in their library about the Physici, as discussed at the last meeting. But I’ll be back in time for Bonfire Night, so I’ll call you and we can go up to Ally Pally for the display. It’s been too long since we spent an evening together, and I’m sorry about that.
Lots of love,
Sondra
LORE: LETTERS FROM SONDRA (2 of 2)
[Address on Envelope]:
St. George’s Mental Health NHS Trust
7 Corbell Road, London, SW17 7DJ
May 11, 2005
Dear John,
I’ll never forget everything you’ve given me. Our time together was the happiest of my life...but now those memories are tarnished, and I want it to stop.
We both know you don’t belong in the trauma unit. But the injustice of it all has changed you. You’re not the man I fell in love with anymore—the man who risked (and lost) everything to try and prepare the world for the coming storm.
That man seems to be dead. Looking back, your letters become more and more bitter over time, filled with cynicism and contempt. God knows, I can’t blame you, after everything that’s happened! But I don’t want to know this new man. I don’t think we have anything constructive to say to one another.
If I do somehow survive the Blight, if any of us do, it’ll be thanks to you. I owe that to the man I loved. He’ll remain a part of me, forever.
Forgive me.
Sondra
LORE: A TOUR OF THE DOCTOR’S LABORATORY (COMMENTARY AND NOTES BY DR. PETER KNIGHT)
Ah, yes, Dr. Dee...He was an odd chap. Claimed he talked to angels, of all things! Some people even think he saw the future, but they’re wrong. Dee was a scientist, the finest mind of his time! He traveled widely and saw plague outbreaks up close. Just like this! Well, think about it. How would they have known the difference, in those days?
That is a 16-century plague mask from the palace archives; thought it might be useful. Most people think it’s just a fancy dress costume, you know? Learn something new every day until you die, as I always say!
A Seal of God-type Kabbalistic symbol, based around a 7-pointed star shape, Dee’s holy table; the seal of God on stone.
The Sigil of Ameth or Sigillum Dei or Seal of God is a large wax disk, on which are inscribed various names of God and angels, within a design of heptagons and heptagrams. Dee placed this sigil at the center of the Holy Table, underneath the scrying stone during his conversations with angels.
Dee’s “Scrying Mirror.” An old Aztec relic, made of obsidian and shaped into a hand mirror. Dee used it to conjure up angels.
This occult symbol was created by John Dee and described in the Monas Hieroglyphica in 1564. The symbol is intended to represent the reality of the monad, a singular entity from which all material things are said to derive. Dee wrote of it: “The Sun and the Moon of this Monad desire that the Elements in which the tenth proportion will flower, shall be separated, and this is done by the application of Fire.”
John Dee, portrait du XVIe siècle, artiste inconnu. Selon Charlotte Fell Smith, ce portrait a été réalisé alors que Dee était âgé de 67 ans. Il a appartenu à son petit-fils Rowland Dee puis plus tard à Elias Ashmole, qui en fit don à l’université d’Oxford. A portrait of John Dee at the age of 67 by an unknown artist.
John Dee performing an experiment before Queen Elizabeth I. Oil painting by Henry Gillard Glindoni.
Book written by James II referenced by the doctor during his conversations with the Survivor.
Dee’s Shew-Stone, used by his scryer Edward Kelley to peer into the future.
John Dee’s coat of arms. The Dees are of Welsh origin, where the name means “black.”
John Dee’s Grimoire.
Charles the Second, the English King who rehabilitated John Dee after his predictions regarding the First Great Plague came true. He founded the secret order known as the Ravens of Dee in 1666.
Appendix X // UPlay Rewards
Make sure you’re part of the UPlay community for additional rewards! Points are given out after you accomplish certain actions. Use these points to purchase specific rewards:
| Action | UPlay Name | Points Awarded |
|---|---|---|
| Pick up the BOB Backpack | BOB is your best friend | 10 |
| Reach a Survivor Score of 2,000 points (or more) | Unbreakable | 20 |
| Hack all the CCTV Junction Boxes in London | CCTV Is Watching You | 30 |
| Complete the game (Campaign or Survivor mode) | I Survived! | 40 |
| Reward | UPlay Name | Points Cost |
|---|---|---|
| Unlock a new, ’80s-style Start screen and music | Back in the ’80s | 10 |
| Customize your cricket bat* | Punk Is Not Dead! | 20 |
| Concept Art Video | God Save the Queen | 30 |
| New multiplayer game mode (Survival) | The Last of Them | 40 |
Appendix XI // Endings
There are three different endings you can achieve:
- Ending A: “The Panacea for the Masses.” You successfully fend off all Infected attacks, and you’re rescued by the Ravens’ helicopter. Extraction from the Tower of London is completed. You hand off the Panacea to Sondra.
- Ending B: “The Panacea Is Missing.” You successfully fend off all Infected attacks, and you’re rescued by the Raven’s helicopter. Extraction from the Tower of London is completed. You escape without the Panacea, and hope is lost.
- Ending C: “Survivor Down.” You unsuccessfully fend off all Infected attacks and fall somewhere between the first pier and the top of the tower. Extraction is incomplete. You will be missed.