
Dead Space 3 with Interactive Map Essentials Tools of the Trade
Tools of the Trade
Crafting Weapons
As an engineer, Isaac Clarke is familiar with a wide range of tools and equipment. However, these same tools can serve as weapons in the fight against the Necromorph hordes. At workbenches, Isaac can use his skills to take parts and resources and use them to craft weapons. When crafting a weapon, you begin with a frame. There are different sizes of frames and some frames can hold more tools and circuits than others. You then add one or two tools to the frame—an upper tool and often a lower tool. Tools are the weapons. For each weapon, you can select a tip. Tips can change the way the weapon functions. Next, you can select an upper and a side attachment. Attachments can affect the projectiles of the weapon or add other effects. Finally, as you find circuits, you can insert them into the weapon to modify damage, reloading time, clip size, and rate of fire. If you are proud of your weapon and want to keep the idea, make a blueprint of the weapon. Let’s take a look at the various parts you can use to craft your own weapons. You can also upgrade existing weapons—even blueprint weapons, to make them better or to fit your style of play.
Frames
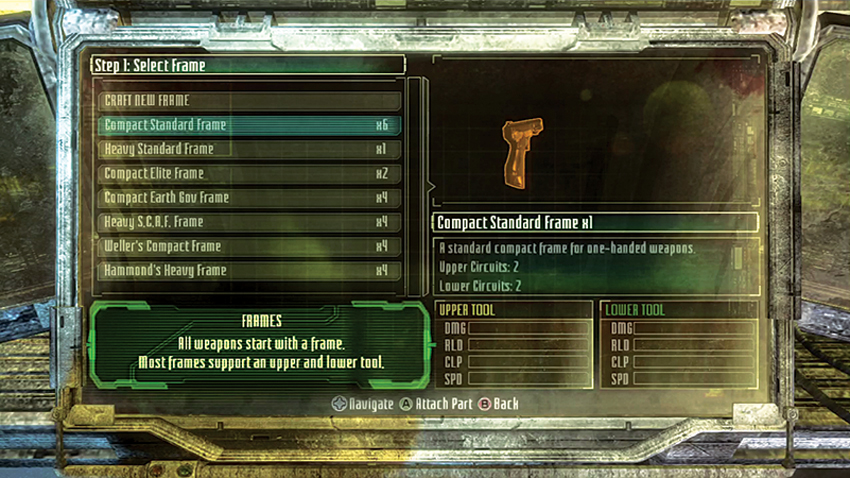
All weapons start with a frame. When selecting a frame, you want to pick one that will provide the slots you need.
| Name | Description | # of Tool Slots | # of Circuit Slots |
|---|---|---|---|
| Compact Standard Frame | A standard compact frame for one-handed weapons | 2 | 4 |
| Heavy Standard Frame | A standard heavy frame for two-handed weapons | 2 | 4 |
| Compact Elite Frame | An elite compact frame for one-handed weapons | 2 | 8 |
| Compact EarthGov Frame | A compact frame with built-in upgrades | 2 | 2 |
| Heavy S.C.A.F. Frame | A heavy frame with built-in upgrades | 2 | 2 |
Tools
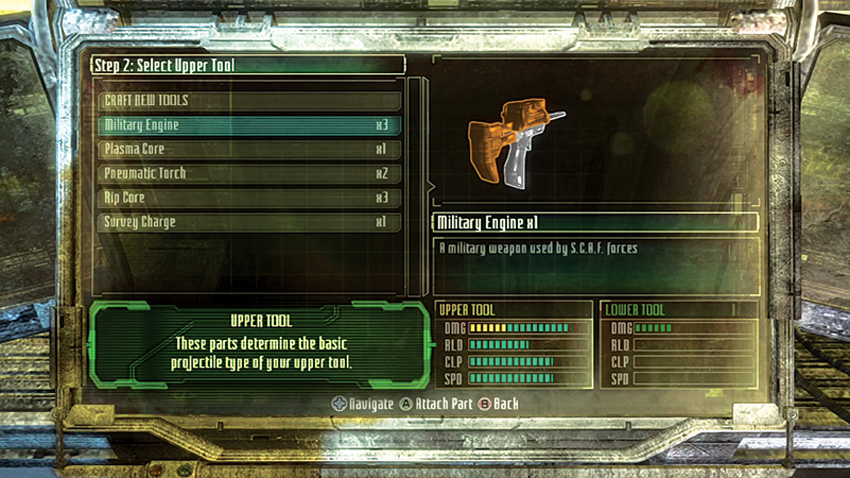
Tools are the meat of the weapon—the part that causes damage. After you have a frame, you can attach one or two tools, depending on the number of tool slots. Most tools can be placed in either the upper or lower tool slots.
| Name | Description |
|---|---|
| Military Engine | A military weapon used by S.C.A.F. forces |
| Plasma Core | A cutting tool that fires ionized plasma fuel |
| Pneumatic Torch | An incendiary device fueled by compressed gas |
| Rip Core | A short-range suspended saw blade tool |
| Survey Charge | A seismic tool that fires explosive canisters |
| Telemetry Spike | A mining tool that fires tempered alloy bolts |
| Tesla Core | An engine for high-current electric welding |
| Hydraulic Engine | A cutting tool resembling a bayonet, used for clearing large areas |
Modules
Modules are tools that can be placed in the lower tool slot. However, they are not weapons in themselves. Instead, they modify the weapon in the upper slot.
| Name | Description |
|---|---|
| Electrocution Module | Electrocutes the last shot fired |
| Explosion Module | Causes the last shot fired to explode |
| Rotator Cuff Module | Allows primary tool to rotate 90 degrees |
| Canister Recovery Module | Allows recovery of last deployed canister |
Tips
Every weapon has a default tip. However, by adding a different tip, you can change the way the weapon operates or the type of projectile.
| Name | Description |
|---|---|
| Directed Ejection Field | Fires effect or projectile in short, forceful impulses |
| Directed Suspension Field | Enables kinetic suspension of effect or projectile |
| Repeater | Applies automatic fire to effect or projectile, for increased rate of fire |
| Compressor | Compresses effect or projectile into a more compact, intense form |
| Conic Dispersal | Disperses effect or projectile into a short-range, spread pattern |
| Diffraction Torus | Allows effect or projectile to spread around the point of impact |
| Precision Adaptor | Focuses effect or projectile for increased accuracy and lethality |
| Rail Accelerator | Accelerates effect or projectile at high speed with penetrating force |
Attachments
Attachments are just that—attachments that you can add to your weapon. Some can be placed only on top of the weapon, such as scopes, while others must be on the side of the weapon. Most attachments can be placed in either location. Attachments can modify projectiles, add abilities to the weapon, or can have an effect on the user or their co-op partner.
| Name | Description |
|---|---|
| Stasis Amplifier | Stasis shots have larger radius |
| Ammo Box | Automatically reloads after last shot |
| Ammo Sweeper | Automatically picks up nearby ammo |
| Explosion Amplifier | Increases the radius of explosions |
| Ammo Support | Increases ammo efficiency for self and partner |
| Damage Support | Increases partner?s damage with all weapons |
| Medic Support | Health packs consumed by user also heal partner |
| Stasis Support | Stasis packs consumed by user also recharge partner |
| Safety Guard | Prevents user from taking damage from his own weapons |
| Scope | Military scope for long-range aiming (top only) |
| Full Zoom Scope | Prototype military scope for advanced long-range aiming (top only) |
| Electric Charge | Electrifies projectiles to cause small amounts of voltaic damage (side only) |
| Acid Bath | Coats projectiles in acid that does damage over time (side only) |
| Stasis Coating | Coats projectiles with a very small amount of stasis (side only) |
| Flame Glaze | Adds fire to projectiles (side only) |
Crafting Guide
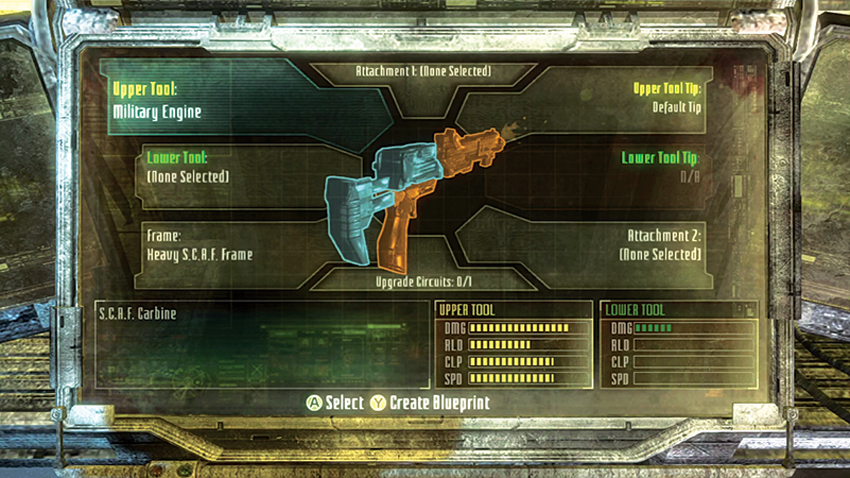
Here is a table that shows how the combinations of frame, tool, and tip can create different types of weapons. Think of it as a cookbook for crafting.
| Weapon | Frame | Tool | Tip |
|---|---|---|---|
| Submachine Gun | Compact | Military Engine | Default |
| Revolver | Compact | Military Engine | Compact Directed Ejection Field |
| Plasma Cutter | Compact | Plasma Core | Default |
| Plasma Disperser | Compact | Plasma Core | Compact Conic Dispersal |
| Plasma Repeater | Compact | Plasma Core | Compact Directed Ejection Field |
| Blowtorch | Compact | Pneumatic Torch | Default |
| Compact Suspended Ripper | Compact | Rip Core | Default |
| Ripper | Compact | Rip Core | Compact Directed Ejection Field |
| Rivet Gun | Compact | Telemetry Spike | Default |
| Arc Welder | Compact | Tesla Core | Default |
| Carbine | Heavy | Military Engine | Default |
| Pulse Rifle | Heavy | Military Engine | Repeater |
| Seeker Rifle | Heavy | Military Engine | Precision Tip |
| Shotgun | Heavy | Military Engine | Conic Dispersal |
| Assault Rifle | Heavy | Military Engine | Compressor |
| Galvanizer | Heavy | Military Engine | Directed Suspension Field |
| Force Gun | Heavy | Plasma Core | Default |
| Kinetic Projector | Heavy | Plasma Core | Compressor |
| Contact Beam | Heavy | Plasma Core | Precision Tip |
| Flamethrower | Heavy | Pneumatic Torch | Default |
| Magnesium Afterburner | Heavy | Pneumatic Torch | Compressor |
| Cryogenic Torch | Heavy | Pneumatic Torch | Precision Tip |
| Heavy Suspended Ripper | Heavy | Rip Core | Default |
| Heavy Ripper | Heavy | Rip Core | Directed Ejection Field |
| Grenade Launcher | Heavy | Survey Charge | Default |
| Detonator Mine | Heavy | Survey Charge | Directed Ejection Field |
| Line Gun Mine | Heavy | Survey Charge | Compressor |
| Knockback Detonator | Heavy | Survey Charge | Rail Accelerator |
| Incendiary Grenade | Heavy | Survey Charge | Diffraction Torus |
| Rocket Launcher | Heavy | Survey Charge | Directed Suspension Field |
| Javelin Gun | Heavy | Telemetry Spike | Default |
| Javelin Repeater | Heavy | Telemetry Spike | Repeater |
| Rivet Shotgun | Heavy | Telemetry Spike | Conic Dispersal |
| Chain Gun | Heavy | Telemetry Spike | Diffraction Torus |
| Line Gun | Heavy | Tesla Core | Default |
| Tesla Beam | Heavy | Tesla Core | Precision Tip |
| Bouncing Bolas | Heavy | Tesla Core | Compressor |
| Anchored Bolas | Heavy | Tesla Core | Directed Suspension Field |
| Bolas Cutter | Heavy | Tesla Core | Repeater |
| Chain Lightning Gun | Heavy | Tesla Core | Diffraction Torus |
| Hydraulic Eviscerator | Heavy/Lower Slot | Hydraulic Engine | Default |
| Hydraulic Hammer | Heavy/Lower Slot | Hydraulic Engine | Conic Dispersal |
| Ground Diffractor | Heavy/Lower Slot | Plasma Core | Diffraction Torus |
| Hydraulic Knife | Compact/Lower Slot | Hydraulic Engine | Default |
Strapped
Craft a weapon to earn this award.
Circuit’s Edge
Earn this award when you add a circuit to a weapon.
Initial Weapons
Submachine Gun
This weapon is given to Isaac by Carver when they first meet. It is also the weapon that the soldier in the Prologue uses. It is a small, rapid-fire weapon. While each round does not inflict much damage, the high rate of fire makes up for this. While it is effective against soldiers, it takes a lot of ammo to kill a Necromorph with one of these.
Plasma Cutter
This high-energy tool is designed for cutting through minerals. Therefore, it will have no trouble slicing through Necromorphs. The plasma cutter fires three projectiles in a linear formation. You can change it from vertical to horizontal mode by pressing the alt-fire button. Use it in horizontal mode to cut off legs or tentacles. Vertical mode is best for cutting off arms.
Blueprint Weapons
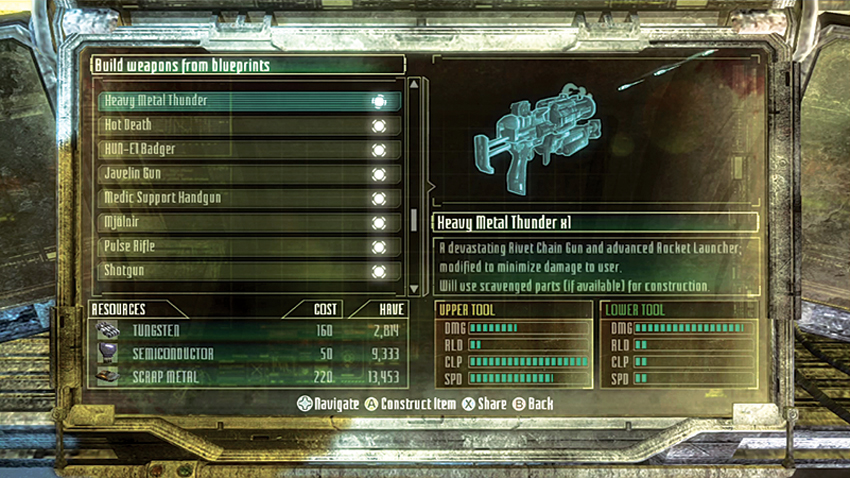
As you advance through the campaign, you can find blueprints for twelve different weapons. While you can craft various weapons on your own, many of the blueprint weapons are unique and have certain features that you can’t craft by yourself. Instead, you must have the blueprint and use it to build the weapon. Then you can customize or upgrade the blueprint weapon. Be sure to find all the blueprints since some of these weapons are very powerful and will help you tremendously in the fight against the Necromorphs.
Basic Line Gun
The line gun fires a horizontal beam that is wider than the plasma cutter. This weapon can cut two legs off a Necromorph with a singe shot and is even great for firing at groups bunched together. The line gun also causes more damage than the plasma cutter, which makes up for its slower rate of fire. This is one of the first weapons you can craft at the workbench on the Roanoke .
Bolas Gun
This weapon has dual bolas guns that afford a variety of tactical options. It is modified to automatically reload after emptying the clip. The top weapon fires a electric bola that can travel a distance and even bounce off the ground or walls. When it hits an enemy, it does considerable damage. The lower weapon also fires a bola. However, this one flies out and one end anchors to the ground while the other end spins around. This acts similar to a land mine as it damages anything that walks through it.
Contact Beam
The contact beam is an energy projector that deals heavy damage. To use it, hold down the fire button to charge a high-intensity blast. Then release the button to fire it at a target. The blast will blow apart most Necromorphs with a single shot. The downside is the charge time. The weapon’s alternate attack is great for clearing the area around you when there are lots of enemies close at hand. Press alt-fire and you blast kinetic energy into the ground to push away all nearby objects. This can give you a chance to then use the primary fire.
Force Gun
The force gun is a handheld graviton accelerator. It fires a short-range, high-powered blast of kinetic energy over a wide area. It acts as a blunt blow rather than a penetrating shot. Shoot it at Necromorphs and it will push them back while causing some damage. This energy affects not only the target, but also anything nearby. This is great for when enemies are charging at you. While it won’t kill most Necromorphs, it is handy to use when you’re being charged by several enemies at close range since it will blow them back away from you. If you press the alt-fire button, the kinetic energy is then fired in a tight-radius energy projection. This causes more damage to the target and can be fired at longer ranges. However, it does not affect other things nearby. This secondary weapon attack can blow an enemy to pieces.
Heavy Metal Thunder x1
A devastating rivet chain gun, this weapon also features an advanced rocket launcher and is modified to minimize damage to the user. Think of this as a javelin machine gun. It puts out a lot of large projectiles in a short amount of time. Then, as if that were not enough, it also has a rocket launcher that fires explosive rockets at long range.
Hot Death
This weapon features a compact ripper and an advanced blowtorch. It is modified with an ammo sweeper. The top weapon launches out a saw blade and suspends it in the air a short distance from you as it spins and damages anything it touches. The blowtorch is a flame weapon with a shorter range, but more concentration than a flamethrower. This is a short-range weapon that can inflict a lot of damage. Since it can use up ammo quickly, the ammo sweeper attachment automatically gathers any nearby ammo so that you don’t have to take time to walk over and pick it up.
HUN-E1 Badger
The HUN-E1 Badger is an advanced rivet shotgun with a hydraulic eviscerator. It is modified for flame damage and ammo conservation. The top weapon fires several javelins all at the same time and these not only cause penetration damage, but because of an attachment on the weapon, they also inflict flame damage to the target. If the javelins don’t stop the target, then use the second weapon, which provides a powerful melee attack.
Javelin Gun
The javelin gun is a pneumatic spear launcher. Fire it at a Necromorph and it will impale the target, causing considerable damage. Press the alt-fire button to make the recently fired javelin emit an electric charge that will usually finish off the target and even damage nearby Necromorphs. This weapon is best used from medium to long range and has a slower rate of fire than other weapons. However, a single shot with a zap of electricity will take care of most Necromorphs. You can also craft this weapon yourself.
Medic Support Handgun
Built on a handgun frame, this is a compact rivet gun with a hydraulic knife designed for quick and accurate triage. It is modified with two co-op support attachments. This is a fast weapon to fire and reload, and it features a melee attack. The rivet gun does not do a lot of damage, but it makes up for this with its rate of fire. The attachments make this a useful weapon when playing cooperatively with another player.
Mjolnir
This is a weapon born of Valhalla. It has an advanced chain lightning gun that works great when you are being attacked by several enemies. As you hit one, the electricity arcs from the target to other creatures or soldiers nearby and inflicts damage on all. The secondary weapon, which you can use by pressing the alt-fire button, is a hydraulic hammer. This gives you a powerful melee attack that can kill many Necromorphs with one or two hits.
Pulse Rifle
While many of the other weapons are tools, the pulse rifle is an assault rifle used by the military. This gun has a very high rate of fire and shoots small projectiles. Each round does not cause as much damage as a shot from the plasma cutter. However, when you have lots of small Necromorphs coming at you, this weapon’s higher rate of fire and large ammunition capacity makes up for its lower damage. When you need an additional punch, press the alt-fire button to launch a grenade at your target. These grenades are great for clearing out groups of small Necromorphs. This weapon is also effective against enemy soldiers.
Shotgun
This is a standard S.C.A.F. issue shotgun. It has only one weapon and fires several rounds with each shot. The shotgun can cause a lot of damage, but only at close range. You can craft a shotgun yourself. If you do, be sure to upgrade it with a secondary weapon.
Integrated Equipment
There are three types of upgradable equipment that are actually integrated into your suits. It is important to upgrade these since you carry them throughout the game no matter which suit you are wearing.
RIG
The RIG not only shows your health by means of the meter on your back, it can also enhance whichever suit you are currently wearing. Be sure to start upgrading the RIG and its modules before you concentrate on weapons. Focus on hit points first. These increase the amount of damage you can sustain. Next, work on upgrading the damage. This attribute actually increases the amount of damage whichever weapon you are using inflicts on the enemy. Finally, go ahead and upgrade the air, which increases the amount of time you can operate in a vacuum before running out of oxygen.
Kinesis Module
The kinesis module is attached to your suit right at the start. It allows you to use kinesis to pick up and manipulate objects without actually having to touch them. This helps you fight enemies as well as solve puzzles to get through the campaign. In addition, you can pick up objects and launch them at enemies to cause damage. At the suit kiosk, when upgrading your RIG, you can increase the range of your kinesis ability as well as the damage you inflict when you launch objects at enemies.
Stasis Module
The stasis module is the single most important piece of equipment you have. You will need stasis to slow down enemies and give you a chance to use your weapons. At the start, you have only two shots of stasis. However, you want to focus on upgrading the shots. Once you have upgraded this, you increase your stasis module so it can store a total of four shots. As you are following the path to the charges, upgrade duration as well so that each shot of stasis will last longer and be more effective. Finally, upgrade the energy so your stasis module will recharge faster on its own.
RIG Master
Fully upgrade your RIG to get this award.
Suits
As you progress through the campaign, new suits become available for you at the suit kiosks. Each suit provides some protection by reducing the damage you take from attacks. In addition, some suits allow you to operate in arctic conditions. It is usually a good idea to upgrade to the latest suit for the best features. You can also purchase additional suits as downloadable content.
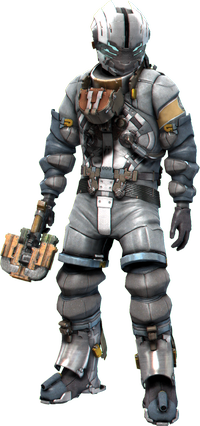
|
EVA Suit | A lightweight space suit designed to protect its wearer from prolonged radiation exposure; typically worn by private-sector salvage operators. |
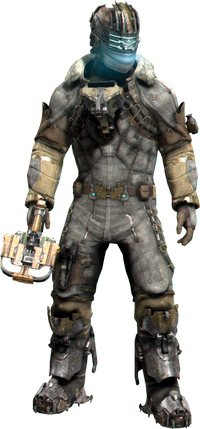
|
Arctic Survival Suit (Snow Suit) | The arctic survival suit is woven with classified S.C.A.F. synthetic fibers that insulate the body from extreme cold and hypothermic conditions. |
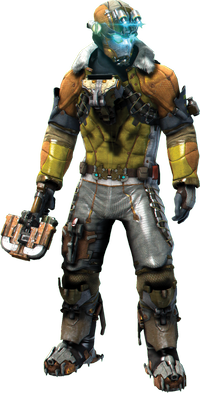
|
Archeologist Suit | The archaeologist suit is woven with puncture-resistant microfibers for increased physical protection and body heat retention. |
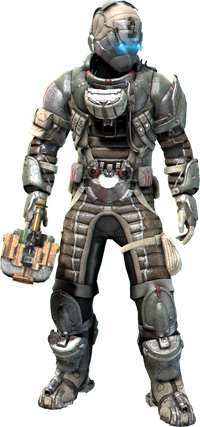
|
Legionary Suit | Decommissioned military armor worn by twenty-third century S.C.A.F. forces, this bulky suit is highly valued by collectors and historians. |
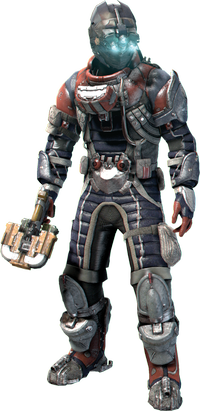
|
Elite Suit | A frontline assault suit used by the 401st Division of the S.C.A.F. Designed with advanced survival and biophysical support technologies. |
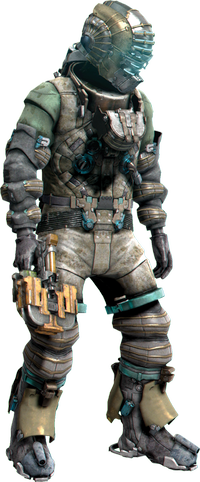
|
Deep Dig Suit | An extremely heavy and durable deep space suit, designed for use by industrial asteroid frackers and long-haul salvage operators. |
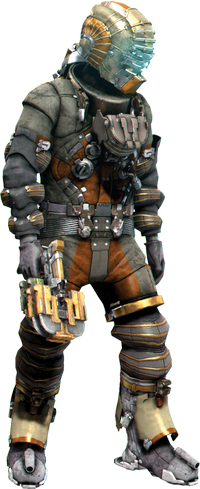
|
Flight Suit | A suit worn by S.C.A.F. pilots, the flight suit continually monitors the wearer for signs of stress and fatigue, and can inject stimulants into the bloodstream to counteract these effects. |
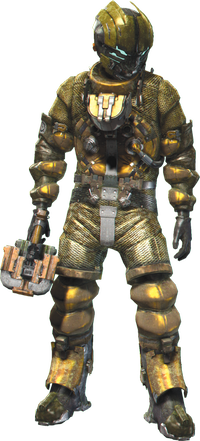
|
First Contact Suit | A unique EVA suit built by S.C.A.F. for encounters with foreign entities. It sports a flamboyant gold finish to provide protection from long term space exposure. |
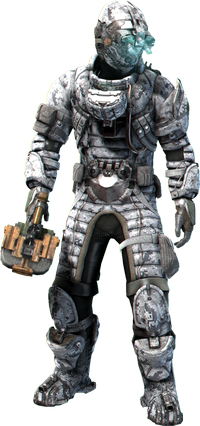
|
Hostile Environment Suit | Issued to S.C.A.F. research scientists on Tau Volantis, the hostile environment suit is designed to withstand the ionizing radiation emanating from the planet’s mantle. |
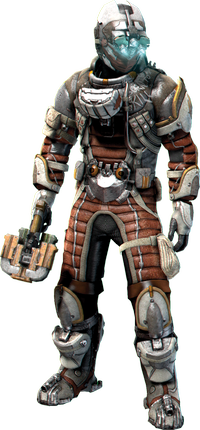
|
Marauder Suit | Issued to S.C.A.F. Marauders during the Separatist Wars, the Marauder suit was used by ship-boarding parties to breach Separatist defenses and destabilize their supply chains. |
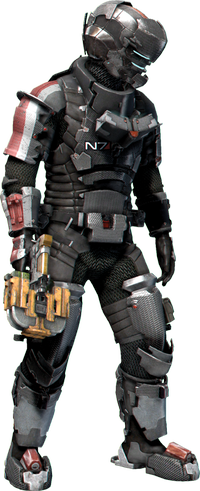
|
N7 Suit | The N7 suit is inspired by the hero “Shepherd” from popular twenty-first century Earth fiction; distributed by Cosplay Intergalactic, INC. |
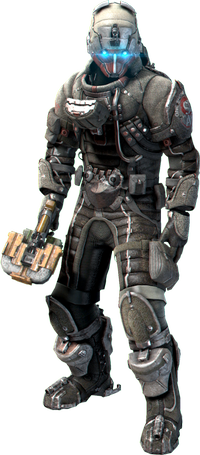
|
Sharpshooter Suit | Designed for S.C.A.F.’s UN14 Special Ops Division; features high-impact armor for maximum protection and the “No Retreat” motto of the UN14 troops. |
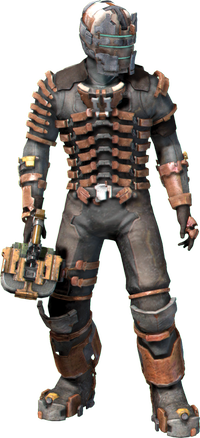
|
Engineering Suit | The Engineering Suit is a vintage CEC uniform worn by mining and engineering personnel on the USG Ishimura. This suit was one of the first to feature an integrated RIG bio-sign monitoring system. |
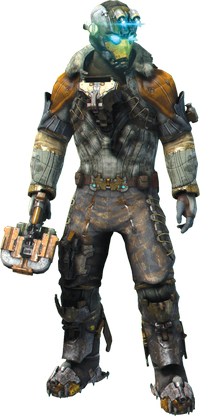
|
Tundra Recon Suit | The tundra recon suit is woven with nanotech fibers that are coated in a paraffin-based analgesic compound, to maintain body heat under any condition. |
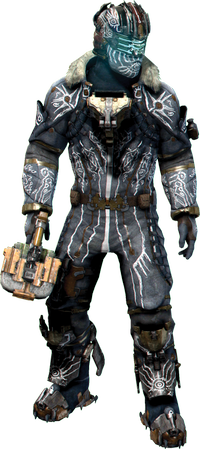
|
Witness Suit | An insulated, graffiti-covered suit worn by an S.C.A.F. deep dig team assigned to exhume the darkest secrets of Tau Volantis. |
Items
There are several types of items that you can pick up. They can be found in lockers, green containers, or just lying around. Some items can be crafted at the workbench. After killing a Necromorph, stomp on the corpse to get an item from it. These items can be divided into different categories.
Ammo
Every weapon requires ammo. Luckily, there is one type of ammo that works for all weapons. While you can craft ammo at the workbench, it can use up your resources. If you are careful to search Necromorph corpses, you will usually find enough ammo to keep you going.
Refill Packs
In addition to ammo, you will also need to look for refill packs. These can be found all over just like ammo. Carry these with you in your inventory. Then you can use them to either restore your health or to recharge your stasis module. You can also craft them at the workbench. The med packs refill different amounts of health while the stasis pack will completely recharge your stasis module.
EMT
At a workbench, craft a large med pack to earn this award.
Circuits
Circuits can be found in circuit boxes on walls as well as lying around throughout the campaign. Collect and keep these. When using a workbench, you use circuits to upgrade your weapons and equipment. At the workbench, select a weapon to upgrade. You then place circuits into slots to get specific types of upgrades, depending on the type of circuit you are inserting. Weapon frames have two, four, or eight slots for circuits. You can always take out and replace circuits, so as soon as you get some, put them in your weapons. Circuits can increase rate of fire, damage, clip capacity, and decrease reloading time. Some circuits can affect two of these categories instead of just one.
The Armorer
Earn this award by collecting all circuits in the campaign.
Resources and Scavenger Bots
Resources are the parts you use to craft new weapons, parts, and equipment at the workbench. There are five different types of resources: scrap metal, semiconductors, somatic gel, transducers, and tungsten. Different items require different resources and various amounts. Resources can be found lying around, or are dropped by enemies you have killed. Spare parts boxes are pick-ups that contain several different types of resources in one convenient package.
During the campaign, you can find up to three scavenger bots. These small robots can be deployed to search for resources while you go about your missions. A scavenger bot has two different modes. While you are carrying it, the bot is in sensor mode and acts similar to a weapon. Select it and then when you hold down the aim button, a sensor activates and shows you the direction to a spot where the bot can recover maximum resources. When you get to one of these locations, the sensor beeps quickly and the vector shape on the sensor changes to circles. Press the fire button to deploy the scavenger bot. It will then convert to its robot form and begin crawling around, gathering resources. This takes several minutes. When it is done, it will return automatically to a workbench. The next time you visit a workbench, the scavenger bot will be there—no matter which workbench you go to. You can then get it and deploy it again. While scavenge locations are best, you can deploy scavenger bots anywhere. They just won’t obtain quite as much resources. However, once you have three, send them out even if not ideal locations so you can get a steady stream of resources coming in. In addition to resources, scavenger bots can also find ration seals. These can be used to purchase resources and weapons online.
Metal Detector
Successfully deploy scavenger bots to 15 resource areas to earn this award.
Blueprints
As you advance through the campaign, you can find blueprints of weapons. By taking them to the workbench, blueprints allow you to construct already designed weapons without having to craft them piece by piece. These weapons work great to introduce you to new features. In addition, once you have crafted a blueprint weapon, you can still upgrade or modify it at a workbench.
Weapon Parts
To craft weapons, you need to find weapon parts. They are scattered throughout the campaign. Some can be found only in optional or co-op quests. New weapon parts allow you to build new types of weapons, so be sure to find all that you can.
Gun Collector
Collect all weapon parts to get this award.
Logs
Logs provide a background story to the campaign and can also give clues to help you complete your objectives. There are two different kinds of logs: audio and text. Be sure to collect all that you can and read or listen to them. Once collected, they can be reviewed from the inventory menu at your convenience.
The Librarian
Collect all of the audio and text logs in the campaign to earn this award.
Artifacts
Artifacts are small items left behind that you want to be sure to collect. The come in three different types: alien, S.C.A.F., and Unitology. Artifacts are often hidden behind crates or in corners, so be sure to search all over to find them.
Aliens
Collect all alien artifacts to earn this award.
The Professor
Earn this award by finding all of the artifacts in the campaign.