
Dead Space 3 with Interactive Map Essentials Collector's Edition Content
Concept Art
//ARTIST COMMENTARY
“While working up the designs for Dead Space 3 we focused on making the necromorphs old and decrepit, accidentally mummified after centuries of being left to the elements. Basically the idea was to remove some of the bloody gore, and replace it a rough, jagged look to emphasize the cold indifference of Tau Valantis. A lot of attention was paid to who the early people to settle the planet were. Often while drawing up necromorphs, the more humanity you can inject in them, the scarier they will appear. There is something that can be very off putting about facing something that is almost human.
Since we were able to add a couple new enemies to the mix I got to play around with some different silhouettes… the mummy angle allowed the Feeders to have an emaciated, starving look. We wanted them to look so desperately hungry that they were feral and dangerous, yet somewhat sympathetic in their plight. Another new bad guy is the Fodder. These guys are basically walking meat puppets, filled with squirming nastiness and necro goo. The idea was to get him to look like he was so full of the rank necro evilness that it was leaking out his eyes and mouth, hinting at the alien chaos that lives inside.
This time we were also able to explore the alien Universe beyond the necromorphs. The formula to create the inhabitants of Tau Volantis consisted of a little bit of science and a lot of reading a big pile of Lovecraft. The new location allowed for a lot of freedom to go bigger (and I mean bigger!) than we could in an Earth like setting. “
Brett Martling
Concept Artist


The Nexus, a terrifying colossus of a Necromorph made from the DNA of the host race on Tau Volantis.


The Lurker enemy, based on dogs brought along on the Sovereign Colonies expedition to Tau Volantis.

Three long-dead Sovereign Colonies soldiers sit where they communally committed suicide during the cleanse order on Tau Volantis 200 years ago.

The surface of Tau Volantis, strewn with half-buried Markers.

A variant on the Waster, based on the mummified remains of the 200 year old Sovereign Colonies research team on Tau Volantis.

A strange spire rises like a mountain on Tau Volantis, like the epicenter of a great frozen storm.


Scavenger Bots: The 200 year old robots were used extensively during the Sovereign Colonies era to keep warehouses and construction areas tidy. Now, they’re useful for gathering resources for the player for use in the Weapon Crafting system.


Captain Norton’s ship, the Eudora, an EarthGov vessel with shockdrive capabilities.

The Leaper enemy, in all its gory glory.

The Leaper enemy found on Tau Volantis. The head, seen up close.


One of the many Waystations that dot the surface of Tau Volantis, left over from the Sovereign Colonies expedition here 200 years earlier.

The Snowbeast enemy.


An up-close look at the concept art for the Snowbeast’s mouth attack.

Eerie sunset on Tau Volantis, highlighting giant creatures frozen in the ice as far as the eye can see.

Tattered remains of the Sovereign Colonies research expedition on the surface of Tau Volantis.

The wreckage of the Isaac’s teammate’s shuttle can barely be seen in the far, cold distance on the surface of Tau Volantis.
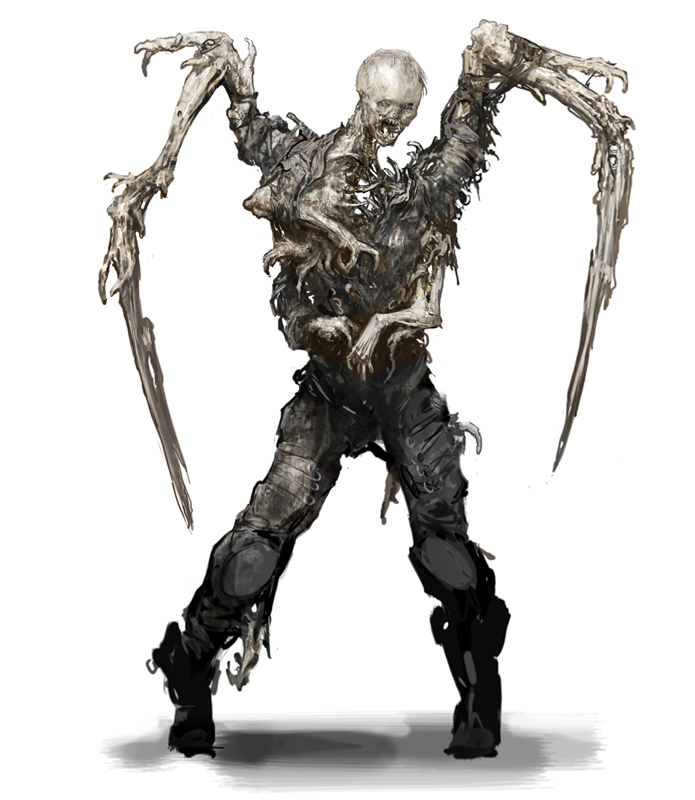
The Slasher enemy, as made from the mummified remains of the 200 year old Sovereign Colonies expedition to Tau Volantis.


The Military weapon modules from the Weapon Crafting system.

The Workbench, where the Weapon Crafting system takes place throughout the game.

The Ripper modules from the Weapon Crafting system.

Epic shot of Isaac Clarke standing on the platform of a derelict 200 year old Sovereign Colonies research ship, high above Tau Volantis.

Inside the stomach of the Nexus, Isaac fights to stay alive!

The Waster enemy, made from 200 year old Sovereign Colonies miners on Tau Volantis.