
How to Beat Red Death in Vampire Survivors (2023)
Blue Oyster Cult - Don't Fear the Reaper (1976)
Death comes for us all, especially the one who throws little twirling scythes at you in Castlevania games. Death is also the enigmatic endgame flag in Vampire Survivors, the sign that you’ve “completed” your level but you still can’t escape alive. But what if you could beat them, what if you could kill Death itself and transcend the barriers of time, space and videogames? In this case, there’s an answer. And weirdly enough, this nearly impossible task is how to unlock the Mask of Red Death character as well. With Prima Games, you will easily Settle the score with the Reaper. Steps on how to defeat Red Death are right below.
How to Kill Red Death in Vampire Survivors? Answered
Now you can kill Death without the shenanigans! As of the most recent update, everyone’s favorite level-ender has become a little more vulnerable. With the new gear you can make by picking up the Rings and Metagilo items on each stage, you basically get a Kill Death Kit. You’ll need:
- Metagilo Left + Metagilo Right + Laurel = Crimson Shroud
- Gold Ring + Silver Ring + Clock Lancet = Infinite Corridor
How to Settle the Score With the Reaper in Vampire Survivors – Solution
If you can get these items (and it can take nearly an entire run to do so), when Death shows up at the end you have a pretty good chance of taking him out. You may have to eat a revive or two (maybe three!), but when you pull it off Death will now drop a bunch of Golden Eggs.
The fun part? When you kill Death now, the timer stops! What could that mean? Well, it means something even nastier than Death is about to mess you up. We’ll leave that for you to see for yourselves.
Related: Vampire Survivors Character Tier List
Vampire Survivors Kill Death Guide – How to Unlock Mask of Red Death
At this moment, there is only one legitimate way to take down Death. That’s an improvement from before, when it was only possible through cheating. This specific method also feels like cheating, but it’s also a matter of patience, knowledge and a little luck on the side. We’re going to be exploiting multiple aspects of Vampire Survivors to accomplish this feat, so we won’t actually be having fun here. Not yet, anyway.
Step One: Clerici’s Massive Runetracer
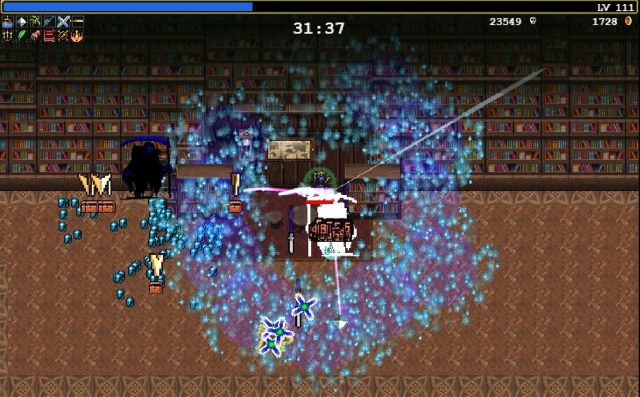
To have even a chance at taking down Death, you need to pick Clerici and play in the Library level. Then you need to make a mad dash up and left to grab the green XP gem chillin’ on the table. If you don’t roll Runetracer, give up and try again. Don’t use your Rerolls; just drop the run and restart. Once you have that, immediately run up into the little mostly enclosed space. It has a table and some chairs, two bookshelves on each side, a clock and a painting or something on the wall.
Line Clerici up so that her right hand is lined up with the clock, and her left hand is lined up with the painting. Position her just above the leftmost chair, and Do Not Move. Chill for a while. Or laugh at how ridiculous this scenario is.

Basically, Clerici has a “temporary” area bonus that’s more powerful than the one you can get normally. But by temporary, it means once you level up it gets smaller and smaller. So the idea here is staying at level 2, so the giant Runetracer gets stuck on the furniture, becoming a de facto shield. If you’re positioned right, Clerici will be safe from all sides, and safe from accidentally picking up XP.
Note: Check your power ups and ditch anything that could make this harder than it should be. Also, you’ll have to open the occasional treasure chest throughout the run, which is a good thing.
Step Two: Hurry up and Wait (if a Red Gem Appears)
While you’re standing here and wasting anything coming close, you need to spend the first few minutes watching out for a red gem. This is the keystone of the whole operation. If around three minutes have passed and you don’t see a red gem on the screen, you’ve been bamboozled by RNGesus and have to restart. If you confirm the red gem and it’s reasonably close by you get to just do whatever you want for the next 27-ish minutes.
But once the clock strikes 30, you better be ready to fight for your life.

Step Three: Run Fool!
The second you hit 30:00, and I literally mean the second, all the enemies will disappear from the stage. Then you have maybe half a breath before Death shows up to wreck your good time. Just as the clock hits 30 you need to book it towards the red gem. You’ll hit other gems and maybe chests on the way, and that’s fine. But your goal is the red gem, because math or whatever.
Step Five: Anti-Death Build
As you speed through levels you’ll need to grab certain items, which is why we don’t use Reroll at the start. There are items you need, items you probably need, extras and then everything else is a strict Do Not Touch. I’ll sort those out for you:
Need:
- Santa Water and Runetracer (you start with these; upgrade ‘em)
- Laurel
- Clock Lancet
- Bracer
- Candelabrador
- Spellbinder
- Empty Tome
You’ll need all of these or you probably won’t make it.
Great:
- Bone
- Knife
- Duplicator Ring
- Spinach
You can’t get all of these, but they’re what you want to seek out after the “needs” are met.
Bonus:
- Magic Wand
- Cross
- Attractorb (to evolve Santa Water)
- Tiragisú
- You don’t need to stress over these, but they definitely contribute to minimizing stress.
Forget about anything else. Seriously, don’t touch that Fire Wand. You will regret wasting thirty minutes.

Related: Vampire Survivors Weapon Upgrade Guide
Step Six: Run More, Fool!
As soon as you touch that red gem, double back to where you came from while setting up your loadout. This is annoying, but it just gotta be like that. Go back to the little table room, but this time go further back, standing between the table and the right chair, lining Clerici’s right hand up with the painting. If you have the knife, make sure to aim down, though.
If everything goes as planned, Death will get stuck on the table, letting you stand there and safely pelt them with as much damage as you possibly can. Don’t move unless you need to aim your knives, and even then just nudge enough to aim down. Then just sit there and let Vampire Survivor’s systems do the work for you.
Step Seven: All or Nothing
What we did, more or less, is take advantage of Death’s stats, which scale to whatever your level is when he spawns. By leaving all the XP until the end, you aren’t just keeping your growth up, you’re also tricking Death and tipping the number scales. That still isn’t good enough, though. After a minute, a second Death will spawn. After that, a third. You can kill Death, but also you can’t beat Death. Unfortunately, the RNG kicks back a little here.
You can fight it, though! Deaths two and three will get stuck on the leftmost bookshelf, and stay there for quite a while thanks to your Clock Lancet. And you chose the weapons you did because of their range. Death has a negative knockback stack, which cruelly draws them to the player every hit. So if you aren’t firing stray shots with the Fire Wand or Lightning Ring, you don’t have to worry about dragging the other two over.
They’re still gonna come over, though. Hopefully you can do just enough damage to the initial Death to send them away before Number Two seals the deal. But this is also where having the revive power up and possibly picking up some Tiragisú comes in handy. There isn’t much room for mistakes, but the revives and Laurel can work together to buy some time. If your skeletal foe blips away like Mega Man, you did it! Congrats. Sorry, you still have to lose though.
If you can pull this off, you don’t get an achievement. You technically aren’t supposed to be able to do this yet! However, Vampire Survivor’s creator threw the community a bone (literally), replacing a glitch with a new character. Mask of the Red Death is a lesser version of the real thing, but compared to the rest of the roster they’re still a beast.

Red Death comes with the Death Spiral, which normally requires an axe upgrade. Their stats are all normal, but their two bonuses are wild; Red Death gets to start with 45% might, and a whopping 110% move speed. You can enact some serious shenanigans with this character. And hey, the effort it took to get there is ridiculous.
Have you unlocked Red Death? Or are you waiting to see if more strategies are discovered or introduced? What’s your best build with them? Let us know on Twitter and stuff.