
How to Complete Destiny 2’s Newest Dungeon Spire of the Watcher
The Spire of the Watcher is the latest and brownest dungeon in Destiny 2

Destiny 2’s Season of the Seraph has brought with it new story missions, weapons, and crucible modes. But what many players have been waiting for is the unveiling of the latest dungeon. We didn’t have to wait long, as it was released three days after the season on December 9, 2022.
This new dungeon, called Spire of the Watcher, is an endgame activity that sends you to Mars to try to put a stop to a Vex threat. This raid has four stages, and it’s recommended that you approach it at a power level of 1580. It’s doable at lower power levels, but you may notice you do less during key damage phases or struggle to stay alive during add-heavy challenges.
How to Complete Destiny 2’s Newest Dungeon Spire of the Watcher
Speak to Ikora
Before you launch the activity, head to Ikora to pick up the quest Ares Desperado, the necessary quest for this Dungeon. You must have also completed the mission The Arrival, which is part of the Witch Queen Expansion, but is free for all players.
Once you’ve completed both steps, navigate to the map, select Savathun’s Throne World, then select Spire of the Watcher. This will launch the dungeon.
Reestablish Power
When you first arrive on a dust-choked Mars, you’ll approach a series of empty buildings set on either side of a dirt road. Take the time to note the yellow-brown cable that stretch across the buildings. This is a foundational part of the puzzle of this first encounter.
Related: How To Unlock Breach and Clear ‘Weakened Clear’ in Destiny 2
Your goal is to defeat Conduit Minotaurs, who will then drop white circles. These white circles will linger on the ground for a set amount of time. If you walk over them, you’ll obtain the Arctician buff for thirty seconds.

With this buff applied to your guardian, it’s your job to follow the yellow cables to their source – a node conduit. These boxes feature a diamond, which you’ll need to shoot while you have the buff applied. There is a correct order in which these nodes must be powered up, and shooting the wrong one will cause it to briefly light up before deactivating.
If the node you’re shooting deactivates, find a different node or determine which one you missed. After you’ve activated all nodes along a power cable, it will light up one of the four nodes at the central hatch between the two buildings.
Once all four nodes are lit up on the central hatch, it will open, and you can descend. While this is the introductory puzzle and fairly straightforward, where it becomes challenging is the sheer number of Vex you encounter. The most lethal among them being the Cyclops, who will continuously spawn. Conduit Minotaurs will also follow you into rooms, so be careful to not get pinned down.
Related: Destiny 2’s Lightfall Game Awards 2022 Trailer Showcases New Class Supers, Locations, and More
Once this is complete, the hatch in the center of the road will open onto a large slide. Jump down, but be careful in how you time your jump at the very bottom. It’s very easy to hit your head on the low ceiling here, leading to some of the fastest squad wipes I encountered in the dungeon.
Ascend the Spire
While your objective tells you to ascend, you’ll spend the first bit descending, then ascending, across a series of platforms. All characters should be able to complete this platforming section without the use of items or abilities, but you may find that equipping such an item or ability is useful. The respawn counter here is just as long as outside, forcing you to wait 45 seconds to respawn if a fireteam member isn’t nearby.
Once you’ve begun your ascent around the tower, you’ll begin encountering Goblins and Conduit Minotaurs again. The function of this puzzle is precisely the same as before.
You’ll need to defeat the Conduit Minoutaurs, who will drop the Arctician Buff in order to charge nodes. But you may want to take a moment to take stock of where those nodes are. Nodes can be very high up, forcing you to platform while getting shot at and under the time limit the Arctician Buff applies.
Activate each Arc Node, again in sequence, and you will eventually charge the elevators. Use the yellow cables to determine which nodes are left. Note that you’ll see short hallways that spark with electricity. Do not attempt to pass through them, as you’re likely to immediately die. Instead, go around them using the solar panels on the side.
Once the elevator is charged, ascend to the next level, rinse, and repeat.
At the end of this section, you’ll get access to a chest.
Defeat Akelous, the Siren’s Current
Once you arrive at the platform, you’ll find Akelous, the Siren’s Current, a massive harpy. Take stock of your environment before you begin the encounter. You’re fortunate that Akelous is too busy sucking a Minoutaur dry to notice you.
You’ll notice that the arena is essentially a box with four walkways on each side. In the center of the arena are four brown boxes, which are connected to wires that then stretch down each of these walkways. Our goal here is to charge up the nodes to activate all four fuel rods, which are the bright electrical things at the end of each walkway.

Once all four are activated, you’ll be able to start the damage phase against Akelous.
To activate the fuel rods, you’ll want to defeat the Minotaurs that gather primarily in the center of the arena. With the buff, shoot one of the brown boxes in the center of the arena, which is the start of the cable connection. Follow your chosen cable down the walkway, shooting nodes that will be on the wall before the walkway and on the side of the walkway. If you’re fast, you can get several nodes at once, and others can also share in your Arctician Buff by also stepping in the white circle.
Once three walkways are fully completed, all fireteam members should head to the final walkway. The damage phase is about to start. Complete the walkway and charge the fuel rod, then jump up on top of the last walk way, in front of the fuel rod.
Akelous, who has been hovering around the arena sniping at you, will approach. To do damage to it, you’ll need to shoot its yellow eyes. Once all of its yellow eyes are gone, you’ll be able to inflict damage on its critical weak point at the center of its mass. It will then begin to draw away from you and, at the end of its damage phase, push back on you, dealing some degree of damage. But if you’re poorly positioned, this concussive blast can also push you off the edge of the map.
Rinse and repeat this process until Akelous falls. A chest will be waiting at the center of the arena.
Pre-Boss Puzzles
Once you’ve obtained your treasure, drop through the hole at the center of the tower. As you descend, you’ll find yourself at a fork. Go left, then you’ll find yourself in a new room full of Vex. There is no boss here, but this is our introduction to red cables.
Red cables are simultaneously easier and more difficult of a challenge than blue wires. You can choose their nodes in whatever order you want, but you must shoot them quickly or they’ll reset. With the sheer amount of Vex that spawn in this room, this can be a tall order. There are five connector points per red cable, so it’s important to take stock of their locations before you begin the process of trying to light them all up.
Related: Destiny 2’s Game Director Promises More “Creative Risk” in Coming Seasons
As you successfully activate each node, the floors will open, allowing you to access new levels. You’ll eventually find yourself standing on a fan. At this point, it’s better to go one by one. You’ll reach a lower level which will begin spawning Hydras. If there is a Hydra on the field, then Minoutars won’t spawn, so your fireteam should beam down Hydras as quickly as possible.
This room also has red cables, which again must be shot quickly. Ensure that you know where all the nodes are, and you’ll again be able to descend. But this is our last stop.
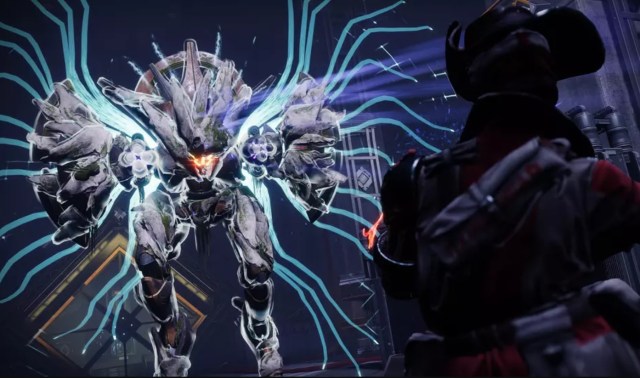
Persys, Primordial Ruin
The final and most difficult boss of the dungeon is Persys, Primordial Ruin. To remove the shield and begin the damage phase against Persys, we’ll again have to contend with the cables around the room. In order to remove its shield, you need to trap it in the room that it spawns with a core after you’ve activated the core.
Now that we know our goal, we can dig into the rest of the encounter.
The arena is divided into two sections: a reactor room and a safe room. Our first objective is to cause a reactor purge by using Arctrician Buff. Defeat Conduit Minoutaurs to gain the Arctrician Buff and start activating the nodes to trigger the reactor.
Once the reactor is activated, you’ll get a warning stating, “Reactor Purge Imminent, Seek Safety”. Head to the room Persys spawned in the safe room. Slay Minoutaurs in this room to gain the Arctrician Buff and start activating the nodes on the pillar, with the last node you need to activate being on top of the door you entered.
Once all the nodes are activated, the reactor purge will start. Persys will be trapped in the reactor, which will lower its shields. Once the reactor purge is over, it will briefly be vulnerable, giving you the opportunity to damage.
Rinse and repeat this process until Persys is dead, then claim your reward. You earned it.