
How To Download the Monster Hunter Wilds High Resolution Texture Pack
Make sure you have the VRAM!

The textures in Monster Hunter Wilds are a mixed bag. Some of the textures are sharp and detailed, but many are low resolution and stand out quite a bit. This is independent of the platform you’re playing on, and even proves an issue on high-end PCs.
While this is something CAPCOM has to address in an update, for now, if you’re looking for textures of higher quality than the default “high”, you can download the “High Resolution Texture Pack” for Monster Hunter Wilds on the PC version specifically.
Monster Hunter Wilds High Resolution Texture Pack PC
To download the high resolution texture pack and unlock the “Highest” texture preset in-game, players need to add the “Monster Hunter Wilds – High Resolution Texture Pack” DLC on Steam.
- You can access the DLC at this Steam page, and hit “Add to library” so that it is added to your DLC list for Monster Hunter Wilds on Steam.


- As soon as you add this, Steam will initiate the download for the texture pack. This is a large download, around 70 GB of textures (larger than the game itself), so if you want to pause it for now, the correct way to do it is to uncheck it from your DLC list, otherwise you won’t be able to play the game till the texture pack is downloaded.
- You can do this by selecting the DLC menu in the Steam library by selecting Monster Hunter Wilds and unchecking the texture pack DLC.
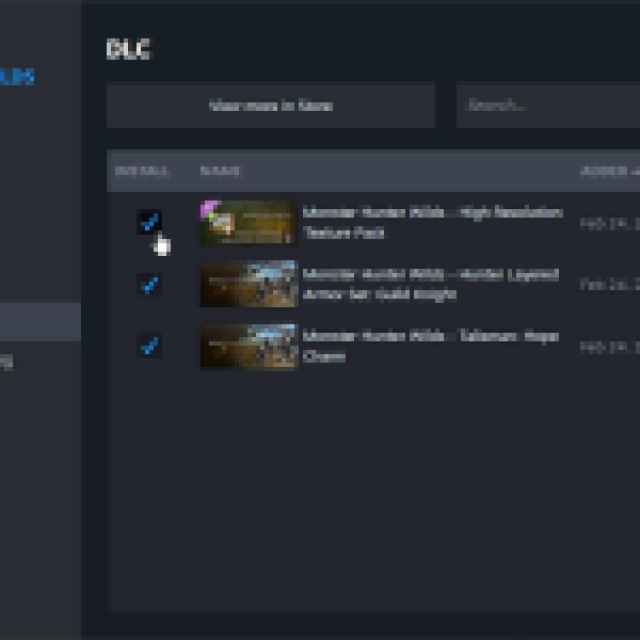

- When you’re ready, simply check the DLC again in the list, and the download will initiate.
Once downloaded, the “Highest” texture option will be available in-game. This significantly improves the texture quality, and overall look of the game, but there are reports of stuttering associated with it.
It also comes with an added VRAM cost, so make sure your GPU has a minimum of 16 GB VRAM according to CAPCOM. If you can’t seem to get a stable experience with the new textures, just use the “High” preset instead.
Make sure to take some screenshots with the new texture pack using the photo mode!