
Best Builds Tier List in Final Fantasy Resonance
The most broken builds in Final Fantasy Resonance


Final Fantasy Resonance has some ridiculously powerful builds once you start combining Vision Mastery abilities. You can make Lasswell attack 16 times in one turn, turn Terra’s Meltdown into a party-wide healing spell, or use Lid to stagger an entire group of enemies before they get a chance to do much.
We’ve ranked the strongest builds in Final Fantasy Resonance based on their damage, Stagger Power, survivability, and performance against endgame enemies and superbosses.
Best Builds Tier List in Final Fantasy Resonance
| Tier | Build | Main Character | Best For |
|---|---|---|---|
| S | Lasswell Spellblade Spam | Lasswell | Everything that doesn’t counter physical damage. |
| S | Meltdown Fire Eater | Sakura | Fire damage and party healing |
| S | Lid Mechabo Stagger | Lid | Sweeping Staggers |
| A | Sakura Multi-Cast Magic | Sakura | Magic damage and elemental coverage |
| A | Rain Counter Tank | Rain | Party protection and counter spam |
S-Tier Builds in Final Fantasy Resonance
Lasswell Spellblade Spam Build
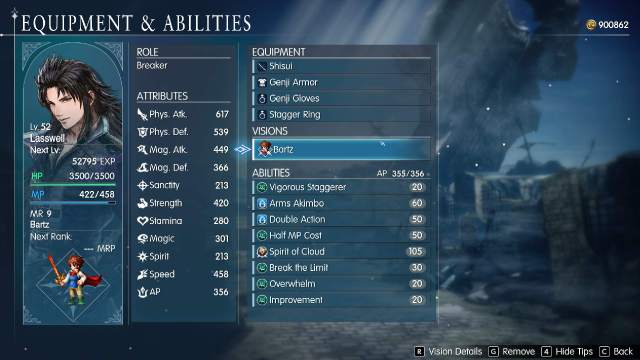
Lasswell’s Spellblade Spam build is one of the strongest offensive setups in the game. It revolves around Bartz’s Dual Spellblade, Firion’s Arms Akimbo, and Squall’s Double Action, which combine to let you perform up to 32 Spellblade attacks in a single turn.
Recommended party: Lasswell, Rain, Nichol, Fina.
| Setup | Lasswell | Rain | Nichol | Fina |
|---|---|---|---|---|
| Equipped Vision | Bartz (MR7+) | Bartz (MR7+) | Squall/Tidus | Leah / Ayaka |
| Required AP 1 | Arms Akimbo — Firion MR9 | Arms Akimbo — Firion MR9 | LB Triple Charge — Onion Knight MR9 | None |
| Required AP 2 | Double Action — Squall MR9 | Mimic — Bartz MR9 | Observe and Charge LB — Aileen MR7 | None |
| Required AP 3 | Half MP Cost — Tronn MR9 | Half MP Cost — Tronn MR9 | Arms Akimbo — Firion MR9 | Pass the Torch — Leah MR5, if not equipped |
| Optional AP 2 | Break the Limit — Terra MR9 | Break the Limit — Terra MR9 | LB Charge Opener — Aileen MR5 | Half MP Cost — Tronn MR9 |
| Optional AP 3 | Improvement — Squall MR1 | Improvement — Squall MR1 | Half MP Cost — Tronn MR9 | Grit — Warrior of Light MR9 |
| Recommended weapon | Shisui / Sasuke’s Blade | Ragnarok / Save the Vermillion | Codex Providentiae / Last Resort | Elysium / Artemis Bow |
| Main role | Stagger Bot | Stagger Damage Dealer | Formations and Mirroring Prism | Healing and recovery |
How to Use the Lasswell Spellblade Spam Build
Bartz’s Dual Spellblade allows eligible Spellblade attacks to activate twice. With Arms Akimbo and Double Action, Lasswell and Rain can each perform eight Spellblade activations in one turn before accounting for Nichol’s Limit Break.
Start by having Nichol apply Formation: Assail to increase Stagger Power and Formation: Regroup to strengthen the party’s attacks. Once his Limit Break gauge is full, use Mirroring Prism to repeat your party members’ selected actions.
You want Nichol to go first, then Fina uses Pass the Torch to give a turn back to him so he can use Mirroring Prism, followed by Lasswell chaining Arms Akimbo with Double Action and Flare Blade, and ending with Rain using Mimic to copy Lasswell.
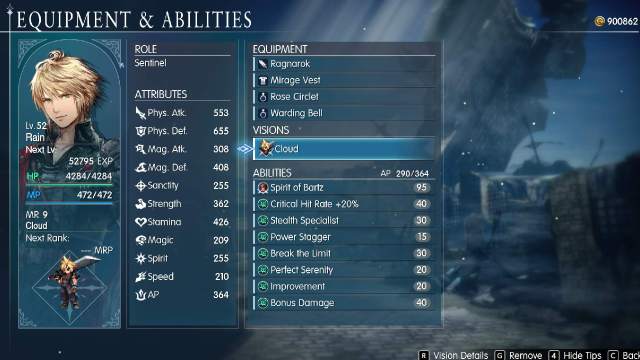
Half MP Cost is highly recommended because Dual Spellblade consumes additional MP, and using several attacks in succession can empty your MP pool quickly. Break the Limit is also required once your attacks start reaching the standard 9,999 damage cap.
The main disadvantage is the investment required. You’ll need Bartz at MR7 and Firion and Squall at MR9 on both attackers, along with enough AP to equip the borrowed abilities.
How to Use the Nichol Mirroring Prism Build
The main interaction is between Observe and Charge LB and LB Triple Charge. Observe and Charge LB generates 15% Limit Break gauge when Nichol performs a qualifying non-damaging action and with LB Triple Charge, it becomes 45%.
Since Nichol’s Formations don’t deal damage, he can strengthen the party while quickly filling his Limit Break gauge.
If you have Codex Providentiae equipped, Nichol also begins battle with Tactic: Fluid Warfare and First Strike. Fluid Warfare grants an additional action after using a Formation, once per turn. This allows Nichol to apply several buffs without wasting his opening turn activating the ability.
Once you’ve applied the important Formations, use Mirroring Prism before your attackers select their strongest combinations. Here is an example setup that allows Nichol to use all his formations and fully charge Mirroring Prism on turn 1.
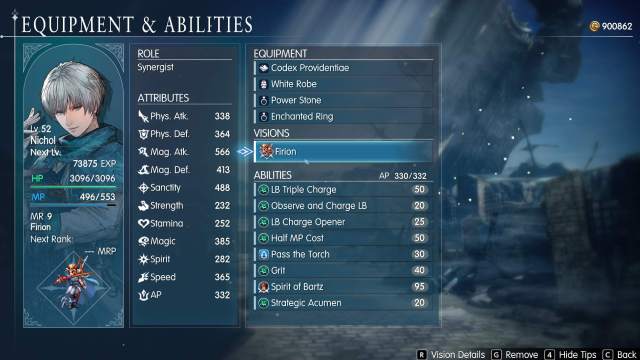
For a simpler version, use Tidus on Nichol and unlock First Strike at MR3, then work toward the Limit Break passives.
Meltdown Fire Eater Build
Terra’s Meltdown deals Fire damage to both enemies and allies. Clive’s Fire Eater absorbs Fire damage and restores HP instead, allowing your party to benefit from an attack that would normally put everyone in danger.
We’re using Sakura as the main caster, with Archwitch Fina providing additional damage, Nichol handling buffs, and Fina providing recovery when needed.
Recommended party: Sakura, Archwitch Fina, Nichol, Fina.
| Setup | Sakura | Archwitch Fina | Nichol | Fina |
|---|---|---|---|---|
| Equipped Vision | Terra | Sephiroth | Tidus / Ayaka | Leah / Ayaka |
| Required AP 1 | Fire Eater — Clive MR9 | Fire Eater — Clive MR9 | Fire Eater — Clive MR9 | Fire Eater — Clive MR9 |
| Required AP 2 | None | Mimic — Bartz MR9 | None | None |
| Optional AP 1 | Half MP Cost — Tronn MR9 | Half MP Cost — Tronn MR9 | LB Triple Charge — Onion Knight MR9 | Half MP Cost — Tronn MR9 |
| Optional AP 2 | Arms Akimbo — Firion MR9 | Break the Limit — Terra MR9 | Observe and Charge LB — Aileen MR7 | Arms Akimbo — Firion MR9 |
| Optional AP 3 | Break the Limit — Terra MR9 | Arms Akimbo — Firion MR9 | Arms Akimbo — Firion MR9 | Grit — Warrior of Light MR9 |
| Recommended weapon | Roselia / Wizard’s Rod | Fire Birch / Abyss | Codex Providentiae | Elysium |
| Main role | Cast Meltdown | Repeat attacks with Mimic | Buffs and Limit Break support | Healing and recovery |
How to Use the Meltdown + Fire Eater Build
First, make sure all four active party members have Fire Eater equipped. Without it, Meltdown will damage any party member who isn’t protected against Fire.
Sakura uses Terra’s Meltdown to damage enemies while healing allies through Fire absorption. Archwitch Fina can then use Bartz’s Mimic to repeat Sakura’s previous action, giving you another Meltdown without requiring Archwitch Fina to equip Terra.
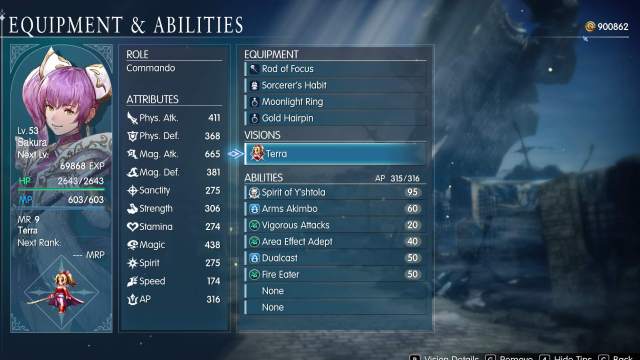
Nichol provides the usual offensive and defensive Formations, while Fina handles status recovery and healing when necessary. Since the party is already recovering HP from Meltdown, Fina can spend more turns supporting the attackers instead.
In fact, you can simply spam Mimic on everyone after Sakura uses her Meltdown attacks since the party is made of mages.
Half MP Cost helps offset the cost of repeated spells, while Break the Limit improves their damage against enemies. The best part of Mimic is that it doesn’t consume any MP, so as long as your main attacker has MP, you don’t need to worry.
Lid Mechabo Stagger Build
Lid’s Mechabo is capable of staggering entire groups of enemies letting you interrupt bosses and quickly unleash Sweeping Staggers.
The main combination involves Overclock, Mecha Behemoth, and Tidus’s Reckless Abandonment. Overclock increases Mechabo’s damage and Stagger Power by 150%, while Reckless Abandonment doubles the Stagger Power of a selected physical attack at an increased MP cost.
We’re pairing Lid with Nichol for additional Stagger buffs, Lasswell to deal damage once enemies are staggered, and Fina for support.
Recommended party: Lid, Nichol, Lasswell, Fina.
| Setup | Lid | Nichol | Lasswell | Fina |
|---|---|---|---|---|
| Equipped Vision | Tronn | Any | Squall/Bartz | Leah / Ayaka |
| Required AP 1 | Reckless Abandonment — Tidus MR5 | None | None | None |
| Optional AP 1 | Arms Akimbo — Firion MR9 | Arms Akimbo — Firion MR9 | Arms Akimbo — Firion MR9 | Pass the Torch — Leah MR5, if borrowed |
| Optional AP 2 | Insult to Injury — Zidane MR3 | Half MP Cost — Tronn MR9 | Barrage — Noctis MR9 | Half MP Cost — Tronn MR9 |
| Optional AP 3 | Vigorous Staggerer — Clive MR1 | LB Triple Charge — Onion Knight MR9 | Half MP Cost — Tronn MR9 | Arms Akimbo — Firion MR9 |
| Optional AP 4 | Sharp Mind — Terra MR7 | Observe and Charge LB — Aileen MR7 | Improvement — Squall MR1, supplied by Vision | Grit — Warrior of Light MR9 |
| Recommended weapon | Mechabo Hammer SUPER | Codex Providentiae | Shisui / Sasuke’s Blade | Elysium |
| Main role | Sweeping Staggers | Stagger and attack buffs | Follow-up damage | Healing and extra actions |
How to Use the Lid Mechabo Stagger Build
Start by having Nichol use Formation: Assail to increase the party’s Stagger Power. Lasswell can use Bravery on Lid to improve her physical damage.
Lid then activates Overclock with Mechabo Hammer SUPER, followed by Arms Akimbo and Double Action into Reckless Abandonment and Mecha Behemoth. Reckless Abandonment works with Mechabo attacks, making the entire enemy group take more Stagger damage.
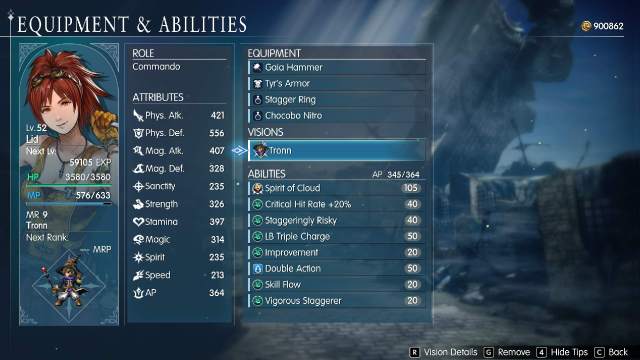
For the late-game version, unlock Overclock Zero through Mechabo Unleashed. It provides a stronger boost and can be used while regular Overclock is active.
Remember that Overclock enhances only three Mechabo attacks before entering a two-turn recovery period. Extra actions use those attacks faster, so save MP if a single Mecha Behemoth is already enough to stagger the enemy.
A-Tier Builds in Final Fantasy Resonance
Sakura Multi-Cast Magic Build
Sakura’s Multi-Cast build focuses on dealing as much magical damage as possible during a single turn. Shantotto’s Dual Cast, Firion’s Arms Akimbo, and Terra’s Break the Limit are the main ingredients, allowing Sakura to cast several powerful spells while bypassing the standard damage cap.
We’re also using Archwitch Fina as a second magic attacker, Nichol for offensive buffs, and Fina to keep everyone alive. You can also go all-in and have everyone spam magic attacks with Mimic.
Recommended party: Sakura, Archwitch Fina, Nichol, Fina.
| Setup | Sakura | Archwitch Fina | Nichol | Fina |
|---|---|---|---|---|
| Equipped Vision | Shantotto | Terra | Ayaka / Tidus | Leah / Ayaka |
| Required AP 1 | Arms Akimbo — Firion MR9 | Arms Akimbo — Firion MR9 | Mimic — Bartz MR9 | Mimic — Bartz MR9 |
| Required AP 2 | Break the Limit — Terra MR9 | Mimic — Bartz MR9 | None | None |
| Optional AP 1 | Half MP Cost — Tronn MR9 | Half MP Cost — Tronn MR9 | LB Triple Charge — Onion Knight MR9 | Dual Cast — Shantotto MR9 |
| Optional AP 2 | Sharp Mind — Terra MR7 | Sharp Mind — Terra MR7, supplied by Vision | Observe and Charge LB — Aileen MR7 | Arms Akimbo — Firion MR9 |
| Optional AP 3 | Magic Attack +10% — Y’shtola MR5 | Break the Limit — Terra MR9, supplied by Vision | Arms Akimbo — Firion MR9 | Half MP Cost — Tronn MR9 |
| Recommended weapon | Roselia / Wizard’s Rod | Fire Birch / Abyss | Codex Providentiae | Elysium |
| Main role | Multi-cast magic | Secondary magic damage | Magic buffs and Mirroring Prism | Healing and recovery |
How to Use the Sakura Multi-Cast Magic Build
Nichol starts by applying Formation: Regroup to increase the party’s physical and magical attack, followed by other buffs if necessary.
Sakura then uses Arms Akimbo with Shantotto’s Dual Cast to cast up to four eligible spells during one turn. Terra’s Break the Limit allows those spells to exceed 9,999 damage, which becomes important once your magic attacks are strong enough.
After this you can either choose to use the rest of the party for buffs, or just spam Mimic on all of them and deal tons of magic damage.
Roselia is an excellent weapon for Sakura because it automatically grants Concentrate and Sage’s Eye at the start of battle. This saves her from spending turns preparing those buffs manually.
Half MP Cost is strongly recommended because casting several high-level spells in succession can drain MP quickly.
Y’shtola’s Magic Barrage is another option if you want to focus on repeatedly striking elemental weaknesses, though it works differently from Dual Cast and doesn’t simply multiply every spell you use.
Rain Counter Tank Build
Rain is already the party’s natural tank, but pairing him with Warrior of Light and the right AP abilities makes him capable of protecting the entire party while retaliating against enemy attacks.
This setup is useful for longer boss encounters where surviving the enemy’s strongest attacks is more important than finishing the fight quickly.
Recommended party: Rain, Lasswell, Nichol, Fina.
| Setup | Rain | Lasswell | Nichol | Fina |
|---|---|---|---|---|
| Equipped Vision | Warrior of Light | Bartz / Cloud | Tidus / Ayaka | Leah / Ayaka |
| Required AP 1 | Multi-Cover — Warrior of Light MR3, supplied by Vision | None | None | None |
| Required AP 2 | Physical Counter — Warrior of Light MR5, supplied by Vision | None | None | None |
| Optional AP 1 | Magic Counter — Cecil MR5 | Arms Akimbo — Firion MR9 | First Strike — Tidus MR3, if borrowed | Half MP Cost — Tronn MR9 |
| Optional AP 2 | Grit — Warrior of Light MR9, supplied by Vision | Half MP Cost — Tronn MR9 | LB Triple Charge — Onion Knight MR9 | Grit — Warrior of Light MR9 |
| Optional AP 3 | Half MP Cost — Tronn MR9 | Break the Limit — Terra MR9 | Arms Akimbo — Firion MR9 | Arms Akimbo — Firion MR9 |
| Recommended weapon | Save the Vermillion | Shisui / Sasuke’s Blade | Codex Providentiae | Elysium |
| Main role | Tanking and counters | Physical damage and Stagger | Buffs | Healing and revival |
How to Use the Rain Counter Tank Build
Start by using Provoke to direct enemy attention toward Rain, then activate Multi-Cover to protect your party against eligible attacks.
Warrior of Light’s Physical Counter allows Rain to retaliate when attacked, while Cecil’s Magic Counter provides another way to punish enemies that rely on spells. You can also equip weapons, accessories and AP passives that improve his counterattack damage.
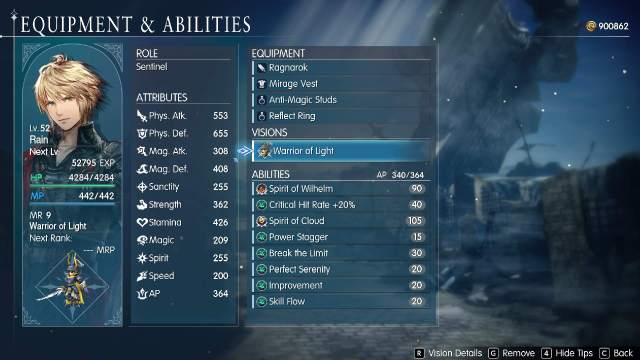
Nichol supports the party with Formation: Bulwark, increasing physical and magical defenses. Fina keeps Rain healed and can apply Reraise during difficult encounters.
Save the Vermillion is our recommended weapon because it reduces both physical and magical damage taken by 20%. Wilhelm is another good defensive Vision mainslot if you want stronger damage reduction instead of Warrior of Light’s counter buffs.
Best Mastery Abilities to Unlock for Late-Game Builds
Most of these builds rely on a handful of Mastery abilities from different Visions. Here are some of the best Mastery Abilities for late-game that let you break the game.
| Ability | Vision | Mastery Rank |
|---|---|---|
| Arms Akimbo | Firion | 9 |
| Half MP Cost | Tronn | 9 |
| Break the Limit | Terra | 9 |
| Double Action | Squall | 9 |
| Dual Spellblade | Bartz | 7 |
| Mimic | Bartz | 9 |
| Dual Cast | Shantotto | 9 |
| Fire Eater | Clive | 9 |
| LB Triple Charge | Onion Knight | 9 |
| Observe and Charge LB | Aileen | 7 |
| LB Charge Opener | Aileen | 5 |
| Reckless Abandonment | Tidus | 5 |
| Tiptop Shape | Tidus | 7 |
| Grit | Warrior of Light | 9 |
| Sharp Mind | Terra | 7 |
You don’t need every ability on this list to make the builds work as you can mix elements of these setups and find out what works best for you.
For more Final Fantasy Resonance guides, check out our Visions Tier List, breakdown on the best Adamantite weapons and Ancient Weapons and a list of the best mods.


