
All Weapon Locations in The Callisto Protocol
8 ways to reduce your enemies heads into red polygons
The Callisto Protocol is a survival horror game and, at the heart of every survival game, is half a dozen weapons used to blow the brains of your enemies. While this concept might be controversial for some old school horror enthusiasts, it’s certainly the way the genre has been trending, and Jacob Lee can be a walking armory under the right circumstances.
Here’s how to get him fully equipped as he struggles to escape Black Iron Prison and the nightmare within.
All Weapon Locations in The Callisto Protocol
Shiv
This is the first weapon Jacob receives in The Callisto Protocol, from Elias during the Outbreak Chapter. This is an item you’ll receive through the main storyline, and while it’s technically a weapon, it performs most frequently as a way to get through doors.
Stun Baton
Perhaps I’m a little biased, but I really like the Stun Baton. You also get this in Chapter 2: Outbreak, but you’ll find it in the possession of a guard who has already been killed by biophages or escaped inmates. Whatever the cause, the guard doesn’t need it anymore, and Jacob surely does. Like the Shiv, this is a story weapon and can’t be missed.
Related: How to Increase Your Inventory Space in The Callisto Protocol
Hand Cannon
The Hand Cannon is likely the weapon players were most relieved to find. This long-range weapon packs a punch and allows you to blow limbs and heads at a distance. You find it during Chapter 2: Outbreak when you stumble across your first workshop. Elias provides the schematics to make it, and Jacob prints out one of his own.
GRP
One of the more unique weapons in The Callisto Protocol is the GRP, a glove which allows you to lift and throw your enemies or props. This can be obtained in Chapter 3: Aftermath, once you enter a wing where some experimentations have occurred. A guard will be on a stretcher and have this glove equipped, but through story progression, Jacob will take it and put it on.
Skunk Gun
This is the first weapon that can be missed, but there’s two chances to obtain it. The first is during Chapter 3: Aftermath. During this chapter, as you progress the storyline, you’ll find a dead guard near the gate with a fuse beside him. If you pick up the fuse and open the door beside him, you’ll continue the story as normal. But if you instead head back to the start of the level, you’ll find another door that can also be opened with a fuse. Do so and climb through the vent that is now accessible. When you come out the other side, you’ll find yourself within this room a small trove of items, but most importantly the Skunk Gun schematic.
If you miss the Skunk Gun here, never fear. It is also available in Chapter 4: Habitat. Play the chapter as normal until you see Jupiter. You’ll know exactly what I mean when you see it. Once this small cut scene is over, head to the Oxygen Processing after destroying or sneaking past the security robot.
Related: All Data Bio Locations in Aftermath in The Callisto Protocol
Once inside, you’ll see a workshop to your right, a locked door in front of you, and Botanical H624 to your left. While there is a collectible to get if you take the righthand side, go left to find the Skunk Gun schematic. Pass the rows of rotating plants, then take a right into the Utility Hall H626 area. Squeeze through the path on your right, get attacked, then find the Skunk Gun Schematic on your right on top of a crate.

Riot Gun
Found during the events of Chapter 5: Lost, this two-handed shotgun will be given to you for helping Dani Nakamura. This occurs naturally through the storyline, so complete the chapter as normal.
Tactical Pistol Schematic
This is the second weapon that can be missed, and you’ll only find it until well into the game, in Chapter 6: Below. It’s a single fire pistol with low recoil and a high rate of fire. After you’ve done the hanging bit, you’ll dispatch a few blind enemies (or sneak past them) and follow the main path. Once there’s an option to hop over a gate, do so, then continue forward until you can turn right. This barred room is bathed in a sort of grimy, orange brown light. Enter it, turn immediately left, and you’ll find the schematic on a table.

Assault Rifle Schematic
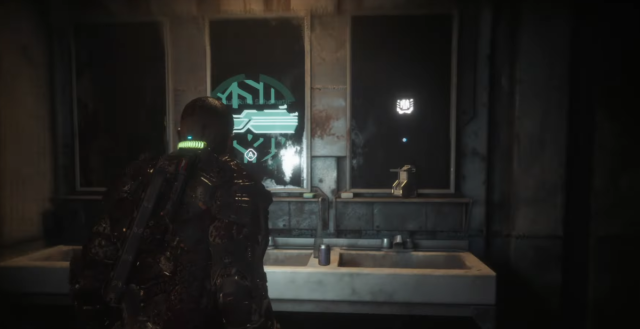
Finally, the queen arrives. The assault rifle schematic can only be obtained in the penultimate Chapter 7: Colony. The assault rifle is a three-round burst automatic rifle. It’s excellent, but expensive to upgrade. Near the beginning of the chapter, you’ll reach an area where you need a key card to access the elevator. Instead, climb up the ladder and go through the door which is surrounded with papers that read “Lies”, “Where R They?”, and a variety of missing person posters. You’ll enter midtown.
Be very aware of the enemies here. You’ll turn around towards the General Store, but what we’re most interested in is Security. Go through the General Store and, once you exit, you’ll see Security right ahead of you. But don’t go there – instead turn immediately left and head into the lit bathroom. The schematic will be on the sink in front of the mirror. Pick up the schematic and be prepared to be jumped by enemies, including a spitter biophage, who were simply waiting for someone to pick up this hidden gun.
The assault rifle is an excellent boss shredder, and that’s unsurprising considering how late you unlock it, but considering how close and personal so much of The Callisto Protocol’s combat is, it’s unlikely you’ll pick it for most fights. The Riot Gun and Skunk Gun have you there.
The Callisto Protocol offers players a wide variety of ways to pick off the many biophages that litter the levels of the game. But these missable weapons are a great opportunity to explore some of the more obscure corners of the game, and receive some of the best DPS in the game for doing so.
Good luck finding them all!