
All Bounty Clearance Kiosk Locations in Starfield
Someone's not so happy with you...
You can technically play through all of Starfield without doing anything the megacorps would consider bad, but where’s the fun in doing that? If you do, you’ll need to pay your bounty off eventually, so here are the locations of all Bounty Clearance kiosks in Starfield.
Every Self-Service Bounty Clearance Kiosk in Starfield
With most of the mission boards scattered throughout Starfield, you’ll tend to find a Self-Service Bounty Clearance kiosk nestled next to it. However, there’s one specific case that’ll be heavily dependent on your choice. If you don’t make any yourself (more on that below), you can find seven Bounty Clearance kiosks out in the world.
Pay attention to what you do in cities, as accidents can be quite costly. Using abilities in a city, for example, could slap a pretty hefty bounty on you upwards of 160,000 credits. If you’re going to go around doing mischievous things, consider creating a backup save or making sure you’re filthy rich enough to pay off the bounty.
New Atlantis Bounty Clearance Kiosk
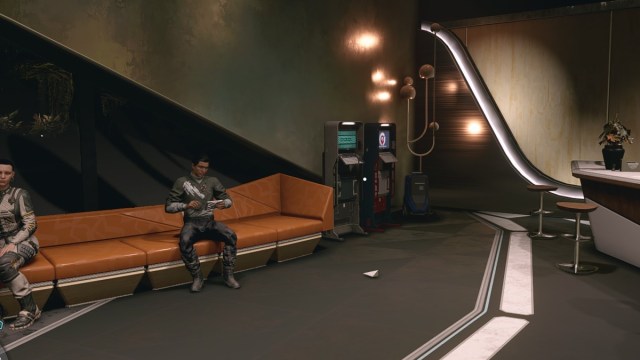
The first Bounty Clearance kiosk isn’t too hard to spot. After landing in New Atlantis, head down the ramp and through the security checkpoint. On the left, you should spot the Viewport Bar. Head into it, and you’ll find the first kiosk in the back corner of the room.
Neon Bounty Clearance Kiosk

The Bounty Clearance kiosk in Neon is a bit of a walk. To get to it, head to the Astral Lounge at the end of the main street, the dead center of the city. As you enter, you should see the kiosk on the right-side wall. You can even head in and party a bit, if you want to dance away the woes of the credits you just lost.
Akila City Bounty Clearance Kiosk

For Akila City, you’ll have to take a slight stroll to get to the Bounty Clearance kiosk. Once you land in the spaceport, head through the main gate and to the Hitching Post bar on your right. Inside, you’ll find the Bounty Clearance kiosk next to the usual mission board. Sounds like the perfect thing to do while drunk.
Cydonia Bounty Clearance Kiosk
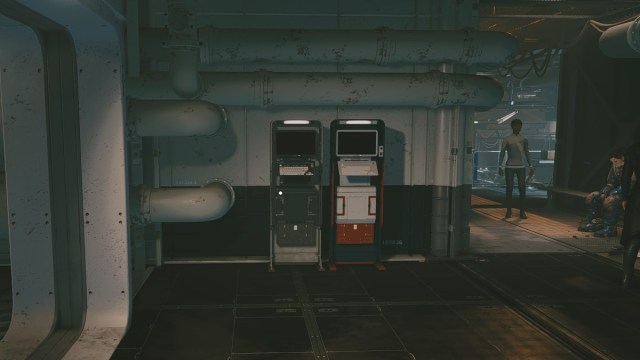
This next Bounty Clearance kiosk can be found easily in the city of Cydonia, on Mars. Head through the airlock and on your first right will be the Broken Spear bar. Immediately left of the entrance is the Bounty Clearance kiosk and a convenient mission board.
The Bounty Clearance Kiosk in Your Outpost

If you weren’t aware, you can plant Bounty Clearance kiosks in any of your Outpost. To do so, open up Build Mode and navigate to the Miscellaneous tab. There you’ll find the Self-Service Bounty Clearance kiosk. You’ll need the following resources to build one:
- 2x Beryllium
- 2x Zero Wire
- 4x Aluminum
You can have one Bounty Clearance Kiosk in a single Outpost, and up to eight Outposts at a time, making for eight kiosks scattered around the Starfield world. I even have one in my Outpost, though I totally wouldn’t use it frequently. I don’t know what you’re talking about.
Trident Luxury Lines Bounty Clearance Kiosk

This Bounty Clearance kiosk is extremely close to Akila City. Orbiting the planet of Akila in the Cheyenne system is the Trident Luxury Lines space station. Once you’re on board, you’ll find the Bounty Clearance kiosk and a mission board to the right of the entryway.
Deimos Bounty Clearance Kiosk

For this Bounty Clearance kiosk, you’ll want to make your way over to the Sol system and onto the Deimos shipyard next to the moon of the same name. Once you make your way inside, you shouldn’t have any trouble seeing it.
Hopetown Bounty Clearance Kiosk
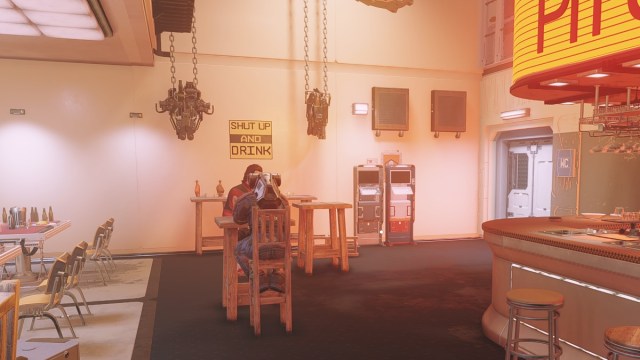
The final Bounty Clearance kiosk can be found in Hopetown (Polvo, in the Valo System). After landing, make your way over to the Pit Stop bar. Once inside, head over to the back left corner where you’ll find a Bounty Clearance kiosk, alongside a mission board.
How Do You Remove a Bounty Using the Kiosk?
The Self-Service Bounty Clearance kiosk allows you to pay off your bounty without the need to travel to a particular system and speak with the security team there. When interacting with it, you’ll be presented with a menu showing all active bounties and their prices, along with a convenience fee for the kiosk. Simply select which ones you want to pay off, and the Credits needed will be deducted from your total Credits. This is going to cost you more than going to places individually, but the convenience can be worth it.
Creating Your Own Bounty Clearance Kiosk at Outpost in Starfield
As a reminder, you can easily create your own bounty clearance kiosk at any outpost you own. There can only be one kiosk at a time at each outpost. You’ll need to head to the Miscellaneous submenu of Build mode. Once there, click the self-service bounty kiosk. You’ll need the following items to craft it:
- 2x Zero Wire
- 2x Beryllium
- 2x Aluminum
This makes managing your bounties a lot more convenient when you’ve got them on various outposts.
We had a bit of trouble finding all bounty clearance kiosks in Starfield ourselves, but it’s not too hard with a little help. If you’re on the hunt for a Technician to repair your ship, check out our guide on all Ship Services Technician locations in Starfield.