ARMS for the Nintendo Switch may not be as technical or deep as a more traditional fighting game, but there’s still a lot to take in with Nintendo’s latest. One of the biggest aspects of ARMS that makes it a unique fighting game are the various Arms you can mix and match between fighters. This article covers the best Arms in the ARMS game, as well as a more in-depth look at all Arms in the ARMS game so you understand what each Arm does and how it should be used in a match.
Of course the Arms in ARMS aren’t the only factor in winning a match. We’ve already taken a look at each of the fighters, but in this article we’ll cover the best Arms for each fighter and how you should be playing with them. There’s a lot to cover, so let’s get right down to it. It should be noted that all of our findings come from a competitive environment. If you’re just playing casually your opinions may vary.
Arm Attributes
Most Arms have a specific attribute or element associated with them. When charged up these elements have a variety of effects on an opponent. While there are a number of seemingly duplicate Arms in the game, they are differentiated by these elements. It’s important to figure out which elements work best with your play style and potentially mix and match elements between your equipped Arms to get the best effect.
Blind – As you might expect, the Blind element obstructs your opponent’s screen, making it difficult for them to see for a short time. At launch only the Blorb has this ability.
Electric – When this attack connects it shocks the opponent for a short time. While shocked an opponent cannot do anything. They can’t move, block or attack in any way. This is an easy way to land guaranteed combos.
Explosive – Most Explosive Arms have a second hit that causes a delayed explosion after the initial attack. Be careful because this explosion can harm your character in addition to an opponent. If your Explosive Arm gets stopped by another Arm or a stage obstacle it can explode near you.
Fire – Generally speaking Fire Arms are the most damaging type of Arm. If you connect with a Fire Arm it knocks an opponent to the ground. These are best as the second hit of a combo after an Electric Arm hits to get maximum damage (without using a throw).
Ice – Ice Arms drastically slow down the movement speed of an opponent. A common misconception is that Ice Arms provide a guaranteed follow-up attack like Electric Arms. This is not the case beyond the normal follow-up you get if you attack with both Arms in rapid succession (if the first connects, the second hits fast enough to connect as well). While iced an opponent can still block and attack.
Stun – While slightly deceptive, the Stun attribute doesn’t actually allow for a guaranteed follow-up attack like the Electric element. Instead it provides a very brief stun as soon as it hits the opponent.
Wind – If an opponent is hit with a Wind element Arm they are knocked into the air. In most cases you can follow with a well-timed second attack, but timing can be tricky sometimes.
Arm Stats and Details
In addition to the attributes for each Arm, there are various stats which help to further differentiate all of the Arms. These stats should be taken into account when determining which Arms you want to equip.
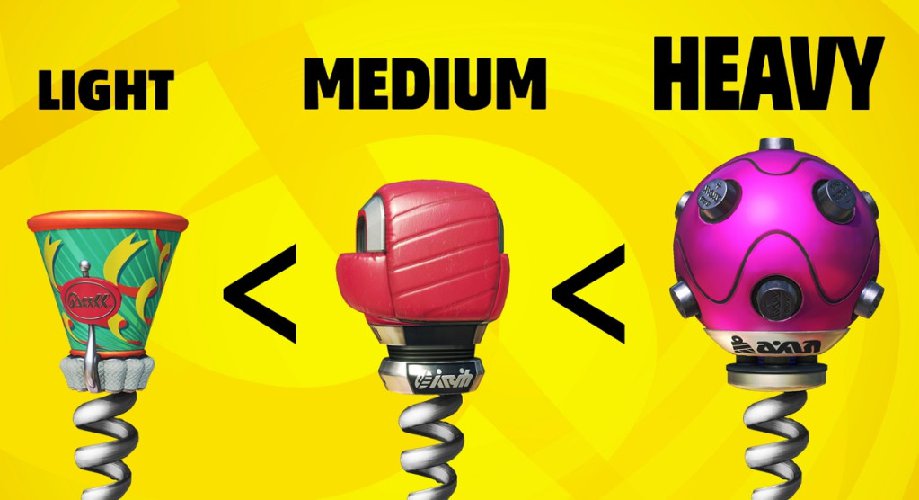
Weight – As we explained in our tips article, there are three weight classes for the Arms: Light, Medium and Heavy. If Arms of equal weight collide they will both fall to the ground, canceling each other out. However, heavier Arms will stop lighter Arms and continue toward the opponent. For example, if a Medium Arm hits a Light Arm, it will stop the Light Arm and continue moving toward the opponent. However, if two Medium Arms collide, they both stop and hit the ground. In addition, heavier Arms move slower, meaning their attack speed is also slower.
Damage – Damage varies depending on the number of attacks for each Arm as well as attacking with a charged Arm or a non-charged Arm. Charged attacks generally inflict more damage, but this isn’t always the case, especially with Electric element Arms. Arms that have three attacks will usually only hit twice before knocking the opponent down or too far away for the third hit to connect. During combos damage is reduced for attacks after the first hit unless you shock an opponent and wait long enough for the invisible combo counter to reset, resulting in full damage for the second hit. All damage in the chart below is based on upgraded Arms since eventually that’s all everyone will have (there’s no way to go back to default Arms without deleting your save file). In most cases remove 10 points of damage to get the non-upgraded numbers.
Number of Attacks – Some Arms can hit multiple times. In some cases two or three attacks come out at once, such as the Triblast. In other cases there’s a delayed second attack, like with the Seekie. The orientation of the characters can cause some or all of the hits to miss, especially if they’re in the air or near a wall or barrier.
Curve Ability – Some Arms have greater curve arcs than others. For example, the boomerang style Arms have huge curve arcs which makes them ideal for attacking around stage obstacles. Generally speaking, heavier Arms have lower curve arcs.
| Arm | Weight | Element | Damage (Normal / Charged) | Curve Ability | Attacks | Default Fighter |
| Blorb | Heavy | Blind | 110 / 110 | Low | 1 | Helix |
| Boomerang | Medium | Wind | 90 / 100 | Very High | 1 | Spring Man |
| Bubb | Medium | None | 100 / 110 | Medium | 1 | Byte & Barq |
| Buff | Medium | None | 100 / 110 | High | 1 | Ninjara |
| Chakram | Medium | Stun | 90 / 110 | Very High | 1 | Ninjara |
| Chilla | Medium | Ice | 100 / 110 | Medium | 1 | Twintelle |
| Coolerang | Medium | Ice | 90 / 100 | Very High | 1 | Kid Cobra |
| Cracker | Light | Fire | 120 / 140 | Medium | 2 | Byte & Barq |
| Dragon | Medium** | Fire | 100 / 140 | Medium | 1 | Min Min |
| Guardian | N/A* | Electric | 90 / 90 | Low | 1 | Helix |
| Homie | Medium | Explosive | 80 / 130 | Low | 2*** | Mechanica |
| Hydra | Light | Fire | 120 / 130 | Low | 3 | Kid Cobra |
| Ice Dragon | Medium** | Ice | 100 / 110 | Medium | 2 | Helix |
| Megaton | Heavy | None | 120 / 140 | Low | 1 | Master Mummy |
| Megawatt | Heavy | Electric | 120 / 120 | Low | 1 | Min Min |
| Ramram | Medium | Fire | 90 / 130 | Very High | 1 | Min Min |
| Retorcher | Light | Fire | 120 / 140 | Low | 3 | Master Mummy |
| Revolver | Light | Electric | 120 / 120 | Low | 3 | Mechanica |
| Parasol | Medium | Wind | 100 / 110 | Medium | 1 | Twintelle |
| Phoenix | Medium | Fire | 90 / 130 | High | 1 | Master Mummy |
| Popper | Light | Wind | 120 / 130 | Medium | 2 | Ribbon Girl |
| Seekie | Medium | Electric | 80 / 120 | Low | 2*** | Byte & Barq |
| Slamamander | Medium | Wind | 90 / 100 | High | 1 | Kid Cobra |
| Slapamander | Medium | Fire | 90 / 130 | High | 1 | Ribbon Girl |
| Sparky | Medium | Electric | 100 / 100 | Medium | 1 | Ribbon Girl |
| Thunderbird | Medium | Electric | 90 / 90 | High | 1 | Twintelle |
| Toaster | Medium | Fire | 100 / 140 | Medium | 1 | Spring Man |
| Triblast | Light | Explosive | 120 / 130 | Low | 3*** | Ninjara |
| Tribolt | Light | Stun | 120 / 120 | Low | 3*** | Spring Man |
| Whammer | Heavy | Stun | 110 / 130 | Medium | 1 | Mechanica |
Note: On most 3-hit attacks, the opponent is knocked down or away after the second hit. All damage values are what you will commonly get in most situations, two hits, but if all three attacks hit it’s usually an additional 20 points of damage.
*The Guardian stops all attacks when first extended as a shield, then trades with all attacks when used as a projectile.
**The Dragon and Ice Dragon beams are Medium in weight but will go through certain Arms, completely ignoring them.
***Seekie and Homie are normally one hit, but two hits when charged. Tribolt is three hits normally and one hit when charged, while Triblast is three hits normally and two hits charged.
Best Arms
Electric Arms are almost always the best Arms for your initial attack. This is because a charged Electric Arm shocks the opponent and gives you plenty of time to follow with two more attacks or a throw. No other Arms give you this much guaranteed follow up damage. With that said, not all of our best Arm recommendations are Electric elements. You also need a good second Arm to use after an Electric Arm hits to maximize your combo damage. While a throw is almost always the best damage, sometimes you’ll be too far away or too late to connect a throw (which attacks slower than a normal punch).
Sparky – As a medium weight Electric element Arm, Sparky is arguably the best Arm in the game. Keep it charged and lead off with this attack to shock the opponent and allow for any number of follow-up attacks. It will beat all Light attacks and is fast enough so it doesn’t leave you open to a counter attack very long if you happen to miss.
Thunderbird / Phoenix – Another Electric Arm, the Thunderbird isn’t as fast as Sparky, but it has much better curve ability and it can catch opponents off guard due to the somewhat delayed attack of the bird connected to the Arm. This also goes for the Phoenix if you already have an Electric Arm and want more damage to go with your curve. Although in that instance the Slapamander is usually a better choice.
Slapamander / Slamamander – One of the most annoying Arms in the game is the Slapamander. It’s difficult for opponents to get away because it has a good curve arc and a large hit box (area of attack). You usually want the Slapamander over the Slamanader for the extra damage when charged, but both can be effective.
Megaton / Megawatt – There are going to be times when you’re constantly trading with an opponent, both Arms canceling each other out. That’s where the Megaton comes into play. As a heavy Arm it grounds lighter Arms as it continues toward your target. While it moves slower than most Arms, if used to counter an opponent’s lighter Arm it almost doesn’t matter how fast it moves so long as you can react fast enough when you see the opponent punch. A charged Megaton is also one of the most damaging attacks in the game, making it a great follow-up after a shock. If you find that you’re leading off with the Megaton, switch to the Megawatt to shock an opponent so you can get a follow-up throw.
Cracker / Popper – The advantage of the Cracker and Popper are speed and a wide hit box (area of attack). As Light Arms they travel fast, but with two attacks it will take a very well-timed Medium or Heavy Arm to stop both hits of the Cracker and Popper. Couple this with the wide hit box and speed, and it’s difficult for many opponents to avoid a well-timed attack. We generally favor the Cracker over the Popper because you’re already giving up damage for speed if you don’t connect with both hits. Cracker at least gives you more damage if you hit a charged attack. You can occasionally follow a charged Popper with a second attack, but the timing can be tricky. If that’s the route you want to go, the Parasol is a better bet. It’s a bit slower, but the wide hit box is similar to the Popper.
Arms Overview
While the Arms listed above are our best recommendations, there’s merit to just about every Arm in the game. So let’s take a closer look at the other Arms to see what they’re capable of.
Blorb – While the Blorb is very similar to the Megaton and Megawatt, and works well if your opponent doesn’t have a Heavy Arm to counter your attacks, you sacrifice damage in exchange for a bit more mobility (it bounces) and the ability to blind an opponent. While the blind is nice in theory, a blinded opponent can still block, dodge and attack just like normal. This makes the Blorb far less useful against skilled players.
Boomerang / Chakram / Coolerang / Ramram – These high curve Arms work very well to attack around obstacles in the various stages and depending on the distance it’s possible to catch an opponent back dashing. They work especially well to attack from behind the columns in the Scrapyard and DNA Lab, as well as the cars in the Cinema Deux stage. However you don’t gain much benefit beyond the high curving ability, and most skilled players will either block or evade if they think you might attack from behind an obstacle (or while they’re hiding behind an obstacle). Even if you land such an attack, it can be difficult to follow it up with additional damage because the obstacle is still in the way.
Bubb / Buff / Chilla / Toaster – All of the common boxing gloves in the game are almost identical to the Sparky. What makes the Sparky so much better is the fact that it shocks an opponent and allows you to follow with an easy throw or some other attack. Buffa has a bit better curving ability, Chilla slows down an opponent’s movements, and Toaster inflicts more damage, but none of that outweighs the shock power of Sparky. However, if you’re leading off with a different Electric element Arm, Toaster is a good secondary Arm since it’s fast and inflicts very good damage.
Dragon / Ice Dragon – The two dragon Arms are very unique. The fire a beam that goes through some Arms, but can be stopped by others. You also get a good attack radius with the beam that covers a decent amount of ground and works very well against opponents that are trying to keep their distance. Where the dragons fail is in close combat. If a skilled opponent closes in on you, the dragon Arms are very difficult to use effectively and usually end up leaving you open to a counter attack more often than not. Ideally you want to use the Dragon as a secondary Arm to follow an Electric shock for good damage.
Guardian – One of the more unique Arms in the game, the Guardian is basically a shield. The initial attack is a shield that stops everything, no matter the weight. You can hit the attack button again and the Guardian will extend farther out at a faster pace in an effort to hit the opponent. Even after the shield portion of the attack, the Guardian is still one of the slowest Arms in the game. This means it should be used primarily as a shield, and if it happens to hit an opponent all the better. This works well against Heavy Arms, but is easily bested by Arms with high curving ability or an opponent who attacks from close range.
Homie / Seekie – These two Arms will move toward an opponent no matter how you curve it. This can come in handy if your aim isn’t very good. In addition, a charged Homie or Seekie will hit like normal, then explode after a short delay. This can easily catch an opponent off guard, especially if they’re playing a highly mobile character like Twintelle or Ribbon Girl. These characters will assume they’ve dodge the initial attack, then potentially get hit by the delayed second attack. Even with these benefits, they are relatively slow and difficult to hit skilled players with.
Hydra – If you’re playing against an opponent who likes to jump a lot, the Hydra is a great answer. It fires three vertical shots that can be difficult to evade in the air. However, on the ground all three shots are fairly easy to evade. They are light attacks, which means they will get beaten out by most other Arms, but due to the fact that there are three shots in vertical alignment, it’s rare for most Arms to hit all three shots. Unfortunately, even if the last shots sneaks in, the damage on a single shot is a bit low (80).
Retorcher / Revolver – These Arms fight three shots in rapid succession. While all three shots are light, they can be difficult to evade when timed correctly. While the Revolver is an Electric Arm, the stun is negated if more than one shot hits. Unfortunately this makes it one of the worst Electric Arms in the game. The Retorcher is the way to go if you like this Arm style.
Parasol – The main advantage of the Parasol is the wide hit box that makes it difficult to dodge and can partially block an opponent’s vision as it travels. It’s still a Medium Arm, which means any Heavy Arms will knock it to the ground and continue toward you. If you don’t need the larger hit box it’s usually better to go with a boxing glove or even a Heavy Arm to counter Medium weight Arms. If you like the wide hit box but want a faster Arm, the Popper and Cracker are better.
Triblast / Tribolt – These Arms are similar to the Hydra except that they shoot three shots in horizontal alignment, making them difficult to evade. Triblast is generally the way to go because of the extra damage, but as an Explosive Arm the charged damage is delayed in a second hit that can technically be evaded, but will usually catch an opponent off guard. When used as a secondary attack the delayed follow-up usually misses when using Tribolt, however Triblast becomes a single attack when charged, allowing it to connect better as a follow-up attack.
Whammer – The Whammer has a wide hit box (area of attack), which can make it difficult to evade once it slams to the ground. Unfortunately, it has to travel to the opponent before the slam occurs, and that travel speed is relatively slow. It’s a Heavy Arm, which means it goes right through all lighter Arms, and that’s how it should mainly be used. However, even in this instance it can be difficult to hit more mobile characters.
If you’re looking for the best character or other strategies and advice, be sure to check out our ARMS game hub!


Published: Jun 9, 2017 5:52 AM UTC