
How To Replace SSD in Steam Deck & Reflash Steam OS
Find out how to swap your SSD in no time!

If you’re one of the many that happen to have a 64 GB Steam Deck, you know the immediate pain of wanting to install a new game, only to find out that you’ve already run out of storage. While the Nintendo Switch can get away with a 32GB and 64GB Model, it feels almost criminal to have a Steam Deck with this low of total memory. Thankfully, 2230 SSDs are coming down in price rather rapidly, so what better way to spend your afternoon than swapping out your SSD in your Steam Deck? Let’s get into the teardown and find out what we need to make this happen.
Tools Of The Trade: What Do You Need To Swap An SSD In A Steam Deck
If you’re hoping to take a crack at it, you’re going to need a few tools:
- Steam Deck
- A 2230 SSD (any storage size)
- Phillips Head Screwdriver, Size #0 (Magnetic, if possible)
- Small Pliers/Tweezers
- Storage Receptical for Screws
- OEM Steam Deck Case
- Credit Card/Plastic Pry Tool
- USB Flash Drive
- USB Type A to USB Type C Converter
- Windows, Mac, or Linux Computer
Now that you’ve got everything ready and in front of you, let’s get into it. Also, please note the following:
If you have a Micro SD card in your Steam Deck, remove it before starting this process, or it may snap in half. Also, power down your Steam Deck before continuing further. Prima Games is not responsible for any damage done to your Steam Deck/Accessories during this process. Proceed at your own risk.
Step One: Remove The Back Cover Of The Steam Deck
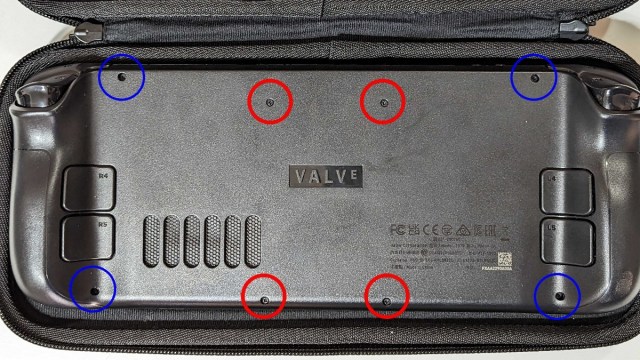
The first thing you’ll need to do is place your Steam Deck face down in the carrying case and remove the eight screws in the back of the Steam Deck. In the photo above, short screws are circled with a Red Circle, and long screws are circled with a Blue Circle. After you have removed every screw, it’s time to start prying it open.
This is where the Credit Card/Plastic Pry Tool will come in handy. Starting up near the Triggers, you’ll want to wedge your prying tool of choice into the cracks between the back and front and start prying it apart. It’s going to be a struggle at first, but as soon as the clasps loosen up, the back becomes much easier to pull off.
Related: Can you Play Honkai Star Rail on Steam Deck? – Answered
If you’ve taken the back off before, you may be able to use a fingernail to pop this open but don’t try it if you don’t want to damage your nails. The plastic is tougher than you may expect, so only do this if you’ve taken it apart before.
Step Two: Peel Back The Foil And Remove The Screw

To get this process started, you’ll need to remove the metal heat shield that also doubles as a bit of protection over some of the more delicate wires. Peel back the small foil piece that is near the top, and unscrew the screw beneath it. There are two more screws located on the side of this shield that you need to remove before you can continue onward.
Step Three: Remove The Shield Side Screws In Your Steam Deck

At the top left and bottom left of this shield, you’ll notice two tiny screws, outlined with a red circle once again. Remove the two of these, and the shield will pop right off. If you’re careful when removing it, you may be able to keep them in the small holes, giving you the chance to plop them right back into the holes during reassembly.
You may also be wondering why the top right and bottom right screw holes have nothing in them. I learned the hard way while reassembling my Steam Deck after taking photos of this tutorial that the backplate screws go directly into those two spots. I thought I lost a screw from the last time I took it apart, but quickly learned that they’re meant to be empty.
Related: How to Optimize Battery Life on Steam Deck? – Answered
Step Four: Remove The Battery Wire From Your Steam Deck

This is by far the most tedious and difficult part of the disassembly process, but also one of the most important steps. You’ll want to disconnect the battery from the main board to avoid hot-swapping your SSD. What is hot swapping, you may ask? Well, it’s replacing parts while there is still power going to the board, so even if you have your Steam Deck turned off, you could still fry the SSD, and that’s not a risk we want to take. Do not pull directly on the wires, you’ll want to use the small pliers or tweezers to try and pry from either the sides of the black plastic or push from the top lip.
Once you have unplugged your battery, press and hold the power button for 10-15 seconds to discharge the device. This ensures there is no power flowing through the board, effectively minimizing any risks of frying parts.
Now that you have the battery taken out, we’re already onto the final step of this process! Time flies when you’re having fun, doesn’t it?
Step Five: Remove And Replace The SSD From Your Steam Deck

At the end of the SSD, there will be a small screw that you need to remove to access the SSD. Take this screw out and set it off to the side. You’ll notice that the SSD will pop up, giving you a chance to pull it out of the socket. Remove it, and take off the heat shield that is covering it. You can either peel it apart and stick it back onto the new SSD, or wiggle the SSD out of it and push the new one in. Personally, I unwrapped mine and went from there, as it was a pain to try and wiggle the new one into the sleeve.
Once you have nestled your new SSD into its cozy little jacket, you’ll just want to repeat this process backward to put your Steam Deck back together. Congratulations on having more storage than you may ever need!
Related: This Steam Deck Mod Changed My (Gaming) Life
How Do I Reflash The Steam OS Onto My Steam Deck?
Now that you’ve installed your SSD, you’re going to need to reflash the Steam OS back onto it so you can access your library and account again. It’s almost like a factory reset, so get ready to download all of your things again. Thank God for cloud saves, am I right?
The first thing you’ll want to do is visit the Steam Deck Recovery Instructions Page, where you can find and download the Steam OS files you’ll need. You’ll also need to download Flashing Software, which you can find links below for your OS of choice:
- Windows: Rufus
- Mac OS: Balena Etcher
- Linux: Balena Etcher or use the following command line
- bzcat steamdeck-recovery-4.img.bz2 | sudo dd if=/dev/stdin of=/dev/sdX oflag=sync status=progress bs=128M
You’ll want to Flash the software directly to the USB Drive that you have, which will be formatted directly into a file system that the Steam Deck can read and work with. When you power on your Steam Deck for the first time after installing your new SSD, you’ll want to do the following:
- Press and hold the Volume Down button
- Press, hold, and release the Power Button once you hear the Startup Chime

From here, you’ll be brought into a completely new menu, called the Boot Manager Menu. If your screen looks like the one in the photo above, you did it right. If it doesn’t, then you may have to power it down and try again. You should spot something that looks like EFI USB, which is what you’ll want to click on to proceed with re-flashing the Steam OS back onto your portable powerhouse.
This process may take 5 to 10 minutes, and you’ll know that it’s complete when you’re greeted by the original Start menu. Punch in all of your Steam credentials, and you’ll be ready to utilize your newfound storage space.
Now that you’re ready to game on the go, or just on the couch, be sure that you’re checking out our Steam Deck section below for more helpful tricks and tips to get the most out of your favorite piece of tech.