
The Best Smoke Grenade Spots on Inferno CS:GO Map
Smoke mid every day!
Inferno (or de_inferno for those old school players out there) is among the most popular Counter-Strike maps in the game’s overall history, probably right under Dust 2. Along with Mirage, they form the holy trinity of the best maps in the game. This guide will go over the Best Smoke Spots in Inferno CS:GO Map.
Best Smoke Spots on Inferno in Counter-Strike: Global Offensive
Below you will see a detailed explanation of the most useful and essential Smoke spots. Also, make sure to check out our similar guides for other popular maps such as:
But first, let’s tell you how to put yourself in Practice mode so that you can toss Smokes to your heart’s content so that you can walk into your Competitive match better prepared. Please note that angles for these smokes can always be adjusted for slightly different results. Make sure to practice them enough.
- In Game Options, Enable Developer Console.
- Drop the Console with the “~” key, and type in “map de_inferno” (without the ” “) and hit Enter.
- When in game, drop the Console again, and type in “bot_kick“, hit Enter, and then, in the same fashion, type in the following commands: “sv_cheats 1“, “mp_roundtime_defuse 60“, “mp_freezetime 0“, “mp_restartgame 1“, “sv_infinite_ammo 1“, “give weapon_smokegrenade“, “sv_grenade_trajectory 1“.
- Additionally, to assist you with lining up the crosshair, you can check what’s your “cl_crosshairsize” variable by typing the command without any value. Then, you can make a bind to toggle the bind when needed in-game like this:
bind “F4” “toggle cl_crosshairsize 5 5000” (this time with the ” “). - To move better, you can use a key that you don’t usually use (we’ll use H) and type in “bind h noclip” and now with it, you can toggle flying so that you can better examine the trajectory of the smoke.
Related: How to Most Efficiently Rank-up in CS:GO Competitive Matchmaking (2022)
From T Spawn to Banana
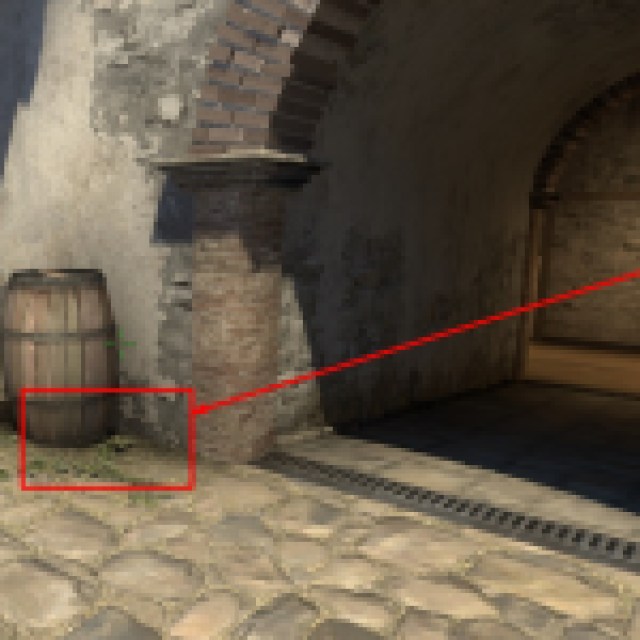
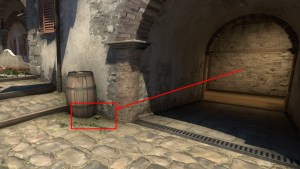

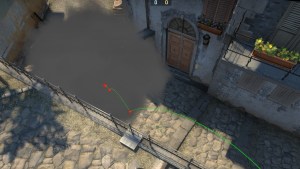
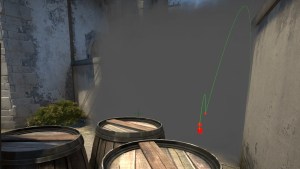
This one is great to deploy early as it completely blocks the vision of Banana to CTs. This bears a few risks and opens up quite a few counterplays by CTs. It is probably best to deploy this if you are pushing elsewhere, to discourage CTs from rotating and approaching you from behind. In order to deploy this, follow these instructions:
- Place yourself in the corner between the barrel and the wall.
- Look at the corner of the roof, hold your walk button and pull the smoke grenade’s pin.
- Start walking towards and immediately toss the grenade out.
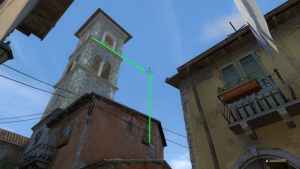
From Firewood to CT Spawn (Construction not visible to CTs)
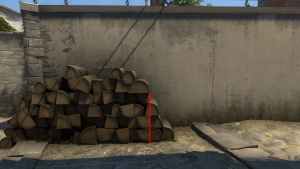
If you are covered by your teammates who are pushing the B site and you know that you won’t get picked off by a wandering CT from CT side of Banana, this smoke is crucial to stop CT rotation from CT Spawn. Here’s how to deploy it:
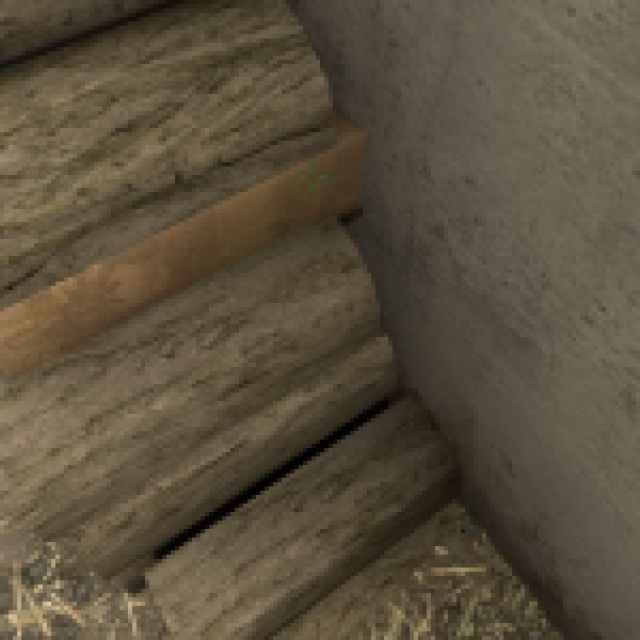
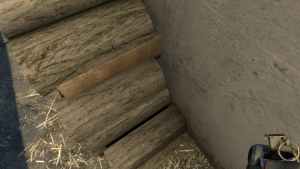
- Hug the indicated point on the Firewood stack.
- Turn around towards B and look up. Align crosshair with the corner of the terrace fence and the flower pot, as in the picture.
- Hold your walk button, pull the pin, start moving forward, and as soon as your crosshair crosses over the flower, release the smoke grenade. This one completely blocks off the CT Spawn if tossed correctly (check the bounces on the wall).
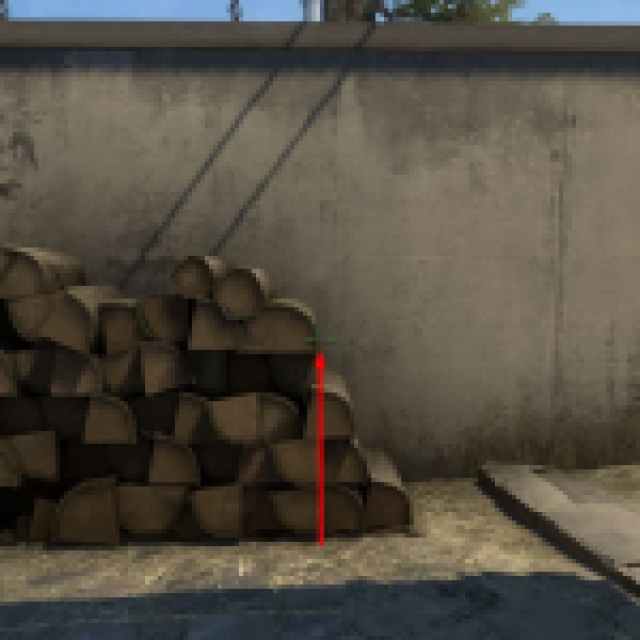
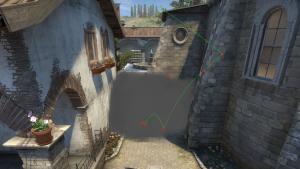
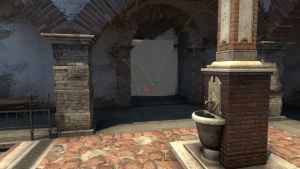
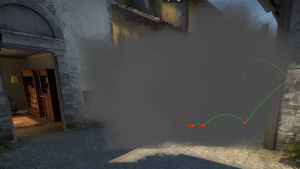
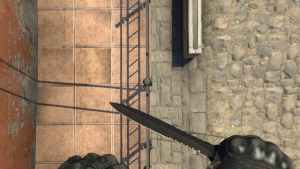
From Firewood to Coffins (Construction)
Here, we introduce a one-way smoke. You will be able to see CT legs should they run out of Construction to defend the B site, due to the elevation of the terrain outside of B and the fact that you have placed the Smoke in a Coffin. Here’s how to replicate this one:
- Run into the Firewood as seen in the picture. You will slightly climb up, this is normal.
- Aim above the top of the fence (above the right edge of that blob in the picture) and connect your crosshair with the bottom wire.
- Throw the grenade. As mentioned above, you can toy with the angle, depending on your needs.
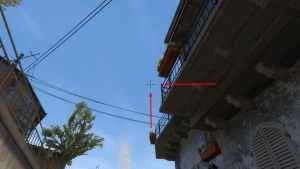
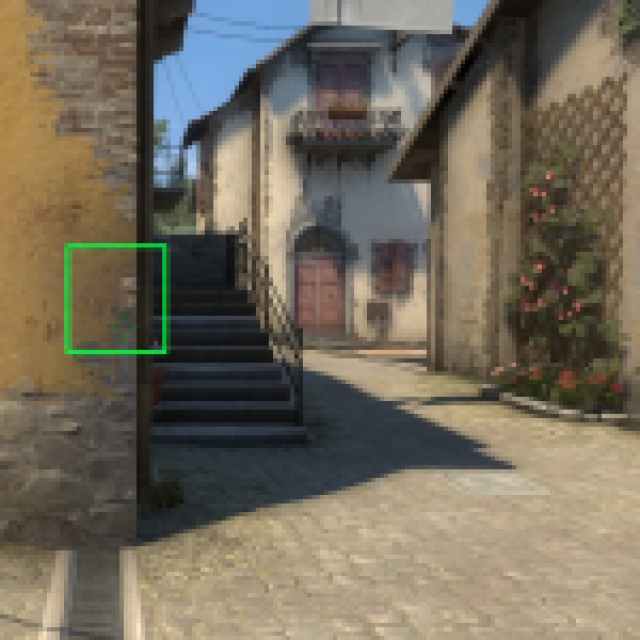
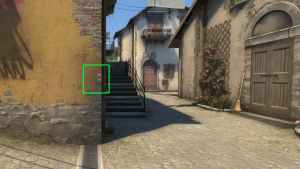
From Wallbang on Banana to CT (Construction visible for CTs)
This Smoke is another way to seal off CT (but since it’s closer to the site, it allows CTs to cruise into Construction). While you’re on Banana, look for the door, and next to the door, the indicated corner on the screenshot. Here’s what to do next:
- Hug that corner, and notice the upside-down T where our crosshair is pointing. Look there specifically.
- Turn around towards the B site and look above the chimney, and align with the indicated line of the terrace balcony (it’s funny how there’s always something to align with as if they were planning the map around these Smoke spots? Talk about conspiracy theories for CS:GO…).
- Yeet? Yeet. Nothing else, no movement, no jumping. Enjoy the result!
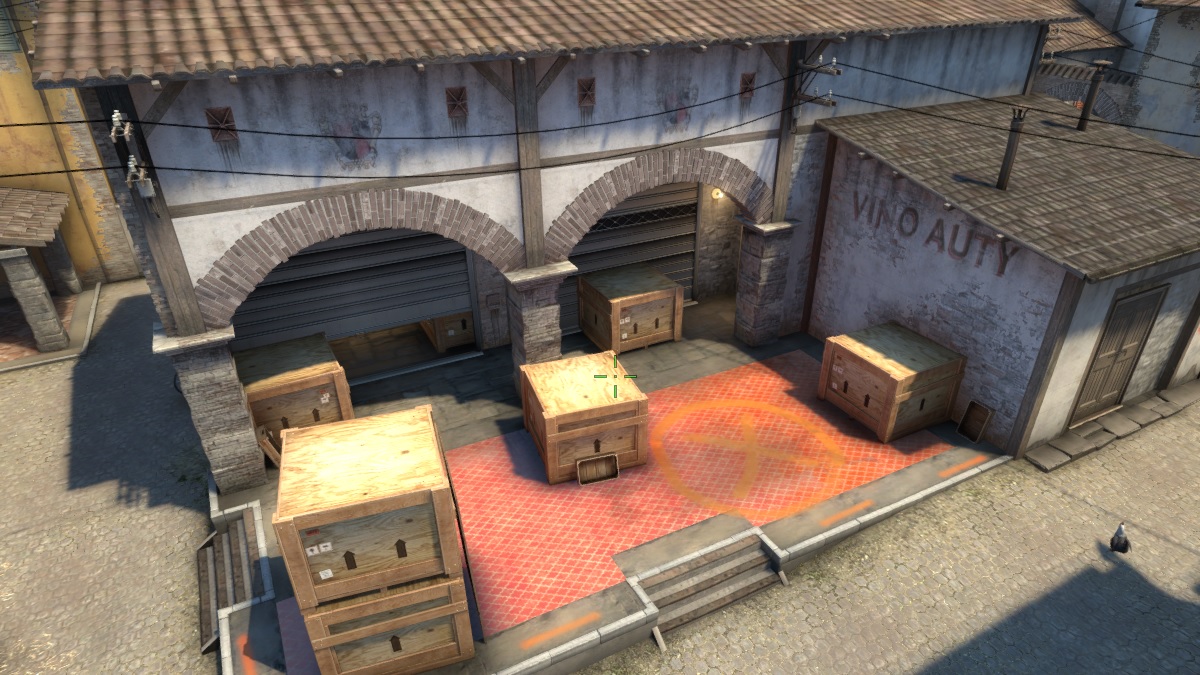
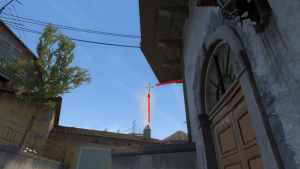
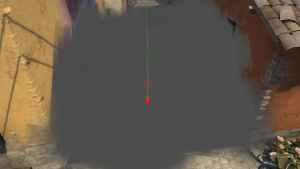
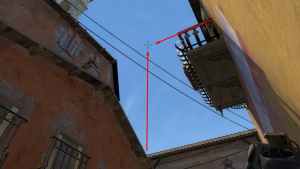
From T Spawn to CT Mid (simple but important Smoke on Inferno)
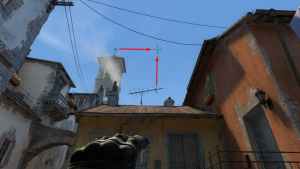
Alright, so you ought to be using this almost every round, it’s very easy to throw and will endlessly frustrate the CTs because you will be denying them AWP picks. As you exit the T Spawn, you will see the Arch and the Barrel from one of the earlier smokes. Here’s what to do:
- Hug the middle of the indicated pillar. Turn around towards Mid.
- Align your crosshair as indicated in the picture, right from the cross, and above the “L” on the antenna.
- Pull the pin, hold the Walk button, and as soon as you start walking forward, release the Smoke.
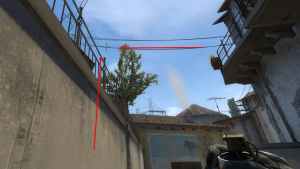
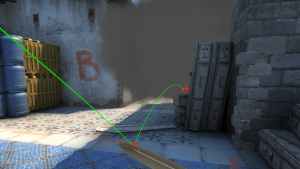
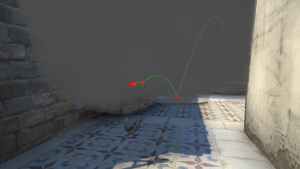
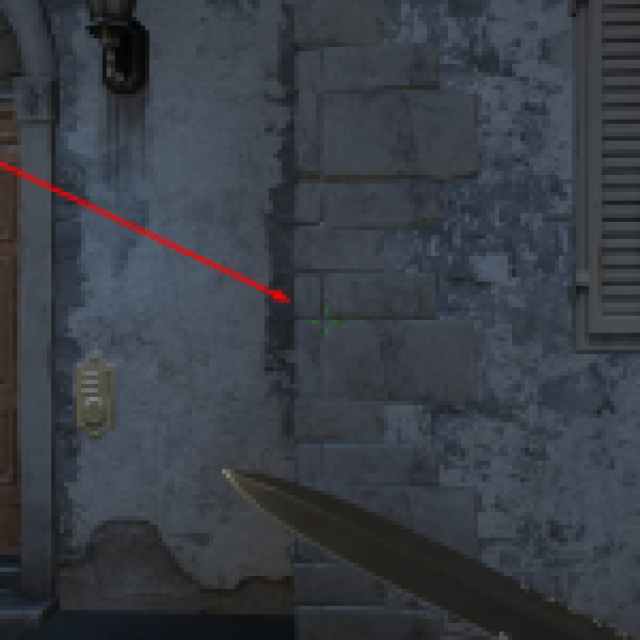
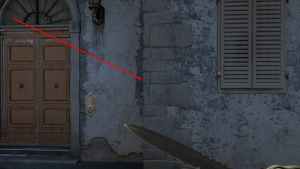
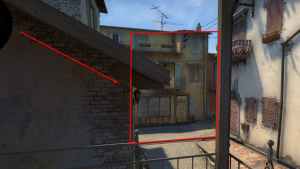
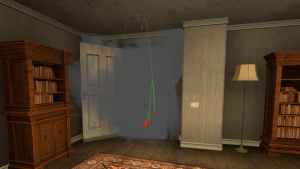
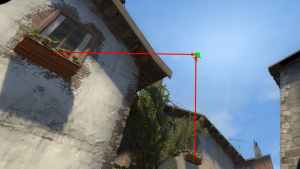
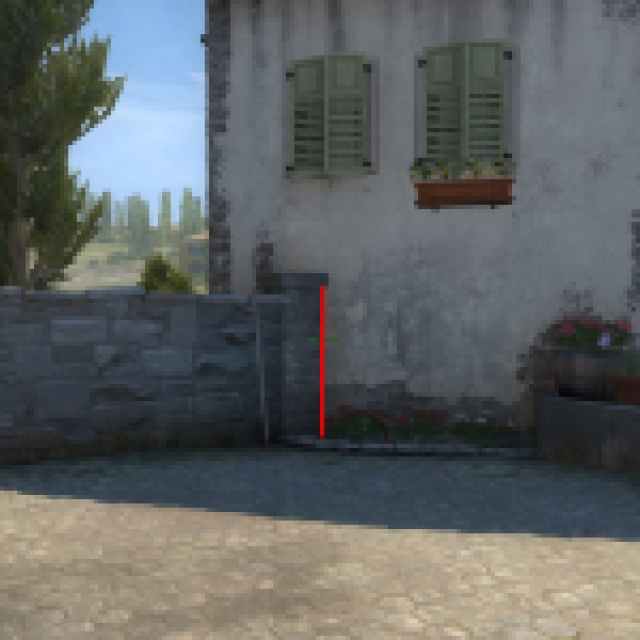
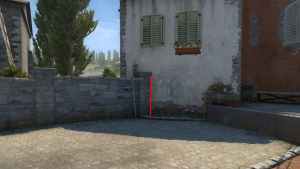
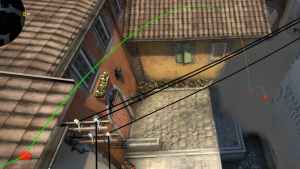
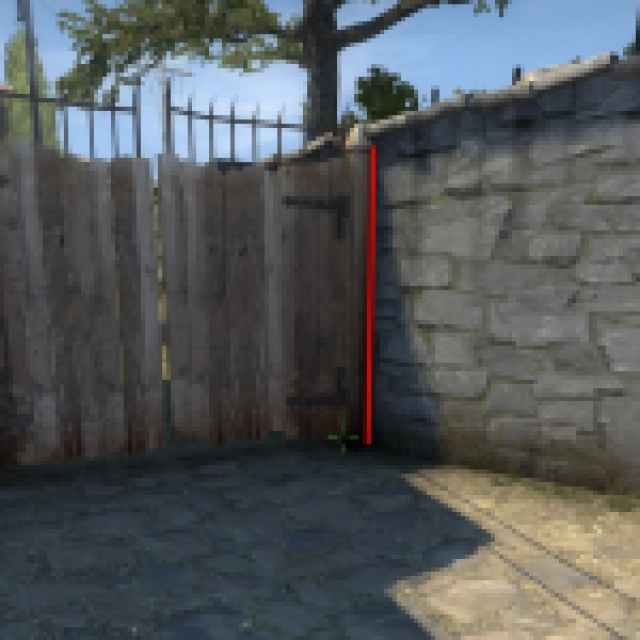
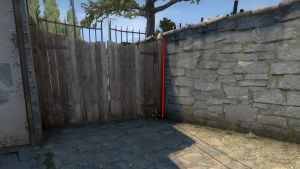
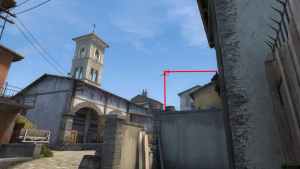
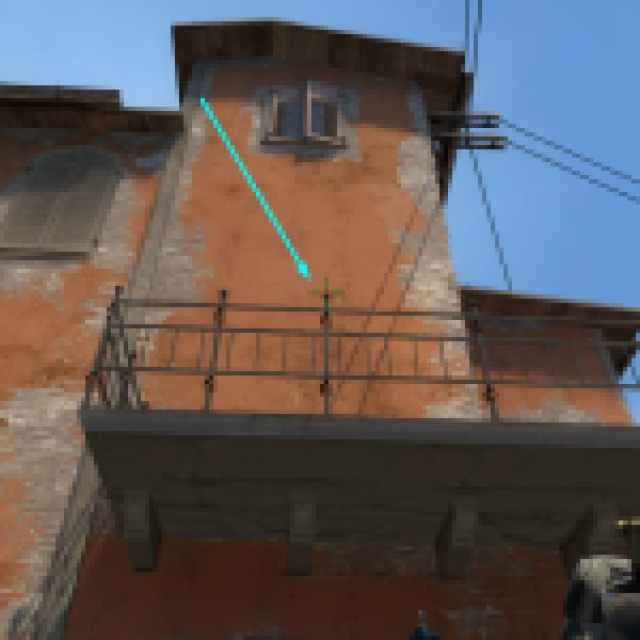
Balcony to Apartments
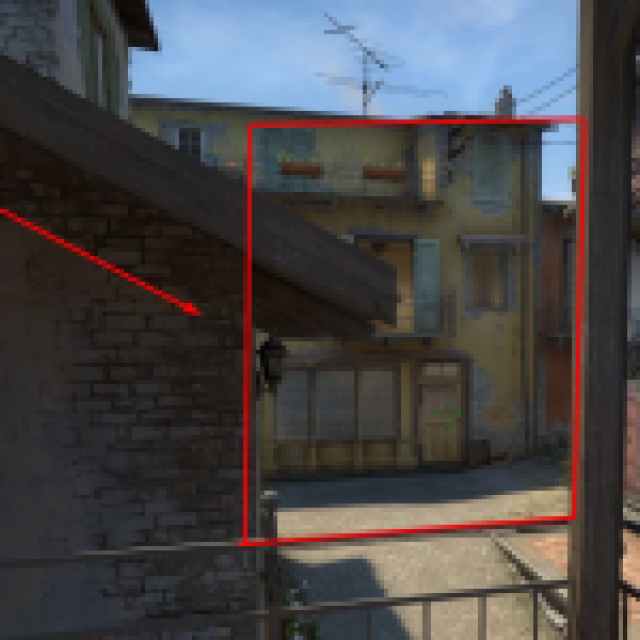
You’ve heard of Smoke on the Mid, now get ready for Smoke in the Apartments (hoping no smoke alarms will trigger). It’s the perfect partner in crime for the previous entry on this list and shuts off quite a few rotations/counterattack routes for CTs.
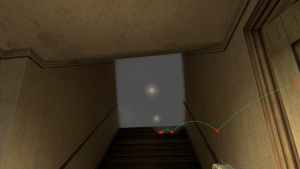
- Crouch jump into the indicated corner on the fence and go as far as you can (forward and right).
- Aim between the red line and the gutter, above the half of the window, and throw the grenade. We have tried tossing this Smoke grenade without breaking the window first a few times and we haven’t seen any trajectory alterations.
- This Smoke discourages CTs from progressing. Careful though, if you step between the CT hiding at the bottom of the stairs and the lamp at the ceiling, you will block out the light and announce your presence. The white dot (light bulb) will disappear from the sights of CT and you will be swiss-cheese from all the spraying that’s heading your way.
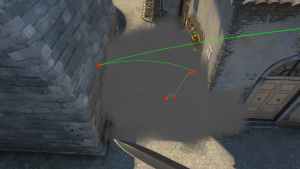
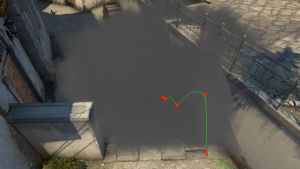
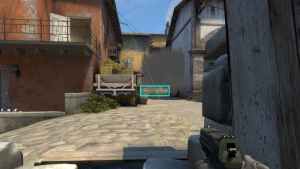
From T Mid to CT Pit on A site
If your team has control of the Mid (or you’re in a gambling mood) and you intend to push A and want to keep yourself safe against The Pit, follow these simple yet effective instructions:
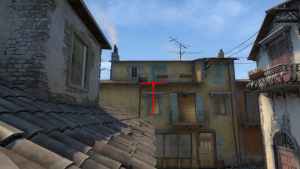
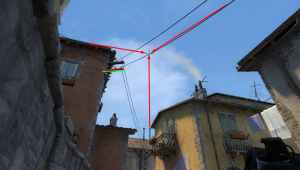
- Go ahead and hug this broom in the picture, and turn around towards A site.
- Look above the 2nd chimney and align with the bottom cable and the rooftop edge as indicated in the picture.
- Hold your Walk button, pull the pin, start walking, and as soon as your crosshair crosses the red/green line painted on the screenshot, release the Smoke. As seen in picture 3, anyone standing in The Pit will need to find a different angle.
From Second Mid to Arch (CT Spawn)
This is an absolutely deadly Smoke that will force the enemy to push through Library (we have that covered as well later in this guide) and is very easy to deploy. Instructions are below:
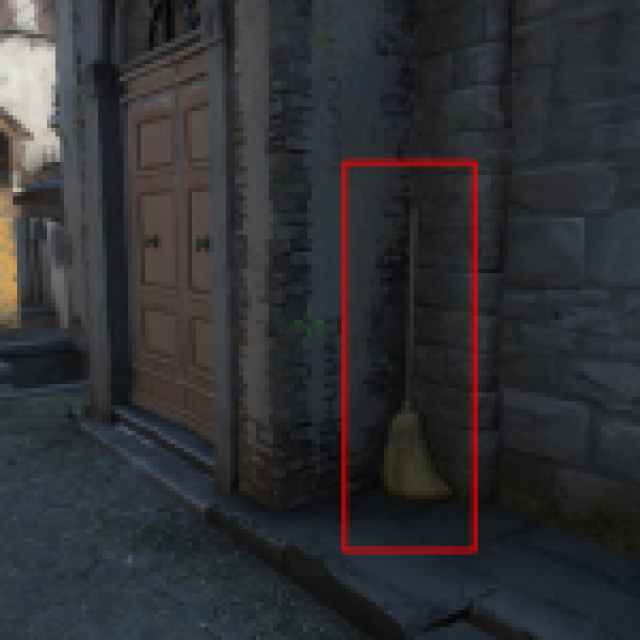
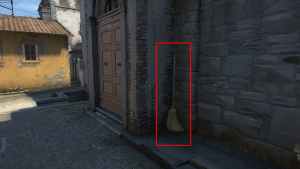
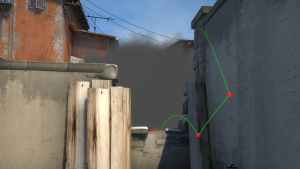
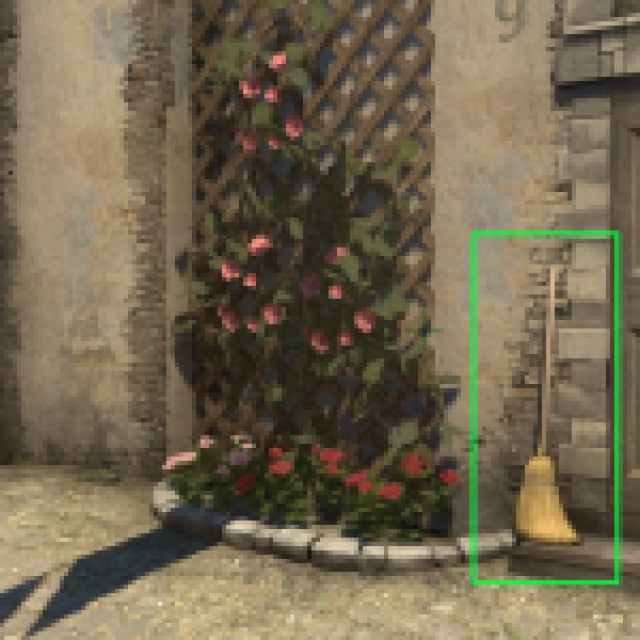
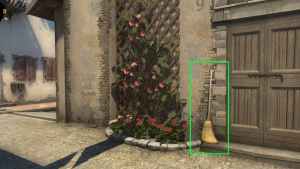
- Hug the broom between the flowers and the doors as indicated in the picture (No seriously, they definitely planned these locations out carefully) and turn around towards the Arch (CT Spawn).
- Aim above that chimney under the green line (or by the right edge of the window above) and stop at the upper green line (that totally unintentionally aligns with the edge of the floor of that tower, trust us).
- Throw the Smoke. Nothing else is needed.
From Mid to Library
From a nearby location, you can smoke out yet another relevant rotation passage (which the Library is of course), and, partnered with the above Smoke, you and a teammate can close off 2 rotation routes towards the A site for a very long time. You should hug the left edge of the third brick from the top in the marked corner). The next steps are:
- Turn around towards Library.
- Aim above the “L” angle made by nearby roofs and the line that comes out from the rail of the terrace above, as indicated in the picture.
- Toss the Smoke grenade. No additional action during throwing is necessary.
And now, some CT side smokes (even though some of these are interchangeable, depending on the game state)
CTs sadly don’t have as many complex smokes as Ts do, but we assure you that these few are very useful when you pull them off. Of course, we didn’t specify common spots that you can easily figure out on your own as you play, to keep it interesting.
From CT Spawn to Banana (Wallbang)
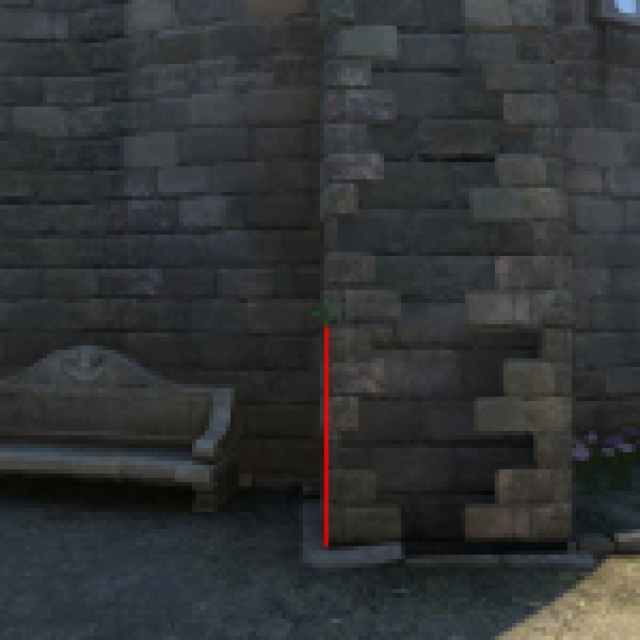
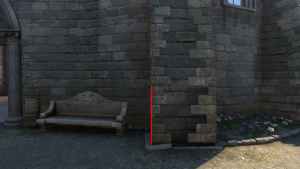
Similar to the first one on this list, this Smoke has advantages and disadvantages, so tread carefully.
- Hug the corner next to the bench (line indicated on the screenshot).
- Aim above the middle of the flower pot that’s down, and right from the middle of the flower pot that’s in the upper left (see picture).
- Throw with no other action. Try to get the angle right so that the area near the Wallbang is also smoked out (this is the difficult part to get down).
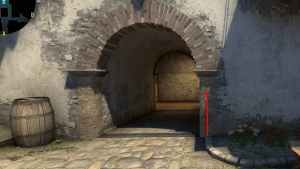
From CT Spawn to Outside B Site
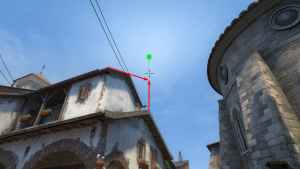
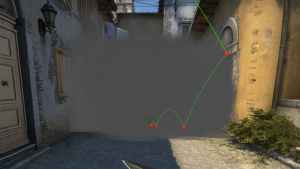
If your CT teammate died on Banana, you can technically try and wall off Ts with this Smoke to prevent them from just waltzing in unobstructed. Or, for example, if you are defending the plant as a T by sitting in the CT spawn, and you get info that CTs are trying a retake through Banana, you can seal off that area, analogous to the vice-versa situation in the previous sentence. This is why we emphasized that some of these spots are usable by both sides, you just need to be creative!
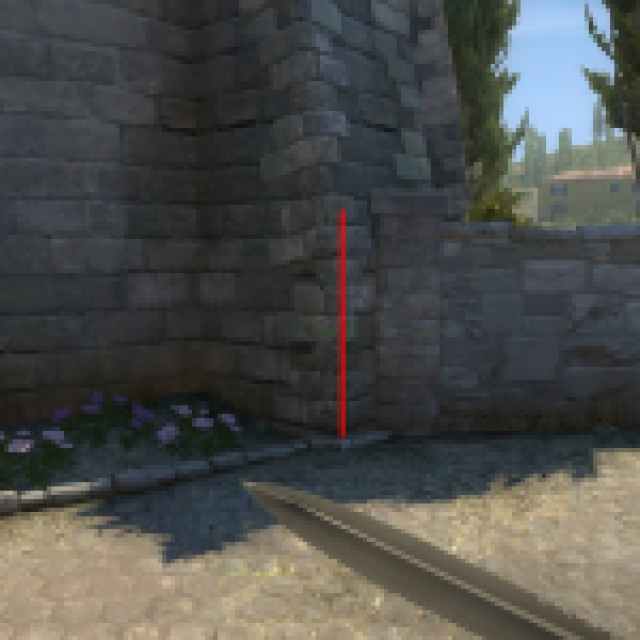
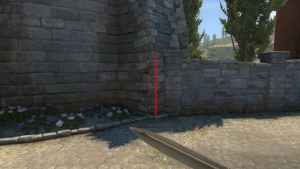
- In the corner of the CT Spawn, you will see this spot, hug the corner and turn around towards the B site.
- Aim above from the tip of the small roof and slightly above the vertical line indicated.
- Deploy the Smoke grenade, without moving.
From CT Spawn to Banana (Car, Sandbags)

This is another Smoke that is aimed toward the Banana area and is fairly simple to reproduce, it smokes a bit more inward but still catches a decent angle that’s easy to defend if Ts try to rush through.
- Find the indicated corner at CT Spawn and hug it.
- Aim at the indicated object in the picture.
- Throw the Smoke grenade without movement. You should bounce the Smoke against the Sandbags (see the trajectory in picture 3) for maximum effect.
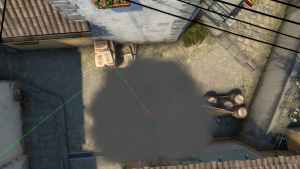
From Haystack on A Site to T Mid
This one is just crazy stupid. No, we really mean it. If you time it right, you can cause serious headaches to the T team, making them vulnerable from pushes through the Mid. This takes some practice but do not give up on it easily.
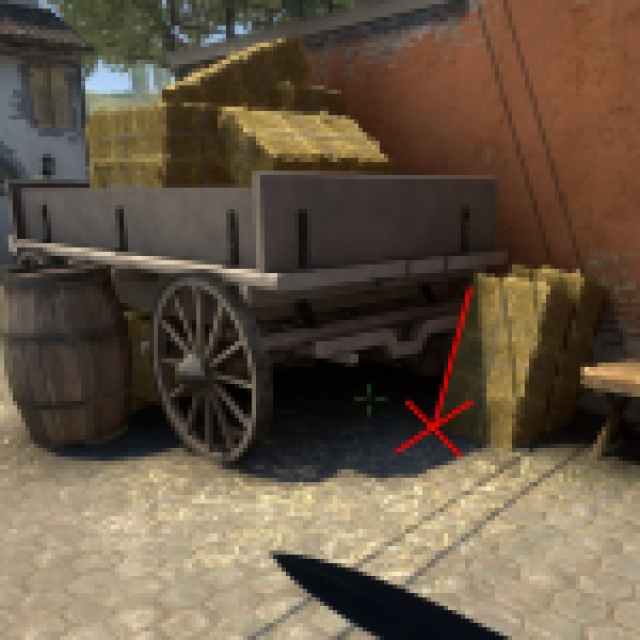
- Stand at the marked location, and hug the corner between the cart and the hay.
- Turn around and aim above the half of the indicated window and stop when you meet the line coming out of the edge of the flower pot as indicated in the screnshot.
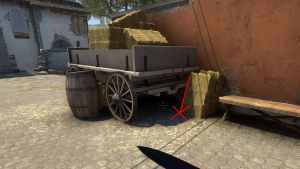
- Hold the Walk button, pull the pin, hold it as well, start walking and immediately toss the Smoke out. This is probably very hard to get right like in picture 3, but you will still provide a great impact even if it misses by a bit. Alternatively, you can throw the Smoke while standing still. It will simply fall close to the CT side of Mid but will still block off Mid to some extent.
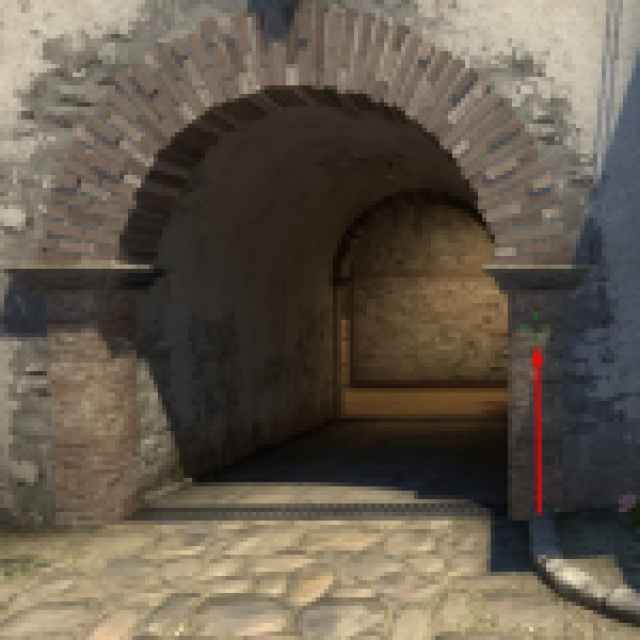
From The Pit to Library
There is an easy way to Smoke outside of the Library, for both CTs and Ts. Instructions are as follows:
- Hug the corner indicated on the picture and turn around.
- Aim above the gap indicated with a vertical arrow and aim slightly above the tip of the street lamp.
- Hold the pin and the Walk key, start going forward and release the pin when your crosshair passes the lamp (practice it out a bit).
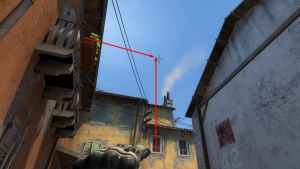
From The Balcony Above The Pit to Truck Side (One-Way Smoke)


To close off this article, we’ll show you another one-way Smoke that’s absolutely brutal (however, expect the surprise factor to work once, maybe twice in a match) and not that difficult to master.
- Notice the THIRD ball on the fence, you’ll need to climb on it for this Smoke spot.
- Walk slightly closer to the Pit for this toss.
- Aim at the right edge (slightly above the half of it) of the visible part of the window that’s on the tower in the distance.
- Deploy Smoke (no additional movement).
That’s it for this guide! We hope that you have found it useful and that you’ll master these Smoke spots with no trouble. Make sure to share this guide with your CS:GO competitive playgroup as when some of these Smokes are deployed simultaneously, they can indeed wreak havoc on your enemies.
To someone else, to “tryhard” these as a team may seem like some sort of a circus show or a roleplay of esports professionals, but to them, we say that it’s just a means to an end. It’s a perfectly legal way to gain an edge in a competitive setting through clever usage of game mechanics that were put there intentionally for a reason (as we’ve concluded earlier).