Yahar’gul, Unseen Village
After beating Rom, the Vacuous Spider, you probably saw some monsters in the area. If you wish to kill them and collect the items, take the lamp to Hunter’s Dream and then access the Grand Cathedral Lamp. If you prefer to continue pushing forward, scroll down to our section for Yahar’gul, Unseen Village.
Cathedral Ward
When you reach the Cathedral, do an about face and walk through the doors ahead. Walk down the steps and then travel left until you reach the end of this walkway and more steps. Head down and then to the tree straight ahead. Pan the camera downward so you can see the dead body. There’s a Frenzied Coldblood to collect, but you should kill the enemies before going after it.
Go right until you see more steps, then look left to see a rooftop. Walk onto this roof and slaughter two Crazed Crows. Now keep walking down the steps and you’ll run into a Hunter and a new Bloodborne enemy, the Shock Hunter.
As its name implies, lightning powers the Shock Hunter’s weapon. On the plus side killing one may grant your hunter access to Bolt Paper, which allows you to take advantage of this ability.
Shock Hunters also carry wooden shields. On top of that, they will dodge away from your attacks. Thankfully you can interrupt this monster’s strikes with your own, providing you have enough stamina.
When the Shock Hunter sees you, head up the steps to put distance between it and the Hunter; avoid battling both at once. After killing the Shock Hunter, walk down the stairs and deal with the Hunter. Make note of the trees on the left and the well in the middle of this location. These provide cover from the Hunter’s firearm. It’s also a great opportunity to regain stamina.
Walk up to the Hunter and it will fire. You won’t have much time to dodge, and you should obviously avoid point blank range. Make sure you’re close enough to avoid at least one gunshot and then attack. Keep in mind you may only get in two hits before this enemy dodges.
Depending on your skill level and your understanding of this Hunter, you’re able to dodge when close by and then unleash a Charge Attack, however you have a short window of time to achieve this. In addition, you can stun the Hunter by shooting him before he attacks, but again, there’s little time.
On the positive side, dead Hunters do not re-spawn. With this one gone, go back to where you saw the corpse with the Frenzied Coldblood and fall down to collect it. From here, drop down again. Don’t worry, there are no monsters.
Upon landing, go towards the red lanterns on the left and give the doors a good knock; all you hear are screams. Leave and look right of these lanterns to see the rocky path. Take it and you’ll encounter a Death Dealer. Remember that getting killed by a Death Dealer puts you inside Yahar’gul, Unseen Village. Trick the monster into following you towards the aforementioned well so you have room to maneuver.
Kill the Death Dealer and take the rocky path once again. You’ll see a ledge where you originally saw the Death Dealer, and you can drop to it and collect a Twin Blood Stone Shard. From here, drop again and dispose of the enemies.
To be fair, you don’t have to bother with the Death Dealer. Instead, you can walk down the steps to the right of this path near its base and into a cave. However, we feel it’s easier to move in the direction of the Death Dealer because after collecting the Twin Blood Stone Shard, you will surprise the gun-wielding Henchmen below and quickly dispose of these adversaries. Taking the cave means having to deal with Cleaver Brutes and then hitting the Henchmen with pebbles to draw their attention.
When fighting the Cleaver Brutes, stun these foes with your firearm and then unleash a critical strike. You must strike at the right time, otherwise your Quicksilver Bullets will ricochet off their weapons.
Make note of the second Cleaver Brute’s location because there are two Imps over there. Kill these creatures before messing with this enemy. Now dispose of the Cleaver Brutes and walk over to the building straight ahead. Look left to see a corpse, then pick up three Lead Elixirs. Now walk further into this building and you’ll return to where you began. Time to proceed to the next place.
Yahar’gul, Unseen Village
Return to the Yahar’gul, Unseen Village lamp, look left and go down the steps. Be cautious, because in this place enemies (predominantly Henchmen) re-spawn shortly after killing them. Stop this from happening by killing a Bell Caller (there’s usually one of these creatures here), which is the source of the bothersome resurrections.
As you descend these steps, look left to see some monsters. You’ll also encounter a Giant Being near the second group of steps. This enemy’s attack consists of a portal that sends your hunter into a frenzy and eventually death. You will also get sent to a secret area.
To succeed, lie in wait until some of the enemies walk towards this second set of steps. When they pass by, walk down the first staircase and travel to the end, where you’ll find a body with a Blood Stone Chunk to make your weapon stronger. While traveling to this corpse you passed some more steps. Turn around and go down these steps, then go left around the corner.
When you walk all the way down, immediately look left and then kill the Wheelchair Blunder. Grab the Iron Yahar’gul Helm, then go up the stairs and deal with the Henchman and Wheelchair Blunder. Now go back to the previous location.
Do your best to get as many creatures as possible to move away from the steps. When two to three are dead, go down the steps towards the building, then walk right and head up more steps. You’ll see the Bell Caller. Destroy it and then slaughter whatever foes remain.
Go to the top floor and inspect the cells to find items. The first one contains a body to the left with a Bold Damp Blood Gem. When finished, go back down the steps, turn left and go through the entryway.
Keep walking down the steps directly ahead of your hunter. From there, head left into a small place and slip through a busted wall. When you reach the other side a Henchman magically spawns from the floor. There’s also a Bell Caller to the right inside of a jail cell. You’ll see the entrance towards of the end of this hallway, so go through the opening and then quickly exit back the other way so the Henchman spawns. Now kill it.
As you explore this hallway a Brute appears. You need to battle this Brute as far away from the Henchman’s former location as possible, because there’s a chance said Henchman will re-appear and now you’re fighting two monsters instead of one. Kill the Brute and go around the corner. You’ll discover a body with an Heir rune, which grants more Blood Echoes for your visceral attacks.
Look at the nearby jail cell and you’ll see a door. Enter and you’ll meet a Wheelchair Blunder and some Henchmen. Your primary target, however, is the Bell Caller above you, so destroy it immediately and then focus your attention towards the other creatures. Explore the remaining cells and you’ll take a Frenzied Coldblood off a body. If you open the door near the Bell Caller, you now have a shortcut.
Walk through the entryway on the bottom floor and then head down more steps. Go right and there are two different routes you can take. You can walk straight ahead or take the steps on the left. Choose straight ahead and you’ll enter a room containing the Tiny Tonitrus. Keep in mind you will need to kill some bad guys along the way, then once more because you’ll head back from where you came. If you choose this path, here’s what you’ll need to do.
There are quite a few Old Hags in this direction. Back up if you choose to battle these enemies one-on-one, then walk down some steps to the right. Go around the corner and then along a tiny bridge until you enter a building. A Brute attempts to literally get the drop on you, so exit this building to not only escape the Brute, but also avoid drawing attention from the other two monsters.
Kill the Brute and then go around the jail cell on the left. You’ll creep behind a Wheelchair Blunder with an automatic weapon. The final monster is a Brute on the furthest side of this room, standing right in front of a chest containing the Tiny Tonitrus. Take down the Brute and then claim your reward.
From here, you want to head back to where you have the two different paths to take, then walk up steps. There’s a Giant Being up here that attacks with its laser, along with some Old Hags. With the Giant Being, wait until you see a light beam along the ground and then dodge to avoid the laser blast. Thankfully this laser also harms the Old Hags, so steer the Giant Being’s attacks in such a way that it weakens or kills these enemies.
Go up the steps and look for an item beneath the small structure. Pick up the Blood Stone Chunk and take the steps down on the far side near the middle of this area. Go into the building and then interact with the Yahar’gul Chapel lamp. Look left and walk into the entryway.
Travel along the end of this walkway past the tiny steps on the right. Now take the steps on the right. Be patient because a Hound will eventually appear. Kill it and then go around the corner to battle another Hound. From here, return to those aforementioned tiny steps and approach the end of this platform, then fall onto the Henchman. After killing him, loot the body close by and you’ll receive a Frenzied Coldblood.
Fall into the below area, approach the steps and go left to engage a Bell Caller. Immediately slaughter the Bell Caller and then dispose of the two Henchmen and Brute in the area. Beware a third Henchman that may decide to help its buddies.
Walk straight ahead and you’ll discover a body with eight Blood Vials. Walk into the building and then travel right, into a lower area. There’s a Hunter who calls two more into the fight. One has a Threaded Cane, another a Stake Driver and the last one carries a Rifle Spear and Cannon.
Do not battle them at the same time because that’s an easy way to die. Instead, go back to the lamp because in our experience with the game, only one hunter gave chase. Kill it and then repeat this strategy to fight each of these enemies one-on-one. Although you can slaughter these enemies with any weapon in the game, their constant dodging makes the Cane, Saw Cleaver or Ludwig’s Holy Sword the best choices.
Don’t get too crazy here. Remain patient until the Hunters attempt to strike and then respond with a well-timed counter attack to disrupt their combos, which prevents them from dodging. Ideally, dodge left or right to avoid their swings.
The Hunter you initially saw will leave behind a Clawmark rune that boosts your character’s visceral attack damage by 20 percent. Meanwhile, the one carrying the Threaded Cane has 20 Quicksilver Bullets for you to grab. Finally, the one with the Cane has a Madman’s Knowledge. With them all dead, search for a body with a Moon rune. This item causes monsters to leave more Blood Echoes for you.
Through this next-door is a new enemy, the Skull Plant. Do not fight it yet. Turn right and unlock a shortcut that leads to the Darkbeast Paarl boss fight, which is optional. Take the hallway and then travel down the steps to discover two bodies, one straight-ahead and then one more in the left corner. Gather the Frenzied Coldblood and a Twin Blood Stone Shard. We’re not trying to make matters worse for you, so do not go towards the Darkbeast Paarl. If you do, skip to the boss battle below.
If you choose to avoid this boss for now, go back up the steps and then around the corner again. Travel up the steps and you’ll come upon a Henchman carrying a firearm. Destroy this creature and continue walking up the steps to dispose of the Bell Caller. With this monster out of the way, enemies in this particular location will not re-spawn.
Walk back down the steps and then go right, slaughter the Henchmen and walk onto the lift, which takes you to a place close to the Yahar’gul, Unseen Village lamp; this is another shortcut. From here, take the lift down, head right and walk down the path. You’ll see a staircase, but before getting there, go right to battle another two Henchmen. Now explore a bit until you find a body with a Frenzied Coldblood. Now it’s OK to go down the steps, walk to the right and then down another hallway.
Be ready because there’s a nearby Imp. Kill it and then go up the steps. Open the door and now you have a shortcut leading to the room where you battled the three Hunters.
Return to the area containing a glowing body. Do not interact with it! Instead go down the steps to that Skull Plant. Again, do not engage this enemy. Go in the opposite direction and then look left. There’s a path with a second Skull Plant.
Since this Skull Plant faces a wall, it is possible to use stealth. Should you attack, the Skull Plant will immediately turn its attention to your Hunter and counter attack. Hit this enemy and then dodge. Best case scenario, wait for the Skull Plant to launch an attack that would otherwise cause it to fall on you, strike back and then retreat before it gets up. This only applies to short-range weapons. If you carry a long-range weapon, you should be able to inflict damage after each of the Skull Plant’s attacks.
With the Skull Plant dead, approach the corpses nearby and take five Bolt Papers and two Blood Stone Chunks. Now return to the main road and there are some Skull Plants towards the end near a mystery item. Be careful because a there’s a Skull Plant near the carriage, and it goes on the attack as soon as you’re nearby. Take care of this enemy and pick up the Blood Stone Chunk.
In our play through, we used pebbles on each Skull Plant and then killed them all one at a time. Then we walked all the way to end of this area to find a Tonitrus weapon. After doing this, we suggest you now walk in the other direction, then travel down the steps where the very first Skull Plant is located. Turns out, it’s still there.
When you reach the bottom you’ll see some bodies. Inspect each one and you’ll receive the Yahar’gul Black Trousers, Yahar’gul Black Garb, Yahar’gul Black Gloves a Black Hooded Iron Helm and finally, three Madman’s Knowledge. Now go left and up the steps, then left again to find a body with Frenzied Coldblood.
Upon gathering this sweet loot, proceed. Beware the Henchman on the bridge because the monster has a gun. You’ll also see a Bell Caller to the farthest side and a Skull Plant to the left.
Walk up the steps on your left behind this Skull Plant to find a corpse with a Frenzied Coldblood. Don’t pick it up because now the Skull Plant is after you. Take these steps to the bridge and then dispose of the Henchman. Now continue walking across this bridge so you come to an Undead Beast in need of a beating.
After crossing the bridge, walk up to the body and pick up six Blood Vials. Now go up the steps on the left. You will see a bath that acts as a teleporter, transporting you to another bath. Do not approach. Instead take the entryway on the left and then walk over another bridge where a Henchman and that Bell Caller lie in wait. With the Bell Caller deceased, you can deal with the remaining Skull Plants in the area below.
Return to the first bridge but don’t move across it yet. Look left and walk into the entryway. When you reach the end of this hallway, look left and go down the steps. Kill the gun-toting Henchman and take the steps all the way down. Destroy the Undead Beast and look for a body containing a Tempering Damp Blood Gem.
Walk through this hallway and you’ll exit into a wide-open place near the Skull Plants. Take them out and use that bath you discovered earlier. After you teleport, slaughter the two Hounds outside of this place. With them out of the way, go outside, look right and then walk down the steps, killing the Imp before it has a chance to flee. Walk down these same steps, then slip around the corner. Take down the Undead Beast, then look for a body holding a Blood Stone Chunk.
Teleport through this bath, then go to where the Bell Caller used to be and descend using the nearby ladder. Drop down and go left, where you’ll discover a body with a Madman’s Knowledge. When ready, proceed to the far end. Watch the cut scene and prepare to encounter another boss, The One Reborn.
Boss Fight with The One Reborn
- Beat The One Reborn to receive Three Yellow Backbones.
At this point, you’re either weary from battling through so many enemies or hungry for more blood. Regardless, don’t immediately go after The One Reborn yet. Instead, go left and walk up the steps until you access the second level, where you’ll see three Bell Callers hanging out on a balcony. Rush up and slaughter these enemies. From there, take the bridge and you’ll find three additional Bell Callers. During this time, The One Reborn will attempt melee attacks with its hands, and when it’s further away, pelt you with projectiles. For now, make sure you are aware of the boss while dealing with those Bell Callers.
With these lesser enemies dead, return to the main floor and engage The One Reborn. Whenever you see a sphere atop its head, this means the creature is about to launch a projectile. You’re free to dodge in whatever direction you wish. In addition, The One Reborn’s body parts will fall from the beast and cause you harm. Dodge like crazy.
Should The One Reborn appear ready to vomit, get off the main floor and go to the side of this location so your hunter is on slightly higher ground. Stand here so The One Reborn’s puke doesn’t damage your character. Yes, the boss vomits. Joy!
Tip: When going for higher ground, you want to be on the opposite side of the boss. Otherwise the vomit will hurt you.
During this battle you’ll eventually see a reddish glow emanating from the center of the monster. That’s your cue to put considerable distance between your hunter and The One Reborn so you this attack does not hit you. Depending on your health, getting struck by this attack may spell your demise.
When The One Reborn finishes any of the aforementioned attacks, quickly approach and strike low. It will attempt to hit you with its legs, but you have plenty of room to maneuver, dodging its kicking attacks while landing hits of your own. Standing behind or to the front of this boss will also help you eliminate getting kicked. Continue this attack pattern until The One Reborn dies and you receive three Yellow Backbones, a ritual item for the Holy Chalice.
From here, light the Advent Plaza lamp and go back to safe haven Hunter’s Dream. When you get there, head to the Yahar’gul, Unseen Village lamp, which sends you on the path to another boss fight, this one against Darkbeast Paarl.
Stay close to the steps on the left to avoid the monsters, of if you feel up to it, slaughter these creatures. Walk down the steps and then turn right. Walk down another staircase and take out the Henchman and Wheelchair Blunder. Now use the lift to access the area below.
Walk straight ahead and then right to round a corner. Walk down some more steps and keep moving right of the large staircase. Round the corner and you’ll reach the end of this walkway. Go down more steps and take the door on the right. There’s an Undead Hound in this location, so kill it and walk through the entryway on the right, then up more steps until you approach the next Undead Hound. Make it dead and go to the other side up some steps. Walk to the left corner and collect two Blood Stone Chunks, then re-enter the first room from which you came.
Once inside, walk into the cell on the left so you enter a room. Pick up the Blood Stone Chunks and walk through the entrance on the right. Finally, jump down to the walkway and travel left until you reach the boss.
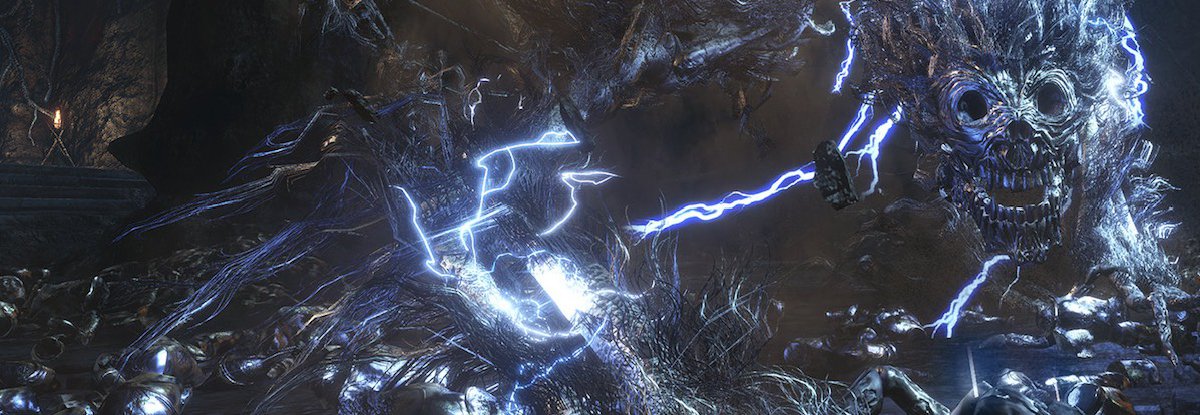
Boss Fight with Darkbeast Paarl
- Beat Darkbeast Paarl to receive the Spark Hunter Badge
Although you can battle Darkbeast Paarl much earlier in the game, we strongly advise against it. Ideally, you should attempt to kill it after entering Yahar’gul, Unseen Village the proper way. By that point, you’ll be strong enough to take down this fast-moving adversary.
Despite its impressive agility, Darkbeast Paarl is not the toughest boss you’ll face in Bloodborne, providing you engage it at a high level. Naturally, we’ll give you step-by-step instructions on how to win as efficiently as possible.
First, run up to Darkbeast Paarl and remain close to the monster. Wait for the creature to charge and then stand still. When this happens escape and move far enough away so you don’t take damage from the ensuing attack. In fact, you should remain beneath Darkbeast Paarl right before it charges up and then run away. Make sure you are far enough to avoid the monster’s lengthy reach.
Stand directly in front of this boss and it will attack with its front legs. It is possible to dodge forward beforehand, run underneath the creature and then lay into it with multiple attacks of your own. To remove even more of its health bar, use Fire Paper, which strengthens your attacks.
A word of warning, and this applies to all enemies in this game: don’t be overzealous. Attack for too long and Darkbeast Paarl will make you regret it. Always keep a close eye on the boss to see what it’s about to do.
After removing a sizable chunk of its health, Darkbeast Paarl can’t use electricity, at least for now. With the monster temporarily vulnerable, quickly run up to the creature and inflict even more damage.
From there, the boss regains its footing and goes for its electrical attack. Continue attacking as it charges up. Now start your attack pattern from the beginning, avoiding the charge attack and rushing in to strike until Darkbeast Paarl eventually succumbs.
With the boss defeated, walk up to the door and open it. Now you have a shortcut leading to Old Yharnam, close to where you already killed the Blood-starved Beast. Now light the Graveyard of the Darkbeast lamp and this section concludes.
Journey back to Prima’s free Bloodborne walkthrough. When ready for more monster bashing, proceed to part 9 to explore the Lecture Building, Nightmare Frontier and kill the next boss, Amygdala!


Published: Mar 28, 2015 04:50 pm