

The Nintendo 3DS (and Wii U) online services will be coming to an end in April 2024. While Pokémon Bank will continue to be available for use for an indeterminate amount of time afterward, it won’t be possible to transfer your Pokémon from Bank into Pokémon HOME on the Nintendo Switch without these online services. Additionally, players will be at risk of losing the Pokémon they’ve stored in Bank if the app closes at any point after the 3DS online service shutdown. It is highly recommended that Trainers transfer all their Pokémon from Bank into HOME while the 3DS online services are still intact. Below is everything you need to know about transferring Pokémon from Bank into HOME.
What You Need to Transfer Your Pokémon from Bank into HOME
These are all the things you’ll need to complete the process of transferring your Pokémon from the 3DS to Switch. It’s a good idea to prepare these all ahead of time.
- A Nintendo 3DS connected to the internet and logged into Pokémon Bank.
- Have all the Pokémon you want to transfer deposited into Pokémon Bank.
- A Nintendo Switch connected to the internet and logged into Pokémon HOME.
- A Pokémon HOME Premium Plan
- (Note: a Nintendo Switch Online membership is NOT required for this process)
While it isn’t required, consider taking this opportunity to replay any Pokémon games from the 3DS or earlier that you’re interested in, especially if you know you’ll want to eventually transfer Pokémon from them. Once the Nintendo 3DS online services shut down in April 2024, transferring your Pokémon to HOME will no longer be possible, even if Bank remains available for use.
About the Pokémon HOME Premium Plan
How Much Does the Pokémon HOME Premium Plan Cost?
There is one Premium Plan for Pokémon HOME. The difference is simply how much it costs and how often it renews. The longer renewal periods cost more upfront but cost less on a month-to-month basis. The different Premium Plan renewal periods and their associated prices (in USD) are as follows:
| Plan Length (in Days) | Plan Price (in USD) | Plan Price Equivalent per Month |
| 30 days | $2.99 | $2.99/month |
| 90 days | $4.99 | $1.67/month |
| 365 days | $15.99 | $1.34/month |
What Are the Pokémon HOME Premium Plan Benefits?
Since you have to get the Pokémon HOME Premium Plan to transfer your Pokémon from Bank, you might as well take advantage of the plan’s other features while it’s active. In addition to the ability to transfer Pokémon from Pokémon Bank (in the Nintendo Switch version of the app), other benefits of the Pokémon HOME Premium Plan include:
- The ability to deposit up to 6,000 Pokémon in Pokémon HOME,
- Access to the Judge (Pokémon IV viewing) function,
- Create a Room Trade room (only available on the mobile version of Pokémon HOME),

- The option to place up to 10 Pokémon at once in the Wonder Box to Surprise Trade (only available on the mobile version of Pokémon HOME),
- And the option to place up to 3 Pokémon at once in the GTS to request specific trades (only available on the mobile version of Pokémon HOME).
How to Select a Pokémon HOME Premium Plan
Once you’ve decided which renewal period you’d like for your Pokémon HOME Premium Plan, follow these steps to activate it:
- Open Pokémon HOME on your Nintendo Switch.
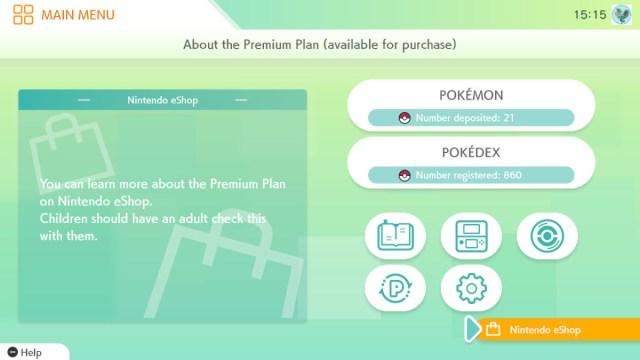
- Scroll to the Nintendo eShop button at the very bottom of the main menu.
- Choose the plan you’d like to check.
- Press A on the “Proceed to Purchase” button.
- You’ll be asked to choose your desired payment method for the account’s automatic renewal. You have the option between a saved credit card, an attached PayPal account, or your eShop account’s available funds.
- You’ll next be asked how you’d like to pay for the initial account payment. You have the same options as before, along with the option to convert Nintendo Gold Points into usable currency.
- Scroll through the information, including the purchase method, how the plan will be renewed, then confirm the purchase one final time.
- You’ll see a confirmation screen and be returned to the start menu for Pokémon HOME. Press A to enter and activate your Premium Plan.
You know your plan is activated if the Nintendo eShop button no longer appears at the bottom of the main menu.
How to Turn off the Pokémon HOME Premium Plan Automatic Renewal
If you don’t want your Pokémon HOME Premium Plan to automatically renew once you’ve finished transferring your Pokémon over from Bank, follow these steps to turn off the automatic renewal:
- On your Nintendo Switch, open the Nintendo eShop.
- Select the associated user.
- Scroll to the right and upwards to highlight your Nintendo account icon. Press A to enter your Account Information.
- Scroll down to “Your Subscriptions.”
- On the right, you’ll see all your currently active subscriptions, including your Pokémon HOME Premium Plan. Information shown includes the plan’s expiration date, the deadline to turn off automatic renewal,* and how much the subscription costs.
- Highlight the “Turn Off Automatic Renewal” button and press A.
- A pop-up warning will appear, reading, “Turn off automatic renewal for this pass. Even if you turn off automatic renewal, you can use the service until your current pass expires,” and the month, date, year, and time the pass will expire. Select “Turn Off” and press A.
- You will see a pop-up confirmation reading, “Automatic renewal has been turned off.” Press A to continue.
Under “Your Subscriptions,” the Pokémon HOME Premium Plan information will now show the plan’s expiration date and list “Automatic Renewal” as “Inactive.”
*You have until up to 48 hours before your current subscription term expires to cancel automatic renewal for that subscription duration.
Since you can continue to use your Premium Plan until its final date, it’s recommended to cancel the automatic renewal as soon as possible if you don’t plan on using HOME’s extra features after you’ve finished transferring your Pokémon.
What Happens if Your Premium Plan Expires but You Have More than one Box of Pokémon still in HOME?
According to the official Pokémon support website, “If you deposit more than 30 Pokémon in Pokémon HOME while you have the Premium Plan and your plan then changes to the no-cost Basic Plan, then only the 30 most recently deposited or traded Pokémon will be in your Basic Box. The Pokémon will remain in Pokémon HOME for a certain period of time. You will not be able to view or withdraw any Pokémon that are not in your Basic Box.”
This unhelpfully vague statement is the only official word regarding the fate of extra Pokémon stuck in a HOME Basic Plan account. Different players have expressed different findings over the years, including Pokémon still being available after not having a Premium Account active for more than a year, as well as statements of Pokémon disappearing after not renewing a Premium Account after more than a year.
Ultimately, if you’re going through the trouble of transferring your Pokémon out of Bank and into HOME, it’s in your best interest to not risk them being lost under any preventable circumstances. Although the information isn’t completely consistent, there is a nonzero chance that your Pokémon could be erased if you keep them outside of the Basic Box when you don’t have a Premium Plan.
If you plan to cancel your Premium Account after transferring your Pokémon from Bank to HOME, make sure your extra Pokémon are placed in a copy of Pokémon Sword, Shield, Brilliant Diamond, Shining Pearl, Legends: Arceus, Scarlet, or Violet so that you only have 30 or fewer in HOME once your Premium Plan expires. If you don’t have enough room in any of your game files, you can make a separate file exclusively for Pokémon storage (described later).
How to Transfer Pokémon from a Nintendo DS (or Older) Game into Pokémon Bank
Before you send all your Pokémon over to HOME in one fell swoop, it’s important to make sure every Pokémon you want to transfer is in Bank already. Using Bank with a 3DS Pokémon game is straightforward, but transferring Pokémon from an older game can be a bit trickier. Follow these steps to transfer Pokémon from a DS (or older) game into Bank:
- Make sure you have the Poké Transporter app (it has a predominantly black-colored icon compared to Bank’s orange-colored icon) downloaded. You can do this by opening Pokémon Bank (while you have a 3DS Pokémon game in your system), then going to the fifth option on the main menu.
- Once you know you have Poké Transporter, exit out of Pokémon Bank and open the game you want to transfer Pokémon from. This can be a Nintendo DS game, or the eShop re-releases of Red, Blue, Yellow, Gold, Silver, or Crystal. You can complete these steps on the 3DS or DS, if they’re DS cartridges.
- Place all the Pokémon you want to send to Bank in the game’s first PC Box (default name “Box 1”).
- If you were playing a DS game on your DS system, put the cartridge into your 3DS that has Pokémon Bank.
- Open the Poké Transporter app.
- Select the game you want to transfer Pokémon from. You’ll get to select between any cartridge or digital games currently loaded into your 3DS.
The following disclaimer will appear: “Pokémon sent to Pokémon Bank can’t be returned to the original game from which they were moved. Additionally, any items held by moved Pokémon will be sent automatically for [the player]’s Bag. But please note that your items will simply disappear if your Bag is full.”
- After reading the disclaimer, the game’s first PC box will appear on the top screen. Confirm that this is the box you wish to transfer.
Once the transfer is complete, the following text will appear: “Pokémon moved to Pokémon Bank’s Transport Box. Please open Pokémon Bank to check the Pokémon in your Transport Box.”
- Once you’ve returned to the Press Start screen, close the Poké Transporter app.
- Make sure a 3DS Pokémon game is accessible in your 3DS console, whether that be as a cartridge or a digitally downloaded game.
- Open Pokémon Bank.
- Select “Use Pokémon Bank,” and select the game you want to use with it (any is fine if you’re just trying to get your transferred Pokémon into Bank).
- Accept Poké Miles, convert them into BP, or don’t take any.
- Once the Bank Boxes load up, press L once to enter the Transport Box.
- Move your Pokémon out of the Transport Box however you like. Make sure to place them into the Bank Boxes (on the top screen) and not the in-game boxes (on the bottom screen) if you want to transfer these Pokémon into HOME.
- When you’re done, press the X button to save your changes.
- Once the saving is complete and you’ve returned to the Press Start screen, you can exit Pokémon Bank.
How to Transfer Your Pokémon from Bank to HOME
Once you have everything set up, all that’s left to do is transfer your Pokémon out of Bank and into HOME. You’ll need both your Nintendo 3DS and Nintendo Switch ready at the same time to make the transfer.
- In Pokémon Bank, select “Move Pokémon to Pokémon HOME.”
- The message, “You’re about to send some of your Pokémon to Pokémon HOME. Please note that you won’t be able to bring your Pokémon back to Pokémon Bank. Please check the official Pokémon HOME website for details” will display. Scroll down to show the options for “Begin” and “Quit.” Select “Begin.”
- You will see all of your Pokémon Bank boxes. Select specific boxes to move, or press R to select them all. Press X to reset your selections. Press Y when you’re done.
- You’ll be asked to “Move these Pokémon to Pokémon HOME?” Select “Yes.”
- Next, the game will ask you to “Please enter the Moving Key displayed in Pokémon HOME.”
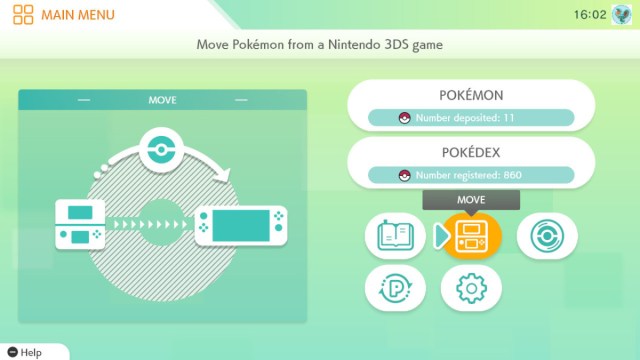
- On the main menu of Pokémon HOME, select “MOVE” (the Nintendo 3DS icon).
- You’ll be shown how many Pokémon you can still deposit into your HOME account and how many empty boxes you have, as well as the disclaimer at the top of the screen that “Pokémon brought over from the Nintendo 3DS can’t be sent back!”
- If you do not have your Nintendo 3DS, you can select “No Nintendo 3DS” to search for your Nintendo Network ID connected to your Nintendo Account and transfer Pokémon that way. Otherwise, select “Begin Move.”
- You’ll receive the warning, “You’ll be unable to use Pokémon HOME until the move is complete. Do you want to begin move preparations?” Select “Begin” when you’re ready.
- Text will display, “Select a Box in the ‘Move Pokémon to Pokémon HOME’ option in Pokémon Bank for Nintendo 3DS systems. Then, proceed to the screen where you can enter the Moving Key.” You’ve already done this, so select “Ready!”
HOME will inform you that “Moving Keys are only valid for three minutes. Enter the key into Poké bank as soon as you can. Once a Moving Key is active, you won’t be able to go back until it expires. Do you want to create a Moving Key?” Select “Display.”
- Pokémon HOME will display a 16-character alphanumeric code and the time remaining for you to enter it into Pokémon Bank.
- Enter the Moving Key into Pokémon Bank.
- Pokémon Bank and HOME will display, “Your Moving key has been confirmed successfully” and “The Moving key has been entered in Pokémon Bank successfully! Move preparations will begin.”
- Press A to progress in Pokémon HOME and Bank after Brigette tells you the Pokémon will be moved. Do NOT close either app.
- Enter Pokemon HOME again after a minute or so has passed. Once the Pokémon are ready, you’ll see a message saying, “Move preparation is complete. There are [X number of] Pokémon that can be moved!”
- HOME will ask, “How would you like to move them to Boxes in Pokémon HOME?” Your options are, “All Boxes as they are,” “One Pokemon at a time,” or “Organize Boxes”
- “Organize Boxes” will only let you organize your HOME boxes before the Bank Pokémon are sent in. Select “All Boxes as they are” if you’re transferring a lot of Pokémon.
- Once the process is complete, Pokémon HOME will save automatically, and you’ll see the confirmation message, “Pokemon were moved from Pokémon Bank to your Boxes in Pokémon HOME!”
If for whatever reason you can’t have all of your older Pokémon in Bank to transfer at once, not to worry. You can transfer Pokémon from Bank to HOME as many times as you’d like so long as you have a Premium Account active.
How to Make a New Pokémon Game Save File on Nintendo Switch Without Erasing Your Previous File
Normally, you can only have a single save file per Pokémon game. If you need to make another file to store your Pokémon (or if you just want to play the games again without erasing your old save files), you can do so by making a new Switch user. Each Switch user has their own save data for physical games, so by making a new Switch user, you can start your physical games over from the beginning without losing your existing save data.
To make a new user on your Nintendo Switch system:
- Go to the Nintendo Switch System Settings (gear icon).
- Scroll down to “Users.”
- In Users, select “Add User.”
- You’ll be given the option to “Create New User” or “Import User Data from Another Console.” Select “Create New User.”
- You’ll be prompted to select an icon for the new user. Select any icon, since this can be changed freely at any time later.
- Input a nickname for the new user. This can also be changed later.
- The user’s nickname and icon will appear, with the confirmation that “This user will be added to the console.” Press A to continue.
- You’ll be given the option to link a Nintendo Account to this new user, or skip it by selecting “Later.”
Your new user will now be added to your Switch console. Now, when you select a Pokémon game, you’ll be prompted to select which user is playing. If you select the new user, they will begin a new save file, and your prior save file on your older user account will remain unaffected. The only caveat is that this only works for physical copies of the game. Digitally downloaded games will only appear for the user who downloaded the game from the eShop.
Each Nintendo Switch console can have up to eight users, and each user has their own save data per Pokémon game. This means you can effectively have up to eight save files for each Pokémon game that you own as a physical copy.
How to Move Pokémon Between Switch User Accounts Using Pokémon HOME
To move Pokémon between the save files of your different Switch user accounts:
- After you have your Pokémon in Pokémon HOME, go to “Pokémon.”
- Above the list of compatible games, select the option with your user’s nickname and icon.
- You’ll be asked if “you want to check a different user’s save data?” Select “Yes.”
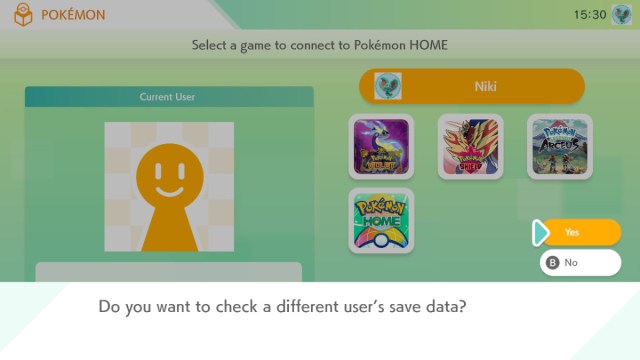
- Select the user with the save file you want to move the Pokémon into.
- You can now move Pokémon from the Pokémon HOME boxes into the in-game boxes of that new save file.
Remember to actually start the new save file and get to a point in the game where you can access boxes before trying to move Pokémon into the save file! When deciding which Pokémon to store in what save files, remember that not every Pokémon can enter every game. Check out our list of transferable Pokémon for Sword and Shield, and our list of returning Pokémon in Scarlet and Violet: The Teal Mask to help you decide where to send your Pokémon to.


Published: Oct 9, 2023 05:12 pm