
How to Complete All Puzzles in AILA
A simulation is not without its puzzles!
AILA is a unique indie horror game with a compelling narrative and plenty of interactive elements for the player to experience alongside Samuel. Along the way, you’ll run into a variety of puzzles, many of which need to be solved to continue the story.
If you’re finding yourself stuck on any of them, here’s how to solve all puzzles in AILA.
All Apartment Puzzle Solutions
Over the course of all Apartment interludes in the game, there’s a total of three major puzzles to complete. Each one is required for story progression.
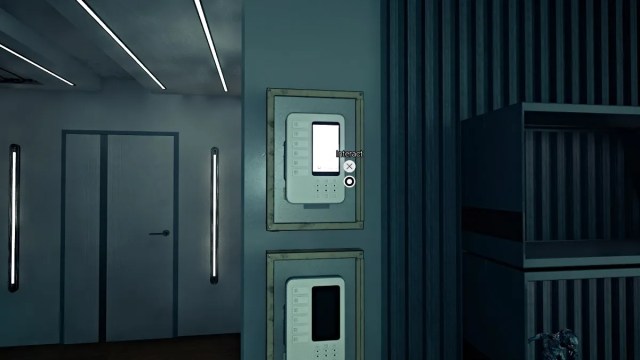
Electronic Panel Puzzle

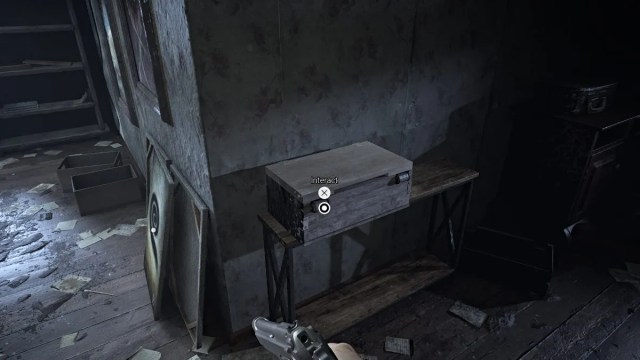
Here, you need to use the contents of the box along with some tools already on the table to assemble the electronic panel.
Start by picking up every part and tool, which includes:
- 3 x Electronic Components (all in the box)
- Screwdriver (on the table)
- Robot Panel Card (on the table)
Use the Screwdriver to open the electronic panel. Next, place the three E

Once done, pick up the Robot Control Panel and take it to the bedroom.

The spot for it is on the wall just around the corner from where you walk into the room.
Robot Control Panel Chip Puzzle
After completing the Woman on the Road simulation and returning to the apartment, you’ll receive a drone delivery that contains the new robot control panel chip that AILA ordered for you the day before.
Pick it up from the balcony and then bring it to the electronic panel you assembled and installed on the bedroom wall. Slot the chip inside the panel, which then brings up a diagnostic menu. You need to press the correct buttons on the left side of the panel in the correct order to run the full setup.
Input the following commands in order:
- Connect
- On/Off
- Send
- Reload
- Connect
- On/Off
Once done, the electronic panel will be calibrated and ready to go.
AILA Reconfiguration Puzzle
This is the final puzzle of the game, and completing it is required to reach the final stages of the story, regardless of your choices up to that point.
After following the previous necessary steps to reconfigure AILA into AIDA, you’ll be given the following slider puzzle to complete the process. You need to adjust each slider and its respective button to their correct positions.

Once done, the sequence of sliders and their buttons should resemble the one shown above. If it’s all correct, you should see a blue ‘Start’ button on the right side. Click that to finalize the process and resume the story.
All Woman on the Road Puzzle Solutions
There are a total of four puzzles to complete in the Woman on the Road experience. Each one is required for level progression.
Safe Door 1 Combination Puzzle

After you use the Carjack tool to pry open the window to the living room from the outside of the farmhouse, jump through the window, and on the table right in front of you will be a note along with the Safe Door Key.

The note indicates the solution for the combination lock on the door to the basement, which is: Left 27, Right 15, Left 8. After you use the Safe Door Key on the door, input those numbers into the combination lock in the correct order. Make sure to pay attention to the direction of the arrow as you increase or decrease the numbers.
Safe Door 2 Combination Puzzle

Once you reach the Baby Room on the second floor of the farmhouse, there will be a note on a small table next to another Safe Door Key. Pick up the note, and it’ll have the code for the door within the basement clearly indicated.

Head down to the basement and, just like the first door, use the Safe Door Key first to open the slot that contains the combination lock. Put in the following code: Left 39, Right 12, Left 39.
Safe Puzzle
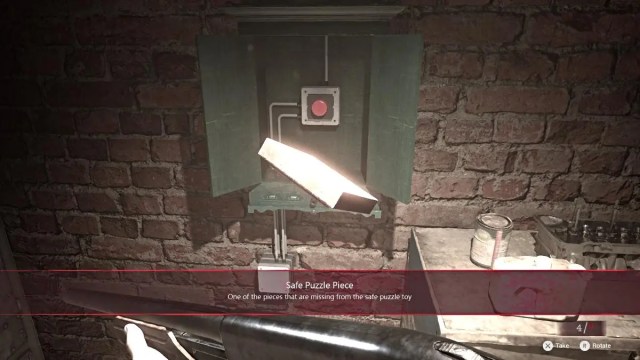
To complete the Safe Puzzle in the Baby Room on the second floor of the farmhouse, you first need to find and collect three missing Safe Puzzle Pieces. They’re each found inside green boxes that must be opened with a Crank tool found in the second safe room in the basement.
The Safe Puzzle Pieces are in the following locations:
- Basement – Room behind second Safe Combination Door
- 1st Floor – Small hallway north of the Shotgun room
- 2nd Floor – Room at the end of the hall on the left (same side as the safe puzzle room)

Once you’ve collected all three Safe Puzzle Pieces around the farmhouse, carefully make your way back to the Baby Room and place the pieces into the puzzle. Note that one space will be left open to move pieces around.
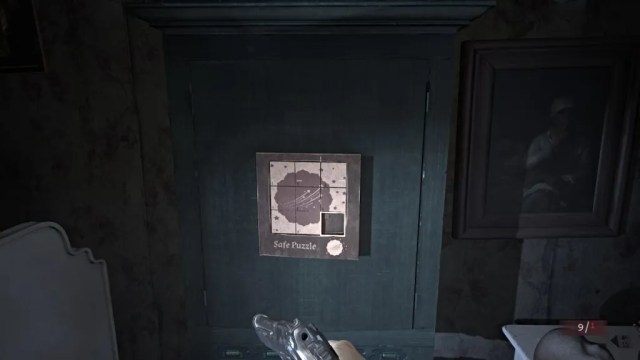
Your goal here is to arrange the pieces until they make the full image (seen above). Each piece has its own number, and they’ll go in order from 1 to 8. Once solved, the case will open, and you can grab the Metal Key (Pentagram) inside.
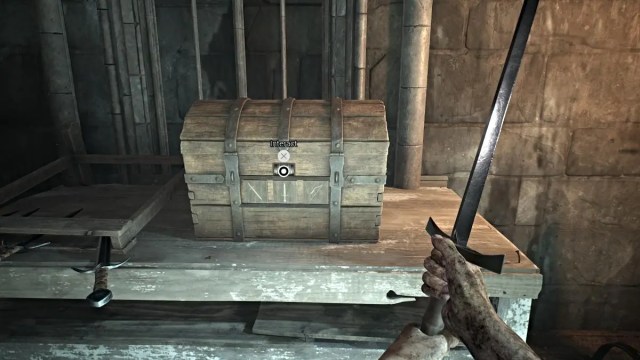
Art Room Chest Puzzle
Once you gain access to the art room via the garage in the farmhouse (requires the Rod tool from the attic to open), the focal point of that room is the chest puzzle.
The chest itself has two combination locks on the left and right sides, similar to a briefcase, and you need to solve both locks to open the chest.
Left Combination Lock Solution –
Right Combination Lock Solution –
Once you solve both combination locks, you can open the chest and obtain the Tetra Key that’s inside, which is used to open the garage door to make your escape with the repaired car.
All Medieval Puzzle Solutions
There are a total of four puzzles to complete in the Medieval simulation. Each one is required for level progression.
Library Painting Puzzle
Once you unlock the door to the library building with the Metal Morning Star key, go up to the second floor, where you’ll find a sequence of six paintings on the back wall. There’s also a wooden console in front of that wall with notes for each painting and a small lever.
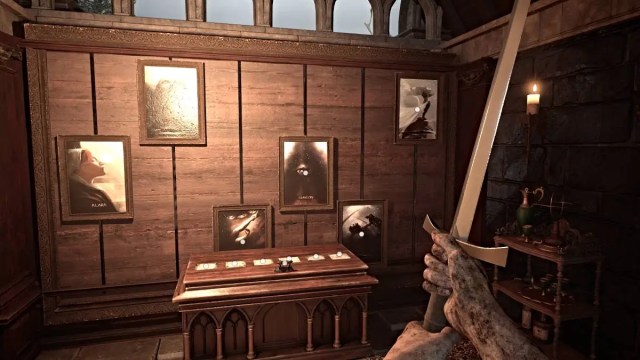
To solve this puzzle, you need to adjust each painting higher or lower into its correct position, according to the hints provided in the notes on the console.
Once done, the sequence should resemble the layout shown above. Pull the small lever on the console, and the door on the first floor will open, allowing you to progress to the next area of the simulation.
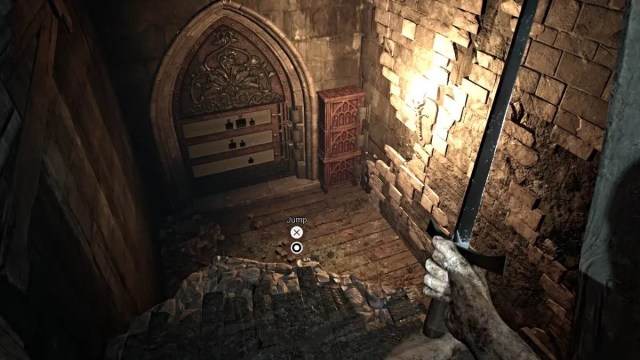
Castle Chest Puzzle
You’ll find this chest puzzle in an armory room at the far end of the right-side hallway from the castle’s front entrance.
You’ll need to solve it via the single combination lock, and weapon symbols are indicated below it as a hint. The correct code for the chest is: 3-7-4.
Open the chest, and you’ll find the Lion Key inside, which you can use for the respective door on the second floor of the castle.
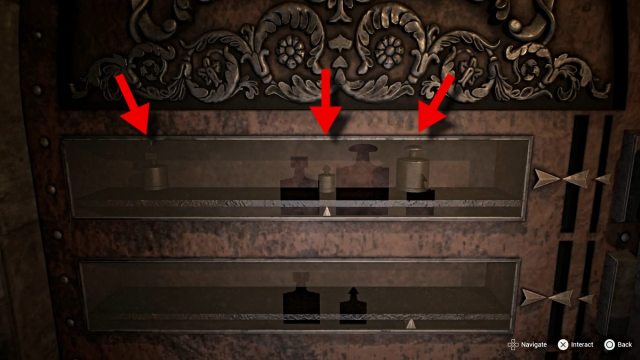
Castle Weight Scale Puzzle
On the left side of the castle, just below the main level, you’ll find the weight scale puzzle. To complete all three tiers of the puzzle, you first need to find all three Copper Weights to insert onto each scale.
- Copper Weight (Small) – Statue in same hallway as the puzzle
- Copper Weight (Medium) – Statue in room behind Dragon Door on the second floor
- Copper Weight (Large) – Statue in room left from the Throne Room
As you complete each tier, the respective cupboard for that tier on the right will open with a reward inside.
- Bottom Tier – Lever
- Center Tier – Skull Key
- Top Tier – Beverage (healing item)
The bottom scale requires one weight, while the center scale requires two, and the top scale requires all three weights. To solve each one, you need to perfectly balance the scale by aligning all three arrows on the right to the center.
Bottom Scale Solution
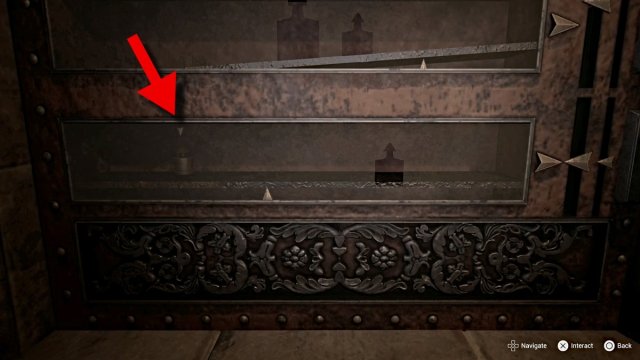
Center Scale Solution
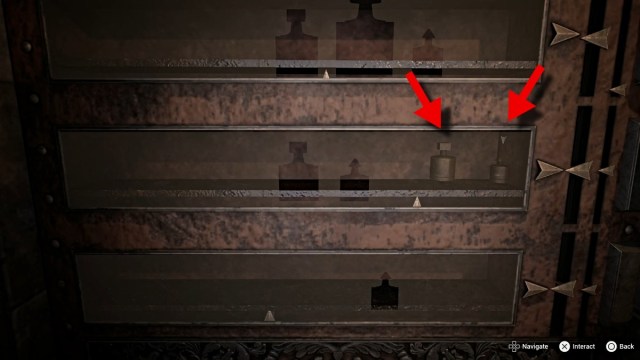
Top Scale Solution
Once all three scales are balanced, the surrounding door will open, letting you access the room behind it. Inside it, you’ll find the Golden Cross that you need for the statue puzzle.
Golden Statue Puzzle
The four statues in the castle’s front room are raised via the chain mechanism on the balcony above (accessed via the Lion Door). They’re used to complete a puzzle to open the cage that contains the Golden Skull (needed to open the Skull Door that leads to the Witch’s swamp).

Once you’ve obtained the Golden Cross from the room behind the Weight Scale Puzzle, you can return here to complete the puzzle.
To do so, place the Golden Cross in the back left statue’s hand (seen above). Next, interact with the back right statue to turn its sword upward.
After that, interact with the front right statue to make it turn its hands with palms facing down. Finally, interact with the front left statue to have it turn its hands into a praying position.

Once done, the cage will open, and you can collect the Golden Skull inside.
All Ghost Ship Puzzle Solutions
There’s a total of five puzzles to complete in the Ghost Ship experience. Each one is required for level progression.
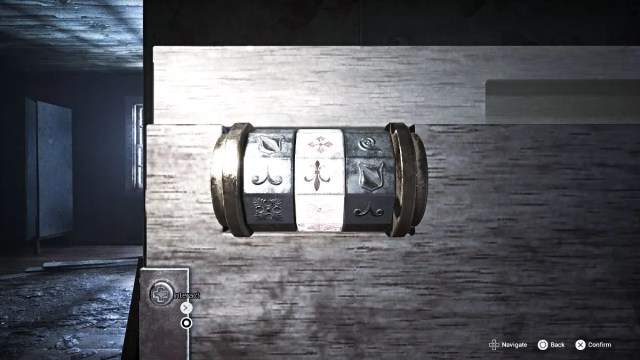
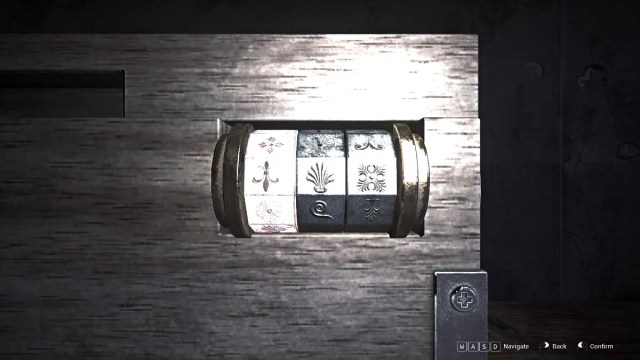
Combination Chest

The combination chest puzzle is found on top of a shelf just outside the cell room where you begin the Ghost Ship simulation. Interact with it, and it’ll show you a symbol combination lock that you need to solve to open it.
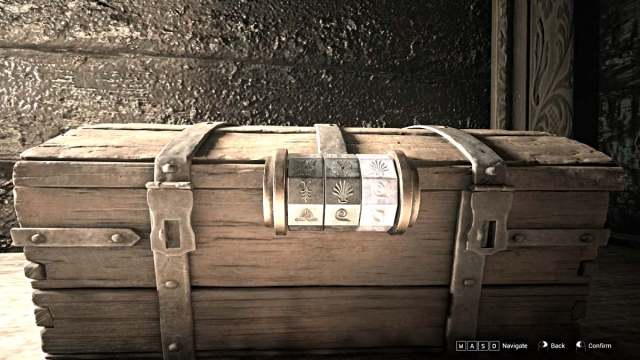
From left to right, input the sequence of symbols shown above to undo the lock. Open the chest to obtain the Cell Key.
Blue Skull Cage
The Blue Skull Cage puzzle is found further inside the ship, and requires you to undo all three combination padlocks on the cage to open it and retrieve the Blue Skull item.

Each lock requires the correct three-number code to unlock it, and a small note with cryptic hints for each is tacked to the top of the cage.
Top Lock Combination Solution –

The combination code for the top lock is: 1-8-9.
Middle Lock Combination Solution –

The combination code for the middle lock is: 2-4-6.
Bottom Lock Combination Solution –

Finally, the combination code for the bottom lock on the cage is: 3-5-7.
Once all locks are disabled, retrieve the Blue Skull item inside the cage, as it’s one of three you’ll need to unlock a door further in the ship.
Skull Door Combination Lock
This door is actually right next to the Blue Skull Cage puzzle, and you’ll need to unlock it to progress further into the ship.
Interact with the skull padlock to view the combination mechanism, which this time is made up of roman numerals.

As seen above, the correct code for this lock is: 5-3-7.
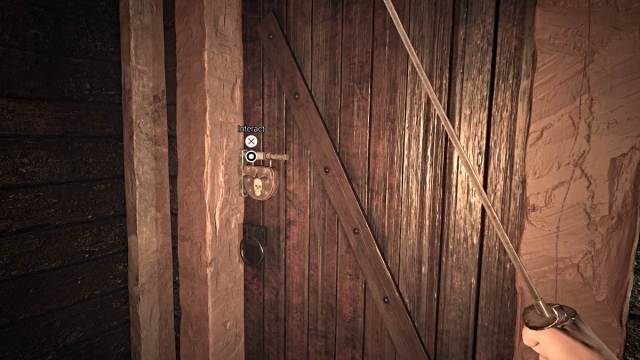
Candle Puzzle
This is one of two puzzles found at the front of the ship that you’ll need to solve to access the captain’s quarters. In addition, to do both of these puzzles, you need to first find and collect the Puzzle Piece item. It’ll be attached to an ornate padlock securing a door that leads to the deck of the ship.

Bring it to the so-called Puzzle Room of the ship and interact with the puzzle console on the left side of the room.

The Puzzle Piece will be placed in the top left slot, and your job here is to light the correct candles in the correct order.
By square, from left to right, light them in the following order: 2-4, 2-4, 3-4, 1-2, and then 1-3.
Once done, you’ll receive the Puzzle Piece back for the room’s second puzzle.
Compass Puzzle
This is the second puzzle in the so-called Puzzle Room at the front of the ship, and you must complete it to reach the captain’s quarters.

This globe compass ironically functions like a combination lock, and the correct order of cardinal directions is the key to solving it.
Note said directions around the compass, then manually push the globe in the following order:
West-West-South-North-East.
Once done, the puzzle will be completed, and you’ll receive the Trapdoor Lock Key as your prize. This is for the ornate lock where you originally found the Puzzle Piece item.
All Forest Puzzle Solutions
There’s a total of three puzzles to complete in AILA’s Forest experience. Each of these is required for level progression.
Watchtower Gate Code
Once you reach the top of the watchtower in the Forest simulation, there will be a computer terminal similar to Samuel’s inside.

Interact with the screen to view its details, then select the Gate Access icon in the top left corner. This will pull up a notification for a password that you need to enter.
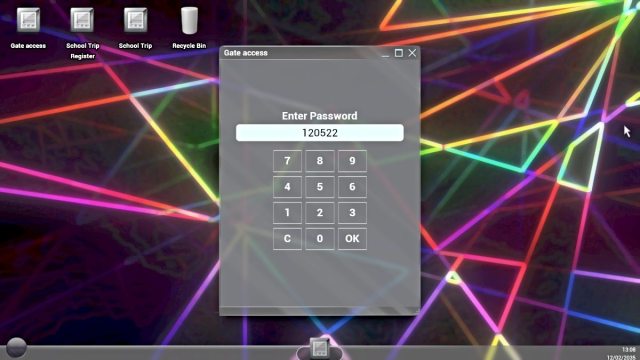
Enter the following code using the keypad: 1-2-0-5-2-2. Once done, this will open the gate at the base of the watchtower, allowing you to continue through the simulation.
Mineshaft Ruins Lever Puzzle 1
After you first reach the ruins inside the mineshaft, you’ll soon come across a room with a sequence of five lever pedestals.

These need to be adjusted in the correct order from left to right to open the path ahead.
Once done, the order is: Down-Up-Down-Up-Up.
Mineshaft Ruins Lever Puzzle 2
You’ll find this puzzle further up the path from the first one, and again, you need to solve it to open a door to continue progressing through the simulation.

Just like before, you need to adjust the levers in the correct order from left to right. Luckily, it’s the same order as the first puzzle: Down-Up-Down-Up-Up.