
Pathologic 3 Tips & Tricks – How to Progress & Unlock More Days
Dankovsky has his work cut out for him this time.

Pathologic 3 is the latest entry in Ice-Pick Lodge’s beloved psychological horror franchise, and piecing together its chilling story is half the battle that Daniil Dankovsky faces. The game features an impressive variety of mechanics and unspoken tactics that you need to keep in mind. Here’s a comprehensive list of tips and tricks for getting started in Pathologic 3, as well as how to survive and progress to the end.
How Concentration Works in Pathologic 3
One of the very first mechanics you learn in Pathologic 3 is Concentration. As soon as you’re off the train on Day 1, you can start using this ability, which allows you to spot any and all useful objects, caches, and persons of interest in your vicinity. It can even point you in the right direction for your current objective, if and when you find yourself lost.
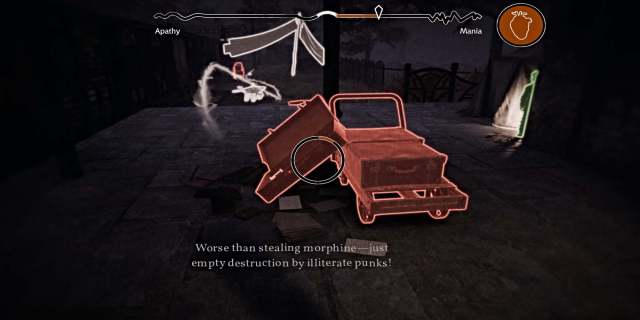
Use the appropriate button (keyboard or controller) to concentrate on the immediate area around you, and anything of importance will be highlighted in specific colors. Mania-related objects will be colored red, Apathy-related objects will be colored blue, NPCs will be colored green, et cetera.
However, don’t hold Concentrate for too long, as doing so will increase your Mania gauge. Instead, use it in quick bursts when needed. Ultimately, this ability will become your best friend throughout the game, as the HUD doesn’t provide much direction and you’re encouraged to rely on personal intuition instead.
How to Use Fast Travel in Pathologic 3
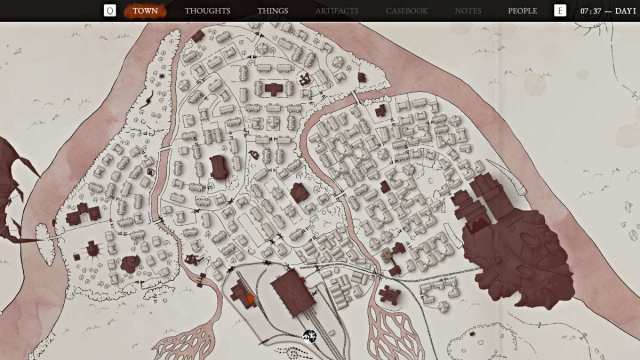
Pathologic 3 has put a twist on the Map feature by subdividing the entire town into standalone districts rather than open-world traversal. To help keep navigation efficient, you’ll have a fast travel option that allows you to quickly travel to any district you wish, regardless of distance. You will be using this quite a lot as you pick up more side quests that require a lot of running back and forth, particularly between Stillwater (your “safehouse” and base of operations) and various objectives in one district or another.
When journeying across the map, it’s important to avoid dangerous districts (e.g. – infected, rioting) as much as possible. These areas can put your life at risk and require the use of your Prototype and/or your weapon, and those resources are finite.
Note that if your route requires you to head through a dangerous district, you won’t be able to fast travel through that specific area. Instead, you will need to manually traverse it as safely as possible until you reach the gate to the next district. If the remainder of the route is safe, it will automatically take you to your destination.
Furthermore, bear in mind that fast traveling still requires varying amounts of precious time, which you can check in the top left corner of the map menu, so choose your routes carefully.
How Amalgam Works in Pathologic 3

You’re first introduced to Amalgam and the time travel mechanic after reaching an apathetic dead end on Day 5 and reviving inside the Mirror Room. To have an actual chance of saving the town along with certain important individuals, time travel becomes an essential part of your playthrough.
To facilitate time travel and keep yourself alive, you need to have a constant, reliable source of Amalgam at all times. The amount of Amalgam that you currently have is represented by the broken mirror icon in the top-left corner of your HUD.
As you use it, the mirror shards will be “drained” in varying amounts. For instance, the further you time-travel (e.g. – Day 5 to Day 2), the more Amalgam that’s required. Vice versa, if it’s a short time jump, less Amalgam will be needed.
Furthermore, Amalgam is directly tied to your survival. If your Apathy gauge fills completely (such as it did on Day 5 as part of the story), or you’re attacked and killed by a hostile in a dangerous district, you must have Amalgam on hand to survive and continue your journey. If you’re out of Amalgam when this happens, it’s game over, and your current playthrough will end.
To ensure that you don’t run out, make sure to restore your Amalgam as much as possible each day by doing the following:
- Shatter any mirror you come across inside or outside
- Help dying locals pass peacefully with the proper use of drugs
- Speak to Eva in Stillwater once each day
How to Unlock More Days in Pathologic 3 (Mind Map)

Pathologic 3 is a tangled web of crises that Dankovsky must unravel in order to progress and find a way to save the town ravaged by this plague. This is by far the most challenging aspect of the game, as there’s no clear way forward, and you need to forge one by completing as many local tasks as possible, subduing the plague however you can, and jumping through time to ensure the odds are in your favor.
While the story technically extends up to Day 12, your first major objective (and narrative obstacle) is finding a way to help the town survive past Day 5, as your off-site interrogations with the Inspector insinuate that the plague initially wipes out the populace by then.
To keep that from happening, you need to do the following:
- Complete as many sidequests as possible (talk to locals, check your map, and inspect your Mind Map for developments)
- Accurately diagnose all patients at your Hospital
- Defeat Shabnak in infected areas on each day
- To do this, you need to safely gather samples from Rupture Points in infected areas. Return to Stillwater and use those samples to craft projectiles that you can load into your Prototype. Fire those projectiles at Shabnak when she appears in front of you, and she will then be “defeated” for that respective day.
- Enforce Decrees that focus on decreasing Contagion levels
To ensure that all of these objectives subdue the plague sufficiently (it must fall below the red Contagion line on your Decree board) by Day 5, the best general strategy is to time-travel back to Day 2 and work your way up consecutively from there. This ensures that you don’t waste Amalgam unnecessarily and that issues are properly resolved.
How to Balance Mania and Apathy in Pathologic 3
Compared to previous entries in the franchise, Pathologic 3 has streamlined the fundamental requirements for survival. This time around, the two main factors you must manage daily are Mania and Apathy.

These are tracked via the gauge at the top of your HUD, with Apathy on the left and Mania on the right. Your goal is to keep a healthy balance of those two mental factors, without letting the gauge swing too far in one direction or the other. Too much Apathy or too much Mania can mean death for Dankovsky, so it’s important to know all the ways that you can manage them.
To keep your Mania low, you can do the following:
- Choose Apathy-fueled dialogue options during NPC conversations
- Use drugs (usually sedatives) that provide varying degrees of Apathy
Meanwhile, to keep your Apathy low, do the following:
- Choose Mania-fueled dialogue options during NPC conversations
- Use drugs (usually stimulants) and other items, such as Coffee Beans and Tobacco, that provide varying degrees of Mania
- Find environmental objects around town that you can interact with (e.g. – dumpsters, water pumps). These will be colored red while in Concentration mode.
Having increased levels of either mental state also comes with some unique side effects. High Mania causes an increase in movement speed. This allows you to move swiftly through districts, but your health gauge (heart icon) will gradually drain as a result. Meanwhile, high Apathy slows your movement speed. Both also influence your dialogue options during NPC conversations.
How Decrees Work in Pathologic 3

Decrees are one of the most important features in the game, and they will become available after you unlock Stillwater and assume control of Emergency Command. They allow you to enforce various town-wide measures to help bring the plague under control while providing support where needed. This is done at your desk on the top level in Stillwater.
Note that you can only enforce one decree per day, and it’s crucial to give your chosen decree time to take effect. Therefore, enforcing one at the start of a day is recommended.
Initially, you’ll start with the Curfew and Quarantine decrees as your options. However, you can unlock several more by completing certain sidequests throughout the story. This is a major priority, as certain decrees will help you bring the plague under control more effectively (e.g., Water Filtration, Experimental Vaccine), and help the town survive past Day 5.
How to Fight Shabnak in Pathologic 3

As you progress through the initial part of the story (up to Day 5), chances are you’ve run into a mysterious NPC named the Changeling while in an infected district. She explains that an entity named Shabnak is at the root of the plague’s spread, and that you’ll need to take certain precautions when in her territory.
To survive Shabnak while crossing through an infected district, you need to do the following:
- Run from Shabnak when you see it, don’t fight it
- Lit bonfires will keep the Shabnak at bay (but they will go out after some time, so beware)
- The prototype can be used to briefly stun the Shabnak
- If you’re “caught” by the Shabnak twice (she’ll pick you up and slam you to the ground), you will die

Later on, the Changeling will inform you that certain infected districts have Rupture Points, which the Shabnak is especially protective of. Your goal is to find these Rupture Points, survive long enough to take a sample from them, and return to Stillwater to turn that sample into a substance that can be used against Shabnak.
Once you craft a projectile from the sample, you then need to use it on the same day, as otherwise it will be useless. Load it into your Prototype, then head back to the same infected district. The best strategy is to seek out a bonfire, light it when Shabnak approaches to stun her, then use the projectile to banish her for that day. You only have ONE shot, so time it carefully. If you miss, you’ll need to redo the entire process (gather the sample, craft the projectile, use it on Shabnak).
It’s highly recommended to do this on as many days as possible, as banishing Shabnak brings the Contagion rate down significantly and improves the town’s odds of survival more than anything else (even Decrees), allowing you to progress further into the story.
How to Complete a Diagnosis in Pathologic 3

Another major factor in subduing the plague in Pathologic 3 is giving correct diagnoses to sick patients. Your first chance to do this is with Khulan the dancer at the Broken Heart pub, and you’ll perform several more over the course of the game, particularly at your makeshift Hospital. The more correct diagnoses you make, the more likely the contagion will slow enough for you to gain control and craft effective vaccines.
The process starts by having a conversation with the patient and watching for instances of symptoms they mention. Next is a physical examination of their body, which allows you to look for visible symptoms and also verify those they previously mentioned. Make sure to check every possible area on the list and use Inspection Mode to view descriptions of symptoms.
After that, open the Casebook menu to select the symptoms you’ve confirmed so far, and this will help narrow down potential ailments through the process of elimination. With enough symptoms noted, a single diagnosis will light up while all others are greyed out, meaning that ailment is the only possible one.

Your final step is to Lock the Diagnosis, which is a final confirmation of your findings. The game will inform you that once you lock it, your choice cannot be changed, so bear that in mind.
Once done, you can receive the results at Stillwater at 18:00 (or 6:00pm) that same day. If done correctly, you’ll get the “Diagnostics Successful” notification, and a new Decree for the vaccine developed from it will become available for you to enforce.
Make sure to check out our latest gaming guides and news here at PrimaGames, such as How to Tame and Breed Animals in Hytale.